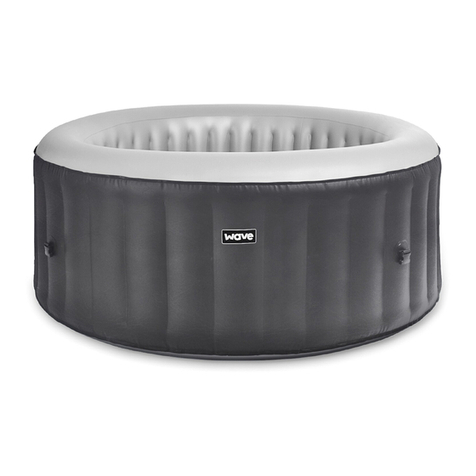
Wave SWIFT OSAKA User manual

C
M
Y
CM
MY
CY
CMY
K
Wave_Installation and user manual_SWIFT US_OUTLINED AND EMBEDDED.pdf 1 10/09/2021 12:04:52

C
M
Y
CM
MY
CY
CMY
K
Wave_Installation and user manual_SWIFT US_OUTLINED AND EMBEDDED.pdf 2 10/09/2021 12:04:52

C
M
Y
CM
MY
CY
CMY
K
Wave_Installation and user manual_SWIFT US_OUTLINED AND EMBEDDED.pdf 3 10/09/2021 12:04:54

C
M
Y
CM
MY
CY
CMY
K
Wave_Installation and user manual_SWIFT US_OUTLINED AND EMBEDDED.pdf 4 10/09/2021 12:04:55

C
M
Y
CM
MY
CY
CMY
K
Wave_Installation and user manual_SWIFT US_OUTLINED AND EMBEDDED.pdf 5 10/09/2021 12:04:58

3.INSTALLATION
EN
11
3.INSTALLATION
3.4. Pool cover and security
After each use, the control panel must be locked and the pool must
be coated with its top cover and it must be attached to the base
protector with the safety buckles.
Each safety buckles has a lock system ; closed buckle, the latch in
up position locks the buckle, the latch in down position unlocks the
buckle.
The top cover keeps the heat from the water and secures the pool.
1. Choose a flat and level
location.
2. Extend the liner to the chosen
area.
3. Add the foam wall segment
with the three holes in it for
connection to the base liner.
4. Adjust the 8 segments until
they form a perfect round shape.
Then, ensure that the holes for
the outer liner connection and
the holes in the foam wall are
still aligned.
5. Install the connection hose on
the liner.
6. Insert the inner liner of your spa.
7. Install the connecting hose
(assemble the short hose and
T-join as shown in the image).
8. Install two-way connector to
another outlet, as shown in the
image.
9. Connect the longest
connecting hose to the T-joint
as shown in the image.
10. Insert the hose into the
groove on the foam, as shown
in image.
11. Connect the other end of the hose of the two-way connector, as
shown in the image.
12. After all hoses are installed, lift the outer cover gently, as shown
in the image. 13. When installed at corner,
push PE foam inward so that
the coat can be installed in
place.
3.3 Assembling
14. Locate the place where
the two zippers are aligned,
connect them first
15. Smooth the liner all around
the SPA to ensure a good fit.
16. When installed at corner, push
PE foam inward so that the coat can
be installed in place.
17. Locate the place where
the two zippers are aligned,
connect them first.
18. Make sure that the zippers
of the liner and outer liners are
aligned before zipping them up.
19. Connect the unit pump to the
pool using the 3 connectiors to
screw. Ensure the icons on the
pump and the pool match up.
20. Insert the cartridge into its
filter holder and then screw on
the suction fitting inside the
basin.
21. Check that the drain plug is
closed properly.
22. Fill the spa pool until the indicat -
ed fill level is reached.
Your spa is ready to be used.
12
C
M
Y
CM
MY
CY
CMY
K
Wave_Installation and user manual_SWIFT US_OUTLINED AND EMBEDDED.pdf 6 10/09/2021 12:05:01

4. USAGE
EN
14
4. USAGE
4.1. Control panel
t tt
tt
tt
tt
tt
4.2. Functions
4.3. Spa cover and security
Once powered up, the LED displays the current water temperature automatically.
The temperature unit’s selector changes the temperature units from Celsiusdegress to
Fahrenheit degress.
Press the temperature adjustment buttons, then the screen will flasj. When it is flashing, you
can see the desired temperature. The value will increase or decrease 1 degree at once. The
temperature could be set betwenn 86°F to 108°F (30°C to 42°C).
To lock or unlock the control panel, press the Lock button and hold 3 seconds.
Lock the control panel when you are away to prevent other people changing your
settings.
Press the Bubble button to activate the bubble and massage system, the green indicator
light turns on. It can be turned off by pressing it again.
The bubble system will stop automatically after 30 minutes of operation. Re-activate the bubble function
by pressing the bubble button again.
When the filter button is on, pressing bubble button will alter the filter mode into bubble mode. The filter
indicator light will turn off and the bubble indicator light will turn on. If the bubble button is pressed again,
the bubble mode will be changed back to the filter mode.
Press the filter button to activate the water filtration. The green indicator light will turn on when
the filtration system is activated. Please note that filters should be changed every 7 days, or
until they become discoloured.
Note:
- If bubble fucntion is on, the filtration can’t be activated.
Press the heating button to activate water heating and filtering system at the same time. The
green indicator light of filter and red indicator light of heating will turn on at the same time.
The pump dpes not stop heating until the current water temperatire reaches the set tempera-
ture; and the heating system will restart after the current water temperature drops below 35°C
below set temperature automatically.
Maximum heating temperature: 108°F (42°C)
Important:
After 150 cumulation hours of filtration operations, an audible alarm will sound and
the LCD display will show the characters CHG, followed by FIL, to remind you to
change or clean the filter. You can hold the filtering button 5 seconds to turn off the
buzzing. The filtering system will turn off, you can press the button to activate the
filtering system again.
Note:
- With the heating system starting, the filtration system will start working together.
- After turning off the heating system, the filtration system will still work.
- If the bubble function is active, the filtration and heating fucntions cannot be activated.
After each use, the control panel must be locked and the pool must be coated with its top cpver and
it must be attached to the base protector with the safety buckles.
Each safety buckles has a lock system; closed buckle, the latch in up position locks the buckle, the
latch in down position unlocks the buckle.
The top cover keeps the heat from the water and secures the pool.
13
C
M
Y
CM
MY
CY
CMY
K
Wave_Installation and user manual_SWIFT US_OUTLINED AND EMBEDDED.pdf 7 10/09/2021 12:05:02

EN
15 16
5. MAINTENANCE5. MAINTENANCE
5.1. Water maintenance
WARNING: Bad spa water quality can harm your health.
5.2. Cleaning and replacing the filter cartridge
5.2a Disinfection
1
2
3
5.3. Drainage and storage
Drainage
4
Storage
5
5.4. Repair kit
6
5
7
8
1
2
3
6
7
8
Depending on the frequency and conditions of use:
- The filter cartridge should be regularly cleaned / replaced every 150 hours max.
- The filter cartridge should be replaced every 150 hours unless cleanable.
- The spa water should be changed every 15 to 30 days.
Use a water tesy kit to control the parameters of the water before using the spa, or at least once a
week.
Use disinfection products fo the spa. The treatment products should be used with caution and it is
imperative to refer to their instructions.
Damage resulting from improper use of treatment products is not covered by the warranty.
1. Water balance
The water balance (pH) must be maintained between 7 and 7.4.
2. Water Sanitation
To sanitise the spa water, we suggest using an active oxygen-based treatment or
bromine placed in a floating dispenser. (Dispenser sold separately).
A dirty filter cartridge may contaminate the spa water and cause damage tp the heating function.
1. Unscrew the filter case by turning it anti-clockwise. Take oiut the filter cartidge from the case.
2. Rinse off the filter cartridge with a garden hose. If the filter cartridge remains dirty and
discoloured, the filter cartridge should be replaced.
3. Put back the cleaned filter cartridge into its case and screw it to the spa.
Water Sanitation:
To sanitise the spa water, we suggest using an active oxygen-based treatment or bromine placed
in a floating dispenser. (Dispenser sold separately).
Seek professional advice and guidance before doing this.
Attention:
Detergent residues and dissolved solids from bathing suits and chemicals may build up on the spa
walls. Use sopa and water to clean the walls and rinse thoroughly with a garden hose using a
direct water spray.
Check the stopper on the bottom of the spa and the drain cap.
Unscrew the drain cap.
Remove the stopper on the bottom of the spa. Completely drain all water from the spa.
Once empty, the spa can be cleaned with soap and water.
Press the bubbling button to blow out the water inside the jet holes. Unplug the pump,
remove the filter cartridge from the inner wall of the spa.
Use a towel to wipe off the spa, dry for 24 hours.
Unscrew the valves to deflate the spa.
Fold the spa.
It is recommended to store the spa in its original package in a warm dry place.
Little holes or punctures can be repairs with the repair kit included and glue can be adhered to
the spa liner.
1. Find the leak.
2. Thoroughly clean the area surrounding the leak.
3. Cut a piece of repair material in a round shape, which should be largers than the damaged
area.
4. Apply adhesive to the back of the patch and around the area to be repaired.
5. Put the oatch on the damaged area and press down firmly. Allow 12 hours for repair to dry.
After the patch has dried, apply glue around the edges for a complete seal (dry 4 hours).
Ensure NO bubbles are left under the patch.
C
M
Y
CM
MY
CY
CMY
K
Wave_Installation and user manual_SWIFT US_OUTLINED AND EMBEDDED.pdf 8 10/09/2021 12:05:03

17 18
6. TROUBLESHOOTING
6.1 Troubleshooting
Here are some useful tips to help you to diagnose and rectify common sourced of trouble.
Reference
Inlet - The inlet is where the filter is attached.
Outlet - The water is directly above of the filter and is where the
hot water is recirculated back into the spa from the heater unit.
Problem Cause Solution
Control panel screen does not
operate
Check power source Power failure
Reset the RCD pluf / Check if the wiring system is
adapted to the power of the pump unit
Call for service if it does not reset
SPA pump does not heat
properly
Set to a higher temperature
Temperature set is too low
Filter Cartridge is dirty
Too low water level
Heating elemend defective
Clean or Replace the cartridge (see chapter 5.2.)
Fill water to minimum water level
Call for service
Bubble massage system does
not work
Cut off power and wait until the pump has cooled.
Pump is overheating
Auto shut-down feature (30min) is
activated
Malfunction of the pump unit
Press the bubble button to reactivate
Call for service if it does not reset
Water filtration does not work Clean or Replace the cartridge (see chapter 5.2.)
Filter cartridge is dirty
Inlet and outlet blocked
Air inside the pump
Malfunction of the pump unit
Clean inlet and outlet
Fill water to minimum water level
Call for service if does not reset
Pump leakage Replace the seal in the right position
Adaptor seal improperly
Water leakage from pump body Check the pump body, call for service
Spa pool leakage Spa pool is torn or punctured Use provided repair kit (see chapter 5.4)
Water is not clean Increase filtering time
Insufficient filtering time
Filter cartidge is dirty
Pool filled water quality
Improper water treatment
Clean or Replace the cartridge (see chapter 5.2.)
Change the pool water completely
Refer to the chemical manufacturer’s instructions
CHG FIL After 150 cumulative hours of filtration operations, an audible alarm will sound and the LCD
display will show the characters CHG, followed by FIL, to remind you to change or clean the filter.
You can hold the filtering button 5 seconds to turn off the buzzing. The filtering system will turn
off, you can press the button to active the filtering system again.
7.1. Error code
If the screen displays an error code “Ex”, please refer to the table below.
E3, E4, E5, E6 error code
- Cut off electricity for 5 minutes and reconnect
If error code is still displayed on the control Box, please do the following instrutions :
1 - Check that the water line is between the high and low limits.
2- Clean or replace the filter cartridge
3 - Unscrew and clean the 2 nozzles (Entry and exit of water) inside the spa and remove wast
es if
necessary (Neaf, hairs, fur, skin...)
4- Check that the propeller of the filter pump does not contain foreign matter.
Cut the spa again electrically for 5 minutes and re-connect it, if the error code is still display
ed on the
control box please contact the Service Center
Problems Causes Solutions
Not heating
Not heatign properly
Wrong temperature control
sensor.
Temperature control sensor
short circuit or open circuit.
Control service center.
Situation
Code
E1
Not heatign properly High water temperature
indicator.
1. The filled water is over 45°C
(113°F)
2. The filter cartridge was put
on the wrong suction fitting
(higher suction fitting).
1. Cut off the power, make
sure the pool water is
between 2°C-44°C (36F-111°F).
If this does not solve the
problem, refer to the box
below.
2. Put the filter cartidge on
the lower suction fitting.
E3
All fucntions do not
work, buzzing warn.
Low water temperature
indicator.
The pool water is lower than
2°C (36°F)
Cut off the power, make sure
the pool water is between
2°C-444°C (36°F-111°F)
If this does not solve the
problem, refer to the box
below.
E4
All fucntions do not
work, buzzing warn.
High water temperature
indicator.
The pool water is lower than
50°C (122°F)
Cut off the power, turn
to qualified electrician to
reset the thermal cutout
described in the next
paragraph.
If this does not solve the
problem, refer to the box
below.
E5
Not heating and filter -
ing properly.
Buzzing warns.
Water pressure is not big
enough to activate healing.
Inlet or outlet on inner wall are
blcoked.
Filter cartridge is too dirty.
Pool water does not reach
minimum water level.
Do not release air from pump
Pump is wrong
Clean inlet and outlet.
Clean or replace filter
cartridge.
Add water to reach water
level
Do air release as outlined
again
If this does not solve the
rpoblem, refer to the box
below
E6
7. WARRANTY
C
M
Y
CM
MY
CY
CMY
K
Wave_Installation and user manual_SWIFT US_OUTLINED AND EMBEDDED.pdf 9 10/09/2021 12:05:03

Wave products have been inspected with no evident defects prior to leaving
the factory.
Wave warrants this product against defects in material and workmanship for a period of time,
Warranty for this product begins on the date of purchase and Wave requires presen-
tation of the original proof to purchase to confirm the date. During the warranty period,
Wave will either repair or replace, at its discretion, any defective products. Replace-
original warranty.
Shipping cost policy
The return of defect parts to the authorized service centre is at the cost of the owner.
On warranty period, the return is at the cost of service center.
Warranty policy
This limited warranty does not apply to any defect resulting from negligence, accident,
misuse, or other reason beyond Wave’s control, included but not limited to:
normal wear and tear, negligence or failure to follow the product instructions, improper
or inadequate maintenance; connection to improper power supply; chemical water
This warranty is valid only in the country of purchase in such countries where Wave
Warranty service outside the country of purchase is limited to the terms and conditions
of the corresponding warranty in the country of service. Where the cost of repairs or
replacement is not covered by this warranty, Wave will advise the owners and the cost
shall be charged to the owner.
This warranty only applies to the original purchaser and terminates upon any transfer of
ownership.
All repairs of which warranty claims are made must be pre-authorized by a Wave
service centre.
your Wave product. Wave will not be liable for results of cost of workmanship from
unauthorized service person.
Warranty registration
To validate your warranty, please register your product on our website Wave:www.wavespas.com
It is essential that all informations including customer name, date of
purchase, serial number, spa model are provided. Without this information the warranty
will be invalid.
7.2. Warranty
Wave Spas
9-10 Charlotte Square
Tyne and Wear, NE1 4XF, United Kingdom
us.wavespas.com
wavetubs.com
7. WARRANTY
C
M
Y
CM
MY
CY
CMY
K
Wave_Installation and user manual_SWIFT US_OUTLINED AND EMBEDDED.pdf 10 10/09/2021 12:05:04
This manual suits for next models
3
Table of contents
Other Wave Hot Tub manuals
Popular Hot Tub manuals by other brands

Jacuzzi
Jacuzzi Nova Pure Air Installation - use - maintenance

Tadpole
Tadpole Hot Tubs 2004 owner's manual

SOFINA
SOFINA DELUXE PORTABLE SPA owner's manual

HOESCH
HOESCH Laola II Installation and operation instructions

American Standard
American Standard Cadet Corner Whirlpool and Bathing Pool... Specification sheet

Strong Pools and Spas
Strong Pools and Spas The Cyprus owner's manual