Wave ROME User manual
INSTALLATION AND
USER MANUAL
ROME
www.wavespas.com
READ CAREFULLY AND
KEEP IT FOR LATER REFERENCE
-Visit wavedirect.co.uk
to register your free
Warranty package.
WARRANTY

EN
-
-
IMPORTANT - PLEASE READ
1. Watch our WAVE videos
We know you can’t wait to jump into your new Wave hot tub and get started, however before you do
that, please check out our set-up videos for an easy step by step guide as to how to get started with
your tub safely.
2. Read the manual
Next up, please read the manual! This will save you a lot of time and hassle by explaining the process
every step of the way. There is a lot of crucial information in here that will help avoid
damage to your spa when setting up and taking down.
3. Choose your site
Get your location right! First off make sure you are setting up your tub in an area where you have
enough space surrounding the spa for you to comfortably perform your daily maintenance tasks.
Secondly, ensure there is a power outlet nearby as extension cables should NOT be used. Thirdly,
choose a site where you can drain the water easily! The site should be flat and completely free from
sharp objects. The site where you choose to set up should also be strong enough to take the weight of
your spa when it is fully filled and in use. The water capacity for 2-4-person spa is 800L and 4-6
person is 1000L.
The location in which you assemble and fill your spa must be the location you intend to use it, once
the spa is full it is strongly advised against that you attempt to move it to another location. Doing so
could cause injury to yourself or damage to your tub, which may result in voided warranty.
4. Open the box
Once you have opened the box that contains your new spa you should remove its contents and
spread the protective ground sheet on the site where your tub will be assembled. You should then
assemble the heater unit and the rest of the tub. Once you are done with the packaging and box you
should remove all debris and packaging parts from the tub area to ensure nothing falls in and
damages the liner.
5.Inflate the spa
Next step will be to inflate your spa! Connect the motor and heater system and once switched on,
the spa can be inflated and ready to fill with water in about 5 minutes. You must NOT over inflate
your spa.
6. Clean your spa
After inflating your spa, use a wet sponge or soft cloth to gently wipe the internal surface of your spa
liner. Even though your spa is brand new, this is to ensure that any debris or dust that could contami-
nate the water is fully removed.
7. Filter and filter housing
After gently cleaning the internal liner of your new spa you should ensure that the filter and filter
housing are fitted in the correct location (the lower port). Also ensure that the cap is not fitted on
the upper port before filling with water.
8. Fill your spa with water
Now you can fill your spa with water! When filling your spa, try to avoid using an old hose as these
carry a lot of old bacteria that could contaminate the water. If you are filling your tub using cold water,
you should carry on filling until you are mid-way between the min and max filling lines. If you have the
ability to fill your spa with hot/warm water this will mean your spa will heat up quicker and be more
energy efficient. If you are planning to fill your spa with hot water, please begin using cold water and
once you the water has risen above the filter, hot water can then be used.
9. Heat your spa water
Now to heat your spa! To do this you should press the heater button on the left side of your external
unit (the sun symbol). A light will then be displayed and remain lit until the water has reached your
selected temperature (38°C is the default temperature). Once the desired temperature is reached,
the light will flash. Once the LCD display has flashed you will be able to adjust the water temperature
using the up and down arrows to increase or decrease the temperature. It is possible for the water to
be approximately 1-3°C different to the temperature selected.
The water in your spa heats up approximately 1°C per hour whilst the heater unit is switched on.
The indicator on the screen corresponds to the current water temperature. For health and safety
reasons the maximum temperature setting on the heater unit is 40°C. You should make sure you
have turned on the filtration system before you start heating the water. Put your hot tub cover on
to help the water heat up faster and retain heat for longer.
10. Chemical shock
Before you jump into your spa, you should first perform your spa chemical shock. When you set up
your hot tub for the first time its always important to add your start up chemicals. You need to perform
a hot tub shock to keep the water healthy and prevent foaming or cloudiness. Treating your water
prolongs its life such that you will not need to keep draining and cleaning your hot tub after each use.
Our Wave starter kit contains everything you need to get your spa up and running!
11. Guide on chemical shock
To chemical shock you should use either warm or cold water and when the water is higher than 25°C
mix your chlorine (granules are better for shocking) in a jug with warm water. Put 5 teaspoons of
granules into the jug of warm water and add this to the spa after mixing well. Activating the bubble
settings whilst doing this will help to disperse the chlorine around the water quicker. After you have
chlorinated your spa water, please leave the spa to sit for 24 hours before use. Remember to use
your test strips before jumping into the spa as some levels may still need adjusting before use.
Make sure alkalinity levels are right after checking the chlorine. pH can be altered as and when
required.
12. Maintenance
Regular maintenance of your tub is essential, especially keeping the correct pH levels! The most
ideal pH level is between 7.2 to 7.6 and the level should be tested two times a week whilst the tub
is filled, and always before use. A heaped teaspoon holds approximately 8g of granules and adding
a teaspoon of chlorine everyday will keep your spa water clean and healthy.
13. FINISH
Now all that is left is for you to enjoy your new spa! For any further questions please check the
FAQ’s on our website or contact a dedicated member of our customer service department using
the live chat on our website www.wavespas.com.

EN
2 3
WARNING
READ ALL INSTRUCTIONS AND SAFETY WARNINGS IN THIS MANUAL
Failure to follow the warnings and instructions in this manual may result in
serious injury, drowning or electric shock.
If incident occurs remove the injured person or child from the pool and pool area
Contact emergency services for advice and guidance on how to treat injured per-
son or child
Zone 2 Zone 2Zone 1
1,5 m 1,5 m2 m 2 m
2,5 m
2,5 m
Zone 0 h
h
The hot tub’s electrical connections must be installed in the electrical safety zones labelled 1, 2 or
For your own safety and that of your product, Ensure you follow the safety precautions
outlined below. Failure to follow the instruction may result in serious injury, property damage
or death. Improper installation or operation will void the warranty.
Read, understand and follow all instructions:
DANGER
Risk of accidental drowning:
- Inspect the spa cover regularly for leak, premature wear and tear, damage or signs of deterioration.
Never use a worn or damaged cover: it will not provide the level of protection required to prevent unsuper-
vised access to the spa by a child.
- Always lock the spa cover after each use.
Risk of injury:
If the supply cord is damaged, it must be replaced by the manufacturer, its service agent or similarly quali-
Risk of Electric Shock:
- Do not permit any electrical appliances, such as a light, telephone, radio or television within 1.5m (5 feet)
of a spa tub.
- Do not use the spa when it is raining, thundering or lightning..
WARNING
plugs to connect the unit to electric supply; provide a properly located outlet.
The spa electrical appliance should be supplied through a residual current device (RCD) having a rated
be inaccessible to occupants in the spa.
that they cannot fall into the spa.
spa.
This appliance can be used by children aged from 8 years and above and persons with reduced physi-
-
sion or instruction concerning use of the appliance in a safe way and understand the hazards involved.
Children shall not play with the appliance. Cleaning and user maintenance shall not be made by children
without supervision.
To reduce the risk or injury, Children are not permitted to use this product unless they are closely.
Supervised at all times
To reduce the risk of child drowning, supervise children all times. Attach and lock spa cover after each
use.
Immediately leave spa if uncomfortable or sleepy.
To reduce the risk of injury :
IMPORTANT SAFETY INSTRUCTIONS
The safety of children is left in the hands of the customer.
Children aged 5 and below are at the most risk.
Always comply with the following instructions:
- Children should be under close and constant supervision
- Learn safety especially when specific to guidelines
-Always designate a responsible person to mange pool and pool area
- For all users and children, wet the nape of the neck, chest and legs before
entering the water
- Prohibit diving and jumping
- Prohibit running, splashing games around the pool
- Ensure no unattended children, who cannot swim, use the pool without
a life jacket
- Always keep the water treatment products out of reach of all children
EN
4 5
In order to avoid the possibility of hyperthermia (heat stress) occurring it is recommended that the average
- Before entering a spa or hot tub the user should measure the water temperature with an accurate ther-
mometer since the tolerance of water temperature regulating devices varies.
- The use of alcohol, drugs or medication before or during spa use may lead to unconsciousness with the
possibility of drowning.
- The use of alcohol, drugs, or medication can greatly increase the risk of fatal hyperthermia in spas.
The causes and symptoms of hyperthermia may be described as follows:
Hyperthermia occurs when the internal temperature of body reaches a level several degrees above
internal temperature of body, dizziness, lethargy, drowsiness, and fainting. The effect of hyperemia include
of drowning.
- Obese persons or persons with a history of heart disease, low or high blood pressure, circulatory system
problem, or diabetes should consult a physician before using a spa.
- Persons using medication should consult a physician before using a spa since some medication may
induce drowsiness while other medication may affect heart rate, blood pressure and circulation.
- Check with doctor before use if pregnant, diabetic, in poor health, or under medical care.
People with infectious disease should not use a spa or hot tub.
Never use a spa or hot tub alone or allow others to use the spa alone.
pool.
Do not turn on the spa when the water is frozen.
Always unplug this product from the electrical outlet before removing, cleaning, servicing or making any
adjustment to the product.
Never jump or dive into a spa or any shallow body of water.
Do not bury the electrical cord. Locate the cord where it will not be damaged by lawn mowers, hedge
trimmers and other equipment.
Do not attempt to plug in or unplug this product while standing in water or when your hands are wet.
Keep all pets away from the spa to avoid any damage.
Do not add bath oil or bath salt to the spa water.
Do not leave an empty pool outside.
-
ching device, such as a timer, or connected to a circuit that is regularly switched on and off by the utility provider.
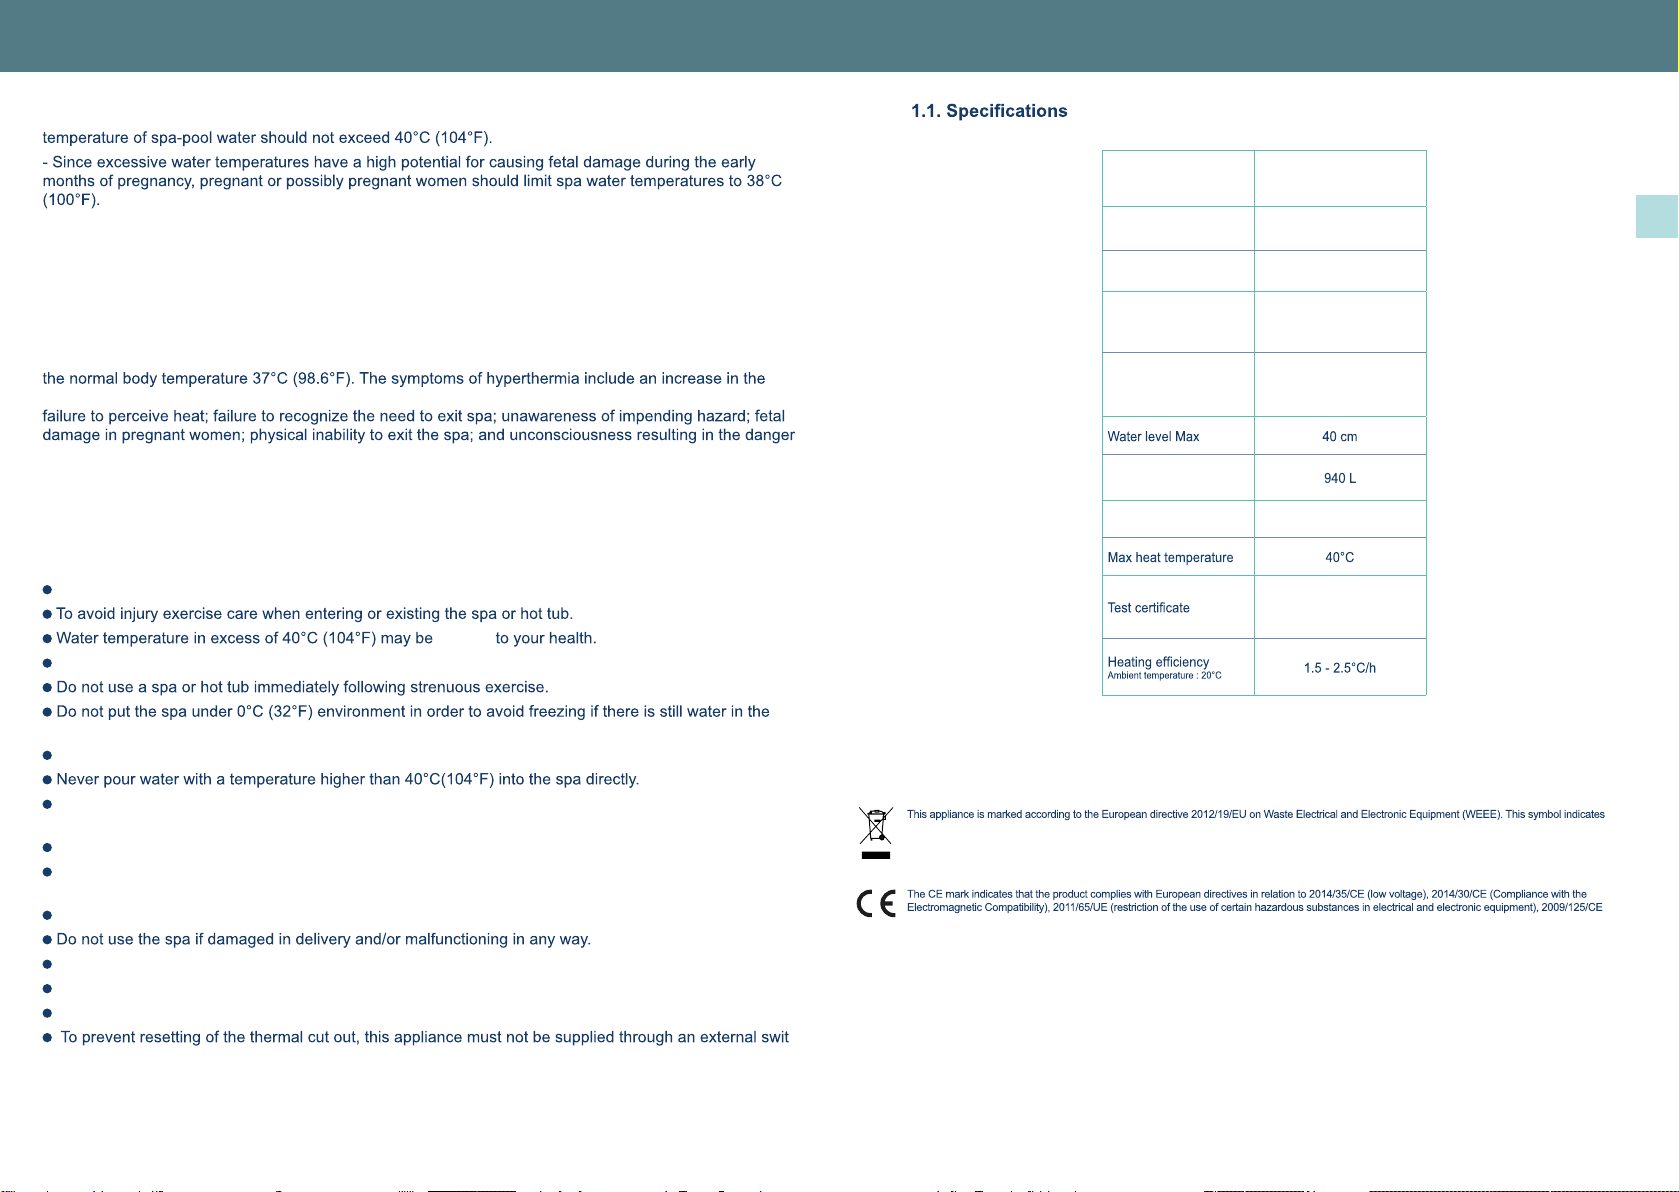
ROME
Model
Capacity 6 persons
Rome
172 x 70cm
68” x 27.6”
152 x 70cm
60” x 27.6”
Dimension (outer)
Dimensions (inner)
Water capacity
Power supply
CE
1. SPECIFICATIONS
that this appliance may not be treated as household waste. Instead it shall be handed over tothe applicable collection point for the recycling of electrical
and electronic equipment. Disposal of the appliance shall be carried out in accordance with the local environment regulations for waste disposal.
(Ecodesign directive).
Couverture
harmful
220-240 V,50 Hz, 2040W
EN
7
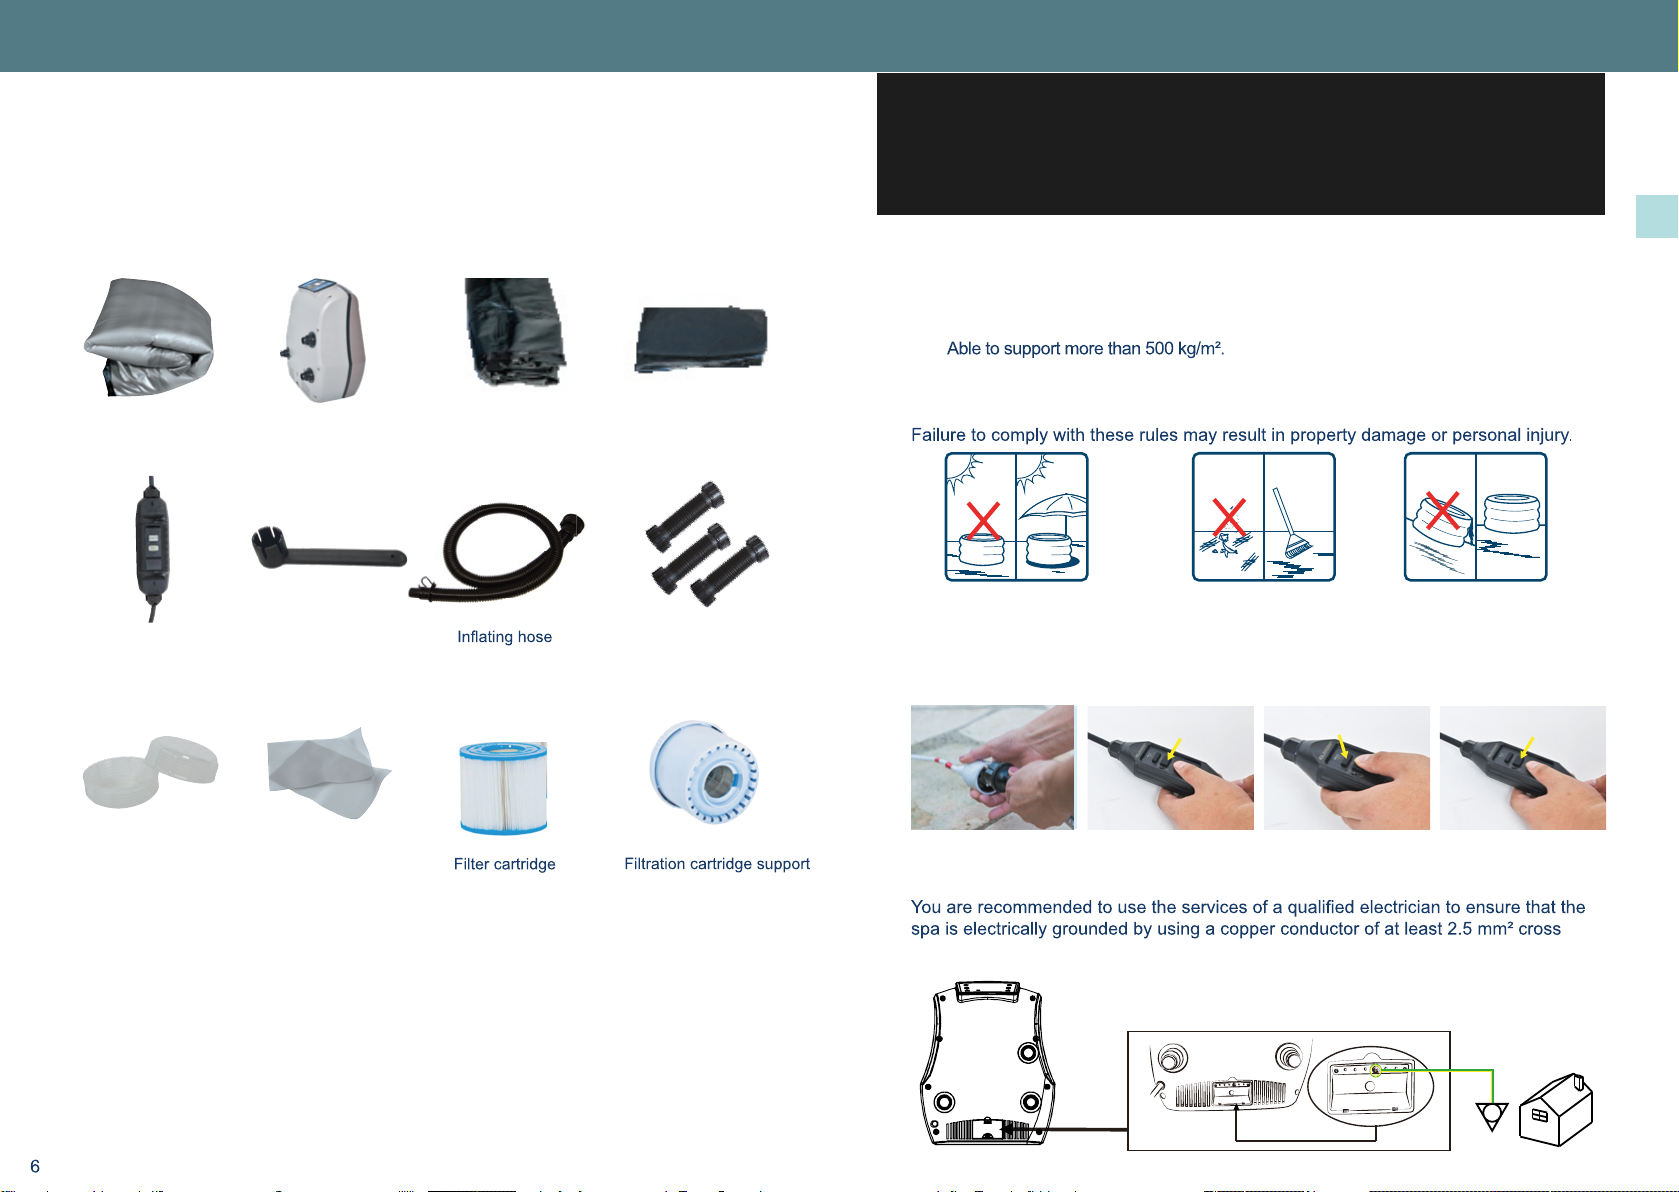
Ensure to check all parts are present:
2. PACKAGE LIST
2.1. Package list
liner
Caps
RCD plug
Pump unit
Repair kit
wrench
Top cover ground sheet
Pump unit connectors
Couverture
Couverture
Couverture
Couverture
Couverture
Couverture
3.2. RCD test
1. Insert the plug into the
power outlet.
2. Press the «RESET» button,
the indicator light turns red.
3. Press the «TEST» button,
the indicator light turns off.
4. Press the «RESET» button,
the indicator light turns red.
The RCD works properly.
3.1. Site selection
Clean the place A level placeA place with an awning
WARNING : Before proceeding to install your spa, please ensure that the allocated
location meets the following conditions :
• A level place in order to avoid any defect, hernia or leakage.
• Wide enough to support the pool and its pump unit.
•
• Sheltered from the sun and bad weather.
• Clean and free from sharp objects.
• Devoid of aggressive vegetation on the ground.
3. INSTALLATION
WARNING: The RCD plug must be tested before each use..
Do not use if RCD test fails and see chapter 6.1.
Grounding
section.
WARNING : Spa installed on inadequately level surfaces are subject to leaking. forming irregulari-
ties or may collapse. which can result in property damage or serious injury for those in or around the
spa area!
CAUTION : Please choose your set-up area carefully as lawn and other desirable vegetation
undereath the ground sheet (if applicable) will die. Furthermore, try to avoid setting the ground sheet
in areas prone to aggressive plant and weed species, as they may grow through the ground sheet.
EN
8
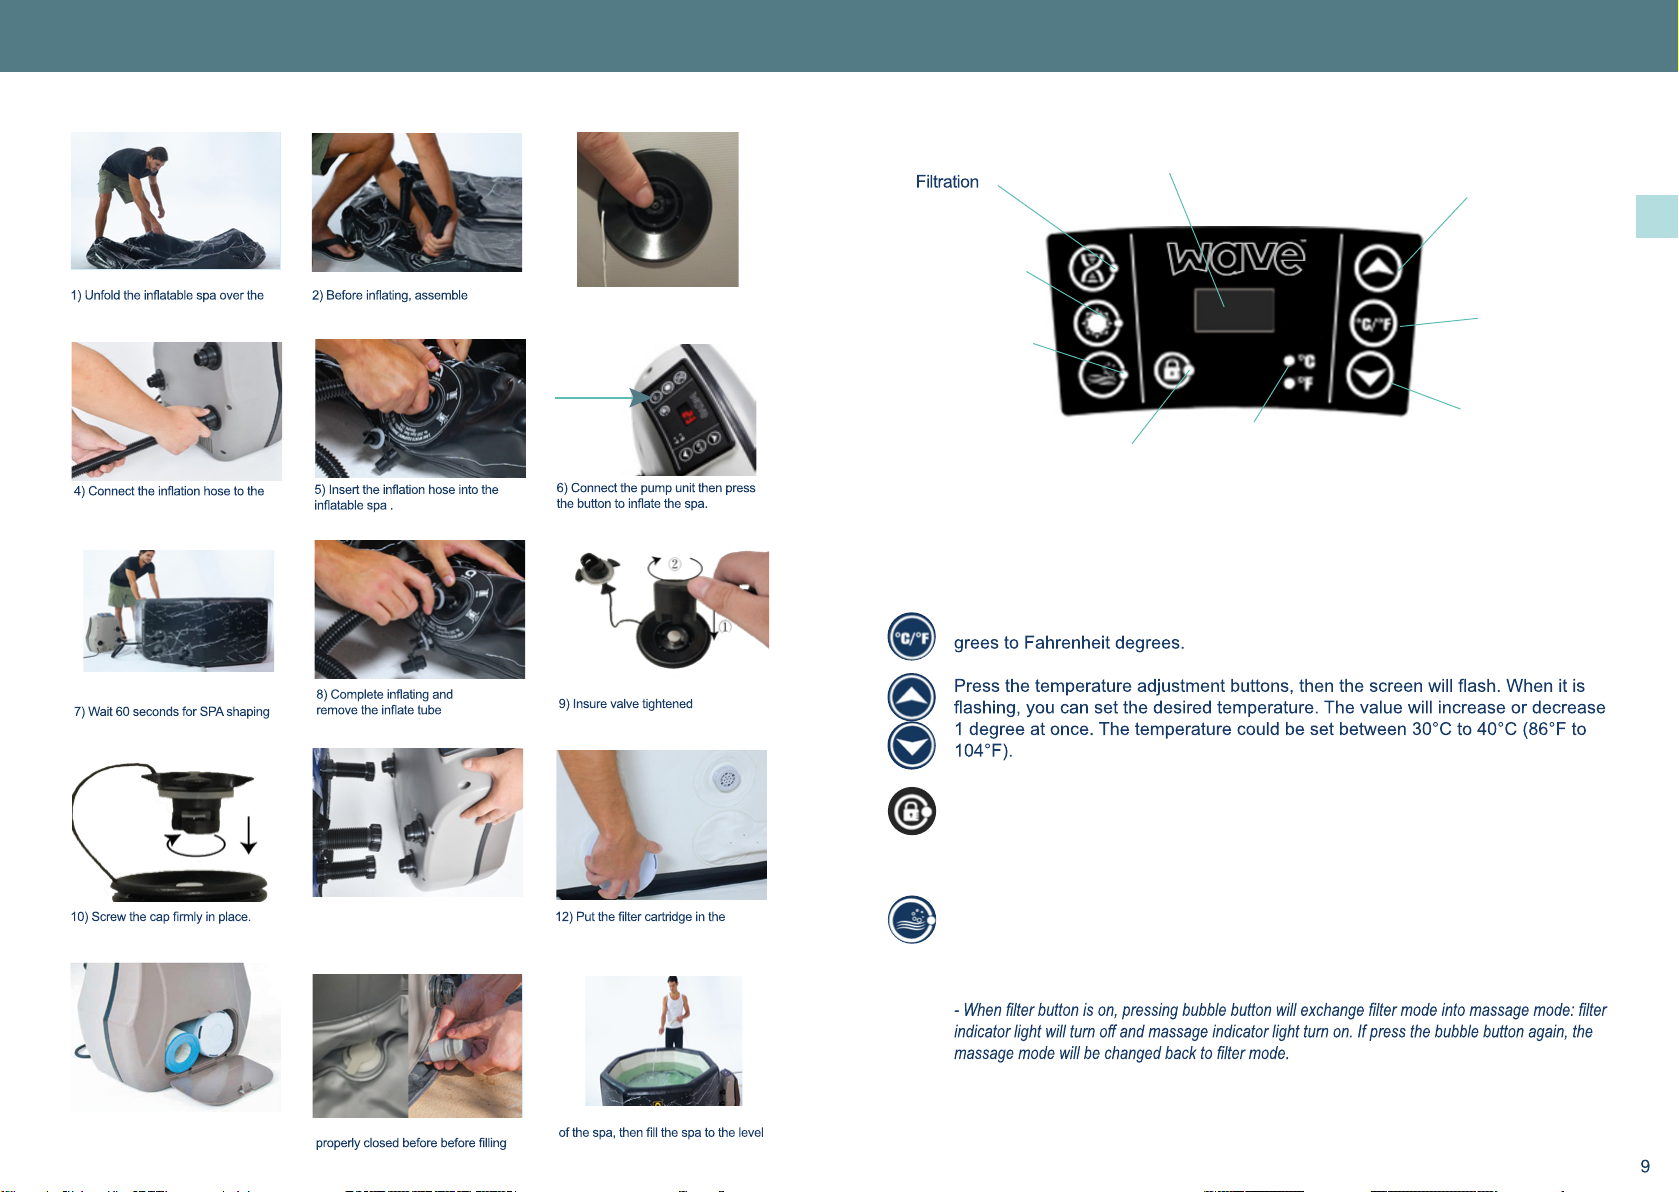
3.3. Assembling
Once powered-up, the LED displays the current water temperature automatically.
The temperature units selector changes the temperature units from Celsius de-
To lock or unlock the control panel, press the Lock button and hold 3 seconds.
Lock the control panel when you are away to prevent other people changing
the settings.
Press the massage button to activate the bubble massage system, the green
indicator light turns on. It can be turned off by pressing it again.
Note :
- The massage system will stop automatically after 30 minutes of operation. Re-activate the mas-
sage function by pressing the massage button again.
4. USAGE
4.1. Control panel
4.2. Functions
Temperature
Decrease Button
Temperature
Increase Button
LED Display
Massage Button
Lock Button Temperature
units indicator
Temperature
units
selector
Heat Button
base protector. connecting tube into SPA pool
by tools.
14) Ensure that the drain caps are
the spa.
15) Smooth wrinkles out of the bottom
indicated. Your spa is ready.
11) Connect the unit pump tothe pool
using the 3 connectors to screw.
Ensure the icons on the pump and the
pool match up.
support then screw it onto the lower
suction inside the basin.
13) Cartridge location as shown.
3) Inspect spring inside valve
in the upspring status
pump on the socket .
EN
11
Note:
turn on at same time
The pump does not stop heating until the current water temperature reaches the
set temperature; and the heating system will restart after the current water tem-
Important :
activate
Note:
starting, commence
4.3. Pool cover and security
After each use, the control panel must be locked and the pool must be coated with its
top cover and it must be attached to the base protector with the safety buckles.
Each safety buckles has a lock system ; closed buckle, the latch in up position locks
the buckle, the latch in down position unlocks the buckle.
The top cover keeps the heat from the water and secures the pool.
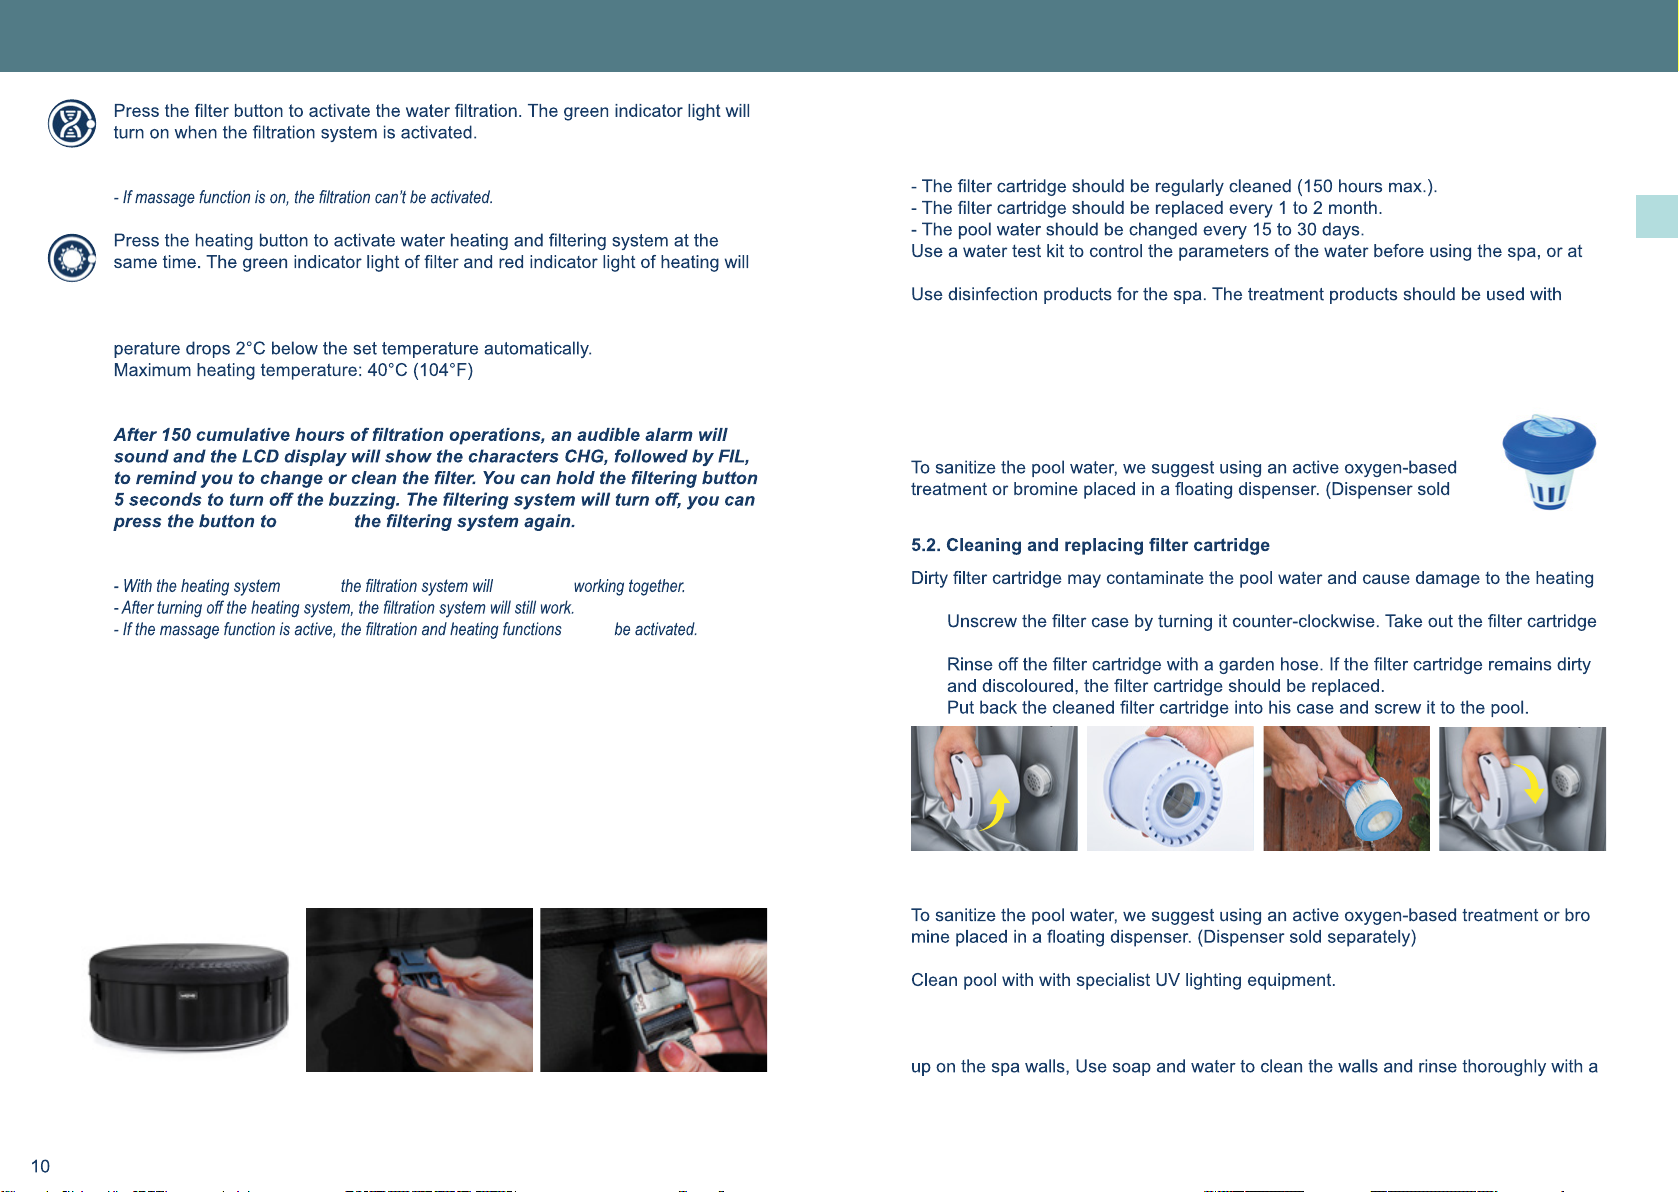
5.1. Water maintenance
WARNING : A bad pool water quality can harm your health.
Depending on the frequency and conditions of use:
least once a week.
caution and it is imperative to refer to instructions before use. Improper use may result in
damage to the equipment.
Damage resulting from improper use of treatment products is not covered by warranty
(overdose, shock treatment, ...).
1. Water balance
The water balance (pH) must be maintained between 7 and 7.4.
2. Water Sanitation
separately).
5. MAINTENANCE
function.
1.
from the case.
2.
3.
Disinfection
Water Sanitation:
-
If water is heavily polluted you should not use pool.
Seek professional advice and guidance before doing this, considering the above.
Attention:
Detergent residues and dissolved solids from bathing suits and chemicals may build
garden hose using a direct powerful waterspray
cannot

EN
12 13
5.3. Drainage and storage
Drainage
1 Check the stopper on the bottom of the pool and the drain cap.
2
3Remove the stopper on the bottom of the pool. Completely drain all water from the
spa pool.
Storage
5
6
7
8
It is recommended that you store the SPA in its original package in a warm dry place.
5.4. Repair kit
Small punctures or holes in the pool liner can be repaired with the repair kit included.
2. Thoroughly clean the area surrounding the leak.
3. Cut a piece of repair material in round shape, which should be larger than the dam-
aged area.
4. Apply adhesive to the underneath side of the patch and around the area to be re-
paired.
to dry. After patch has dried, apply glue around the edges for a complete seal (dry 4
hours).
1
5
2
6
3
7 8
Here are some useful tips to help you to diagnose and rectify common sources of
trouble.
ProblemCause Solution
Control panel
screen does not
operate
Check power source
Power failure
Call for service if it does not reset
SPA pump does not
heat properly
Temperature set is too low Set to a higher temperature
Clean or Replace the cartridge (see chapter 5.2)
Too low water level
Heating element defective Call for service
Bubble massage
system does not
work
Pump is overheatingCut off the power and wait until the pump has cooled.
activated Press the bubble button to reactivate
Malfunction of the pump unitCall for service if it does not reset
not work
Clean or Replace the cartridge (see chapter 5.2)
Inlet and outlet blockedClean the inlet and outlet
Air inside the pump
Malfunction of the pump unitCall for service if it does not reset
Pump leakage
Adaptor seal improperlyReplace the seal in the right position
Water leakage from pump bodyCheck the pump body, call for service
Spa pool leakage Spa pool is torn or punctured
Water is not clean
Clean or Replace the cartridge (see chapter 5.2)
Change the pool water completely
Improper water treatmentRefer tothe chemical manufacturer’s instructions
6. TROUBLE SHOOTING
6.1. Troubleshooting
If air valve damages or leaks, please replace valve according to the steps followed.
Directly press down spring
spindle.Replace a new air valve spindle.Tighten the air valve by tools.
dry for 24 hours
4Once empty, the pool can be cleaned with soap and water.
EN
14 15
Wave products have been inspected with no evident defects prior to leaving the
factory.
Wave warrants this product against defects in material and workmanship for a period of time,
Warranty for this product begins on the date of purchase and Wave requires presen-
tation of the original proof to purchase to confirm the date. During the warranty period,
Wave will either repair or replace, at its discretion, any defective products. Replace-
original warranty.
Shipping cost policy
The return of defect parts to the authorized service centre is at the cost of the owner.
On warranty period, the return is at the cost of service center.
Warranty policy
This limited warranty does not apply to any defect resulting from negligence, accident,
misuse, or other reason beyond Wave’s control, included but not limited to:
normal wear and tear, negligence or failure to follow the product instructions, improper
or inadequate maintenance; connection to improper power supply; chemical water
This warranty is valid only in the country of purchase in such countries where Wave
Warranty service outside the country of purchase is limited to the terms and conditions
of the corresponding warranty in the country of service. Where the cost of repairs or
replacement is not covered by this warranty, Wave will advise the owners and the cost
shall be charged to the owner.
This warranty only applies to the original purchaser and terminates upon any transfer of
ownership.
All repairs of which warranty claims are made must be pre-authorized by a Wave
service centre.
your Wave product. Wave will not be liable for results of cost of workmanship from
unauthorized service person.
Warranty registration
To validate your warranty, please register your product on our website Wave:www.wavespas.com
It is essential that all informations including customer name, date of
purchase, serial number, spa model are provided. Without this information the warranty
will be invalid.
7. WARRANTY
7.2. Warranty
If the screen displays an error code “Ex”, please refer to the table belo
w.
E
3, E4, E5, E6 error code
I
f error code is still displayed on the control Box, please do the followinginstructions:
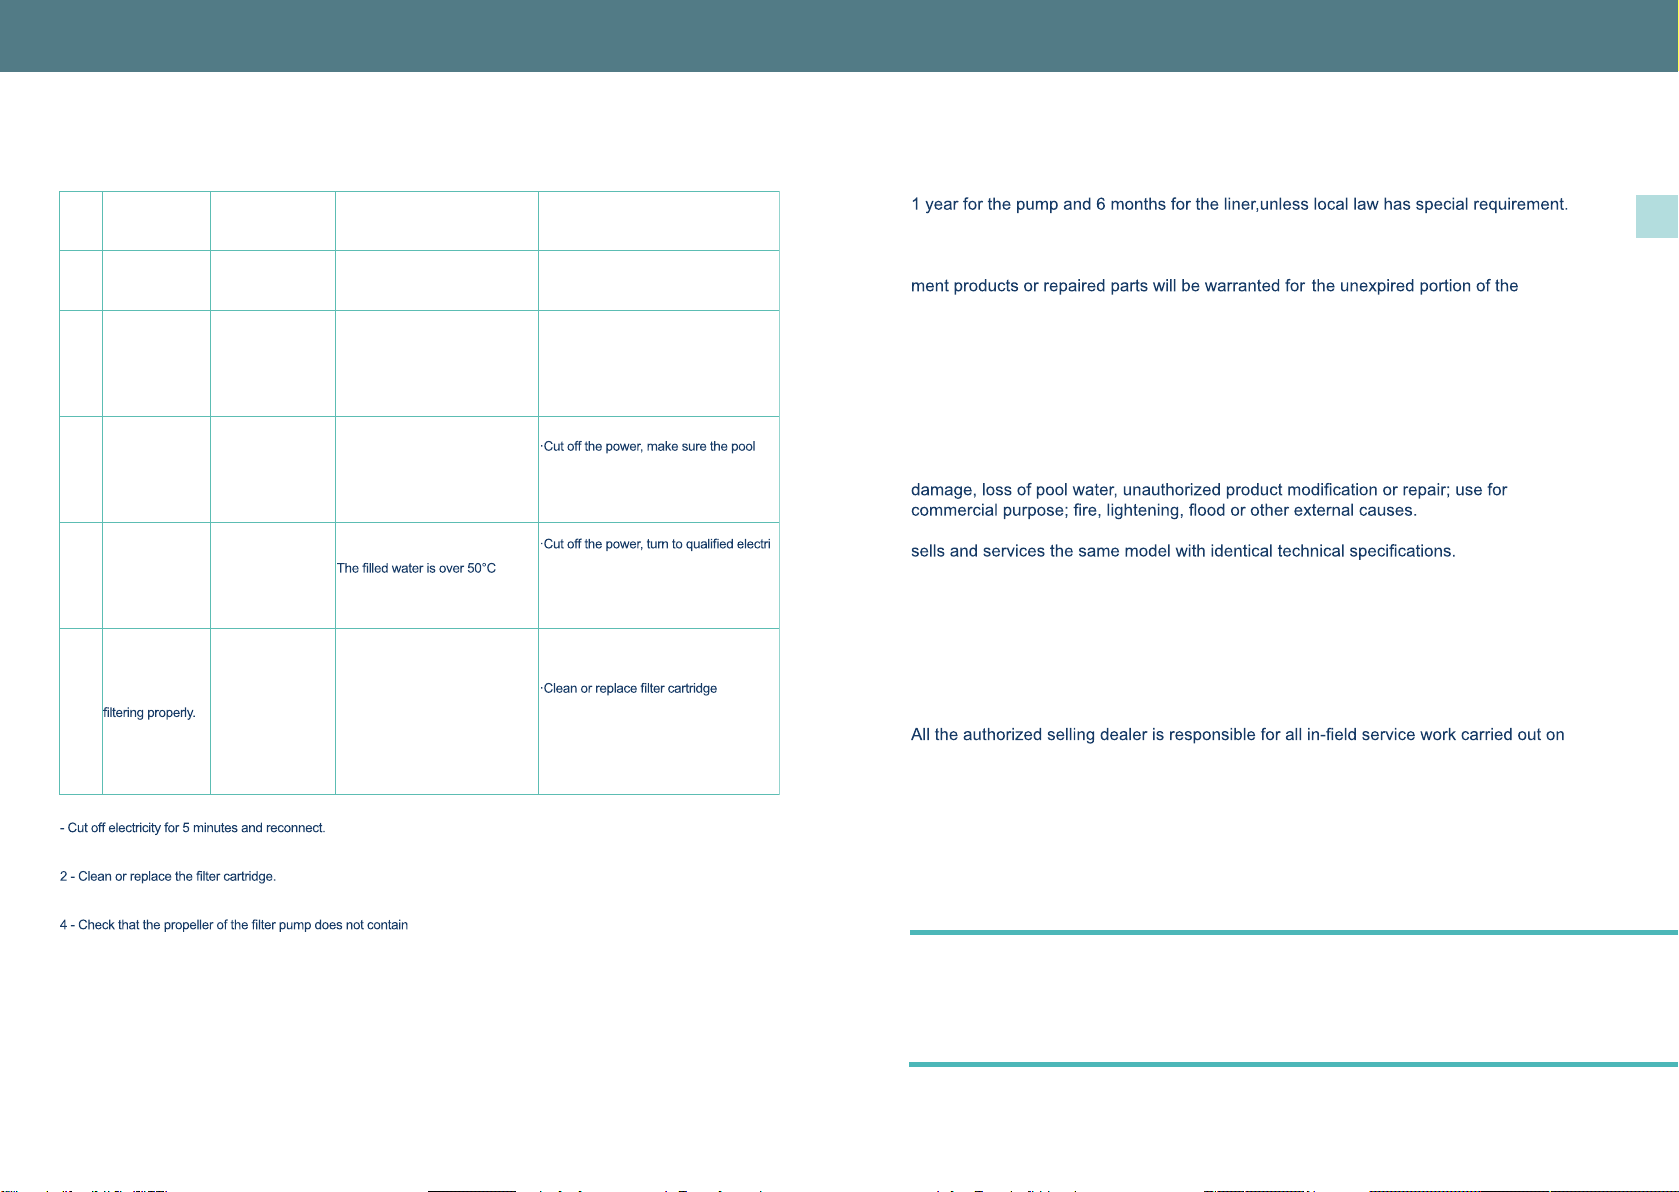
1 -
Check that the water line is between the high and low limits.
3 -
Unscrew and clean the 2 nozzles (Entry and exit ofwater) inside the spa and remove wastes if necessary (leaves, hairs, fur,
s
kin...)
foreign objects.
C
ut the spa again electrically for 5minutes and re-connect it, if the error code is still displayed on the control box please contact
the service centre.
7.1. Error code
Code Situation Problem Cause Ss olutions
E1 Not heating Not
heating properly.
Wrong temperature
control sensor.
Temperature control sensor short
circuit or open circuit. Contact service center.
E3 Not heating
properly.
High water tempera-
ture indicator.
E4
All functions do
not work, buzzing
warning.
Low water tempera-
ture indicator.
Thepool water is lower than 2°C
(36°F).
water is between 2°C~44°C (36°F~111°F)
·If this does not solve the problem, refer
to the box below
E5
All functions do
not work, buzzing
warning.
High water tempera-
ture indicator. (122°F).
-
cian toreset the thermal cutout described
in next paragraph.
·If this doesnot solve the problem, refer
to the box below
E6
Not heating and
Buzzing warning.
Water pressure is
notbig enough to
activateheating.
·Inlet or outlet on inner wall are
blocked.
·Filter cartridge is too dirty.
·Pool water does not reach mini-
mum water level.
·Do not release air from pump
Pump iswrong”
·Clean inlet and outlet
·Add water to reach water level
·Do air release as outlined again
·If this doesnot solve the problem, refer
to the box below
1. The filled water is over 45°C
(113°F)
2.The filter cartridge was put on the wrong
suction fitting (higher suction fitting). 2.Put the filter cartridge on the lower suction
fitting.
1.Cut off the power,make sure the pool water is
between 2°C~44°C(36°F~111°F).If this does not
solve the problem, refer to the box below.
Waves Direct
121 New Bridge Street, Newcastle upon Tyne,
Tyne and Wear, NE1 2SW, United Kingdom
wavespas.com
Table of contents
Other Wave Hot Tub manuals


Popular Hot Tub manuals by other brands

Jacuzzi
Jacuzzi Unique Instructions for preinstallation

Master Spa
Master Spa Spa 2008 owner's manual

Aquatic
Aquatic SERENITY 6 Specification sheet

Dimension One Spas
Dimension One Spas Diplomat Specifications

Jacuzzi
Jacuzzi Experience ALIMIA Instructions for preinstallation

CalderaSpas
CalderaSpas vacanza series owner's manual


