Wave SWIFT User manual

SWIFT
www.wavespas.com
SWIFT SPA
INSTALLATION AND
USER MANUAL
READ CAREFULLY AND
KEEP IT FOR LATER REFERENCE
-Visit wavedirect.co.uk
to register your free
Warranty package.
WARRANTY

EN
-
-
IMPORTANT - PLEASE READ
1. Watch our WAVE videos
We know you can’t wait to jump into your new Wave hot tub and get started, however before you do
that, please check out our set-up videos for an easy step by step guide as to how to get started with
your tub safely.
2. Read the manual
Next up, please read the manual! This will save you a lot of time and hassle by explaining the process
every step of the way. There is a lot of crucial information in here that will help avoid damage to your
spa when setting up and taking down.
3. Choose your site
Get your location right! First off make sure you are setting up your tub in an area where you have
enough space surrounding the spa for you to comfortably perform your daily maintenance tasks.
Secondly, ensure there is a power outlet nearby as extension cables should NOT be used. Thirdly,
choose a site where you can drain the water easily! The site should be flat and completely free from
sharp objects. The site where you choose to set up should also be strong enough to take the weight
of your spa when it is fully filled and in use. The water capacity for 2-4-person spa is 800L and 4-6
person is 1000L.
The location in which you assemble and fill your spa must be the location you intend to use it, once
the spa is full it is strongly advised against that you attempt to move it to another location. Doing so
could cause injury to yourself or damage to your tub, which may result in voided warranty.
4. Open the box
Once you have opened the box that contains your new spa you should remove its contents and
spread the protective ground sheet on the site where your tub will be assembled. You should then
assemble the heater unit and the rest of the tub. Once you are done with the packaging and box you
should remove all debris and packaging parts from the tub area to ensure nothing falls in and
damages the liner.
5.Assemble the spa
Next step will be to assemble your spa! Once your foam spa walls have been assembled and covered
with the liner you can connect the motor and heater system. Then your tub is ready to fill with water!
6. Clean your spa
After assembling your spa, use a wet sponge or soft cloth to gently wipe the internal surface of your
spa liner. Even though your spa is brand new, this is to ensure that any debris or dust that could
contaminate the water is fully removed.
7. Filter and filter housing
After gently cleaning the internal liner of your new spa you should ensure that the filter and filter
housing are fitted in the correct location (the lower port). Also ensure that the cap is not fitted on
the upper port before filling with water.
8. Fill your spa with water
Now you can fill your spa with water! When filling your spa, try to avoid using an old hose as these
carry a lot of old bacteria that could contaminate the water. If you are filling your tub using cold water,
you should carry on filling until you are mid-way between the min and max filling lines. If you have the
ability to fill your spa with hot/warm water this will mean your spa will heat up quicker and be more
energy efficient. If you are planning to fill your spa with hot water, please begin using cold water and
once you the water has risen above the filter, hot water can then be used.
9. Heat your spa water
Now to heat your spa! To do this you should press the heater button on the left side of your external
unit (the sun symbol). A light will then be displayed and remain lit until the water has reached your
selected temperature (38°C is the default temperature). Once the desired temperature is reached,
the light will flash. Once the LCD display has flashed you will be able to adjust the water temperature
using the up and down arrows to increase or decrease the temperature. It is possible for the water to
be approximately 1-3°C different to the temperature selected.
The water in your spa heats up approximately 1°C per hour whilst the heater unit is switched on.
The indicator on the screen corresponds to the current water temperature. For health and safety
reasons the maximum temperature setting on the heater unit is 40°C. You should make sure you
have turned on the filtration system before you start heating the water. Put your hot tub cover on to
help the water heat up faster and retain heat for longer.
10. Chemical shock
Before you jump into your spa, you should first perform your spa chemical shock. When you set up
your hot tub for the first time its always important to add your start up chemicals. You need to perform
a hot tub shock to keep the water healthy and prevent foaming or cloudiness. Treating your water
prolongs its life such that you will not need to keep draining and cleaning your hot tub after each use.
Our Wave starter kit contains everything you need to get your spa up and running!
11. Guide on chemical shock
To chemical shock you should use either warm or cold water and when the water is higher than 25°C
mix your chlorine (granules are better for shocking) in a jug with warm water. Put 5 teaspoons of
granules into the jug of warm water and add this to the spa after mixing well. Activating the bubble
settings whilst doing this will help to disperse the chlorine around the water quicker. After you have
chlorinated your spa water, please leave the spa to sit for 24 hours before use. Remember to use
your test strips before jumping into the spa as some levels may still need adjusting before use. Make
sure alkalinity levels are right after checking the chlorine. pH can be altered as and when required.
12. Maintenance
Regular maintenance of your tub is essential, especially keeping the correct pH levels! The most
ideal pH level is between 7.2 to 7.6 and the level should be tested two times a week whilst the tub is
filled, and always before use. A heaped teaspoon holds approximately 8g of granules and adding a
teaspoon of chlorine everyday will keep your spa water clean and healthy.
13. FINISH
Now all that is left is for you to enjoy your new spa! For any further questions please check the FAQ’s
on our website or contact a dedicated member of our customer service department using the live chat
on our website www.wavespas.com.

Carefully read, understand, and follow all information in this user manual before installing and
using the swimming pool.
These warnings, instructions, and safety guidelines address some common risks of water
recreation, but they cannot cover all risks and dangers in all cases. Always use caution, common
sense, and good judgment when enjoying any water activity. Please read carefully and keep for
future reference.
Non Swimmers safety
1.Continuous, active, and vigilant supervision of weak swimmers and non-swimmers by a com-
drowning)
2.Designate a competent adult to supervise the pool each time it is being used;
3.Weak swimmers or non-swimmers should wear personal protection equipment when using
the pool;
4. When the pool is not in use, or unsupervised, remove all toys from the swimming pool and its
surrounding to avoid attracting children to the pool.
Safety devices
1. It is recommended to install a barrier (and secure all doors and windows, where applicable) to
prevent unauthorized access to the swimming pool;
2. Barriers, pool covers, pool alarms, or similar safety devices are helpful aids, but they are not substi-
tutes for continuous and competent adult supervision.
Safety equipment
1. It is recommended to keep rescue equipment (e.g. a ring buoy) by the pool;
2. Keep a working phone and a list of emergency phone numbers near the pool.
Safe use of the pool
1. Encourage all users especially children to learn how to swim;
2. Learn Basic Life Support (Cardiopulmonary Resuscitation - CPR) and refresh this knowledge regu-
larly. This can make a life-saving difference in the event of an emergency;
3. Instruct all pool users, including children, what to do in case of an emergency;
4. Never dive into any shallow body of water. This can lead to serious injury or death;
5. Do not use the swimming pool when using alcohol or medication that may impair your ability to
safely use the pool;
6. When pool covers are used, remove them completely from the water surface before entering the
pool;
7. Protect pool occupants from water related illnesses by keeping the pool water treated and practi-
cing good hygiene.Consult the water treatment guidelines in the user’s manual;
8. Store chemicals (e.g. water treatment, cleaning or disinfection products) out of the reach of child-
ren.
9. Use the signage as outlined below;
10. Removable ladders shall be placed on horizontal surface.
WARNING: drained pool outdoors may cause unknown hazards.
WARNING: Installation and assembly shall be done by adults.
WARNING: Read and follow the the instruction for use and maintenance
to ensure a safe use of the swimming pool kit. Not following the instructions
for use and maintenance can cause serious health hazards, in particular for children.
WARNING: Only for domestic outdoor use.
WARNING: Drowning hazard. Children have drowned in portable swimming-pools.
WARNING: Empty the pool when not in use. Do not leave a small pool empty outdoor.
WARNING: Keep children under supervision in the aquatic environment.
WARNING: No diving.
WARNING
READ ALL INSTRUCTIONS AND SAFETY WARNINGS IN THIS MANUAL
Failure to follow the warnings and instructions in this manual may result in
serious injury, drowning or electric shock.
The safety of your children is left on your hand! The risk is the highest for
children aged below 5. Be high alert all the time.
Always comply with the following instructions:
- The children should be under close and constant supervision;
- Designate one security responsible;
- Always designate a responsible person to mange pool and pool area;
- Adult supervision should always be relevant to the number of people using the
pool;
- Wet the nape, chest and legs before entering the water;
- Prohibit diving and jumping;
- Prohibit running, splashing games around the pool;
- Do not let an unattended child who does not swim use the pool with no life-jack-
ets on;
- Do not leave any players around and in the basin unattended;
- Always keep the water treatment products out of reach of all children.
If incident occurs remove the injured person or child from the pool and pool area
Contact emergency services for advice and guidance on how to treat injured per-
son or child
Zone 2 Zone 2Zone 1
1,5 m 1,5 m2 m 2 m
2,5 m
2,5 m
Zone 0 h
h
The hot tub’s electrical connections must be installed in the electrical safety zones labelled 1, 2 or
2 3
EN

For your own safety and that of your product, make sure to following the safety precautions below.
Failure to follow the instruction may result in serious injury, property damage or death. Improper
installation or operation will void the warranty.
Read, understand and follow all instructions:
DANGER
Risk of accidental drowning:
- Extreme caution must be exercised to prevent unauthorized access by children.
- Inspect the spa cover regularly for leak, premature wear and tear, damage or signs of deterioration.
Never use a worn or damaged cover: it will not provide the level of protection required to prevent unsuper-
vised access to the spa by a child.
- Always lock the spa cover after each use.
Risk of injury:
If the supply cord is damaged, it must be replaced by the manufacturer, its service agent or similarly quali-
Risk of Electric Shock:
- Do not permit any electrical appliances, such as a light, telephone, radio or television within 1.5m (5 feet)
of a spa tub.
- Do not use the spa when it is raining, thundering or lightning..
WARNING
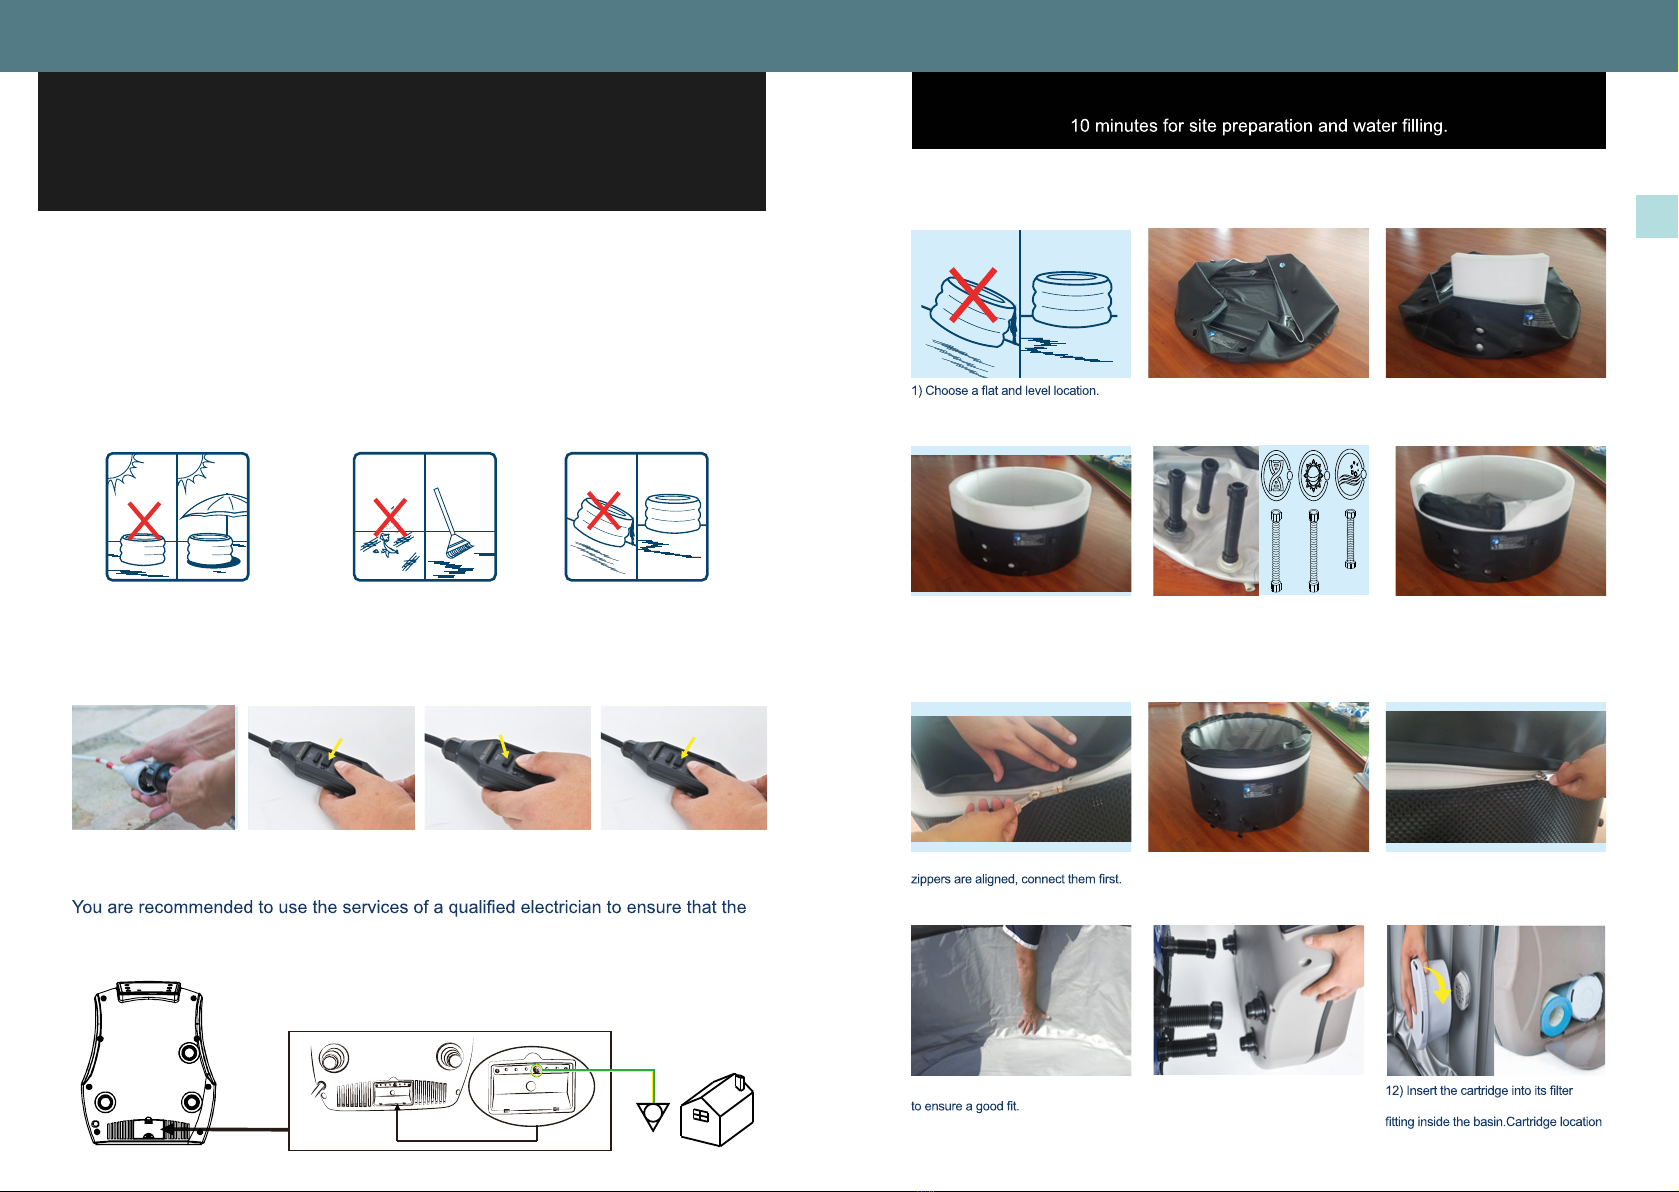
To reduce the risk of electric shock, do not use an extension cord, timers, plug adapters or converter
plugs to connect the unit to electric supply; provide a properly located outlet.
The spa electrical appliance should be supplied through a residual current device (RCD) having a rated
residual operating current not exceeding 10mA.
Parts containing live parts, except parts supplied with safety extra-low voltage not exceeding 12V, must
be inaccessible to occupants in the spa.
that they cannot fall into the spa.
Residential electrical connection box must be located safely with a distance of at least 2m away from the
spa.
This appliance can be used by children aged from 8 years and above and persons with reduced physi-
cal, sensory or mental capabilities or lack of experience and knowledge if they have been given supervi-
sion or instruction concerning use of the appliance in a safe way and understand the hazards involved.
Children shall not play with the appliance. Cleaning and user maintenance shall not be made by children
without supervision.
To reduce the risk or injury, do not permit children use this product unless they are closely supervised all
times.
To reduce the risk of child drowning, supervise children all times. Attach and lock spa cover after each
use.
pporting the expected load (≥ 500kg/m²).
To avoid damage do not leave the appliance empty for an extended period.
Immediately leave spa if uncomfortable or sleepy.
To reduce the risk of injury :
- Lower water temperatures are recommended for young children and when spa use exceeds 10 minutes.
IMPORTANT SAFETY INSTRUCTIONS
In order to avoid the possibility of hyperthermia (heat stress) occurring it is recommended that the average
temperature of spa-pool water should not exceed 40°C (104°F).
- Since excessive water temperatures have a high potential for causing fetal damage during the early
months of pregnancy, pregnant or possibly pregnant women should limit spa water temperatures to 38°C
(100°F).
- Before entering a spa or hot tub the user should measure the water temperature with an accurate ther-
mometer since the tolerance of water temperature regulating devices varies.
- The use of alcohol, drugs or medication before or during spa use may lead to unconsciousness with the
possibility or drowning.
- The use of alcohol, drugs, or medication can greatly increase the risk of fatal hyperthermia in spas.
The causes and symptoms of hyperthermia may be described as follows:
Hyperthermia occurs when the internal temperature of body reaches a level several degrees above
the normal body temperature 37°C (98.6°F). The symptoms of hyperthermia include an increase in the
internal temperature of body, dizziness, lethargy, drowsiness, and fainting. The effect of hyperemia include
failure to perceive heat; failure to recognize the need to exit spa; unawareness of impending hazard; fetal
damage in pregnant women; physical inability to exit the spa; and unconsciousness resulting in the danger
of drowning.
- Obese persons or persons with a history of heart disease, low or high blood pressure, circulatory system
problem, or diabetes should consult a physician before using a spa.
- Persons using medication should consult a physician before using a spa since some medication may
induce drowsiness while other medication may affect heart rate, blood pressure and circulation.
- Check with doctor before use if pregnant, diabetic, in poor health, or under medical care.
People with infectious disease should not use a spa or hot tub.
To avoid injury exercise care when entering or existing the spa or hot tub.
Water temperature in excess of 40°C (104°F) may be injurious to your health.
Never use a spa or hot tub alone or allow others to use the spa alone.
Do not use a spa or hot tub immediately following strenuous exercise.
Do not put the spa under 0°C (32°F) environment in order to avoid freezing if there is still water in the
pool.
Do not turn on the spa when the water is frozen.
Never pour water with a temperature higher than 40°C(104°F) into the spa directly.
Always unplug this product from the electrical outlet before removing, cleaning, servicing or making any
adjustment to the product.
Never jump or dive into a spa or any shallow body of water.
Do not bury the electrical cord. Locate the cord where it will not be damaged by lawn mowers, hedge
trimmers and other equipment.
Do not attempt to plug in or unplug this product while standing in water or when your hands are wet.
Do not use the spa if damaged in delivery and/or malfunctioning in any way.
Keep all pets away from the spa to avoid any damage.
Do not add bath oil or bath salt to the spa water.
Do not leave an empty pool outside.
To prevent resetting of the thermal cut out, this appliance must not be supplied through an external swit-
ching device, such as a timer, or connected to a circuit that is regularly switched on and off by the utility.
4 5
EN

1. SPECIFICATIONS
This appliance is marked according to the European directive 2012/19/EU on Waste Electrical and Electronic Equipment (WEEE). This symbol indicates
that this appliance may not be treated as household waste. Instead it shall be handed over to the applicable collection point for the recycling of electrical
and electronic equipment. Disposal of the appliance shall be carried out in accordance with the local environment regulations for waste disposal.
The CE mark indicates that the product complies with European directives in relation to 2014/35/CE (low voltage), 2014/30/CE (Compliance with the
Electromagnetic Compatibility), 2011/65/UE (restriction of the use of certain hazardous substances in electrical and electronic equipment), 2009/125/CE
(Ecodesign directive).
Ensure to check all parts are present:
2. PACKAGE LIST
2.1. Package list
Outer liner
2 Caps
Pump unit
8 Foam walls Inner liner
Top cover
RCD plug
Couverture Structure gonflable Base de protection Bloc moteur
Prise différentielle Valve d’air Bouchon de vidange Tube de gonflage
Raccords du bloc moteur Tuyau de vidange Cartouches de filtration Support de filtration
Bouchons Kit de réparation DVD d’installation
Couverture Structure gonflable Base de protection Bloc moteur
Prise différentielle Valve d’air Bouchon de vidange Tube de gonflage
Raccords du bloc moteur Tuyau de vidange Cartouches de filtration Support de filtration
Bouchons Kit de réparation DVD d’installation
pump unit connectors
Couverture Structure gonflable Base de protection
Prise différentielle Valve d’air Bouchon de vidange
Raccords du bloc moteur Tuyau de vidange Cartouches de filtration
Bouchons Kit de réparation DVD d’installation
Repair kit
Couverture Structure gonflable Base de protection
Prise différentielle Valve d’air Bouchon de vidange
Raccords du bloc moteur Tuyau de vidange Cartouches de filtration
Bouchons Kit de réparation DVD d’installation
Couverture Structure gonflable Base de protection
Prise différentielle Valve d’air Bouchon de vidange Tube de gonflage
Raccords du bloc moteur Tuyau de vidange Cartouches de filtration Support de filtration
Bouchons Kit de réparation DVD d’installation
6 7
SWIFT
Model
Capacity 6 persons
Dimension (outer)
Dimensions (inner)
Water capacity
Power supply
CE
SWIFT
76” x 27.6”
193 x 70cm
65” x 27.6”
165 x 70cm
EN
220-240 V,50 Hz, 2040W
1000 L

3.2. RCD test
1. Insert the plug into the
power outlet.
2. Press the «RESET» button,
the indicator light turns red.
3. Press the «TEST» button,
the indicator light turns off.
4. Press the «RESET» button,
the indicator light turns red.
The RCD works properly.
3.1. Site selection
Clean the place A level placeA place with an awning
WARNING : Before proceed to installation your spa, please make sure that the future
location meets the following conditions :
• A level place in order to avoid any defect, hernia or leakage.
• Wide enough to support the pool and its pump unit.
• Able tosupport more than 500 kg/m².
• Sheltered from the sun and bad weather.
• Clean and free from sharp objects.
• Devoid of aggressive vegetation on the ground.
Failure to comply with these rules may result in property damage or personal injury.
3. INSTALLATION
WARNING: The RCD plug must be tested before each use..
Do not use if RCD test fails and see chapter 6.1.
Grounding
spa is electrically grounded by using a copper conductor of at least 2.5 mm² cross
section.
WARNING : Spa installed on inadequately level surfaces are subject to leaking. forming irregulari-
ties or collapses. which can result in properly damage or serious injury for those in or around the spa
area!
CAUTION : Please choose your set-up area carefully as lawn and other desirable vegetation
undereath the ground cloth (if applicable) wil die. furthermore, try to avoid setting the ground cloth in
areas prone to aggressive plant and weed species, as they may grow trough the ground cloth. 3.3. Assembling
2) Extend the liner tothe chosen area.3) Add the foam wall segment with the
three holes in it for connection tothe
base liner.
4) Adjust the 8 segments until they form
a perfect round shape. Then, ensure
that the holes for the outer liner connec-
tion and the holes in the foam wall are
still aligned.
5) Install the connecting hose on the
liner.
8) When installed at corner, push PE
foam inward sothat the coat can be
installed in place..
10) Smooth the liner all around the SPA
6) Insert the inner liner of your spa.
7) Locate the place where the two
3. INSTALLATION
9) Make sure that the zippers of the
liner and outer liners are aligned before
zipping them up.
11) Connect the unit pump tothe pool
using the 3 connectors toscrew. Ensure
the icons on the pump and the pool
match up
holder and then screw on the suction
as shown.
The number of persons required for installation: 1 adult at least.
8 9
EN

3.4. Pool cover and security
After each use, the control panel must be locked and the
pool must be coated with its top cover and it must be at-
tached to the base protector with the safety buckles.
Each safety buckles has a lock system ; closed buckle, the
latch in up position locks the buckle, the latch in down posi-
tion unlocks the buckle.
The top cover keeps the heat from the water and secures the pool.
13) Check that the drain plug is closed
properly.
14) Fill the spa pool until the indicated
be used.
3. INSTALLATION
bottom of the spa. Pull the outer wall out from the top edge, all around the bottom of the spa, so
Once powered-up, the LED displays the current water temperature automatically.
The temperature units selector changes the temperature units from Celsius de-
grees to Fahrenheit degrees.
1 degree at once. The temperature could be set between 30°C to 40°C (86°F to
104°F).
To lock or unlock the control panel, press the Lock button and hold 3 seconds.
Lock the control panel when you are away to prevent other people come to
change your settings..
Press the massage button to activate the bubble massage system, the green
indicator light turns on. It can be turned off by pressing it again.
Note :
- The massage system will stop automatically after 30 minutes of operation. Re-activate the mas-
sage function by pressing the massage button again.
indicator light will turn off and massage indicator light turn on. If press the bubble button again, the
4. USAGE
4.2. Functions
10 11
EN
4.1. Control panel
Temperature
Decrease Button
Temperature
Increase Button
LED Display
Massage Button
Lock Button Temperature
units indicator
Temperature
units
selector
Heat Button

Note:
turn on at same time
The pump does not stop heating until the current water temperature reaches the
set temperature; and the heating system will restart after the current water tem-
perature drops 2°C below the set temperature automatically.
Maximum heating temperature: 40°C (104°F)
Important :
Note :
.
4.3. Pool cover and security
After each use, the control panel must be locked and the pool must be coated with its
top cover and it must be attached to the base protector with the safety buckles.
Each safety buckles has a lock system ; closed buckle, the latch in up position locks
the buckle, the latch in down position unlocks the buckle.
The top cover keeps the heat from the water and secures the pool.
4. USAGE
5.1. Water maintenance
WARNING : A bad pool water quality can harm your health.
Depending on the frequency and conditions of use:
- The pool water should be changed every 15 to 30 days.
Use a water test kit to control the parameters of the water before using the spa, or at
least once a week.
Use disinfection products for the spa. The treatment products should be used with
caution and it is imperative to refer to their instructions.
Damage resulting from improper use of treatment products is not covered by warranty
(overdose, shock treatment, ...).
1. Water balance
The water balance (pH) must be maintain between 7 and 7.4.
2. Water Sanitation
To sanitize the pool water, we suggest using an active oxygen-based
separately).
5. MAINTENANCE
function.
1.
from the case.
2.
3.
Disinfection
Water Sanitation:
To sanitize the pool water, we suggest using an active oxygen-based treatment or bro-
If water is heavily polluted you should not use pool.
Clean pool with with specialist UV lighting equipment.
Seek professional advice and guidance before doing this.
Attention:
Detergent residues and dissolved solids from bathing suits and chemicals may build
up on the spa walls, Use soap and water to clean the walls and rinse thoroughly with a
garden hose using a direct powerful waterspray
12 13
EN

5.3. Drainage and storage
Drainage
1 Check the stopper on the bottom of the pool and the drain cap.
2Unscrew the drain cap.
3Connect the drainage hose.
4Press the drain valve. Completely drain all water from the spa pool.
Once empty, the pool can be cleaned with soap and water.
Storage
5Press the bubbling button to blow out the water inside the jet holes. Unplug the
6Use a towel to wipe off the pool, dry 24 hours.
7
8Fold the pool.
It is recommended that store the SPA in its original package in a warm dry place.
5.4. Repair kit
Little holes or puncture can be repaired with the repair kit included and glue reserved to
pool liner.
1. Find the leak.
2. Thoroughly clean the area surrounding the leak.
3. Cut a piece of repair material in round shape, which should be larger than the dam-
aged area.
4. Apply adhesive to the underneath side of the patch and around the area to be re-
paired.
to dry. After patch has dried, apply glue around the edges for a complete seal (dry 4
hours).
1
5
2
6
3
7 8
5. MAINTENANCE
Here are some useful tips to help you to diagnose and rectify common sources of
trouble.
ProblemCause Solution
Control panel
screen does not
operate
Check power source
Power failure
Reset the RCD plug / Check if the wiring system is adapted to
the power of the pump unit (2040W)
Call for service if it does not reset
SPA pump does not
heat properly
Temperature set is too low Set to a higher temperature
Filter Cartridge is dirty Clean or Replace the cartridge (see chapter 6.2)
Too low water level Fill water to minimum water level
Heating element defective Call for service
Bubble massage
system does not
work
Pump is overheatingCut off the power and wait until the pump has cooled.
Auto shut-down feature (30min) is
activated Press the bubble button to reactivate
Malfunction of the pump unitCall for service if it does not reset
not work
Filter Cartridge is dirty Clean or Replace the cartridge (see chapter 6.2)
Inlet and outlet blockedClean the inlet and outlet
Air inside the pump Fill water to minimum water level
Malfunction of the pump unitCall for service if it does not reset
Pump leakage
Adaptor seal improperlyReplace the seal in the right position
Water leakage from pump bodyCheck the pump body, call for service
Spa pool leakage Spa pool is torn or puncturedUse provided repair kit (see chapter 6.4)
Water is not clean
Filter Cartridge is dirty Clean or Replace the cartridge (see chapter 6.2)
Change the pool water completely
Improper water treatmentRefer tothe chemical manufacturer’s instructions
6. TROUBLE SHOOTING
6.1. Troubleshooting
14 15
EN

Wave products have been inspected with no evident defects prior to leaving
the factory.
Wave warrants this product against defects in material and workmanship for a period of time,
Warranty for this product begins on the date of purchase and Wave requires presen-
tation of the original proof to purchase to confirm the date. During the warranty period,
Wave will either repair or replace, at its discretion, any defective products. Replace-
original warranty.
Shipping cost policy
The return of defect parts to the authorized service centre is at the cost of the owner.
On warranty period, the return is at the cost of service center.
Warranty policy
This limited warranty does not apply to any defect resulting from negligence, accident,
misuse, or other reason beyond Wave’s control, included but not limited to:
normal wear and tear, negligence or failure to follow the product instructions, improper
or inadequate maintenance; connection to improper power supply; chemical water
This warranty is valid only in the country of purchase in such countries where Wave
Warranty service outside the country of purchase is limited to the terms and conditions
of the corresponding warranty in the country of service. Where the cost of repairs or
replacement is not covered by this warranty, Wave will advise the owners and the cost
shall be charged to the owner.
This warranty only applies to the original purchaser and terminates upon any transfer of
ownership.
All repairs of which warranty claims are made must be pre-authorized by a Wave
service centre.
your Wave product. Wave will not be liable for results of cost of workmanship from
unauthorized service person.
Warranty registration
To validate your warranty, please register your product on our website Wave:www.wavespas.com
It is essential that all informations including customer name, date of
purchase, serial number, spa model are provided. Without this information the warranty
will be invalid.
7.2. Warranty
Waves Direct
121 New Bridge Street, Newcastle upon Tyne,
Tyne and Wear, NE1 2SW, United Kingdom
wavespas.com
7. WARRANTY
If the screen displays an error code “Ex”, please refer to the table belo
w.
E3
, E4, E5, E6 error code
If
error code is still displayed on the control Box, please do the followinginstrutions :
1
- Check that the water line is between the high and low limits.
3
- Unscrew and clean the 2 nozzles (Entry and exit ofwater) inside the spa and remove wastes if necessary (Neaf, hairs, fur,
sk
in...)
foreign matter.
C
ut the spa again electrically for 5 minutes and re-connect it, if the error code is still displayed on the control box please contact
the Service Center.
7.1. Error code
Code SituationProblem Cause Ss olutions
E1 Not heating Not
heating properly.
Wrong temperature
control sensor.
Temperature control sensor short
circuit or open circuit. Contact service center.
E3 Not heating
properly.
High water tempera-
ture indicator.
E4
All functions do
not work, buzzing
warn.
Low water tempera-
ture indicator.
Thepool water is lower than 2°C
(36°F).
water is between2°C~44°C (36°F~111°F)
·If this doesnot solve the problem, refer
to the box below
E5
All functions do
not work, buzzing
warn.
High water tempera-
ture indicator. (122°F).
-
cian toreset the thermal cutout described
in next paragraph.
·If this doesnot solve the problem, refer
to the box below
E6
Not heating and
Buzzing warns.
Water pressure is
notbig enough to
activate heating.
·Inlet or outlet on inner wall are
blocked.
·Filter cartridge is too dirty.
·Pool water does not reach mini-
mum water level.
·Do not release air from pump
Pump iswrong”
·Clean inlet and outlet
·Add water to reach water level
·Do air release as outlined again
·If this doesnot solve the problem, refer
to the box below
1. The filled water is over 45°C
(113°F)
2.The filter cartridge was put on the wrong
suction fitting (higher suction fitting). 2.Put the filter cartridge on the lower suction
fitting.
1.Cut off the power,make sure the pool water is
between 2°C~44°C(36°F~111°F).If this does not
solve the problem, refer to the box below.
7. WARRANTY
16 17
EN
Table of contents
Other Wave Hot Tub manuals
Popular Hot Tub manuals by other brands

Aquatic
Aquatic iNfiNity serIes Owner's manual & installation guide

Auto Spa Cover
Auto Spa Cover ASC-2 installation guide

Coleman
Coleman CO534L-A owner's manual

Endless Pools
Endless Pools RECSPORT R200 Pre-delivery instructions

Kohler
Kohler Whirlpool Baths owner's manual

Aquatic
Aquatic AI29AIR7236TO Specifications

European Touch
European Touch FORTE SPA owner's manual

Novitek
Novitek LUMISPA 603 Installation and operation manual

Leisure bay
Leisure bay C Series owner's manual

Intex
Intex PureSpa SPJ-H-20-1 owner's manual

Coleman
Coleman 37 jets legend owner's manual

Sunrise spas
Sunrise spas Classic Collection Series owner's manual