We.lock OPTIMUS-S User manual

OPTIMUS-S Fingerprint cylinder
USER MANUAL
Please read this manual carefully
Setting Description
1) Our products have the function of classical privilege management. The system divide the user
into: Administr tor and ordinary User.
The Administrator has the privilege to add, delete and manage settings; ordinary User can only
open the door if his of her fingerprint is positively verified.
The system will save Admin and User into different area for more convenient management. The
Admin area can store Administrator fingerprints, ordinary Users area can register up to 996
fingerprints.
2) Cylinder has two buttons at the front of it:: the one on the left side is the SET button with short
press commands, the one on the right is the RESET button to restart the system software.
3. Insert b tteries / cylinder powered-on

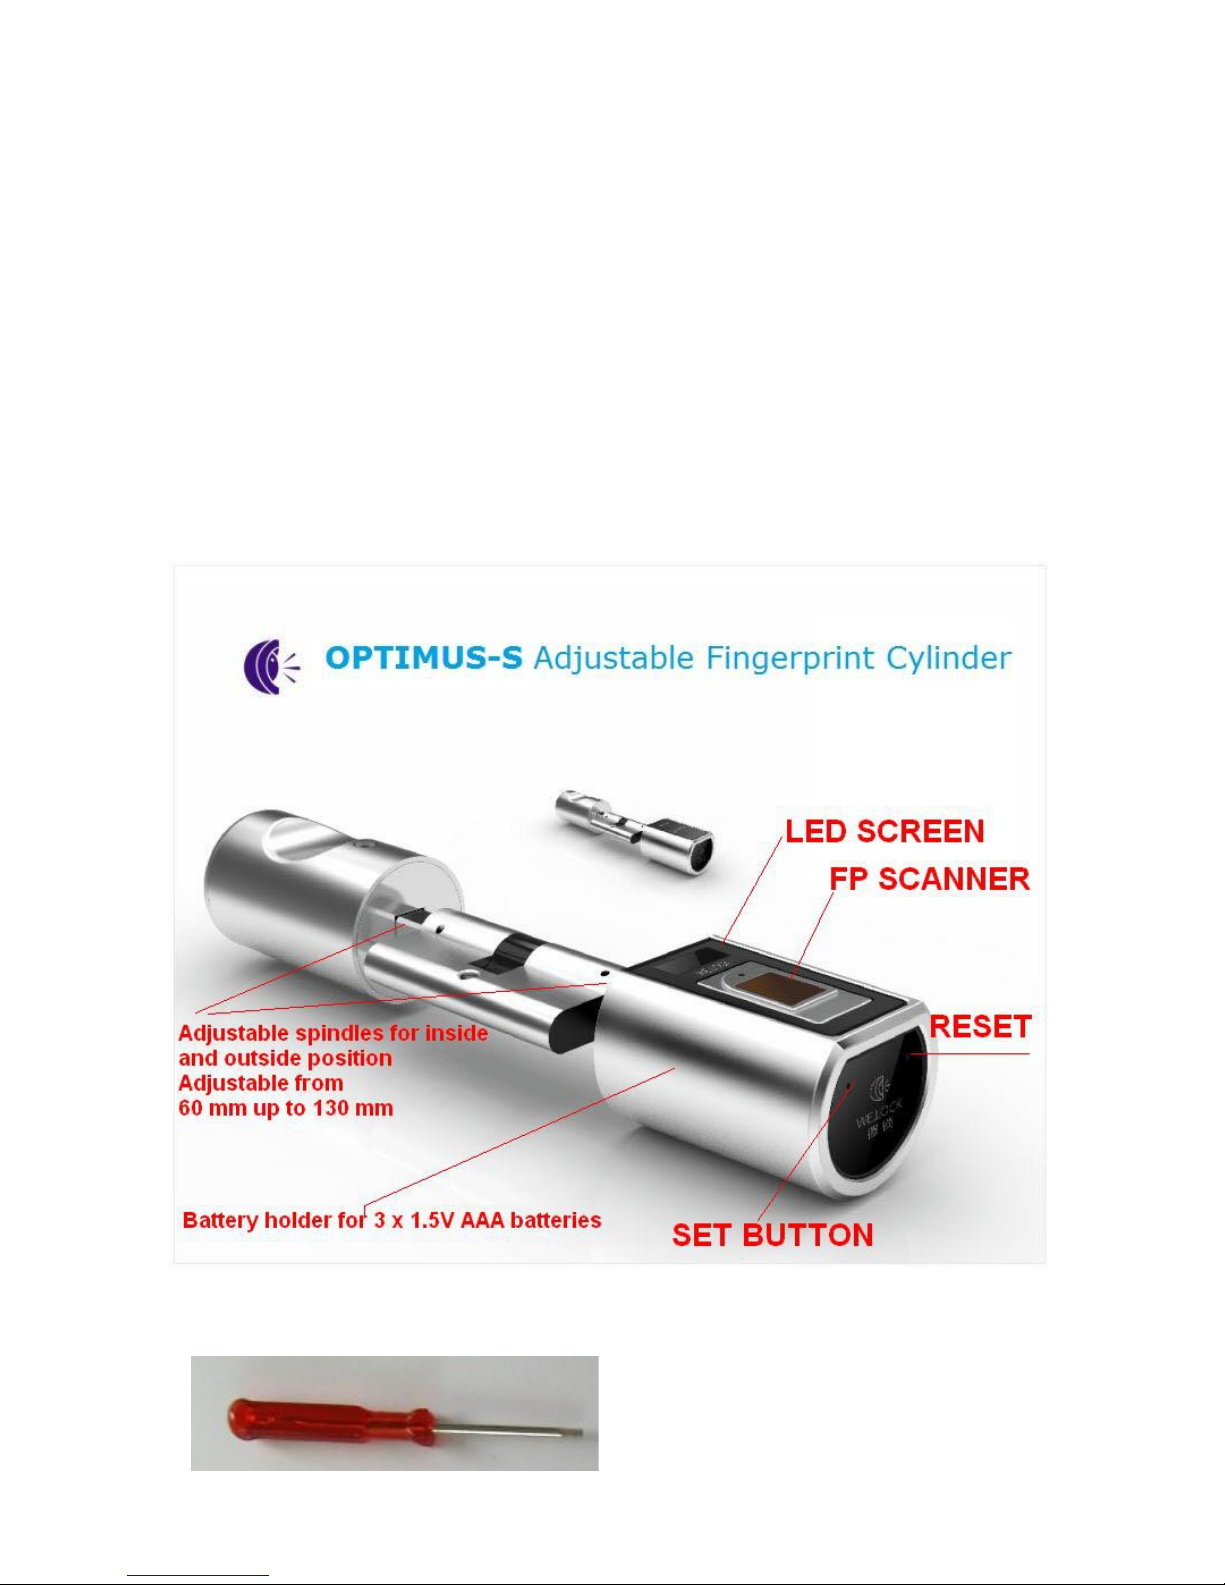
Use the screwdriver to remove the cover from fingeprint head (delivered with Product).
Install x 1.5 V AAA alkaline batteries to power on cylinder ( please pay attention to the Plus-n-
Minus positions of the batteries). The screen will show ‘ Welcome to use YOUDO Sm rt Lock’ ,
then lock body will be in st ndby st tus.
4. Unlock oper tion
4.1 When there is no registered Admin or User, then anyone can start unlock operation by
gently pressing any finger on the fingerprint sensor.
When you put your finger on the scanner the screen will show that “ No FP Regist. NOT SAFE”.
This is because there is no Admin enrolled yet, so the system uses Factory Settings.
4.2 Adding Admin for the fisrt time:
Use this small key to press SET and RESET buttons (delivered with the Product).
Short press the "SET" button once (1x), you will see “Sys Config”, Press SET button one
time again and you will see Add Admin FP. Wait for 2 seconds, you will see text “Add FP No 1”
and then consecutively REGISTER s me fingerprint three times (text on the screen will
prompt you e ch time to l y finger on it),
Admin fingerprint was added successfully.
4.3 Adding second nd third Admin fingerprint
Short press the "SET" button two times, then you need to verify the first Admin fingerprint
you have saved in the system.
System enters into Adding m n gement after two seconds and prompt you to register “Add FP
2”, consecutively register second fingerprint three times,
Admin was added successfully. Now you can add third Admin if you want, using the same
procedure.
Note: the first three registered fingerprints are automatically considered to be Admin fingers, so be
wise to whom you grant the second and third fingerprint because they are also able to manage
settings, add and remove users.
4.4 Adding ordin ry user fingerprint
Short press the "SET" button three times, you will see ADD User on the screen, then you
need to verify first Admin fingerprint you have saved in the system.
Start to register user fingerprints after successful verification of your Admin finger.
You can continue adding as many users as you want or need to register.

When you finish registering new users then just press RESET button once (1x) to confirm changes.
5.0 Delete single user fingerprint
Short press the "SET" button four times (4 x) , now you need to verify Admin fingerprint, then
system shows “Delete User 04”.
You have 2 seconds to press user finger 04 to be deleted. Screen will show FP No 04 Deleting.
After deletion screen will show “Delete FP 05”. You may continue to delete next fingers, or let the
system to close itself after two seconds.
IMPORTANT:
To delete p rticul r user (let s y his user FP is No. 10), you just press SET button g in
when you see on the screen “Delete User 04”, until you re ch number 10 on the screen;
then user number 10 press his finger on the sc nner to be deleted.
You m y keep pressing SET button do next user number(s) is you need to delete p rticul r
users (number 13, 20 etc.).
Press RESET button 1 x (once) to confirm oper tion when you finish.
Note: you should keep User Records in a notebook or computer of all your users with their name
and registered FP number under which they have registered their finger(s).
5.1 Delete ll user fingerprints
Short press SET button four times (4 x) until you see “Delete ll User” on the screen.
Verify your Admin finger. System will delete all user fingerprints and let you know: “All User FP
Deleted”
5.2 Delete Admin fingerprint
Short press the "SET" button nine times (9x), until you see “RESTORE TO INIT. STATUS”
Now you need to verify your first registered Admin fingerprint (you will see text on the screen
prompting to do this), then the system automatically enters into deleting ALL fingerprints,
including Administr tor fingerprints.
If you h ve Remote opener(s) registered they lso will be deleted.
If you use Bluetooth then this connection will lso be dis bled.
Your cylinder h s entered FACTORY SETTINGS, so everyone c n enter your room.
Note: Only Admin is ble to execute this oper tion by using his first registered Admin
fingerprint number 01.
No other possibility exist to remove Admin fingerprint nd to m ke system roll b ck to
F ctory Settings.

Note: Ple se m ke sure th t you h ve set FACTORY SETTINGS in cylinder before you send
it to us for rep irment.
5.3 Verify deletion
Short press the "RESET" button once (1x).
6.0 Locking time
Short press the "SET" button eight times (8 x). You need to verify Admin fingerprint, then screen
shows you how many seconds is present locking time (8 seconds).
Shortly press "SET" button if you want to increase locking time, one press is one second increase,
etc.
The door lock motor reverse time is set successfully. Shortly press the "RESET" button.
7.0 L ngu ge setting
Short press the "SET" button SEVEN TIMES (7 X). You need to verify Admin fingerprint, then
system enters Language setting automatically after 2 seconds. S
Shortly press "SET" button, the screen will show and change “Chinese” and “English”
Press SET button once (1 x) for Chinese, press twice 2 x to get back to English language.
8.0 Unlock oper tion
The user put the finger on the fingerprint sensor directly, system will sound a wonderful music. If
matched successfully lock will open for 8 seconds to enable user to enter the room.
System will beep in quick intervals if fingerprint was not recognized. User should verify fingerprint
again, or use next registered finger.
Good to know tips:
Please gently press finger to scanner surface by touching wireless symbol to wake up the system
and ensure fingerprint authentication process. Please keep fingerprint surface flat so that reader
can generate image of your fingerprint skin and make encrypted code out of it. This code is then
stored in system memory. Note: fingerprints will stay in PCB even if batteries run out because
system uses flash memory.

System shut down: If continuous fingerprint validation is invalid for more than 5 times, then the
system will enter into shut down state for three ( ) minutes.
After three minutes the system will wake up again.
Prec utions for use
a/ System prompt for low battery:
When low battery, the screen will prompt “ Low b ttery, ple se ch nge”, the buzzer will beep,
then please replace batteries in time.
B/ We suggest to register two or more fingerprints per User in case one of fingerprints cannot be
used.
How to djust inside spindle lenght:
Use screwdriver (included in package) and unscrew small inbus (hex) screw until you can pull
handle to desired length. Tighten the screw again into appropriate recess fixing position (there
is a small recess made every 5 mm on a spindle).
How to djust outside spindle length:
Use screwdriver to remove round Stainless Steel cover. Now you will see plastic cover. Pull it
off (see arrow symbol for right direction)..
You see three batteries: take out battery in the middle of battery holder. You will find inbus /
hex screw under that battery, in the middle of the holder. Unscrew it enough to be able to pull
body to desired position. Find recess most close to that position and fix the screw back.
W rr nty note: If you encounter ny kind of problem, ple se cont ct us first for dvise
nd rep ir.
Do not open fingerprint sc nner or dism ntle cylinder for wh tever re son s long s
Product is under W rr nty. If you do so the W rr nty will be NULL nd VOID.
Sales and Service:
ArtGu rd Security info@ rtgu rdsecurity.eu
Albert Plesm nweg 3A www. rtgu rdsecurity.eu
4462 GC Goes, Netherl nds
+31 (0) 113 270360
Table of contents
Other We.lock Door Lock manuals