weha EP 800 User manual

ISO
ze rt if izie rt
Vacuum lifter EP 800 / 600 / 400 / 300 / 150 - Operating instructions
File: D:\\Bedienungsanleitungen\Englisch\Vakuumheber EP 800 600 400 300 150
Revision/ Erstellt am: 4/ 12.10.2001
Page: 1 of 11
Vacuum lifter EP 800 / 600 / 400 / 300 / 150
Description Vacuum lifter
Type
EP 150 EP 300 EP 400 EP 600 EP 800
Machine’s/ Serial no.
Manufacturing year 2003
Remote-control device (optional)
Injector valve (optional)
Contents
1Contact......................................................................................................................................................2
2Conformity declaration “CE”..................................................................................................................2
3Symbols and warning instructions........................................................................................................3
3.1 Warning instructions on the Vacuum lifter EP......................................................................................................................3
3.2 Symbols in the operating instructions..................................................................................................................................3
4Regulations for the use of the Vacuum lifter EP ..................................................................................3
4.1 Field of application of the Vacuum lifter EP..........................................................................................................................3
4.2 Inappropriate application.......................................................................................................................................................4
4.3 Safety regulations...................................................................................................................................................................4
4.4 Safety device of the Vacuum lifter EP ...................................................................................................................................4
4.5 Machine identification plate...................................................................................................................................................5
4.6 Technical and structural data ................................................................................................................................................5
4.6.1 Vacuum lifter EP 150.......................................................................................................................................................5
4.6.2 Vacuum lifter EP 300.......................................................................................................................................................5
4.6.3 Vacuum lifter EP 400.......................................................................................................................................................5
4.6.4 Vacuum lifter EP 600.......................................................................................................................................................5
4.6.5 Vacuum lifter EP 800.......................................................................................................................................................5
4.7 Supply and connections ........................................................................................................................................................5
Picture 1b
Overall view of the Vacuum lifter EP 150
Picture 1a
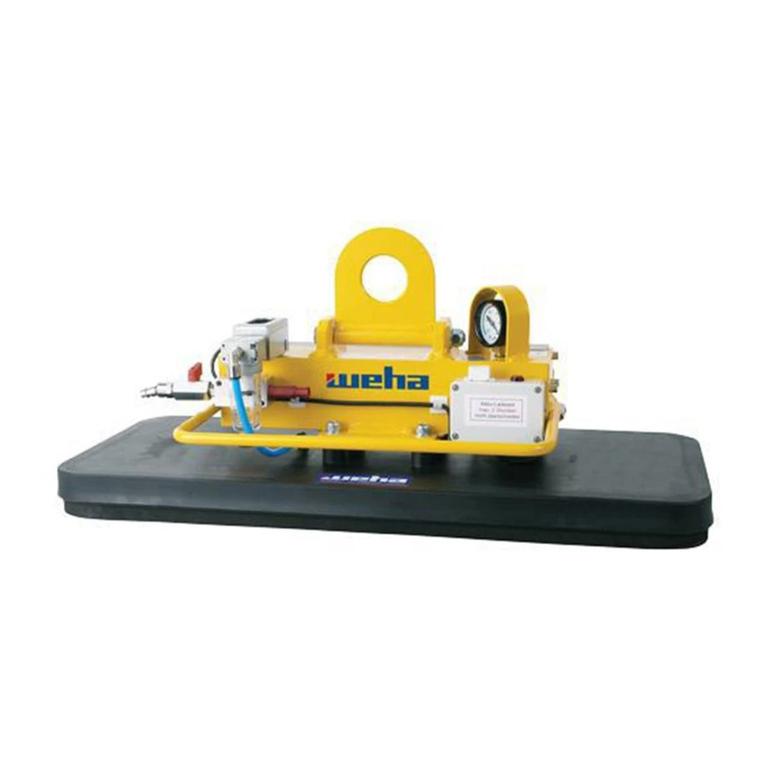
Overall view of the Vacuum lifter EP 800

ISO
ze rt if izie rt
Vacuum lifter EP 800 / 600 / 400 / 300 / 150 - Operating instructions
File: D:\\Bedienungsanleitungen\Englisch\Vakuumheber EP 800 600 400 300 150
Revision/ Erstellt am: 4/ 12.10.2001
Page: 2 of 11
5Assembly ..................................................................................................................................................5
5.1 Removing the transportation packaging...............................................................................................................................6
5.2 Scope of supply......................................................................................................................................................................6
5.3 Assembly instructions ...........................................................................................................................................................6
6Operating instructions of the Vacuum lifter EP....................................................................................6
6.1 Preparing the Vacuum lifter EP..............................................................................................................................................6
6.2 Transporting by means of the Vacuum lifter EP...................................................................................................................6
6.3 Operating the additional assembly groups (optional)..........................................................................................................8
6.3.1 Vacuum lifter EP with remote-control device....................................................................................................................8
6.3.2 Vacuum lifter EP with pneumatic injector valve................................................................................................................9
7Maintenance .............................................................................................................................................9
7.1 Maintenance............................................................................................................................................................................9
7.2 Inspection................................................................................................................................................................................9
8Parts list..................................................................................................................................................10
1 Contact
For any questions and orders please contact the WEHA-Ludwig Werwein GmbH or directly the manufacturer:
In Germany
In Austria
WEHA-Ludwig Werwein GmbH
WEHA Steinbearbeitungsmaschi-
nenvertriebsgesellschaft m. b. H.
Our website :
Postfach 13 55
86331 Königsbrunn/ Augsburg
Lange Gasse 17
Wikingerstr. 15
A-1080 Wien
http://www.weha.com
86343 Königsbrunn/ Augsburg
Telefon: +49 (0) 8231 / 60 07-0
Telefon: +49 (0) 1 / 40 39 340
Telefax: +49 (0) 8231 / 60 07-148
Telefax: +49 (0) 1 / 40 88 762
E-mail: info@weha.com
E-mail: [email protected]
E-mail: office.[email protected]
2 Conformity declaration “CE”
Conformity declaration EG
EWG No. 89/392/EWG
(EN 292)
Manufacturer:
DREMA GmbH
Wikingerstraße 15
86 343 Königsbrunn
Tel.: 08231 / 91 69 - 22
Fax: 08231 / 91 69 - 24
Machine type: Vacuum lifter EP
Application: To lift stone slabs
Machine No.:
Signature:
Erich Eberle
Hereby we certify that the above-mentioned machine corresponds to the requirements of the above guideline.

ISO
ze rt if izie rt
Vacuum lifter EP 800 / 600 / 400 / 300 / 150 - Operating instructions
File: D:\\Bedienungsanleitungen\Englisch\Vakuumheber EP 800 600 400 300 150
Revision/ Erstellt am: 4/ 12.10.2001
Page: 3 of 11
3 Symbols and warning instructions
The following explanations of the symbols occurring on the machine or in the operating instructions should help you to understand them.
3.1 Warning instructions on the Vacuum lifter EP
The following warning symbols can occur on the machine:
This symbol points out the availability of the operating instructions and warns the operator to read these
instructions before the installation or the commissioning of the machine.
This warning sign occurring on the machine points out to the operator the existence of electrical current, whose
strong enough to cause an electric shock to the operator by contact with the danger point. In such a place health
or life are at risk.
This warning sign warns the operator to wear ear-protection and goggles.
3.2 Symbols in the operating instructions
The following symbols can occur in the operating instructions:
This exclamation mark, framed in a equilateral triangle, draws attention to a very important information and
recommends the operator to read and follow it with particular attention.
Obligation to recycle waste materials into the production process to help safeguard the natural resources and
save the environment.
Marking of switches, articles, etc. in the pictures of this operating manual. The first number begins with the letter
A, for the marking (e.g. article D) and the second number is the current numbering of the picture (e.g. picture 6.2)
within a section e.g. 6.1 Inspection. The marking always refers to the accompanying or following description;
otherwise the description refers to a marking in another picture.
4 Regulations for the use of the Vacuum lifter EP
Please pay attention to the information about the use of the machine.
Attention: danger of injury!
The inappropriate use leads to personal injuries and damage of materials!
The machine is especially conceived for one or several application fields.
The following chapters explain the possible applications and the dangers during the use.
4.1 Field of application of the Vacuum lifter EP
You’ve bought a quality product of WEHA-Ludwig Werwein GmbH.
The Vacuum lifter EP is a device to facilitate the movement of stone slabs.
Please note the following characteristics:
•Easy and fast movement of stone slabs, without electricity and compressed air
•Robust overall structure construction
•High lifting capacity of one stone slab
•Optical and sound warning device to warn early possible failure.
D2

ISO
ze rt if izie rt
Vacuum lifter EP 800 / 600 / 400 / 300 / 150 - Operating instructions
File: D:\\Bedienungsanleitungen\Englisch\Vakuumheber EP 800 600 400 300 150
Revision/ Erstellt am: 4/ 12.10.2001
Page: 4 of 11
4.2 Inappropriate application
The Vacuum lifter EP can be exclusively used to move stone slabs.
•Use the Vacuum lifter EP for the intended purposes and do without means, which can damage the metal or other parts!
•The Vacuum lifter EP is completely and particularly appropriate for the indicated ranges of application.
•Do not place any object between the stone slab and the sealing lip of the Vacuum lifters EP.
•Never walk under moving load!
4.3 Safety regulations
•Please read thoroughly these operating instructions before using the Vacuum lifter EP!
•Keep the operating instructions carefully in the proximity of the Vacuum lifter EP, for a future reference when in doubt.
•Unconventional changes or installing of additional devices will lead to the cancellation of any liability by the dealer or
manufacturer!
•Remove all articles from the work area, which can be a possible source of danger!
•Only authorized persons may use the Vacuum lifter EP. Each user must have read and understood this documentation!
•Before each use check the basic parts and welding seams for damages! In case of defects don’t use the Vacuum lifter EP,
the use by unauthorized persons must be prevented by suitable measures!
•Check the sealing lip for damage and in case of damage take out of operation, by making the machine unusable making
sure that there’s no danger to other people!
•Make sure that the ground in the work area is solid and is not liable to subsidence!
•Make sure that the battery of the warning device is sufficiently charged. The safety regulations of the battery charger are
enclosed in the operating instructions of the battery charger!
•Make sure that the area, on which you put the stone slab, has enough load capacity!
•Make sure that the sealing lip of the vacuum lifters EP is completely in contact with the stone slab!
•Make sure that the stone slab is dry and dust-free before coming in contact with the vacuum lifter EP. The surface of the
stone slab must be smooth ground in the contact surface of the vacuum lifters EP. The face of the stone slab must be an
even plane!
•Make sure that the Vacuum lifter EP is placed in the middle of the stone slab. Consider the possible subsidence too!
•Avoid excessive swinging or vibration of the moving load!
•The max. admissible load is to be found on the machine identification plate or in the technical data on chapter 4.6.
•Only one stone slab at a time may be lifted and transported by means of the Vacuum lifter EP!
•Keep the working area clean and provide sufficient lighting!
•Never walk under moving load!
•While handling the vacuum lifter EP always wear the appropriate protective clothing, in accordance with the valid rules for
the prevention of accidents!
•This includes:
•Working gloves and working clothes in accordance with the valid regulations!
•Safety shoes in accordance with the valid regulations!
•Safety helmet in accordance with the valid regulations!
•Use only suitable work pieces. Do not lift slabs liable to crack or break during the work.
•Check to ensure during use that nobody is in the proximity of the equipment, in order to avoid danger to other personnel!
•Check to see whether all the parts are correctly installed!
•In case of damage or malfunction of the machine, please contact the dealer or the manufacturer immediately!
•Protect the machine against the weather, e.g. rain, sun, humidity and etc.!
•In case of irreparable damage or other reasons which prevent the use of the machine in the long-term, cease its operation,
by making the machine unusable thus making sure that there’s no danger to other people!
•If disposing of the machine or parts thereof, dismantle and separate the different materials which can then be
disposed of to be recycled!
4.4 Safety device of the Vacuum lifter EP
The Vacuum lifter EP has been manufactured according to the general regulations for mechanical engineering.
Safety features include:
•The red warning lamp lights, when the warning device is switched on and if the required vacuum is falling.
•The audible alarm sounds when the warning device is switched on and if the required vacuum is falling.
•A vacuum gauge for constant vacuum control during the lifting process.
•The safety cover on the blue hand slide valve prevents the accidental opening of the hand slide valve.

ISO
ze rt if izie rt
Vacuum lifter EP 800 / 600 / 400 / 300 / 150 - Operating instructions
File: D:\\Bedienungsanleitungen\Englisch\Vakuumheber EP 800 600 400 300 150
Revision/ Erstellt am: 4/ 12.10.2001
Page: 5 of 11
4.5 Machine identification plate
The identification plate informs about the origin, identity as well as year of
construction and, if necessary, about the maximum carrying capacity.
By the supply please compare the identification plate with the data on the
first side of the operating instructions. If the data differ from each other,
please contact immediately the dealer or the manufacturer.
4.6 Technical and structural data
4.6.1 Vacuum lifter EP 150
Total height [cm]
19 cm
Max. Load capacity [kg]
150 kg
Total width [cm]
55 cm
Net weight [kg]
13 kg
Total length [cm]
33 cm
Suction area [cm x cm]
50 cm x 11 cm
4.6.2 Vacuum lifter EP 300
Total height [cm]
19 cm
Max. Load capacity [kg]
300 kg
Total width [cm]
55 cm
Net weight [kg]
14 kg
Total length [cm]
33 cm
Suction area [cm x cm]
54 cm x 15 cm
4.6.3 Vacuum lifter EP 400
Total height [cm]
19 cm
Max. Load capacity [kg]
400 kg
Total width [cm]
51 cm
Net weight [kg]
19 kg
Total length [cm]
40 cm
Suction area [∅cm]
∅40 cm
4.6.4 Vacuum lifter EP 600
Total height [cm]
19 cm
Max. Load capacity [kg]
600 kg
Total width [cm]
61 cm
Net weight [kg]
22 kg
Total length [cm]
40 cm
Suction area [cm x cm]
60 cm x 25 cm
4.6.5 Vacuum lifter EP 800
Total height [cm]
24 cm
Max. Load capacity [kg]
800 kg (lying stone slab)
Total width [cm]
35 cm
Net weight [kg]
45 kg
Total length [cm]
75 cm
Suction area [cm x cm]
70 cm x 30 cm
4.7 Supply and connections
Battery charger - Electrical supply
230V / 50Hz
Compressed air supply (optional)
Filtered and lubricated with pressure of max. 8,0 bar
5 Assembly
Please read carefully the information in the chapter “Assembly” and follow it precisely. The manufacturer or the company WEHA-Ludwig
Werwein GmbH will not be liable for any damage due to incorrect assembly.
On receipt, check the supplied commodity for any damage during transportation and packing. Advise the manufacturer/agent
immediately about any damage!
The dealer/manufacturer are not liable
for any defects caused by incorrect assembly and incorrect application!
Please follow precisely the safety regulations in chapter 4.3 !

ISO
ze rt if izie rt
Vacuum lifter EP 800 / 600 / 400 / 300 / 150 - Operating instructions
File: D:\\Bedienungsanleitungen\Englisch\Vakuumheber EP 800 600 400 300 150
Revision/ Erstellt am: 4/ 12.10.2001
Page: 6 of 11
5.1 Removing the transportation packaging
The vacuum lifter EP is usually delivered in cardboard packaging.
Before unpacking please compare the attached delivery note with the supplied articles!
Remove the transportation packing:
•Release the adhesive strips and/or the strapping belts and unpack the contents carefully!
•Be careful by unpacking the vacuum lifter, in order to prevent it from damage!
•Heavy contact of the vacuum lifter on sharp edges can damage the surface protection and/or parts of the assembly!
•Dispose of the packing wastes for recycling according to the local guidelines!
5.2 Scope of supply
Before beginning the assembly, please check precisely to see whether all necessary parts are available. If the scope of the supply is not
complete contact the dealer or the manufacturer immediately.
Scope of supply consists of:
•1 x Vacuum lifter EP with battery charger
•1 x Operating instructions
•1 x Remote-control device (optional)
5.3 Assembly instructions
The Vacuum lifter EP is delivered already assembled. Assembly of the individual parts is thus not necessary.
6 Operating instructions of the Vacuum lifter EP
The aim of this chapter is to inform you of the correct application of the machine. Consider the operating instructions in every detail!
Take care that any sharp edged articles do not damage the protective layer of the metal parts!
The dealer and/or manufacturer is not liable for any defects caused by incorrect assembly!
Please follow precisely the safety regulations in chapter 4.3 !
6.1 Preparing the Vacuum lifter EP
Before using the Vacuum lifter EP make sure that the warning device’s battery is completely charged.
Picture 6.1 – Warning device
•Connect the battery charger BCA 120-600 to the electrical outlet 220-230V /
50Hz.
•Connect the cable exit of the battery charger with the connector [A1] of the
warning device, which has to be charged.
•Check to see whether the charge control indicator on the battery charger lights
up.
•When the charge control indicator goes out, it doesn’t mean that the battery is
completely recharged.
•Take the battery charger off the general power outlet and disconnect the
warning device.
6.2 Transporting by means of the Vacuum lifter EP
•Place the stone slab so that it can be transported by means of the vacuum lifter EP. The suction area of the vacuum lifter EP
must be completely in contact with the stone. Please find the technical data about the contact area of the vacuum lifter in
chapter 4.6
•The Vacuum lifter EP must be placed in the center of the stone slab. Now find the technical data concerning the contact area
of your Vacuum lifter in the chapter 4.6
•Make sure that the stone slab placed in the contact area of the Vacuum lifter EP is dust-free and dry. The stone slab’s surface
must be plane ground in the contact area of the Vacuum lifter EP and moreover the stone slab must have an even plane!
•Now place the Vacuum lifter EP in the middle of the stone slab.
A1

ISO
ze rt if izie rt
Vacuum lifter EP 800 / 600 / 400 / 300 / 150 - Operating instructions
File: D:\\Bedienungsanleitungen\Englisch\Vakuumheber EP 800 600 400 300 150
Revision/ Erstellt am: 4/ 12.10.2001
Page: 7 of 11
•Make sure that the sealing lip of the Vacuum lifter EP lays completely and correct on the stone slab. Make sure that it doesn’t
twist.
Picture 6.2 – Vacuum lifter EP
•Push the blue ring of the hand slide valves [A2] on the right. The warning device gives off a sound warning signal and the red
lamp [B2] lights. The operator is thereby warned that the necessary vacuum of -0,8 bar is not available. If the vacuum lifter is
already in use, a residual vacuum is still available in the safety tank [C2]. If the warning device, the warning signal and the red
lamp [B2] are not activated, it is possible that the necessary vacuum is still available at the moment.
•Activate now the pneumatic cylinder by pulling out to the right the handle [D2] of the piston and by retracting again to the left.
Repeat the procedure till the Vacuum gauge [E2] shows a vacuum of -0,8 bar.
•At a vacuum pressure of -0,8 bar the red lamp [B2] and the sound warning signal will stop.
•Make sure that there’s no vacuum loss. It’s important that the indicator on the vacuum gauge doesn’t move [E2] . If losing
vacuum, the stone slab can’t be transported. The sealing lip and the contact area must be checked and the vacuum has to be
produced again. If the condition occurs again have the lifter checked by a technician.
•Now connect the Vacuum lifter EP by means of the eye [F2] to the lifting equipment.
•Make sure that the lifting tackle and the lifting equipment have the necessary load capacity to carry and transport the gross
lifting weight. Don’t exceed the admissible load capacity of your lifting equipment (see the technical data in chapter 4.6! .
•Lift the vacuum lifter EP by means of the lifting equipment until the stone slab is hanging.
•Make sure that the stone slab is hanging horizontally if it’s possible. In case of inclination the stone slab must be appropriately
placed, otherwise it may come loose from the Vacuum lifter EP!
•Now you can lift the stone slab to the travelling height.
•Make sure that whilst transporting there are no vibrations and that the stone slab does not swing.
Attention danger!
If during the transport the sound warning signal sounds or the red lamp [B, Picture2] lights, you have to
take the stone slab off immediately!
In case of emergency the vacuum can be quickly produced again by operating the pneumatic cylinder, to
avoid a dangerous occurrence!
•Make sure that the area, on which the stone slab is placed, has enough load capacity!
•When the stone slab is in position and fastened, push the blue ring of the hand slide valve [A2] to the left. The vacuum
chamber will be ventilated and the vacuum safety tank [C2] will retain the vacuum.
•Now you can remove the vacuum lifter EP from the stone slab.
Vacuum lifter EP 800:
•The vacuum lifter EP 800 may be placed only in vertical, erect position on the standing stone slab. Attention: max. admissible
load capacity in this application case is 600 kg!
•In this application case you can use the appropriate eye [Picture 6.2; G2]. This second eye is available only on the Vacuum
lifter EP 800.
E2
C2
A2
D2
B2
F2
G2

ISO
ze rt if izie rt
Vacuum lifter EP 800 / 600 / 400 / 300 / 150 - Operating instructions
File: D:\\Bedienungsanleitungen\Englisch\Vakuumheber EP 800 600 400 300 150
Revision/ Erstellt am: 4/ 12.10.2001
Page: 8 of 11
6.3 Operating the additional assembly groups (optional)
6.3.1 Vacuum lifter EP with remote-control device
For the additional safety regulations see paragraph 4.3.
Attention danger!
Take care that the remote-control device can not be accidentally released!
Attention danger!
Ensure that no strong electro-magnetic fields are in the proximity, e.g. mobile phones, electrified rails,
power lines or similar!
•The vacuum lifter EP with remote-control device should not be used near strong electro-magnetic fields. Do not keep in close
proximity or do not use any mobile phone whilst in operation.
Picture 6.3 – Remote-control device
•You can operate the hand slide valve by means of
remote-control device, comprising the receiver [A3],
the remote-control device [B3] and the control valve
[C3].
•Before putting into operation make sure that the 9V-
Block-Battery of the remote-control device has
enough power.
Picture 6.4 - Remote-control device
•Instead of the instruction „Turn the blue ring of the
hand slide valve [A2] to the right [Picture 6.2]“
[Paragraph 6.2] push the gray button [B4] of the
remote-control device [A4].
•The remote-control device [A4] must show with the
front side (the side with the red warning light [D4]) to
the receiver [E4]. If the remote-control device [A4] is
used in the right way, both red warning devices [D4]
light.
•Now you must operate the pneumatic cylinder again,
as explained in paragraph 6.2 from point 8.
•After setting down and securing the stone slab,
press the red button [C4] of the remote-control
device. The vacuum chamber will be now
ventilated and the vacuum safety tank retain the
vacuum.
B3
C3
A3
C4
D4
A4
B4
E4

ISO
ze rt if izie rt
Vacuum lifter EP 800 / 600 / 400 / 300 / 150 - Operating instructions
File: D:\\Bedienungsanleitungen\Englisch\Vakuumheber EP 800 600 400 300 150
Revision/ Erstellt am: 4/ 12.10.2001
Page: 9 of 11
6.3.2 Vacuum lifter EP with pneumatic injector valve
•The pneumatic injector valve can be individually installed on the vacuum lifter EP as an expansion kit!
Picture 6.5 - Vacuum lifter EP with injector valve
•The application of the pneumatic cylinder will be
completed with the pneumatic injector valve [A5]. The
vacuum can be produced by means of the pneumatic
injector valve [A5] as well.
•Before using the pneumatic injector valve [A5], first of all
connect the compressed air supply to the compressed-
air nipple [B5]. Max. air pressure is 10,0 bar.
•Instead of the instruction „Operate the pneumatic
cylinder,....“ [Paragraph 6.2; Point 8] the vacuum will be
produced by opening the hand valve [C5] in arrow’s
direction.
•The momentary vacuum appears on the vacuum gauge
[D5].
•When the vacuum of -0,8 bar appears on the vacuum
gauge [D5] close anticlockwise the hand valve [C5]. The
evacuation takes approximately 1 minute, if the vacuum
safety tank had not already emptied.
7 Maintenance
The operator of the vacuum lifter EP must be instructed in the following activities by a person with the
appropriate training !
The manufacturer is not liable for any damage due to neglect of these instructions!
Please follow precisely the safety regulations in chapter 4.3!
7.1 Maintenance
The Vacuum lifter EP does not require regular maintenance.
•The sealing lip of your Vacuum lifter must be cleaned monthly and checked for damage.
7.2 Inspection
•The Vacuum lifter EP is a load carrying attachment! The user of the Vacuum lifter EP must make sure that
an expert checks it at least once a year! (§ 40, Abs. 1, VBG 9a)
•The next test for the Vacuum lifter EP is shown on the yellow mark „nächster Prüftermin“. (e. g. April
2003)
•Only the persons, who have the necessary knowledge and training may implement repairs and welds
(poisoning danger!)
•You can have your vacuum lifter EP checked by an expert at the manufacturers, ask us!
Please follow precisely the safety regulations in chapter 3.3!
This inspection has to be executed at least once a year.
•Check the vacuum lifter EP once a year for rusty parts, in particular all the welded seams.
•Remove the rust and protect these parts by means of an appropriate anti-corrosive agent, e.g. zinc spray.
•Check the rubber sealing lip for damages and if necessary have it changed by the dealer or the manufacturer.
Only the persons, who have the necessary knowledge and training may implement repairs and welds
(poisoning danger!)
Picture 7.1
Test mark
A5
B5
C5
D5

ISO
ze rt if izie rt
Vacuum lifter EP 800 / 600 / 400 / 300 / 150 - Operating instructions
File: D:\\Bedienungsanleitungen\Englisch\Vakuumheber EP 800 600 400 300 150
Revision/ Erstellt am: 4/ 12.10.2001
Page: 10 of 11
8 Parts list
In the following chapter you find the part list for the vacuum lifter EP. Please consider by orders of spare parts that a smooth completion
can take place only by full information about the data specified into the part list. Thus always indicate by an order the quantity, the
piece’s description, the article number and if it’s necessary the abbreviation.
Only the manufacturer may implement repairs!
Unconventional repairing or use of non-manufacturers parts will lead to the cancellation of any liability
and right to claim under guarantee by the dealer or manufacturer.
Pos. Quantity Description Abbreviation Werkpc.
1 1 Suction plate for EP 150 vulcanized Art. No. VD080088
1 1 Suction plate for EP 300 vulcanized Art. No. VD080043
1 1 Suction plate for EP 400 vulcanized Art. No. VD080215
1 1 Suction plate for EP 600 vulcanized Art. No. 8020823
1 1 Suction plate for EP 800 vulcanized Art. No. VD080120
2 1 Pneumatic cylinder for EP 150 / EP 300 / EP 400 / EP 600
2 1 Pneumatic cylinder for EP 800 P2 63 H400 S/2
3 1 Foot ISO 6431 ∅63
4 1 Vacuum safety tank
5 1 (2) Eye (by EP 800)
6 1 Screw M16 x 120 DIN 933
7 1 Nut M16
8 1 Check valve Europa ART 100 R 3/8
9 1 Sound absorber 3 SEP R 3/8
10 1 Vacuum meter Art. No. 8020818
11 1 Vacuum gauge’s screw connection MAVer 12 PLR A3C
12 1 Vacuum pressure switch Type 300 800 312 14
13 1 Hand slide valve R 3/8
14 1 Safety cover A 024 R 3/8
15 8 Screws M8 x 16
16 1 Grip plate
17 1 Handle
18 1 Bar
19 1 Halter bar right
20 1 Halter bar left
21 6 Pipe ∅12 x 1
22 1 Body Art. No. 8020817
23 1 Warning device switch Art. No. 8020816
24 1 LED
25 1 Connector
26 1 Buzzer
27 1 Battery 12V DC Art. No. VD080095
28 1 Mini-contact switch
29 1 Battery charger Art. No. VD080086
30 1 Hand transmitter
31 1 Receiver
32 1 3/2 control valve R 1/8
33 1 Connector
34 1 PG 11 C 18211 N21
35 1 Injector valve
36 1 Quick coupling - Type 26 NW 7.2
37 1 Plug nipple NW 7.2
38 1 Pipe bend

ISO
ze rt if izie rt
Vacuum lifter EP 800 / 600 / 400 / 300 / 150 - Operating instructions
File: D:\\Bedienungsanleitungen\Englisch\Vakuumheber EP 800 600 400 300 150
Revision/ Erstellt am: 4/ 12.10.2001
Page: 11 of 11
39 1 Warning device
40 1 Remote-control device (optional)
41 1 Pneumatic injector valve (optional) Art. No. 8020800
Vacuum lifter EP
Vacuum lifter EP 150 Art. No. 8010307
Vacuum lifter EP 300 Art. No. 8010305
Vacuum lifter EP 400 Art. No. 8010306
Vacuum lifter EP 600 Art. No. 8010308
Vacuum lifter EP 800 Art. No. 8010310

This manual suits for next models
4
Table of contents
Other weha Lifting System manuals