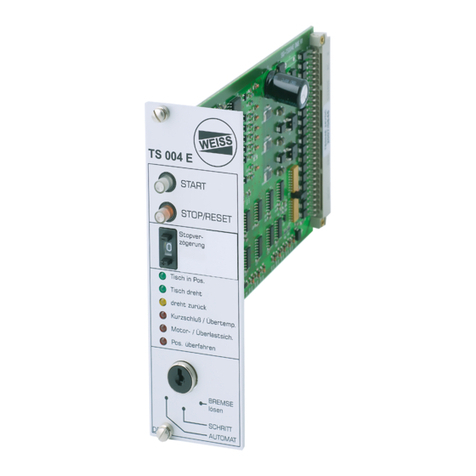
WEISS TS 002 E User manual

Operating Instructions
Control card TS002
Control card TS003
Control card TS004
980-200117001 / EN 11/2007
Technology that inspires

2
This documentation is copyright-protected. Duplication (even of extracts) is not permitted without the prior written
consent of WEISS GmbH.
WEISS GmbH reserves the right to make alterations to this documentation (also without prior notice).
WEISS GmbH is not liable for any technical or printing errors in this document. We accept no liability for damages
directly or indirectly related to the provision or use of this documentation.
This does not include damages arising from death, personal injury or damage to health or to such damages resulting
from a grossly negligent or deliberate infringement of obligations.
Release: November 2007
Copyright: WEISS GmbH Sondermaschinentechnik
Siemensstraße 17
D-74722 Buchen/Odw.
Tel.: +49 (0)6281/5208-0
Internet: www.weiss-gmbh.de

3
Table of Contents
1 Safety Instructions 4
1.1 Safety and application instructions 4
2 Controlling with the Electronic Control Card TS004 E 7
3 Technical Data 8
3.1 General specications 8
3.2 Terminal connection 9
4 Description of the Inputs and Outputs 10
4.1 Inputs 10
4.2 Outputs 12
5 Operating Controls 13
6 Installation Instructions 15
6.1 Card holder 15
6.2 Terminal PCB 15
6.3 Built-in housing 15
7 Wiring 17
7.1 Circuit diagram 17
7.2 Motor line 17
8 Trouble Shooting and Fault Finding 18
8.1 Trouble shooting 18
8.2 Fault report 18
9 Manufacturers Declaration 19

4
1. Safety instructions
1.1 Safety and application instructions
Validity:
These instructions apply to control cards in the model series:
TS 002 E
TS 003 E
TS 004 E
Symbols:
Warnings are emphasised by a safety symbol and are shown as follows depending on the degree of risk:
Importance of the operating instructions:
This manual contains important information for working safely with the control card. It contains safety instructions which
must be observed as well as information necessary for trouble-free operation. The operating instructions must be kept
with the device. It must be ensured that all persons who work at the device have access to the operating instructions at
all times.
In addition to the operating instructions for the control card, the operating instructions for the indexing table and the
operating regulations subject to the labour protection laws must also be provided.
The operating instructions must be kept in a safe place for further use and must be passed on to every subsequent
owner, user and end customer.
The indexing table with the control card may only be started up when the whole machine and control system, in
particularly the safety system, correspond to the machinery directive 98/37/EC.
Target group:
The operating instructions are aimed at persons who are involved in the planning, installation, starting-up, and
maintenance of the system and who have the qualifications and know-how appropriate for this work. Qualified personnel
are persons who have the necessary qualifications and who are familiar with the execution of the work cited above and
the operation of the system. All work in other areas such as transport, storage and disposal must be carried out by persons
with the appropriate training.
Danger!
Imminent danger. Fatal injury, death or substantial material damage can be
caused if the appropriate safety measures are not taken!
Warning!
Minor injuries may occur if the appropriate safety measures are not taken.
Electrical hazard
Warning against hazardous voltage
Useful information

5
Danger!
In the case of inappropriate usage, incorrect installation or operation, there is a
risk of serious personal injury or material damage.
Warning!
Depending on the type, some of the components (e.g. motor) may have hot
surfaces during operation. Operating temperatures > 60 °C (> 140 °F) can occur.
Skin contact will cause burns.
Control and power connections may be carrying voltage even if the motor is
standing still. Never connect or disconnect the electrical connections of the
device when it is live.
General:
Prior to installation and starting up, please carefully read and observe all safety instructions, technical documentation and
connection data accordingly. National accident prevention regulations and all internal company regulations must be
observed.
Never install or operate damaged products.
The device must be installed in accordance with these regulations.
The control card must be protected against impermissible use. It contains components which are electrostatically
sensitive and which can easily be damaged by incorrect handling. Electrical components may not be damaged
mechanically or destroyed (possible health risk).
WEISS devices conform to the relevant VDE regulations. The VDE regulations must also be observed in the case of
modification or extension of the devices.
This documentation contains instructions for an installation in accordance with the EMC regulations. Compliance with
the limit values stipulated by EMC legislation is the responsibility of the manufacturer of the system or machine.
Unauthorised alterations and the use of spare parts and additional devices which are not recommended by the
manufacturer can cause personal injury or damage to the mechanism and the control system.
Before switching on the control card you must ensure that the motor housing is correctly earthed (PE rail).

6
EMERGENCY STOP:
Suitable protective devices in accordance with EN 60204 Part 1 must be used.
Danger!
Adequate protective devices, e.g. covers, protective grids, light curtains or
step sensors must be installed for operation in order to protect the operating
personnel from injury by the rotary indexing table.
In the case of an EMERGENCY STOP the motor line must be reliably interrupted in order to stop the supply of energy and
to ensure protection against unintentional re-starting. Interruption of the terminal “2“ (RESET) alone is not sufficient, as
these terminals require a functioning circuit.
In the case of an EMERGENCY STOP, interrupt the following lines:
- Motor line between the contactor and the motor
- Terminal “2“ (RESET/STOP) on the control card
Designated use:
This device is designed for industrial and commercial systems and conforms to the valid standards and regulations. All of
the instructions regarding technical data and the permissible conditions at the place of installation must be observed.
This device is a component for installation in machines. Start-up (start of designated operation) is not permitted until it
has been established that the machine is in conformance with the EMC directive 89/336/EEC and the end product is in
conformance with the machinery directive 89/37/EC.

7
2. Controlling with the electronic control card TS004 E
We provide this electronic control card for use in controlling our cam indexing tables (TC, TR and TS). This card monitors
the operation of the indexing table and also allows you to optimize the indexing time. The card provides for manual
operation as well as independent contol by your main PLC.
The indexing table is equipped with a control cam on the drive curve and a sensor. The sensor signals as soon as the
table is in the locked position. The control card will then stop the motor and signal to the main PLC.
The motor is stopped after a delay time which is set at the turn switch. This allows the drive to proceed to an ideal
starting position for the next cycle.
The drive must come to a standstill within the locking phase. This is monitored by the control card and in the event of an
error, reported as a fault (“Position overrun“). If this fault occurs, all processing stations must be immediately reset and the
motor voltage supply shut down, as the indexing table is not in the locked position (risk of crash).
The TS002 has been constantly upgraded. As of version TS003 the brake is controlled on a time-optimised basis and it
was possible to substantially reduce wear on the brake. As of version TS004 the motor temperature is monitored by a
temperature switch.
The control card remains downwards compatible, therefore in the event of replacement an earlier version can be
exchanged with the new TS004.

8
3. Technical data
3.1 General Specications
Operating voltage 24V DC +/- 10%
Power consumption typ. 40mA (without 24 V brake)
Power consumption brake 1.0 to 2.0 DC (depending on type)
Digital inputs Level: LOW: 0V to 5V
HIGH: 15V to 30V
Input current: 6mA
Digital outputs Output current: 100 mA (outputs: 4, 6, 7, 8, 9, 10)
Output current: 2.0 A (outputs: C, D, E)
EMV according to EC directive 89/336/EEC
Applicable harmonised standards:
EN 61 000-3 (harmonic current emissions)
EN 61 000-4 (disturbance immunity)
EN 55014-1 (interference emission)
Permitted temperature ranges Storage: -25 °C to 55 °C (-13 °F to 135 °F)
Operation: 0 °C to 40 °C (-32 °F to 104 °F)
Humidity 5 to 95%, without condensation
Dimensions Eurocard: 100 x 160mm

9
3.2 Terminal connection
Terminal Function Level Comment Multipoint plug, 32-pin
+ +24V Supply voltage 3/4/A/B
- GND (OV) Supply voltage 1/2/A/B
1 Rotation direction LOW CW
HIGH CCW
Input 24V 26A
2 Enable
(RESET/Stop)
LOW: - Disable
- Reset Alarm
HIGH: ENABLE
Input 24V 19A
3 Start“edge“ rising edge Input 24V 18A
4 Automatic Output 24V/100mA 16B
5 additional stop Log. “1“ activ Input 24V 18B
6 Alarm: Position overrun Output 24V/100mA 10B
7 Alarm: Drive time timeout
Motor overload
Output 24V/100mA 10A
8 Sum of alarms Output 24V/100mA 9A/B
9 Start permitted Output 24V/100mA 8B
10 Table in position Output 24V/100mA
Output 24V/100mA
8A
C Motor contactor “Forward“ Output 24V/2A 5A/B
D Brake Output 24V/2A 6A/B
E Motor contactor “Backward“ Output 24V/2A 14A/B
F Limit switch Log. “1“ activ Input 24V 15B
G Release brake Log. “1“ activ Input 24V 15A
H Start “level“ Log. “1“ activ Input 24V 17B
T Temperature sensor Log. “0“ activ Input 24V 17A

10
4. Description of inputs and outputs
4.1 Inputs
Terminal 1: Rotation direction
LOW Direction of rotation CW (right)
HIGH Direction of rotation CCW (left)
The signal must appear on the rising/leading edge of cam and the direction of rotation must be determined
(Output“C“ or“E“).
Terminal 2: Enable (RESET/Stop)
It is absolutely necessary to wire this input.
LOW - Disable (Motor STOP)
- Reset Alarm
HIGH Enable
At LOW all drive movements are locked (including manual mode).
Outputs“C“ and “E“ (motor contactor) and output “D“ (brake) are switched off immediately.
Danger!
Input “Terminal 2“ on the control card alone does not full the requirements
for the specication of EMERGENCY STOP and door circuits as it requires a
functioning wiring. In order to achieve the full EMERGENCY STOP functionality,
“Terminal 2“ and the motor line must be interrupted.
Terminal 3: Start (edge triggered)
A LOW/HIGH edge starts a complete cycle. The start impulse must have a minimum width of 20 msec. A permanent
signal will not trigger a new start.
The jumper“N-2H“ must be inserted on the left. The terminal “H“ has no effect.
Terminal 5: Stop
A HIGH level causes suppression of the start signal and an interruption of the drive movement.
Terminal “F“: Sensor
The connection of the sensor to the rotary indexing table. It signals when the cam has been reached and triggers a
motor STOP.

11
Warning!
Make sure that the motor line is properly disconnected to avoid hand injuries due
to the motor suddenly starting up.
Terminal “H“: Start status-controlled
A LOW/HIGH edge starts a cycle. In contrast to input “3“, this input must remain at HIGH during the whole drive time.
A LOW causes the table to stop immediately (in an intermediate position). No alarm is given. A permanent signal will not
trigger a new start, only a new change from LOW to HIGH. At this start input it is possible, for example, to connect a
two-hand trigger relay to ensure when one button is released the rotary indexing table is immediately stopped and the
started cycle can be completed after both buttons are pressed in accordance with the regulations.
The jumper “N-2H“ must be inserted on the right. Terminal “3“ will have
no effect.
Danger!
Danger Input “Terminal H“ on the control card alone does not full the
requirements for the specication of EMERGENCY STOP and door circuits as
it requires functioning wiring. In order to achieve the full EMERGENCY STOP
functionality, “Terminal 2“ and the motor line must be interrupted.
Terminal “T“: Temperature monitoring
Motors with a temperature switch (break contact) can be connected
here.
The break contact is connected between terminal “T“ and “Ground“. An
interruption of the line causes an alarm.
The jumper must be disconnected to activate this function. This
function is switched off as a default (jumper connected) in order to
ensure downwards compatibility.
This function is realised on the control card “TS004 E“. Older cards do not
have this input.
Terminal “G“: Manual mode brake
A HIGH signal opens the brake. The table cannot be started

12
Terminal 4: Automatic
This output signals HIGH when the front panel key switch is on“Automatic”.
Terminal 6: Alarm: Position overrun
This output signals HIGH when the indexing table has overrun the stop position.
Terminal 7: Alarm: Drive time timeout (motor overload)
This output signals HIGH when the indexing table has not reached the position cam approx. 10 seconds after the start
signal.
Reasons for this are:
- Rotating plate is restricted. Check whether all handlings have been fully returned.
Important: Check for score marks on top of and underneath the rotating plate.
- E-STOP contactors have interrupted the motor line without terminal“2“ being at LOW.
- Brake is not fully opened. Check 24 V supply of the brake.
- No feedback from sensor. Check function of sensor and sensor wiring.
Terminal 8: Sum of alarms
This output indicates that there is an alarm. It also includes the alarm at output “6“ and “7“. Reset the alarm with a LOW
signal at input“2“.
Terminal 9: Start permitted
Signals HIGH as soon as a new start is permitted.
Terminal 10: Table in position
This output indicates that the indexing table is in a valid position. For this purpose the indexing table has a cam. The
signal of the position cam is switched through 1:1 to this output.
If this output is HIGH, processing may begin as the indexing plate is no longer moving. The motor of the indexing table,
however, continues to run for the set delay time in order to reach the optimum starting point for the next cycle.
If this signal is LOW, processing must be interrupted immediately as the indexing plate is not in position.
Terminal “C“: Motor contactor CW (forward)
Output 24 V/2 A for the motor contactor or the coupling coil in the brake/clutch combination.
Terminal “D“: Brake
Output 24 V/2 A for direct connection of the motor brake.
Terminal “E“: Motor contactor CCW (backward)
Output 24 V/2 A for motor contactor direction of rotation“left“.
4.2 Outputs:

13
5. Operating controls
1. START key
The light (LED green) signals that there is 24 V at the control card. If the key switch is at “STEP“ (manual mode), a cycle can
be triggered by pressing the START key.
2. STOP/RESET key
The STOP/RESET key functions in all operating modes. When pressed it immediately stops the indexing table and signals
an alarm by illuminating the light (LED red).
3. Rotary switch for stop delay
Immediately on reaching the locking phase the position sensor at terminal 10 is made, the motor however, continues for
a short time. In order to time-optimize the cycles of the indexing table the motor should only be stopped at the end of
the cam. Otherwise on each cycle the time which the motor requires to go through the locking phase is lost as dead
time. The time for this continued rotation of the motor (the indexing plate is locked) is referred to as the stop delay.
The basic increments for the stop delay are 20, 40 or 80 ms. This is preselected with a sliding switch on the circuit card.
Rotary switch for stop delay
Key for operating mode
position overrun
table in position
table rotating
return
short circuit/high temp.
motor-/table overload
BRAKE
release
INCHING
AUTOMATIC
stop
delay

14
The multiplicator of this time scale is set at the rotary switch “Stop delay“ (at the front panel) between 0 and 9.
0 = no delay
1 - 9 = delay factor in 1-9 x 20, 40 or 80 ms increments
Optimum setting
1. With the key switch on Inching (manual mode), press the green start button to run one cycle. If the alarm
“Position overrun“ does not occur, increase the value of the rotary switch by one.
2. Repeat point 1 until the alarm “Position overrun“ is signalled.
3. Confirm the alarm by pressing the STOP/RESET key and reduce the delay time by one increment.
4. Status displays
“Table in pos.“ lights up when the table is in position, i.e. the indexing plate is locked.
“Table rotating“ lights as long as the motor is running.
“Return“ lights when return signal appears.
“Short circuit“ lights when an overload or a short circuit is monitored in one of the outputs clamps
flashes when motor temperature is too high.
“Motor overload“ lights when the cycle has not reached the in-position sensor signal within 9 seconds, i.e. when
there is no stop 9 seconds after the start (drive time out).
“Pos. overrun“ lights when the position cam at the end of the cycle has overrun.
5. Key switch: Toggling the operating modes between “Automatic”, “Inching“ and “Release brake“
5.1 Release brake
Releasing the brake allows the indexing table to be turned by hand to the next locking phase provided that it is
not already in a locked position. The outputs “Forwards“, “Back“, “Start permitted“, “Sum of alarms“ are at Log. “0“.
Starting by terminal 3 or H is not possible.
5.2 Inching (manual mode)
When the “Start“ key is pressed the indexing table runs one cycle. Terminal 2 (enable) must be HIGH. No alarm
must be pending. An external start by terminal 3 or H is not possible.
5.3 Automatic operation (Automat)
Automatic operation of the indexing table. The start can be carried out by terminal 3 or H only.

130
145
197
136
68
252,5
15
6. Installation instructions
6.1 Card holder
The card holder is designed for installation fixing to din rails in rear of electrical panel. It has screw wiring terminals on the
left and right hand sides for the connection of the 24V and the control wires.
6.2 Terminal PCB
single terminal PCB (screw xing)
The PCB terminal is designed for installation screw xing.
6.3 Built-in housing
The terminal block is built into the
rear of housing.
This is our recommended
standard version
(din rail mounting)
Partial front plate
Basis
Rear
Card guide

16
Versions:
without door with door
front panel mounting installation xing onto din rails screw fastening

17
7. Wiring
7.1 Circuit diagram
The motor line is switched by use of an electronic relay (solid state relay). Following this the two obligatory E-Stop
contactors must be connected to ensure a reliable shutdown in the event of an E-STOP.
Please see the motor name plate for the dimensioning of the motor protection switch. The motor line is a simple
non-screened line 4 x 1.5 mm².
There are three versions of the“electrical contactor“:
7.2 Motor line
one direction
motor 0 ... 3kW
two directions of rotation
motor 0 ... 0,75kW
two directions of rotation
motor > 0,75kW
indexing table TC or TR
terminal C
E-STOP
brake
sensor
3 x 400V
motor line
terminal F
terminal D
24 V inputs and outputs
electronic
contactor

18
8. Trouble shooting and fault nding
8.1 Trouble shooting
In the event of an alarm the red LED “STOP“ key illuminates. Outputs 6, 7 and 8 indicate the alarm.
The alarm can be reset using the“STOP“ key or by a LOW signal at terminal 2.
8.2 Fault report
Text Output 6 Output 7 Output 8 Output
Position
overrun
HIGH LOW HIGH Indexing table overruns the end position.
Causes:
- Turn switch stop delay time is too high
- Brake is worn Readjust brake
see documentation: mechanical system
Drive time
timeout/
overload
LOW HIGH HIGH Indexer does not arrive within the timeout period (10 sec).
- Rotating plate is restricted
- E-STOP contactors have switched off the motor
- E- STOP contactors are no longer providing
the right contact
- Star / delta bridge incorrectly wired in the motor
- Brake is not fully opened (check 24 V)
- No feedback from sensor (terminal F)
Short circuit LOW LOW HIGH - 24 V outputs overloaded
(output current > 100 mA / resp. > 2 A)
- Voltage peaks > 30 V on signals
- Supply voltage > 30 V
High motor
temperature
LOW LOW HIGH - Motor too hot
- Temperature switch interrupted
For trouble shooting please contact our Head Office:
WEISS GmbH
Siemensstraße 17
D-74722 Buchen/Odw.
Tel.: +49 (0)6281/5208-0
www.weiss-gmbh.de

19
9. Appendix
9.1 Manufacturers Declaration
EC - Manufacturers Declaration according to annex
II B of the EC Machine directive (98/27/EC)
Manufacturer: WEISS GmbH
Sondermaschinentechnik
Siemensstraße 17
D-74722 Buchen
Germany
hereby declares that the machine
described below: Control card TS004 E
Is not ready for operation in the sense of the EC machinery directive and therefore does not comply entirely with the
requirements of this guide line!
The initial operation of this product is prohibited until conformity with the EC Machine Guideline of the total
machine in which this product is installed has been declared.
98 / 37 / EG
73 / 23 / EWG
Machinery directive
Low voltage directive
DIN EN 60034
DIN EN 60204
DIN VDE 0470 – 1
DIN EN 414
DIN EN 1050
Rotating electrical machines
Safety of machines, electrical equipment
Protection categories by housing
Safety of machinery, possible dangers
Safety of machinery, sources of danger
Applicable EC directives:
Applicable harmonised standards:
Changes to the design which aect the technical data contained in this product description and the intended
purposes, i.e. which mean signicant changes, render this conformity declaration invalid!
Buchen, 2. April 2004
Uwe Weiß, CEO

20
GND
+ 24V
L2
L1
L3
L2
L1
L3
PE PE
TS 004
F
G
M
E
D
C
B
A
+
+
+
+
-
-
-
-
Limit switch
Indexer in position
black
brown
blue 24V
GND
brown
blue
white
white
M
3~
Motor:
See motor name plate
Schematic: one direction
U
V
W
PE
10
H
T
9
8
7
6
5
4
3
2
1
+
+
-
-
230V / 400V
Table in position
Start permitted
Sum of alarms
Alarm: Timeout (overload)
Motor ON
Brake
Sensor
Alarm: Position overrun
Automatic
Stop
Start (edge)
Enable (RESET/STOP)
Direction CW/CCW
I> I> I>
K 0.1
K 0.2
-K 1.0
13 5
2 4 6
A2
A1
Q 1.0
Electronic relay
One direction
E-Stop
Motor protection
switch
This manual suits for next models
2
Table of contents
Other WEISS Controllers manuals
Popular Controllers manuals by other brands

Bristan
Bristan Wave Single Outlet Touchpad Installation instructions and user guide

CBS ArcSafe
CBS ArcSafe RSK-CS01W instruction manual

Honeywell
Honeywell 190887-EET installation guide

Graco
Graco PRECISIONMIX 231-119 Instructions-parts list

Trane
Trane Tracer VV550 Installation

Morningstar
Morningstar ProStar PS-15M-48V Operator's manual