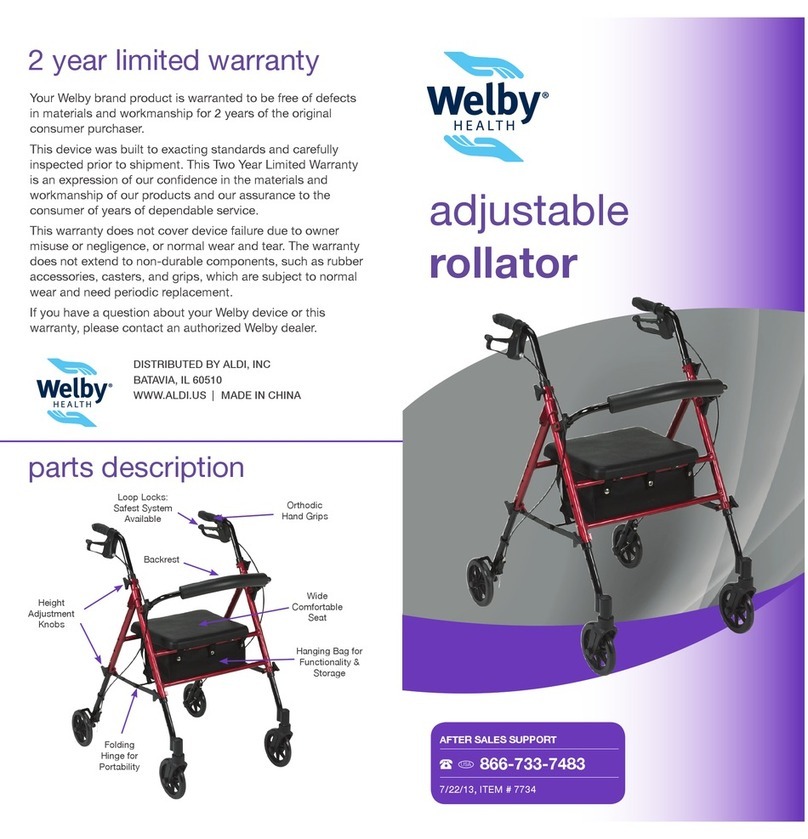
Welby 7734 User manual

AFTER SALES SUPPORT
866-694-5085
USA
1
Adjustable
Rollator
Andador
ajustable
User Guide
Manual del usuario
English... Page 2
Español... Página 17

AFTER SALES SUPPORT
866-694-5085
USA
2
Contents
Introduction..................................................................................3
Parts List.............................................................................................4
Parts Diagram 5
SafetyPrecautions..............................................................................6
Assembly..........................................................................................7
Height Adjustment 8
Operation.....................................................................................9
Loop Lock Operation 9
Measuring 10
Preparing to Sit 11
Preparing to Stand 12
Preparing to Walk 13
Maintenance..............................................................................14
Hand Brake Adjustment 14
Warranty..................................................................................15

AFTER SALES SUPPORT
866-694-5085
USA
3
Congratulations on your purchase of an adjustable rollator. Our
rollators are a product of quality engineering and are manufactured
to meet our own highly rigid specications and will surpass all your
expectations.
In this manual, you will nd the assembly, use and safety instructions for
the adjustable rollator.
The rollator is suitable for a single user with limited mobility. The rollator
is ideal for indoor and outdoor use.
Adjustable Rollator
Adjustable Rollator Introduction

AFTER SALES SUPPORT
866-694-5085
USA
4
Parts List Adjustable Rollator
Hand Grips (2)
Loop Locks (2)
Handle Height Adjustment Knobs (2)
Backrest (1)
Folding Hinge
Seat (1)
Hanging Bag (1)
Leg Height Adjustment Knobs (4)
Rear Wheels With Locks (2)
Front Swivel Wheels (2)
1
2
3
4
5
6
7
8
9
10
Parts List

AFTER SALES SUPPORT
866-694-5085
USA
5
1
2
34
5
6
7
8
9
10
Adjustable Rollator Parts List
Parts Diagram

AFTER SALES SUPPORT
866-694-5085
USA
6
1. Please make sure the Rollator is fully opened, seat is down and the
folding bar under seat is locked in the down position.
2. Be sure that all knobs are fully tightened and are at equal heights.
Test Rollator for stability before applying full weight to hand grips.
3. Test the loop locks before operating the Rollator. When wheels are
locked, lock bar on rear wheels should prevent wheels from turning.
If the wheels turn while brakes are locked, please refer to page 14
for hand brake adjustment instructions or contact after sales support.
When locks are released, the wheels should turn freely.
4. Always lock loop locks before sitting and do not use seat when unit is
on an incline or uneven ground.
5. Replace tires when signicantly worn or damaged.
6. Do not have anyone push you while you are seated on the Rollator.
This is a walking aid only and is not to be used as a transportation
device.
7. Check that the nuts and bolts are secure, on a regular basis, before
use.
8. Do not stand on the rollator.
Do not attempt to adjust or operate Rollator without carefully reading
all instructions in this manual.
WARNING
THIS IS A WALKING
AID ONLY AND IS
NOT TO BE USED AS
A TRANSPORTATION
DEVICE.
!Warning: Do Not Move Rollator While Seated
6.5"
0.75"
22pt. Arial Font, Yellow Text, Black Background
Warning Labels
Safety Precautions Adjustable Rollator
Safety Precautions

AFTER SALES SUPPORT
866-694-5085
USA
7
1. Remove all contents from carton.
2. Open frame and place up-side-down on the
oor. Attach legs without brakes to the front
of the rollator by depressing push pin and
sliding leg into the receptacle, making sure
to match the number on the frame with the
number on the leg. Secure in place using
the tightening knob, threading the knob in
from the outside. Repeat for second leg,
making sure both legs are set to the same
height (Figure 1).
3. Attach back legs (with brakes) using the
same process, making sure the wheels are
on the outside of the rollator and are at the
same height as the front wheels (Figure 2).
Afx brake cable to the black portion of the
leg using the “S” shaped clamp provided.
4. Insert handle tube into frame and set to
desired height. Secure in placed using
tightening knob, threading the knob in from
the outside. Repeat for second handle,
making sure both are set to the same
height (Figure 3).
5. Attach padded backrest by depressing the
black thumb buttons and sliding into the
black bracket (Figure 4). Note that backrest
can be folded up when not in use.
Adjustable Rollator Assembly
Figure 1
Figure 2
Figure 3
Figure 4
Assembly

AFTER SALES SUPPORT
866-694-5085
USA
8
The height of the rollator can be adjusted in two ways to
accomodate many different users.
Height Adjustment
Handle Height Adjustment
1. Remove tightening knob from handle.
2. Set handle to desired height.
3. Replace tightening knob into handle,
making sure to insert knob from the
outside.
4. Repeat for second handle, making sure
both handles are set to the same height
setting.
Leg Height Adjustment
1. Remove tightening knob from leg.
2. Depress push pin and slide leg to desired
height.
3. Replace tightening knob into leg, making
sure to insert knob from the outside.
4. Repeat for second, third and fourth legs,
making sure all are set to the same height
setting.
Assembly Adjustable Rollator

AFTER SALES SUPPORT
866-694-5085
USA
9
Adjustable Rollator Operation
Always engage and disengage wheel locks on both sides
simultaneously.
1. To slow down or come to a temporary stop — Pull up slowly on
the loop locks with four ngers until unit slows down or comes to
a temporary stop (Figure 5).
2. To temporarily lock wheels in position — Press down on both
loop locks with palms until you hear a “click” that will tell you
wheels are locked (Figure 6).
3. To release wheel locks — Push up on both loop locks with palms
of hand to original position (Figure 7).
Loop Lock Operation
Figure 5 Figure 6 Figure 7

AFTER SALES SUPPORT
866-694-5085
USA
10
Operation Adjustable Rollator
Measuring
• First measure the handle height. Start by
standing up straight with your shoes on.
Have a friend or family member mea-
sure from the crease in your wrist to the
ground. This measurement should be the
approximate height of the handle bars.
• Next, measure the height of a chair you
like and from which you can rise easily. If
you have difculty with a chair that is too
high or too low, keep that in mind when
setting the seat height.
• Finally, measure the width of the smallest
place you will need to t through. Most
often, that is a doorway or hallway. You
need to be sure you can get in and out
with your rollator.

AFTER SALES SUPPORT
866-694-5085
USA
11
Adjustable Rollator Operation
• Stand directly in front of the chair, facing
away from it. The back of your legs should be
almost touching the chair. Do not start to sit
until you are balanced and standing still.
• Move the rollator a little away from you so
that you can bend slightly forward as you sit
down.
• Engage the brakes by pushing down on
the loop locks until they lock in the down
position. Refer to loop lock operation for
complete instructions.
• Reach behind for the chair with both hands
(preferred) or with one hand and one hand on
the rollator. Do not tip the rollator by placing
too much weight one side as you sit.
• Slowly lower yourself using your legs as
much as you can.
• If you “fall” into the chair, try leaning a little
more forward as you sit and bend your knees
to lower yourself to the chair.
Preparing to Sit

AFTER SALES SUPPORT
866-694-5085
USA
12
Operation Adjustable Rollator
• Engage the brakes by pushing down on
the loop locks until they lock in the down
position. Refer to loop lock operation for
complete instructions.
• Move forward and sit as close to the edge
of the chair as you feel comfortable.
• Keep your feet as far under you as possible.
Aim to place your toes directly below the
edge of the chair.
• Place both hands on the arms/seat of your
chair OR one hand on the chair and one
hand on the rollator. Do not tip the rollator
by placing too much weight on one side of
the rollator as you stand.
• Lean forward until you feel some of your
weight on your feet.
• Use your legs to stand as much as possible
– your arms should only lift what your legs
cannot. Use your arms mostly to help keep
your balance as you stand.
• Do not walk forward until you have tested
your balance and you feel strong enough to
walk.
• Disengage the brakes by pulling up on the
loop locks.
Preparing to Stand

AFTER SALES SUPPORT
866-694-5085
USA
13
Adjustable Rollator Operation
• Place your rollator ahead of you
before you take any steps.
• Gently roll the rollator ahead of you
as you walk. Keep the rollator close
enough to you that it is supportive.
• If your steps are uneven, its best to
shorten your longer step rather than
work to lengthen your shorter step.
The shorter step is usually the step
where you have less balance.
• To turn around, stay within the width
of the rollator even if you are slightly
behind. Roll the rollator around you
without twisting your back – you
should always be facing the front of
the rollator.
• When standing in the kitchen and
bathroom, use the counters for your
support rather than the rollator – but
keep the rollator within reach.
Preparing to Walk

AFTER SALES SUPPORT
866-694-5085
USA
14
To ensure that your rollator is operating safely and smoothly, please check
the following peridoically:
1. Be sure that all knobs are fully tightened and are at equal heights.
Test Rollator for stability before applying full weight to hand grips.
2. Test the loop locks before operating the Rollator. When wheels are
locked, lock bar on rear wheels should prevent wheels from turning.
If the wheels turn while brakes are locked, please take unit back to
dealer for adjustment. When locks are released, the wheels should
turn freely.
3. Replace tires when signicantly worn or damaged.
4. Check that the nuts and bolts are secure, on a regular basis, before
use.
Hand Brake Adjustment
The hand brake system tted on this rollator complies with the
manufacturer’s quality standards. The hand brake system has
been pre-set (adjusted) to the best performance setting. To better
suit your personal needs, you may need to adjust the hand brake
system from time to time.
1. Hold rmly in place.
DO NOT turn.
2. To tighten the hand brake
adjustment, turn nut CLOCKWISE.
To loosen the hand brake adjustment,
turn nut COUNTER-CLOCKWISE.
Maintenance Adjustable Rollator
1
2

AFTER SALES SUPPORT
866-694-5085
USA
15
Warranty Conditions
Warranty Adjustable Rollator
Dear Customer,
The ALDI warranty offers you extensive benets compared to the statutory
obligation arising from a warranty:
Warranty period: 2 years from date of purchase
Costs: Free repair/exchange or refund.
No transport costs
ADVICE: Please contact our service hotline by phone, e-mail or
fax before sending in the device. This allows us to
provide support in the event of possible operator errors.
In order to make a claim under the warranty, please send us:
• together with the faulty item the original receipt and the warranty
card properly completed.
• the product with all components included in the packaging.
This warranty does not cover damage caused by:
• Accident or unanticipated events (e.g. lightning, water, re).
• Improper use or transport
• Disregard of the safety and maintenance instructions
• Other improper treatment or modication
After the expiry of the warranty period, you still have the possibility to have
your product repaired at you own expense. If the repair or the estimate of
cost is not free of charge you will be informed accordingly in advance.
This warranty does not limit the statutory obligation of the seller arising
from a warranty. The period of the warranty can only be extended in
accordance with a legal standard. In countries where a (compulsory)
warranty and/or spare part storage and/or a system for compensation are/
is required by law, the statutory minimum conditions apply. In the event
that a product is received for repair, neither the service company nor the
seller will assume any liability for data or settings possibly stored on the
product by the customer.

SERVICIO POSVENTA
866-694-5085
USA
16
Your details
Name
Address
WARRANTY CARD
ADJUSTABLE ROLLATOR
E mail
Date of Purchase*
We reccomend you keep the receipt with this warranty card
Location of purchase
Description of malfunction:
If after contacting the manufacturer
you are requested to return the faulty
product please return the completed
warranty card together with it.
Drive Medical
99 Seaview Boulevard
Port Washington, NY 11050, USA
866-694-5085
2
YEAR WARRANTY
866-694-5085 [email protected]
AFTER SALES SUPPORT
Phone lines available
Monday to Friday,
8:30am - 8pm.
MODEL: 7734 02/2016

SERVICIO POSVENTA
866-694-5085
USA
17
Introducción..................................................................................18
Lista de piezas ................................................................................19
Diagrama de las piezas 20
Medidas de seguridad ...................................................................21
Ensamblaje.......................................................................................22
Ajuste de la altura 23
Operación.....................................................................................24
Operación del freno de mano 24
Mediciones 25
Preparación para sentarse 26
Preparación para pararse 27
Preparación para caminar 28
Mantenimiento .................................................................................29
Ajuste del freno de mano 29
Garantía..................................................................................30
Contenido

SERVICIO POSVENTA
866-694-5085
USA
18
Felicitaciones por su compra de un andador ajustable. Nuestros an-
dadores son el producto de una ingeniería de calidad y están fabrica-
dos para satisfacer nuestras especicaciones propias muy rígidas y
superarán a todas sus expectativas.
En este manual puede encontrar las instrucciones de montaje, utilización
y de seguridad del caminador ajustable.
El andador es adecuado para un solo usuario con movilidad limitada. El
andador es ideal para el uso en interiores y al aire libre.
Andador ajustable
Andador ajustable Introducción

SERVICIO POSVENTA
866-694-5085
USA
19
Lista de piezas Andador ajustable
Agarraderas (2)
Frenos de mano (2)
Perillas de ajuste de altura del mango (2)
Respaldo (1)
Bisagra plegable
Asiento (1)
Bolso colgante (1)
Perillas de ajuste de altura de las patas (4)
Ruedas traseras con tranques (2)
Ruedas delanteras giratorias (2)
1
2
3
4
5
6
7
8
9
10
Lista de piezas

SERVICIO POSVENTA
866-694-5085
USA
20
Andador ajustable Introducción
1
2
34
5
6
7
8
9
10
Diagrama de las piezas
Table of contents
Languages:
Other Welby Mobility Aid manuals
Popular Mobility Aid manuals by other brands

Alu Rehab
Alu Rehab Netti Mobile Service manual

identités
identités NEO FOLD EVOLUTION instruction manual

Sunrise Medical
Sunrise Medical Quickie Smart Seat User instruction manual

EZee Life
EZee Life CH1052 instructions

Darco
Darco A.P.B. Instructions for use

Schuchmann
Schuchmann Dynamic Pacer Instructions for use

aidapt
aidapt Strolley Fixing and maintenance instructions

Timago
Timago TGR-R RA 888 Instructions for use

Vitea Care
Vitea Care Premium VCTP0011 user manual

CareCo
CareCo BD06018 manual

Bischoff & Bischoff
Bischoff & Bischoff RL 120 instruction manual

Ultimate Healthcare
Ultimate Healthcare UMOWAL1L user manual