weltico SKIMFILTRE A800 User manual

SKIMFILTRE
BY
WELTICO
FR ... 2
EN ... 8
ES ... 14
IT ..... 20
DE ... 26
NL ... 32
PT .... 38
WELTICO
15 rue des Marais
44310 ST-PHILBERT DE GRAND LIEU
Tel : +33 (0)2 40 59 95 95
Fax : +33 (0) 2 40 59 94 91
Made in France
2 years warranty
Photos non contractuelles.
Non-contract photo.
63682

NOTICE DE MONTAGE
SKIMFILTRE A800
Nous vous remercions d’avoir choisi un matériel WELTICO et nous vous invitons à lire attentivement cette notice vous
permettant d’en obtenir toute satisfaction.
- L’installation de ce Skimltre nécessite l’intervention de personnes qualiées.
IMPORTANT : cette notice contient des informations de premières importances sur les mesures de sécurité à adopter au
moment de l’installation et de la mise en service. Il est par conséquent indispensable que l’installateur et l’utilisateur lisent
attentivement ces instructions avant de commencer le montage.
Cette notice est également disponible au format PDF et EPUB sur www.weltico.com rubrique Skimltre.
À LA RÉCEPTION DU MATÉRIEL
Vous devez avoir reçu un ensemble de 2 colis :
• Un colis contenant le meurtrière et ses accessoires.
• Un colis contenant la partie Skimltre et ses accessoires.
SPÉCIFICATIONS TECHNIQUES :
VERSION : PANNEAU / LINER / BETON / COQUE
• Fabriqués en ABS
• Sortie diamètre 50 mm
• 2 trop plein diamètre 40 mm
Le
18/12/2017
Notice 63682
806
753
266
126
73
63
ligne d’eau
246 315 / 305
A25 / 44
TYPE A
C2 626
C3 751
C5 876
C6 1001
C7 1126
Page : 2

ASSEMBLAGE
Les deux partie peuvent être assemblées avant ou après la mise en place sur la paroi.
ATTENTION : Une fois les deux partie collées avec la colle fournie, il est pratiquement impossible de les
séparer au bout d’une 1/2 heure.
PARTIE SKIMFILTRE
PARTIE MEURTRIÈRE
4 PINCES DE MAINTIEN
APPLIQUEZ UN CORDON DE
COLLE CONTINU SUIVANT
LES POINTILLES
FACE DE COLLAGE
MEURTRIÈRE
FACE DE COLLAGE
ÉCUMEUR
MEURTRIÈRE BETON LINER / COQUE
MEURTRIÈRE BETON
MEURTRIÈRE PANNEAU
Page : 3

MISE EN PLACE SUR LA PAROI PANNEAU
La version panneau demande une découpe particulière pour sa xation.
796
126
MINIMUM
[1]
Emboîtez et plaquer le
Skimltre contre la meurtrière
1
2
Faire glisser les 4 pinces pour
maintenir les 2 pièces entre-elles
Page : 4

Mettre l’ensemble ou la meurtrière en position sur la
paroi comme ci-dessus.
Contre-percez aux endroits échés pour les passages
des vis. Boulonner avec les vis fournies.
[2]
Posez un joints plat coté adhésif sur la meurtrière.
[4]
Fixez l’accroche liner sur le dessus de la paroi.
Renforcez par une traversée métallique à xer sur
les bossages prévus.
[5]
Une fois le liner posé, mettre le deuxième joint plat
coté adhésif sur la bride. Positionnez la bride sur le
liner an de faire correspondre les trous puis vissez
toutes les vis.
[6]
A l’aide d’un cutter, découpez le liner à l’intérieur
de la bride. Enlevez la chute de liner.
[7]
Clipsez le cache vis sur la bride
[8]
75 mm
minimum
Repère
ligne d’eau
Attention : Le Skimltre doit être calé.
[3]
Page : 5

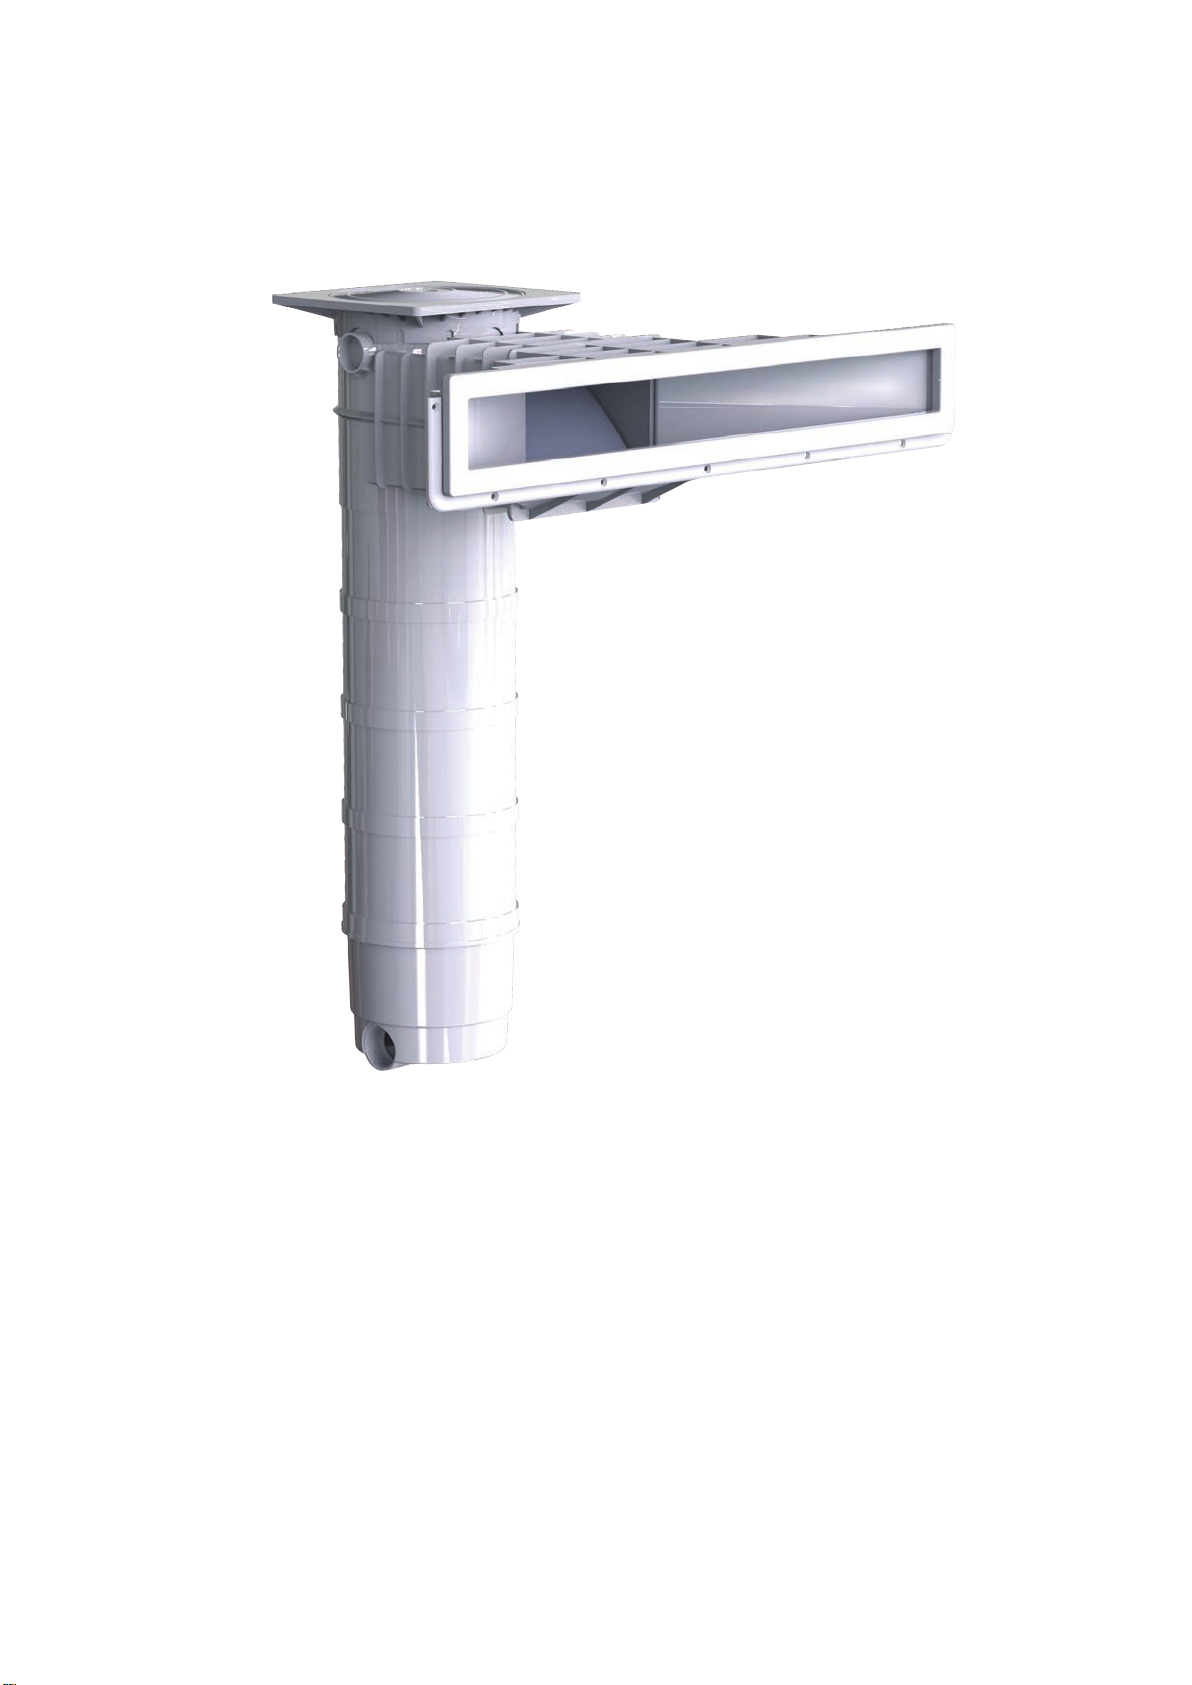
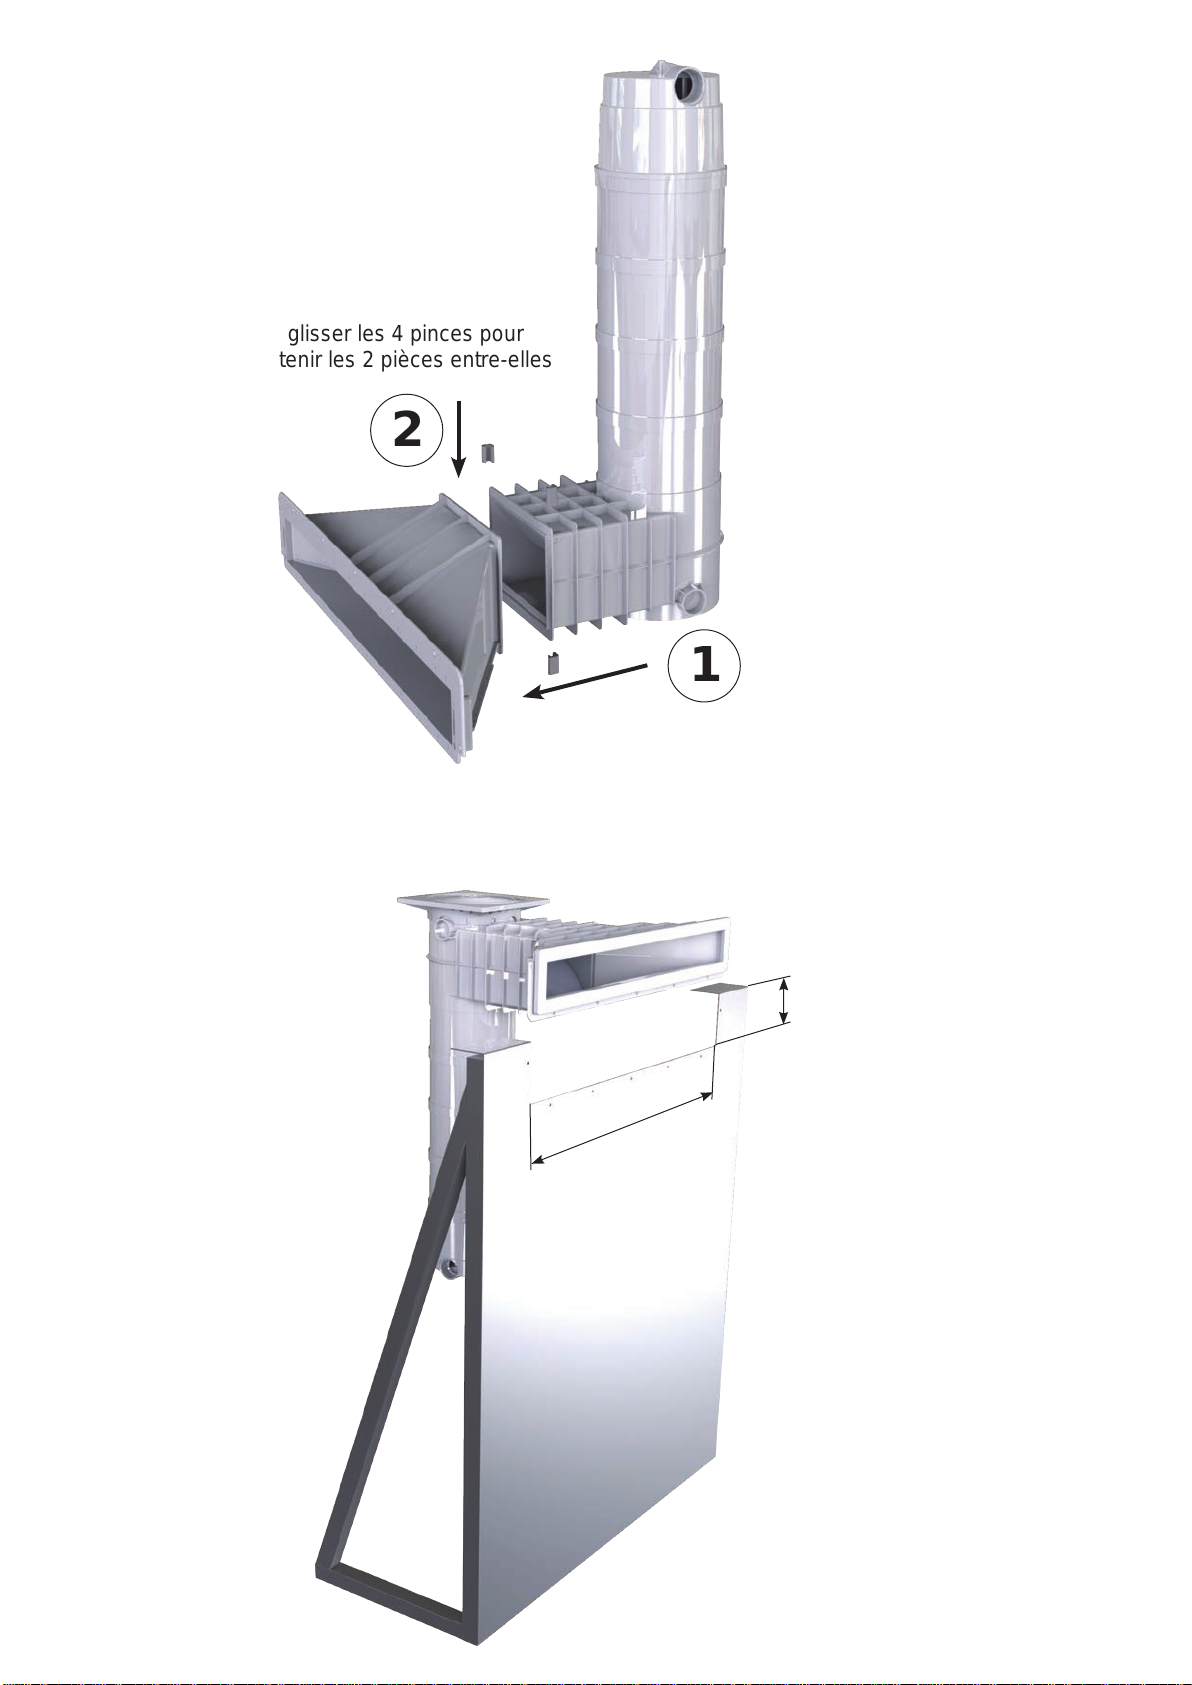
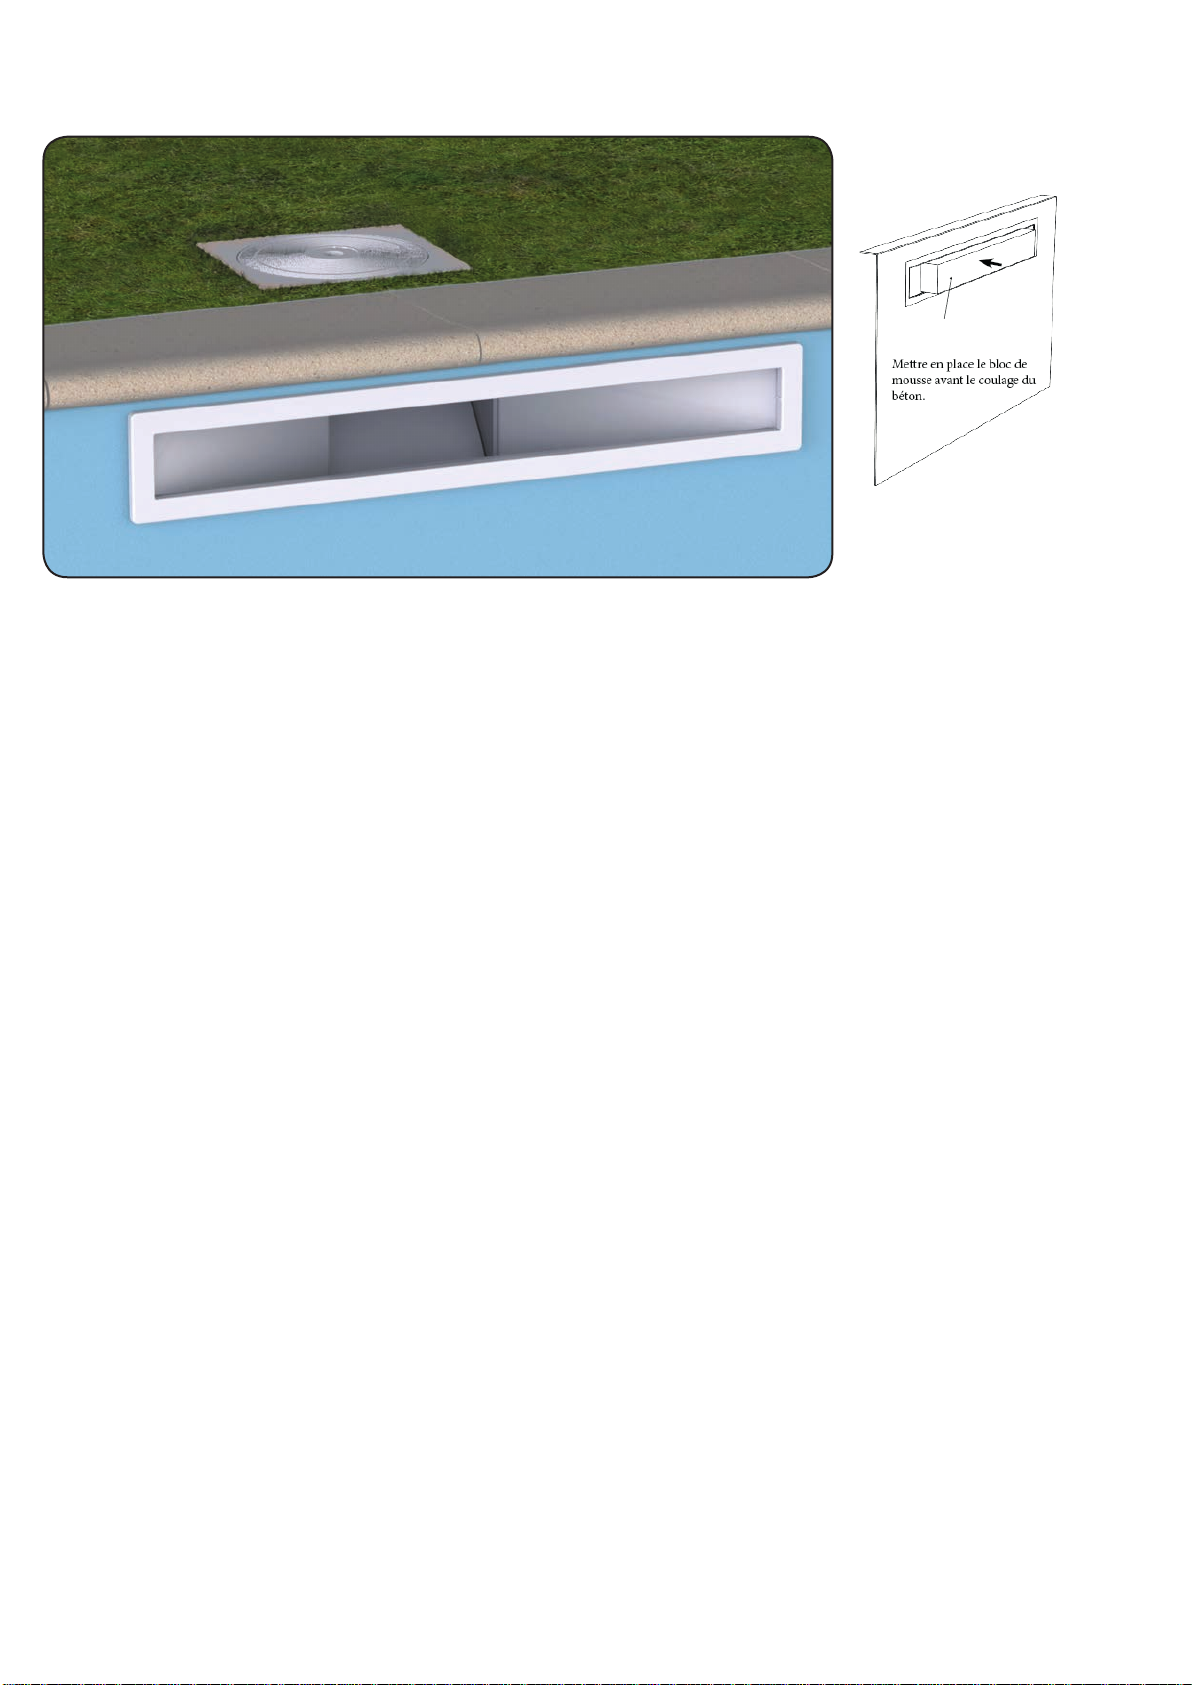
MISE EN PLACE SUR LA PAROI BETON, BETON LINER OU COQUE
Les procédés de mise en place sont identiques aux modèles traditionnels.
RETIRER LA CARTOUCHE POUR NETTOYAGE
1 - Soulevez le couvercle, retirez le panier, .
2 - Pompe du bassin en marche, fermez l’orice du skimltre en utilisant la plaque de fermeture bleu.
3 - Attendre que la cuve se vide de son eau, retirez le bloque cartouche puis la cartouche.
4 - Enlever la plaque bleu de l’orice.
NETTOYAGE DE LA CARTOUCHE DE FILTRATION
Le nettoyage s’effectue en moyenne une fois tous les 3 semaines selon le taux d’utilisation de la piscine et la taille
du bassin. Le nettoyage de la cartouche se fait au jet d’eau et à la brosse souple. En cas de fort encrassement de la
cartouche ou d’entartrage, faire tremper la cartouche dans une solution de détergent ou détartrant pour cartouche.
Il est conseillé d’utiliser un jeu de deux cartouches pour éviter l’arrêt de la ltration du bassin pendant l’opération de
nettoyage.
REMETTRE LA CARTOUCHE DANS LE SKIMFILTRE
1 - Soulevez le couvercle, retirez le panier.
2 - Pompe du bassin arrêtée, plongez lentement la cartouche jusqu’à sentir l’appui au fond puis rabattre la poignée.
3 - Mettre en place le bloque au-dessus de la cartouche.
4 - Remettre le panier puis mettre la pompe en marche.
5 - Remettre le couvercle.
ENTRETIEN DE LA CARTOUCHE
Pré-ltre de panier WELBAG : cette ‘chaussette’ jetable s’installe en quelques secondes sur le panier, Il réduit
l’entretien et limite l’encrassement du ltre en collectant tous les débris en suspension dans l’eau (feuilles, aiguilles,
insectes ...).
Clariant ultra-concentré FLOVIL (en pastilles) : augmente la nesse de ltration du ltre en coagulant les nes
particules en suspension dans l’eau qui sont ensuite stoppées par le ltre. Son action permet de réduire jusqu’à
50% le temps de ltration, la consommation de produits chlorés et d’algicide.
Page : 6

1
2
4
5
3
7
6
8
PIÈCES DÉTACHÉES
N° LINER BETON COQUE
1 COUVERCLE COUVERCLE COUVERCLE
2 PANIER PANIER PANIER
3 VOLET VOLET VOLET
4JOINT PLATA800 -JOINT PLATA800
5BRIDE A800 -BRIDE A800
6 SACHET VIS LINER A800 - SACHET VIS LINER A800
7CACHE VIS A800 -CACHE VIS A800
8KIT LINER A800 -KIT LINER A800
9 BLOQUE CARTOUCHE BLOQUE CARTOUCHE BLOQUE CARTOUCHE
10 CARTOUCHE CARTOUCHE CARTOUCHE
11 PLAQUE BLEU PLAQUE BLEU PLAQUE BLEU
TYPE B
C2 ~ 260
C3 ~ 385
C5 ~ 510
C6 ~ 635
C7 ~ 760
9
10
B
Page : 7

INSTALLATION INSTRUCTIONS
SKIMFILTRE A800
We thank you for choosing WELTICO materials and we invite you to read these instructions to ensure your complete
satisfaction.
- Installation of this Skimlter requires skilled people.
IMPORTANT : This manual contains information of great importance on the safety measures to be adopted at the time of
installation and commissioning. It is therefore essential that the installer and user read these instructions carefully before
beginning installation.
This manual is also available in PDF and EPUB on www.weltico.com - Skimltre section.
RECEIVING EQUIPMENT
You should have received a set of two packages:
• One package containing the input and accessories.
• One package containing the Skimltre part and accessories.
TECHNICAL SPECIFICATIONS:
VERSION: PANEL / LINER / CONCRETE / SHELL
• Made of ABS
• Outlet diameter 50 mm
• 2 overows diameter 40 mm 806
753
266
126
73
63
waterline
246 315 / 305
A25 / 44
TYPE A
C2 626
C3 751
C5 876
C6 1001
C7 1126
Page : 8

ASSEMBLY
The two parts may be joined before or after placement on the wall.
CAUTION: Once the two parts are glued with the glue provided, it is virtually impossible to separate them
after half an hour.
PART SKIMFILTRE
PART DEADLY
4 HOLDING CLIPS
APPLYA CONTINUOUS LINE
OF GLUE FOLLOWING THE
DASHED LINES.
FACE FOR GLUING
FOR INPUT
FACE FOR GLUING
SKIMMER
CONCRETE LINER / SHELLINPUT
CONCRETE INPUT
PANELINPUT
Page : 9

INSTALLATION ON PANEL WALL
The panel version requires special cutting for its xing.
796
126
MINIMUM
[1]
Fit and atten the Skimltre
against the input
1
2
Slide the four clips to hold the two
parts against each other.
Page : 10

Put the assembly or the input in position on the wall as
above.
Pierce holes in the arrowed locations for the passage of
screws. Bolt with the screws supplied.
[2]
Fix a at joint, adhesive side, to the input.
[4]
Attach the liner hook on top of the wall.
Reinforce a metal bushing to be xed on bosses
provided.
[5]
Once the liner is in position, place the second at joint,
adhesive side, on the ange. Position the ange of the
liner to match the holes and tighten all the screws.
[6]
Using a cutter, cut the liner inside of the ange.
Remove the waste liner material.
[7]
Clip the screw cover on the ange
[8]
75 mm
minimum
Mark the
water line
Warning: the Skimltre must be secured with
wedges.
[3]
Page : 11

INSTALLATION ON CONCRETE WALL, CONCRETE LINER OR SHELL
The processes of implementation are the same as with tradiational models.
REMOVING THE CARTRIDGE FOR CLEANING
1 - Open the lid and remove the basket.
2 - With the pool pump running, close the opening of the skimltre
3 - Wait until the tank is emptied of its water, remove the cartridge block and then the cartridge.
4 - Replace the blue plate of the opening.
CLEANING THE FILTER CARTRIDGE
Cleaning takes place on average once every 3 weeks depending on the rate of use of the pool and the pool size.
Clean the cartridge with a water jet and soft brush. In case of heavy soiling of the cartridge or scaling, soak the
cartridge in a solution of detergent or descaling agent. It is advisable to use a set of two cartridges to avoid stopping
the ltration of the pool during the cleaning operation.
REPLACE THE CARTRIDGE IN THE SKIMFILTRE
1 - Open the lid and remove the basket.
2 - With the pump stopped, slowly immerse the cartridge until you feel the bottom, then close the handle.
3 - Place the block on top of the cartridge.
4 - Replace the basket and start the pump.
5 - Replace the cover
MAINTENANCE OF THE CARTRIDGE
WELBAG pre-lter for the basket: This disposable ‘sock’ installs in seconds on the basket. It reduces maintenance
and reduces lter clogging by collecting all the debris in the water (leaves, needles, insects ...).
Ultra-concentrated FLOVIL clarifying agent (chips): Increases the ne action of the lter by coagulating the
ne particles suspended in the water which are then stopped by the lter. Its action reduces ltration time, the
consumption of chlorinated products and anti-algae products by up to 50%.
Page : 12
set up the foam
block before pouring
concrete

1
2
4
5
3
7
6
8
PARTS
N° LINER CONCRETE SHELL
1 COVER COVER COVER
2 BASKET BASKET BASKET
3 FLAP FLAP FLAP
4 A800 FLAT SEAL - A800 FLAT SEAL
5 A800 FLANGE - A800 FLANGE
6 A800 SACHET OF LINER
SCREWS - A800 SACHET OF LINER
SCREWS
7 A800 SCREW COVER - A800 SCREW COVER
8 A800 LINER KIT - A800 LINER KIT
9 CARTRIDGE BLOCK BLOQUE CARTOUCHE CARTRIDGE BLOCK
10 CARTRIDGE CARTRIDGE CARTRIDGE
11 BLUE PLATE BLUE PLATE BLUE PLATE
TYPE B
C2 ~ 260
C3 ~ 385
C5 ~ 510
C6 ~ 635
C7 ~ 760
9
10
B
Page : 13

INSTRUCCIONES DE INSTALACIÓN
SKIMFILTRE A800
Le damos las gracias por haber elegido un equipo WELTICO y le invitamos a leer detenidamente estas instrucciones para
poder disfrutar plenamente del equipo.
- La instalación de este Skimlter requiere la intervención de personal cualicado.
IMPORTANTE: estas instrucciones contienen información sobre las principales medidas de seguridad que se deben
adoptar durante la instalación y la puesta en servicio. Por tanto, es indispensable que el instalador y el usuario lean
cuidadosamente estas instrucciones antes de comenzar el montaje.
Estas instrucciones también están disponibles en formato PDF y EPUB en el sitio www.weltico.com, sección Skimltre.
AL RECIBIR EL MATERIAL
Debe haber recibido dos paquetes:
Un paquete que contiene la boca y sus accesorios.
Un paquete que contiene el Skimltre y sus accesorios.
ESPECIFICACIONES TÉCNICAS:
VERSIÓN: PANEL / LINER / HORMIGÓN / ARMAZÓN
• Fabricados en ABS
• Diámetro de salida 50 mm
• 2 rebosaderos de diámetro 40 mm
806
753
266
126
73
63
Línea de agua
246 315 / 305
A25 / 44
TYPE A
C2 626
C3 751
C5 876
C6 1001
C7 1126
Page : 14

MONTAJE
Las dos piezas se pueden montar antes o después de la colocación en la pared.
ATENCIÓN : Una vez pegadas las dos piezas con el adhesivo suministrado, es prácticamente imposible
separarlas al cabo de media hora.
PIEZA SKIMFILTRE
PIEZA BOCA
4 PINZAS DE SUJECIÓN
APLIQUE UN CORDÓN
CONTINUO DE COLAALO
LARGO DE LA LÍNEA DE
PUNTOS.
SUPERFICIE DE ENCOLADO
BOCA
SUPERFICIE DE ENCOLADO
SKIMMER
BOCAHORMIGÓN LINER /ARMAZÓN
BOCAHORMIGÓN
BOCAPANEL
Page : 15

COLOCACIÓN EN LA PARED DEL PANEL
Para la versión de panel, se requiere un corte especial para su jación.
796
126
MINIMUM
[1]
Encaje y pegue el Skimltre a
la boca
1
2
Deslice las 4 pinzas para sujetar las
2 piezas entre sí.
Page : 16

Coloque el conjunto o la boca en posición sobre la
pared como se indica anteriormente.
Contrataladre en los lugares señalados con echas
para el paso de los tornillos. Atornille con los tornillos
suministrados.
[2]
Coloque una junta plana por el lado adhesivo sobre la
boca.
[4]
Fije el gancho del liner en la parte superior de la
pared. Reforzar una barra de metal que se je en
los jefes previstas.
[5]
Una vez colocado el liner, ponga la segunda junta
plana por el lado adhesivo sobre la brida. Coloque la
brida sobre el liner para que coincida con los oricios y
luego atornille todos los tornillos.
[6]
Con ayuda de un cutter, corte el liner por el
interior de la brida. Retire el fragmento sobrante
de liner.
[7]
Encaje el tapón de tornillo sobre la brida
[8]
75 mm
minimum
Localice la
línea de agua
Atención: El Skimltre se debe jar.
[3]
Page : 17

INSTALACIÓN EN LA PARED DE HORMIGÓN, HORMIGÓN LINER O ARMAZÓN
El procedimiento de instalación es similar al de los modelos tradicionales.
RETIRAR EL CARTUCHO PARA SU LIMPIEZA
1 - Levante la tapa y retire la cesta.
2 - Con la bomba de la piscina en marcha, cierre el oricio del skimltre utilizando la placa de cierre azul.
3 - Espere a que el tanque se vacíe de agua, retire el bloque del cartucho y luego el cartucho.
4 - Retire la placa azul del oricio.
LIMPIEZA DEL CARTUCHO DE FILTRACIÓN
La limpieza se realiza en promedio una vez cada 3 semanas, dependiendo de la frecuencia de uso de la piscina
y del tamaño de esta. La limpieza del cartucho se efectúa con un chorro de agua y un cepillo suave. En caso de
que el cartucho presente demasiada grasa o incrustaciones, sumerja el cartucho en una solución de detergente
o desincrustante. Se recomienda utilizar un juego de dos cartuchos para no interrumpir la ltración de la piscina
durante la operación de limpieza.
VUELVAA COLOCAR EL CARTUCHO EN EL SKIMFILTRE
1 - Levante la tapa y retire la cesta.
2 - Con la bomba de la piscina desactivada, sumerja lentamente el cartucho hasta que sienta el apoyo en el fondo y,
a continuación, cierre el asa.
3 - Coloque el bloque en la parte superior del cartucho.
4 - Vuelva a colocar la cesta y ponga la bomba en marcha.
5 - Vuelva a colocar la tapa.
MANTENIMIENTO DEL CARTUCHO
Preltro de cesta WELBAG: esta ‘funda’ desechable se instala en unos segundos en la cesta, reduce el
mantenimiento y limita la acumulación de suciedad en el ltro recogiendo todos los desechos suspendidos en el
agua (hojas, agujas, insectos...).
Solución de aclarado ultra-concentrada FLOVIL (en pastillas): aumenta la nura de ltración del ltro por
coagulación de las partículas nas suspendidas en el agua, que son más tarde atrapadas por el ltro. Su acción
permite reducir hasta el 50% el tiempo de ltración, el consumo de productos clorados y de algicida.
Page : 18
congurar el
bloque de espuma
antes de verter el
concreto

1
2
4
5
3
7
6
8
PIEZAS DE RECAMBIO
N° LINER HORMIGÓN ARMAZÓN
1TAPA TAPA TAPA
2 CESTA CESTA CESTA
3 COMPUERTA COMPUERTA COMPUERTA
4JUNTA PLANAA800 -JUNTA PLANAA800
5BRIDAA800 -BRIDAA800
6BOLSATORNILLO LINER
A800 -BOLSATORNILLO LINER
A800
7TAPÓN DE TORNILLO
A800 -TAPÓN DE TORNILLO
A800
8KIT LINER A800 -KIT LINER A800
9 BLOQUE CARTUCHO BLOQUE CARTUCHO BLOQUE CARTUCHO
10 CARTUCHO CARTUCHO CARTUCHO
11 PLACAAZUL PLACAAZUL PLACAAZUL
TYPE B
C2 ~ 260
C3 ~ 385
C5 ~ 510
C6 ~ 635
C7 ~ 760
9
10
B
Page : 19

ISTRUZIONI PER L’INSTALLAZIONE
SKIMFILTRE A800
La ringraziamo per aver scelto un prodotto WELTICO e la invitiamo a leggere con attenzione le istruzioni che le consentiranno
di ottenere le migliori prestazioni.
- L’installazione di questo skimmer richiede l’intervento di personale qualicato.
IMPORTANTE : questo manuale contiene informazioni importanti sulle misure di sicurezza da adottare al momento
dell’installazione e messa in servizio. E’ quindi indispensabile che l’installatore e l’utente leggano attentamente queste
istruzioni prima di iniziare l’installazione.
Questo manuale è disponibile anche in formato PDF e EPUB sul sito www.weltico.com alla sezione Skimltre.
CONSEGNA DEL PRODOTTO
Dovrebbe aver ricevuto una spedizione di 2 colli:
• Un collo contenente la bocchetta e i suoi accessori.
• Un collo contenente il componente Skimltre e i suoi accessori.
SPECIFICHE TECNICHE:
VERSIONE: PANELLO / RIVESTIMENTO / CEMENTO / CUSTODIA
• Realizzato in ABS
• Diametro di uscita 50 mm
• 2 trabocchi diametro 40 mm
806
753
266
126
73
63
linea dell’acqua
246 315 / 305
A25 / 44
TYPE A
C2 626
C3 751
C5 876
C6 1001
C7 1126
Page : 20
Table of contents
Languages:
Other weltico Lighting Equipment manuals
Popular Lighting Equipment manuals by other brands

Chess
Chess mymesh Meanwell LCM40 Installation instruction

Philips
Philips GreenPower LED toplighting linear module 2.2 Quick installation guide

Colorbeam
Colorbeam Coloray Line 48II user manual

Horticulture Lighting Group
Horticulture Lighting Group 260 XL KIT Product Assembly

Vision & Control
Vision & Control LDLF30x240-IR850/UDC Instructions for use

Frontgate
Frontgate Holuday 61357 CLE manual