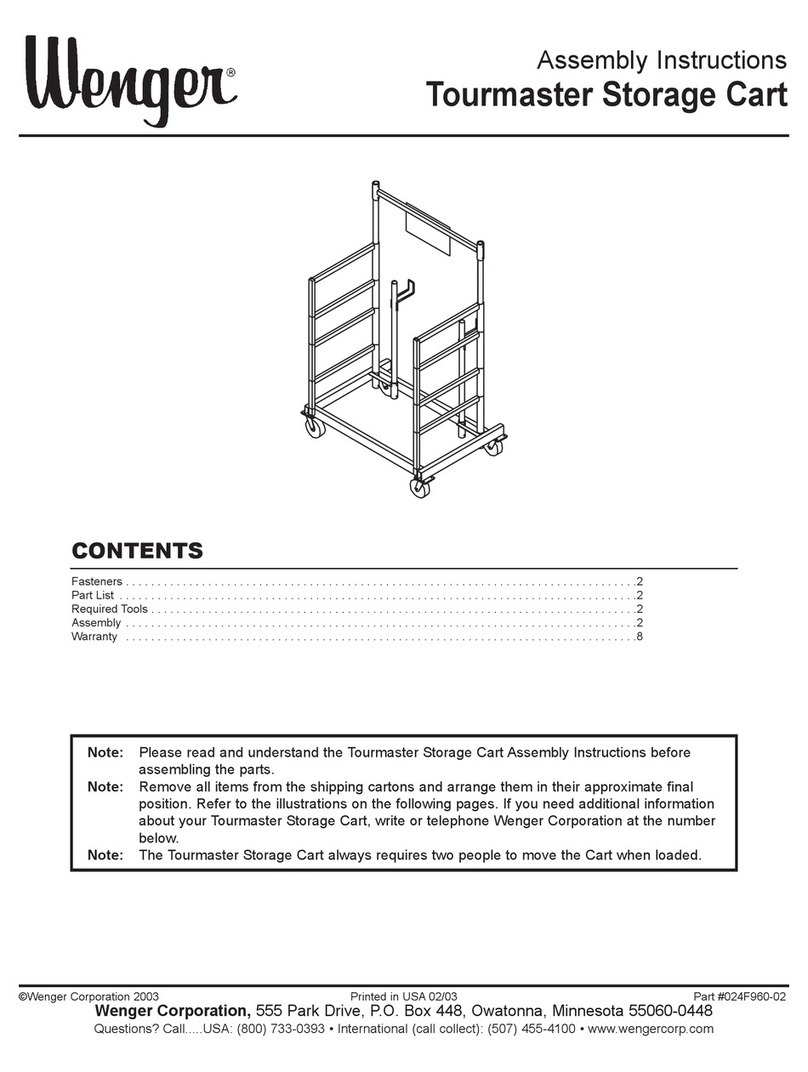
Wenger Tourmaster Storage Cart User manual

Owner’s Manual
Tourmaster Storage Cart
©Wenger Corporation 2003 Printed in USA 03/03 Part #024F990-01
Wenger Corporation, 555 Park Drive, P.O. Box 448, Owatonna, Minnesota 55060-0448
Questions? Call.....USA: (800) 733-0393 • International (call collect): (507) 455-4100 • www.wengercorp.com
CONTENTS
Note: Please take a few minutes to read this manual and to familiarize yourself with the
Tourmaster Storage Cart unique operating features. If you should need additional information
on your new Tourmaster Storage Cart, just write or phone.
Warranty . . . . . . . . . . . . . . . . . . . . . . . . . . . . . . . . . . . . . . . . . . . . . . . . . . . . . . . . . . . . . . . . . . . . . . . . . . . . . . . . .2
Precautions . . . . . . . . . . . . . . . . . . . . . . . . . . . . . . . . . . . . . . . . . . . . . . . . . . . . . . . . . . . . . . . . . . . . . . . . . . . . .2
Safety . . . . . . . . . . . . . . . . . . . . . . . . . . . . . . . . . . . . . . . . . . . . . . . . . . . . . . . . . . . . . . . . . . . . . . . . . . . . . . . . . . .2
Load Back Rails . . . . . . . . . . . . . . . . . . . . . . . . . . . . . . . . . . . . . . . . . . . . . . . . . . . . . . . . . . . . . . . . . . . . . . . . .3
To Store Risers on the Storage Cart . . . . . . . . . . . . . . . . . . . . . . . . . . . . . . . . . . . . . . . . . . . . . . . . . . . . . . . . . . . .3
Load Risers onto the Cart . . . . . . . . . . . . . . . . . . . . . . . . . . . . . . . . . . . . . . . . . . . . . . . . . . . . . . . . . . . . . . . . . .6
Load Fourth Steps onto the Cart . . . . . . . . . . . . . . . . . . . . . . . . . . . . . . . . . . . . . . . . . . . . . . . . . . . . . . . . . . . . .10
Replacement Parts List . . . . . . . . . . . . . . . . . . . . . . . . . . . . . . . . . . . . . . . . . . . . . . . . . . . . . . . . . . . . . . . . . . . . . .11
Storage Cart

2
SAFETY
!CAUTION
Always start
loading Risers at
the bottom of the
Storage Cart.
!CAUTION
Always use two
people to load
risers
Throughout this manual you will find CAUTIONS and WARNINGS which are defined as follows.
• WARNING means that failure to follow the instruction may result in serious injury or death.
• CAUTION means that failure to follow the instruction may result in serious injury or damage to the
pit filler.
PRECAUTIONS
•Make sure that anyone using the Storage Cart is familiar with this manual.
•Two people are always required to move a loaded Storage Cart.
•Always use two people to load Risers onto the Storage Cart.
•Always load Risers first onto the bottom or the Storage Cart.
•Never laod anything on the Swing Arms unless Risers have been loaded first.
•A dangerous pinch point develops when the Swing Arm closes.
!CAUTION
Two people are
always required to
move the loaded
Cart.
!CAUTION
Never load anything
on the top swing
arms unless risers
have been loaded
first.
The Tourmaster Storage Cart is guaranteed free of defects in materials and workmanship for three full
years.
Our guarantee assures you of either a full refund or repair or replacement of the defective
materials or workmanship without charge, at the discretion of our Customer Service Department. Just
call a Customer Service Representative at 1-800-887-7145 and state the reason you are dissatisfied. If
a product return is necessary, your representative will issue a return authorization. This is your sole
remedy for breach of this warranty.
Should you have a question or problem with any Wenger product, don’t hesitate to call, even if the
product is past warranty. It’s important to us that all our customers be satisfied.
This is the sole warranty made by Wenger. Wenger disclaims all other warranties, including
the warranties of merchantability and fitness for a particular purpose, as well as all liability for incidental,
consequential, special, and indirect damage. Wenger liability for direct damages shall be limited to the
amount you paid for the product involved. Wenger reserves the right to make product changes without
obligation to incorporate such changes into products previously sold.
Some states do not allow the exclusion or limitation of damages or warranties, so the above may not
apply to you. This warranty gives you specific legal rights. You may also have other rights which vary
from state to state.
WARRANTY
!WARNING
A Dangerous Pinch
Point develops
when the Swing
Arm closes.
3
TO STORE RISERS ON THE STORAGE CART
LOAD BACK RAILS
Load up to four Back Rails onto a Storage Cart as follows.
1. Lift a Back Rail with the Positioning Wheels on the legs pointing upward and the legs next to the
Cart (Horizontal Rail is away from the Cart).
2. Place the Back Rail onto the Back Rail Supports with each Back Rail Leg facing toward the
Back Rail Support Posts as shown below.
Back Rail
Back Rail Leg
Back Rail Support
Back Rail Leg Positioning Wheel
Back Rail Support Post
Storage Cart
Back Rail Support
Back Rail Support Post
Back Rail Leg
Place the Back Rail Legs outside
of the Back Rail Support Post
Storage Cart with one
Back Rail Loaded
Horizontal Rail

4
LOAD BACK RAILS CONTINUED
TO STORE RISERS ON THE STORAGE CART CONTINUED
3. To load the second Back Rail, lift it with the Positioning Wheels on the legs pointing upward and
the Back Rail Legs facing away from the Cart.
4. Place the Back Rail onto the Back Rail Supports with the Back Rail Horizontal Rails touching as
shown below.
Note: Each pair of Back Rails can be loaded onto the Cart with either the Horizontal Rail touching
or the Back Rail Legs nested together.
First Back Rail
Second Back Rail
Storage Cart
Back Rail Support
Back Rail Support Post
First Back Rail Leg
Second Back Rail Leg
Back Rail Legs
Note that the Back Rail Legs are on opposite
sides of the Back Rail Horizontal Members and
the Horizontal Rails are touching.
Positioning Wheels
Horizontal Rails

5
LOAD BACK RAILS CONTINUED
TO STORE RISERS ON THE STORAGE CART CONTINUED
5. Place the third and fourth Back Rails onto the Cart with the Horizontal Rails touching as shown
below.
Third Back Rail
Fourth Back Rail
Horizontal Rails
Horizontal Rails are touching
and the Vertical Legs of the
Second and Third Back Rails
nest together.
Second Back Rail
Vertical Legs
Cart loaded with
tour Back Rails
Third Back Rail
Storage Cart
Horizontal Rails

6
TO STORE RISERS ON THE STORAGE CART CONTINUED
LOAD RISERS ONTO THE CART
Load up to four Risers onto the Storage Cart as follows.
1. Begin opening the Swing Arms by pushing upward on the under side of the Swing Arm
Horizontal Bar as close to the Swing Arm Post as possible. Always start with the highest Arm
and swing the Arm away from the Cart.
Swing Arm
Horizontal Bar
Storage Cart
2. Continue opening all of the Swing Arms
Swing Arm
Swing Arm Pivot Post Lift the Swing Arm here
to free the keeper on the
end of the Arm to allow
swinging.
Keeper
Cart Support Frame
Loaded Back Rails are not
shown for clarity.
Storage Cart
Swing Arm Post

7
TO STORE RISERS ON THE STORAGE CART CONTINUED
LOAD RISERS ONTO THE CART CONTINUED
3. With two people working together, place the first Riser onto the Cart. The Positioning Wheels
will hang over the right end of the Cart Support Frame.
Note: The 13-inch Swing Arm must be on the right side of the Cart. If the 13-inch Swing Arm is not
on the right side of the Cart, it is assembled incorrectly. Call Customer Service for
assistance in the correct assembly.
Folded Riser
Riser Positioning Wheels
Riser is placed with Positioning Wheels hanging
over the right end of the Support Frame
4. Close the two lower Swing Arms. It will be necessary to lift all of the Arms high enough for the
two lower Arms to clear the Riser.
Note: When the Swing Arm Keeper is inserted into the Holding Socket, a dangerous pinch point
develops. Serious injury is possible if this precaution is not observed.
!WARNING
A Dangerous Pinch
Point develops
when the Swing
Arm closes.
Swing Arms shown in the
closed position.
Back Rails are not
shown for clarity !CAUTION
Always start
loading Risers at
the bottom of the
Storage Cart.
Storage Cart
Folded Riser
Positioning Wheels must
hang outside of the Cart.
!CAUTION
Always use two
people to load
risers

8
TO STORE RISERS ON THE STORAGE CART CONTINUED
LOAD RISERS ONTO THE CART CONTINUED
5. With two people working together, place the second Riser onto the Cart with the positioning
Wheels on the left end, opposite from the first Riser Positioning Wheels. Make sure that the
Positioning Wheels hang outside of the Swing Arm.
Second Folded Riser
Riser Positioning Wheels
!WARNING
A Dangerous Pinch
Point develops
when the Swing
Arm closes.
6. Close the two Swing Arms above the Riser. It will be necessary to lift all of the Arms high
enough for the two Arms to clear the Riser.
Note: When the Swing Arm closes, a dangerous pinch point develops. Serious injury is possible if
this precaution is not observed.
Swing Arm Closed
Swing Arm Closed
Second set of Swing Arms
shown in the closed
position.
First Riser
Second Riser
Storage Cart

9
TO STORE RISERS ON THE STORAGE CART CONTINUED
LOAD RISERS ONTO THE CART CONTINUED
7. With two people working together, place the third and fourth Risers onto the Cart (as in steps 2
to 6 above) with the Positioning Wheels alternating as shown below. Make sure that the
Positioning Wheels hang outside of the Swing Arm.
Note: If the Storage Cart is to be transported by a vehicle, always fasten each Riser to both
Swing Arms (or Storage Cart Frame for the lowest Riser) with rubber or polyurethane tie
down cords or light duty cinch straps.
!WARNING
A Dangerous Pinch
Point develops
when the Swing
Arm closes.
Fourth Riser
Third Riser
!CAUTION
Two people are
always required to
move the loaded
Cart.
Storage Cart
Riser Positioning Wheels

10
TO STORE RISERS ON THE STORAGE CART CONTINUED
LOAD FOURTH STEPS ONTO THE CART
1. Place the first 4th-Step onto the top set of Swing Arms with the carpet side down and the
Positioning Wheels facing outward (away from the Swing Arm Post).
2. Place the second 4th-Step with the carpet side up with the positioning wheels facing outward.
3. Place the third step carpet side down with the positioning wheels facing outward.
4. Place the fourth step carpet side up with positioning wheels facing outward.
Storage Cart
Swing Arm Post
4th-Steps, Folded, Carpet
Side Down
Positioning Wheels
2. Fasten the Cinch Straps around the stacked 4th-Steps.
Back Rails and Folded Risers
are not shown for clarity.
Storage Cart
Cinch Strap
Storage Cart Cross Bar
4th-Steps
Load the 4th-Steps alternating Carpet
Side Down and then Carpet Side Up.
Positioning Wheels face away from the
Cross Bar and Swing Arm Posts
Storage Cart Cross Bar
!CAUTION
Two people are
always required to
move the loaded
Cart.
!CAUTION
Never load anything
on the top swing
arms unless risers
have been properly
loaded first.
4th-Steps, Folded,
Carpet Side Up
Back Rails and Folded Risers
are not shown for clarity.

11
REPLACEMENT PARTS LIST
Storage Cart
Item Qty Description
1 12 Hex Head Cap Screw, 3/8-16x2-1/2"
2 16 Hex Head Cap Screw, 3/8-16x1"
3 28 Hex Head Lock Nut, 3/8-16
4 1 Cross Bar
5 2 Swing Arm Post
6 4 Swing Arm, 13-inch
7 4 Swing Arm, 10-inch
8 1 Storage Cart Frame
9 4 Caster
10 2 Back Rail Support Post
11 2Safety Strap (not shown)

Other manuals for Tourmaster Storage Cart
1
Table of contents
Other Wenger Outdoor Cart manuals

Wenger
Wenger teacherTAXI User manual

Wenger
Wenger GEARBOSS TranSport Cart User manual

Wenger
Wenger Gearboss User manual

Wenger
Wenger Roll-A-Deck Kit User manual

Wenger
Wenger OnBoard Percussion Cart User manual

Wenger
Wenger teacherTAXI Assembly instructions

Wenger
Wenger OnBoard Timpani Cart User manual

Wenger
Wenger Diva User manual

Wenger
Wenger OnBoard 210A327-02 User manual

Wenger
Wenger OnBoard Uniform User manual