Wespro Power Tools BRV250HD User manual

1/5
Wespro Power Tools
BRV250HD BLIND RIVETER
For rivets 1/8” & 5/32, please replace jaws #4 105915 and jaw pusher #5 WP 500007A to #4 249766
and #66 WP 500080.

No.
Description
Order Code
Qty
No.
Description
Order Code
Qty
1A
Nosepiece 1/8"
188083
1
37
Valve Pressure Spring
85478
1
1B
Nosepiece 5/32"
188084
1
38
Valve Plate
88439
1
1C
Nosepiece 3/16" (STD)
188085
1
39
Valve Spring
97054
1
Nosepiece 3/16" (XL)*
282581
1
40
Valve Rod
187708
1
1D
Nosepiece 1/4"
105920
1
41
O-Ring
188172
1
2
Head
129789
1
42
Pin
106125
1
3
Jaw Housing
106147
1
43
Pin
106126
1
4
Jaw (Heavy Duty)
105915
3
45
Mandrel Collector Ass'y
176213
1
Jaw (for rivets 1/8" & 5/32")
249766
46
O-Ring Seal
85485
1
5
Jaw Pusher
317902
1
49
Lock Nut
106134
1
6
Spring
282382
1
50
O-Ring Seal
188141
1
7
O-Ring Seal
190375
1
51
Trigger
106127
1
8
Jaw Housing Coupler
106088
1
52
Trigger Rod
140362
1
9
Nut
106148
1
53
Trigger Lever
188171
1
10
X-Ring Seal
97046
2
54
X-Ring Seal
97037
2
11
O-Ring Washer
97061
2
55
Ring Washer
97038
2
12
Hydraulic Section
187446
1
56
Pin
106131
1
13
Oil Plug
106116
1
57
Fill Washer
140363
1
14
Hydraulic Plunger
317903
1
58
Retaining Ring
106145
1
15
O-Ring Seal
97034
1
59
Rubber Plate
190369
1
15-1
O-Ring Seal
300155
1
60
Spring
106146
1
16
Washer
97035
1
61
O-Ring Seal
194331
1
17
O-Ring Seal
106133
2
62
O-Ring
120316
1
18
Return Spring
233026
1
63
Adjustable Bushing
249739
1
19
O-Ring Seal
120311
1
64
O-Ring Seal
120319
1
20
Hanging Ring
106121
1
65A
Adjustable Screw Assy
299340
1
21
Screw Plug
176214
1
65
Adjustable Screw
167940
1
22
Piston Disc
106151
1
66
Jaw Pusher
317901
1
23
O-Ring Seal
97056
2
67
Rubber Cushion
97063
1
24
O-Ring Seal
97062
1
68
Hand Grip
264334
1
25
Spring Washer
264335
1
69
Universal Joint Kit
218043
1
26
Piston Head Lock Screw
106154
1
70
O-Ring Seal
218044
1
27
Plunger Rod
106155
1
Acc.
Spanner (17/19 mm)
190397
1
28
Pin
301533
1
Spanner
249816
1
29
O-Ring Seal
106163
1
Oil Syringe
120340
1
30
Screw Plug
106132
1
Allen Wrench 5 mm
31968
1
31
Air Cylinder Body
295825
1
Opt.
32
Damping Ring
264336
1
1E
Nosepiece for 3/16" Monobolt
300277
33
O-Ring Seal
97051
2
1F
Nosepiece for 1/4" Monobolt
213705
34
Air Cylinder Cap
188170
1
1G
Nosepiece for 3/16" Magna-Lok
213707
35
Clip
97052
1
1H
Nosepiece for 1/4" Magna-Lok
213708
36
Plug Screw
97053
1
*20mm long 10/30/18
Western Office 604-298-2933 Eastern Office 905-428-1616 www.wespropowertools.com
2/5
Wespro Power Tools
BRV250HD BLIND RIVETER

3/5
Wespro Power Tools
BRV250HD BLIND RIVETER

PLEASE READ ALL INSTRUCTIONS CAREFULLY BEFORE USING
THE BRV250HD AIR HYDRAULIC RIVETER.
Safety Instructions
WEAR SAFETY GLASSES OR GOGGLES while using the riveter –
rivets are dispensed at high speed, and may cause damage or
bodily harm.
DO NOT leave riveter plugged into air supply when not in use.
NEVER point riveter towards or at someone.
KEEP OUT OF REACH OF CHILDREN AT ALL TIMES.
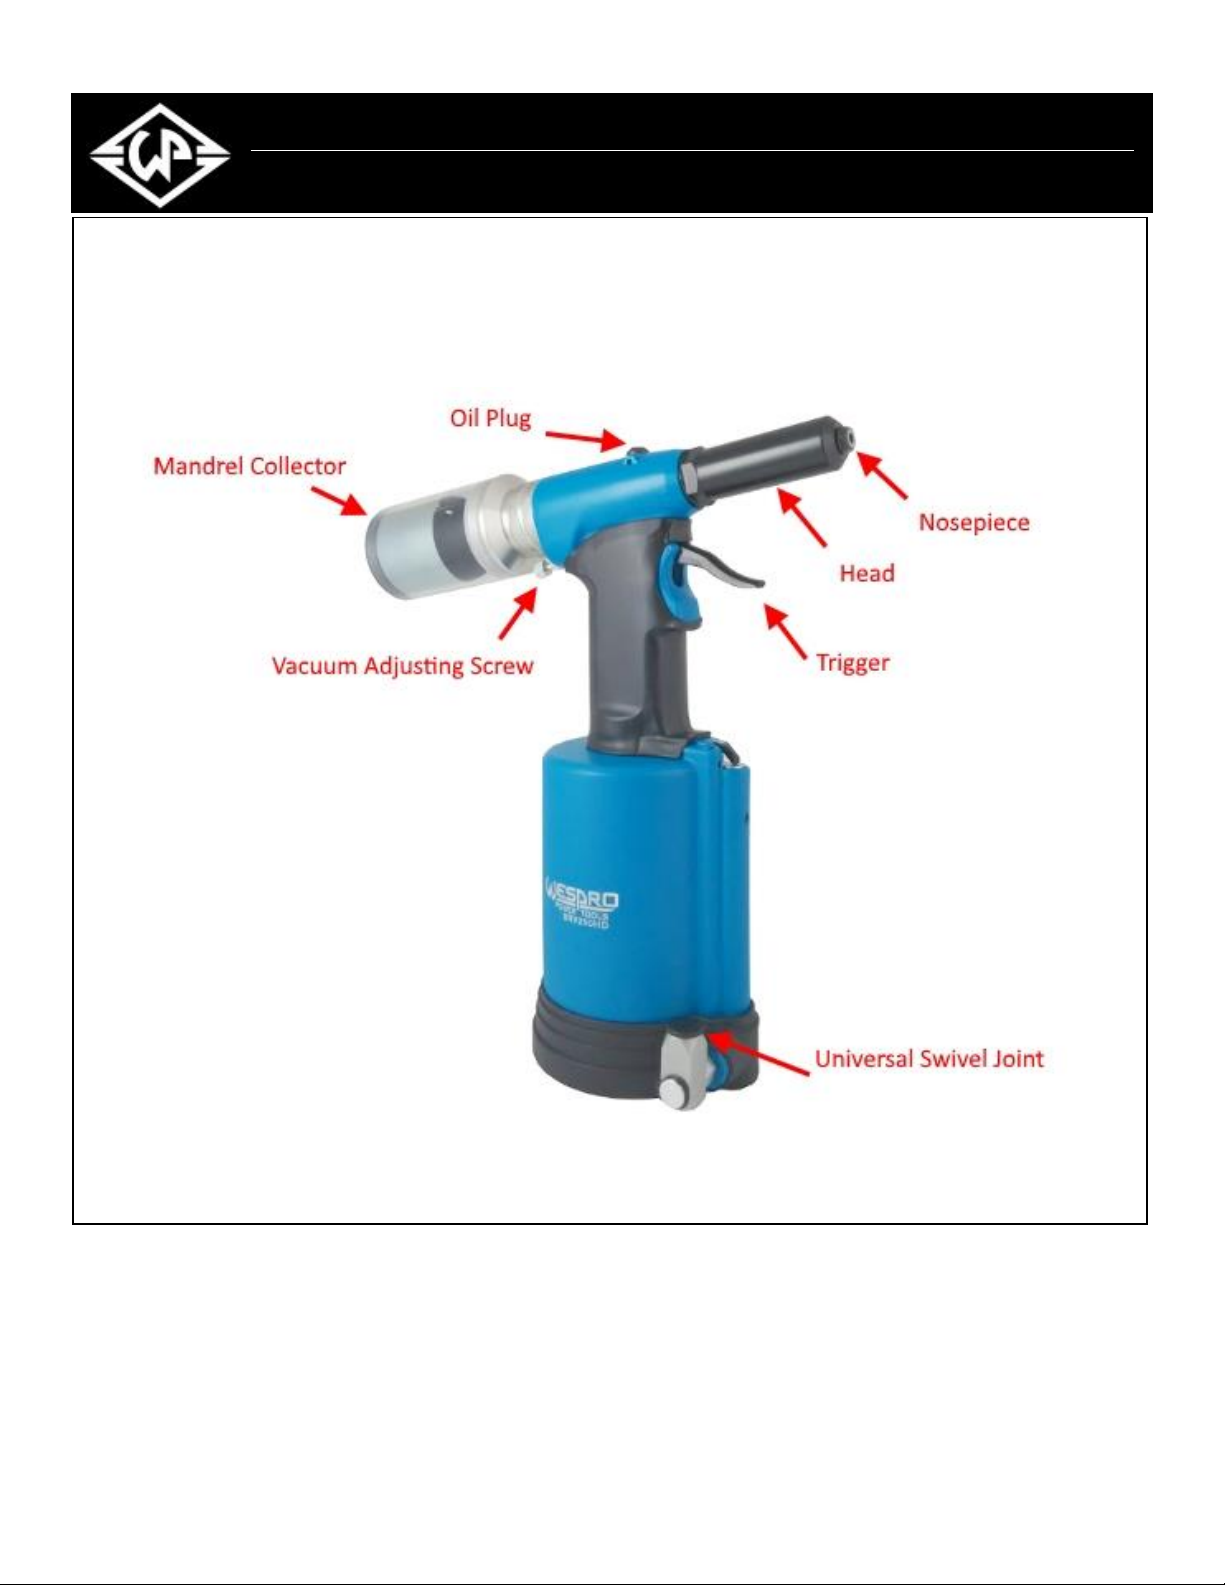
GENERAL INFORMATION
Features - Double O-Seal avoids oil leakage
-Air Return head design minimizes repairs
-Adjustable vacuum air flow
The BRV250HD comes with 1/4" nosepiece factory-installed on the tool.
Specifications:
Tool weight: 5.3 pounds
Length of Tool: 317mm
Dynamic Air Pressure: 85-100 psi
Pulling Power (lbs): 3800
Stroke Length: 21mm
Hydraulic Oil: Texaco R&O-68 or equivalent (36Cst=4.3EI 50゜C)
Riveter Accessories
Your BRV250HD Riveter comes with the following accessories:
-Wrenches (Part No. WP 54005, WP 17S19, WP 63026)
-Oil Syringe (Part No. WP 11790)
- Tool Hanger (#20) to attach to top of Riveter
Tool Preparation before Operation
1. Prior to each operation of the Riveter, you must choose the size rivet you’ll
be using. If setting 3/16”, 1/4” rivet, make sure the nosepiece on tool
corresponds to the size of rivet being used as well as jaw pusher. No
further changes to the tool are necessary.
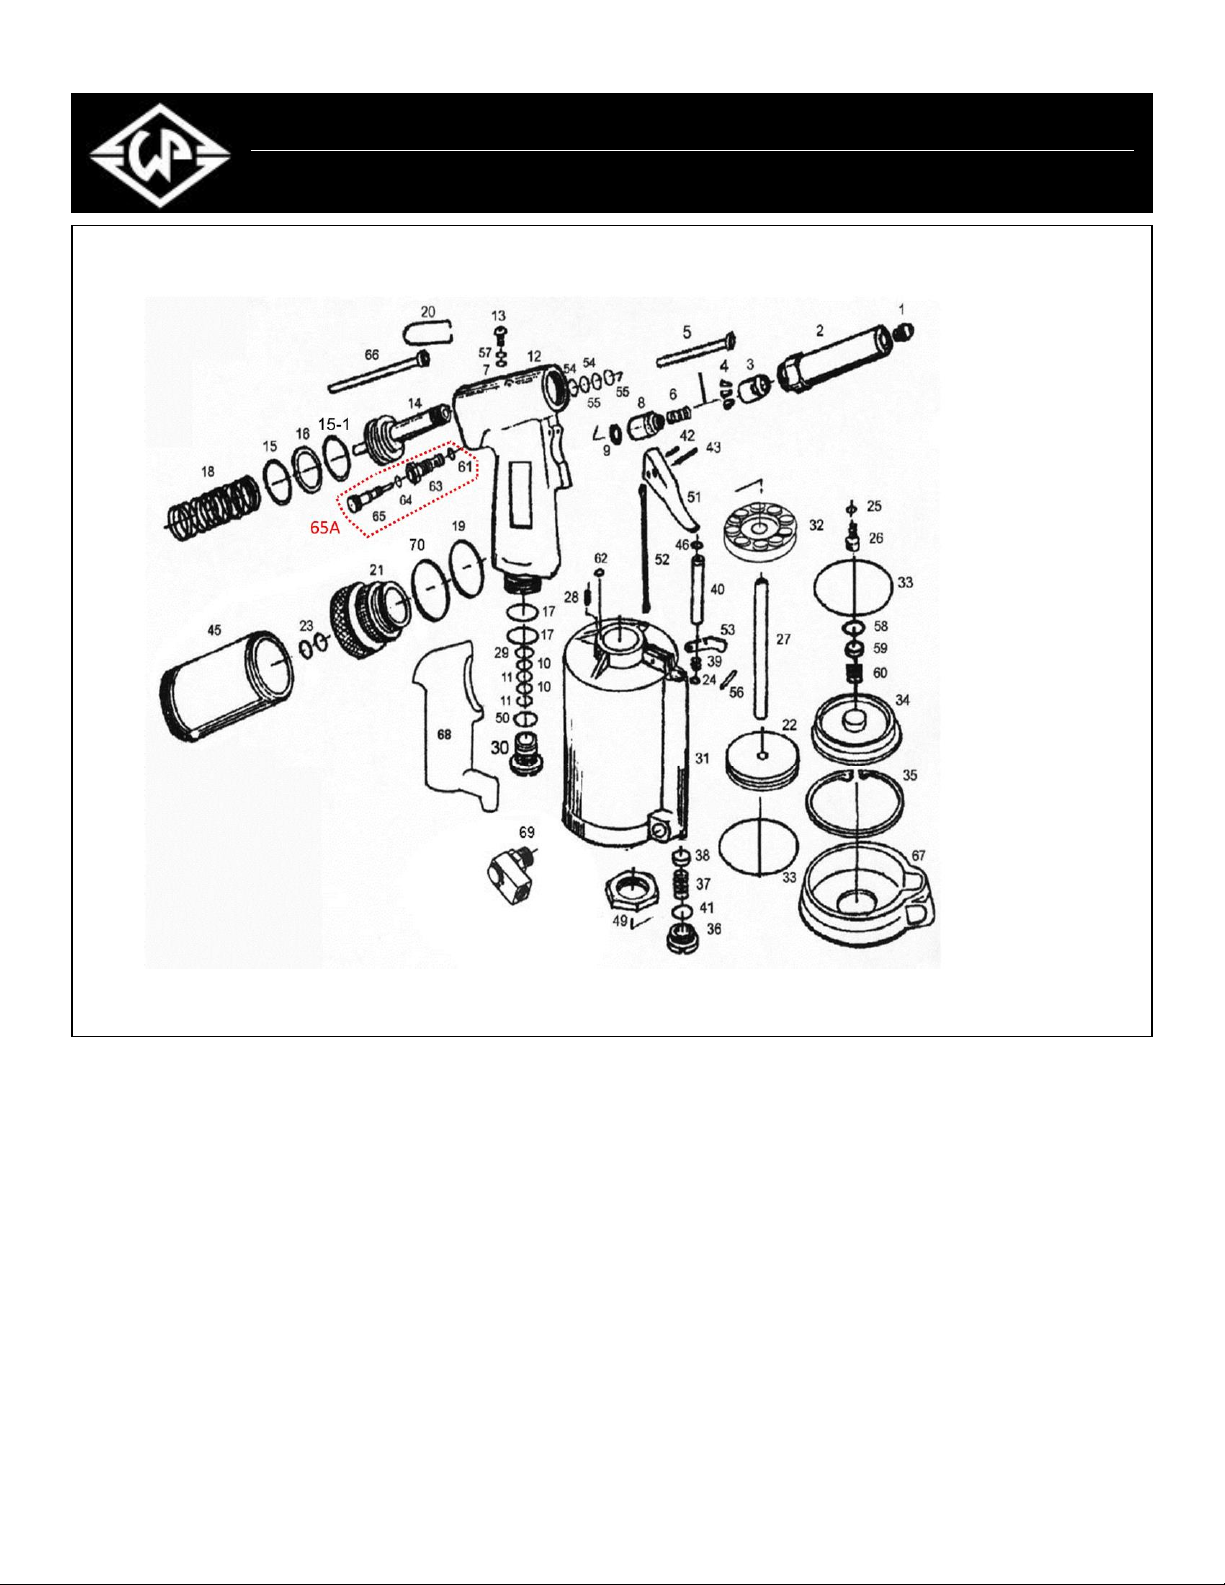
2. To change nosepiece only: remove Nosepiece (#1) from Riveter. Unscrew
by turning Nosepiece counter-clockwise. Choose Nosepiece that
corresponds to size rivet you are using. Screw Nosepiece onto Riveter by
turning clockwise (you will be pushing the Jaws into the tool as you’re
attaching Nosepiece). Use the 11mm wrench included with accessories to
loosen and tighten the Nosepiece.
3. To do this, remove Nosepiece (#1) and Head (#2) from Riveter. Use
11mm wrench to loosen Nosepiece. Unscrew Jaw Housing (#3)
from Jaw Housing Coupler (#8); when Housing is removed, Jaw
pusher (#5) as well as 3 pieces of Jaws (#4) will be loose inside
Housing. (this size Jaw Pusher is for setting 1/4”& 3/16” rivets).
4. NOTE: Jaws must be correctly positioned inside Housing for optimal
performance. Place 3 pieces of Jaws down into small end of
Housing, with narrower ends of jaws facing downward and
protruding out small end of Housing. The long serrated edges face
inward towards each other. MAKE SURE THE 3 PIECES ARE IN
THE CORRECT POSITION –Riveter will not operate correctly if
Jaw pieces are not properly inserted. You may need to adjust how
far each piece of Jaw protrudes through small opening. This insures
they are equally distributed.
5. Carefully screw Head (#2) back onto tool securely, making sure that
Jaw pieces stay in place. Then screw correct Nosepiece onto tool.
Please note: you will be pushing jaws back into tool slightly as you
are attaching Nosepiece. Use 11mm Wrench (included in
Accessory bag) to tighten Nosepiece onto tool.
6. Install Mandrel Bottle (#45) to back of Riveter.
7. Cycle air through tool once air connection is hooked up to insure
correct alignment of jaws.
Operating Instructions
1. Attach a ¼” NPT (Quick Connect Valve) to the Universal Joint (#69).
Plug air supply into Quick Connect Valve. Air supply should operate
at no higher than 100 PSI.
2. Squeeze Trigger (#51) to start the vacuum system.
3. Insert mandrel of rivet into Riveter. Rivet will be held in Riveter by air
vacuum. If rivet falls out of tool, vacuum is not strong enough.
Amount of vacuum can be adjusted via Adjuster Screw (#65) located
under the Mandrel Bottle area. Turn this screw counter-clockwise to
increase vacuum, or clockwise to decrease vacuum. The longer the
rivet, the stronger the vacuum must be to hold rivet in place in tool.
4. Mandrel will be ejected into Mandrel Bottle once Trigger is released.
5. NEVER allow Mandrel Bottle to fill more than 1/3 full. Damage to
Hydraulic Plunger may occur. To empty Mandrel Bottle, turn knob at
end of bottle to reveal bottle opening. Shake mandrels out of hole.
Once emptied, turn knob until opening is covered and Mandrel
Bottle is resealed.
4/5

Care and Maintenance
BRV250HD
Regular service should be performed on this tool for best performance and
longer life of tool.
1. Empty Mandrel Bottle before it gets more than 1/3 full of mandrels. Too
many mandrels in collector can damage the Hydraulic Plunger and/or cause
a hazardous condition for the operator.
2. Insure that jaws are clean and free of metal shavings, dirt and oil. Clean
serrations in Jaw pieces with a wire brush or steel wool to remove debris.
3. Keep oil at optimum level. With use of tool, there may be a gradual loss of
oil. When you notice a reduction in the stroke, you need to add a small
amount of oil.
-Change nosepiece to largest diameter that the tool accepts. This
is necessary in order to test the tool after the oil has been filled.
-Remove air supply to Riveter, and remove Oil Plug (#13) on top of
Riveter using Allen wrench (included).
-Use proper oil as listed under Specifications. Put small
amount of oil in a saucer or cup; place syringe nozzle
(syringe included) down into oil, then draw plunger of
syringe back to fill body of syringe. Fill to 9.
-Screw syringe nozzle into Riveter in top hole where Oil Plug (#13)
was removed. Very slowly push in plunger of syringe to deliver oil
into tool.
-Unscrew syringe nozzle from Riveter and insert Oil Plug
(#13) back into Riveter; tighten Oil Plug firmly. Reconnect
Riveter to air supply and depress trigger 2-3 times.
-To test oil level, insert rivet into Nosepiece (use largest
diameter rivet that tool accepts). Check to see if rivet
mandrel can be inserted completely into Nosepiece –head
of rivet must touch Nosepiece. If rivet cannot be
completely inserted into tool, too much oil has been added
and some must be removed.
-To remove excess oil, unscrew Oil Plug (#13)
approximately 1/4 turn. Depress and release the trigger to
cycle air through the Riveter –oil will leak from the top of
the tool at the Oil Plug hole as trigger is depressed.
-Wipe excess oil off of tool as you continue to depress and
release the trigger as needed, until rivet head touches the
Nosepiece. Once tool is properly adjusted, tighten Oil Plug
(#13) completely with Allen wrench.
-Save plunger for future use.
Add Oil
Insert Rivet
Rivet Head touches
Nosepiece
Remove Excess Oil
Tighten Oil Plug
Remove Oil Plug
Western Office 604-298-2933 Eastern Office 905-428-1616
www.wespropowertools.com
5/5
Table of contents
Other Wespro Power Tools Power Tools manuals