Westfield PLUTO 7 User manual

www.westfieldoutdoors.eu
PLUTO
DE
GB
PREMIUMSERIES
PREMIUMSERIES
PLUTO 7 8 9 10 11
Gr.8/Size 8 Artikel- Nr.12020370800000
Gr.10/Size 10 Artikel- Nr.12020371000000Gr.9/Size 9 Artikel- Nr.12020370900000
Gr.7/Size 7 Artikel- Nr.12020370700000
Gr.11/Size 11 Artikel- Nr.12020371100000
VOLLEINGEZOGENES LUFTVORZELT/ FULL AIR AWNING

PREMIUMSERIES
Vielen Dank, dass Sie sich für ein Vorzelt der „Premium Series“ von „Westfield Top Quality Concept“
entschieden haben. Bitte lesen Sie diese Gebrauchsanweisung sorgfältig durch und beachten Sie unsere
Pflege- und Sicherheitshinweise.
Thank you for purchasing this Westfield Top Quality Concept awning. Please read these instructions for
use fully and carefully before using your awning. Please observe the care and safety instructions.
WILLKOMMEN/ WELCOME
ZUSAMMENFASSUNG/ SUMMARY
BEWAHREN SIE DIESES HANDBUCH SORGFÄLTIG AUF/KEEP THIS MANUAL FOR FUTURE REFERENCE.
!
ALLGEMEINE EMPFEHLUNGEN UND VERWENDUNG
GENERAL RECOMMENDATIONS AND USAGE
STÜCKLISTE/ PARTS LIST
AUFBAU/ INSTALLATION
Vorbereiten/ Preparation
Zelt einziehen/ Insert Awning
Aufpumpen/ Pumping
Front- und Seitenwände/ Front and side panels
Montieren des Vordachs/ Assembling the front canopy
ABSPANNUNG/ PITCHING
Sturmleinen/ Storm Strap
OPTIONAL/ OPTIONAL
Anbau/ Annex
Luftgestange/ Front Air Tube
PFLEGEANLEITUNG
GENERAL CARE AND USAGE INSTRUCTIONS
1
2
4
5
6
8
9
10
12
13

1
PREMIUMSERIES
www.westfieldoutdoors.eu
BEWAHREN SIE DIESES HANDBUCH SORGFÄLTIG AUF/KEEP THIS MANUAL FOR FUTURE REFERENCE.
ALLGEMEINE EMPFEHLUNGEN UND VERWENDUNG
GENERAL RECOMMENDATIONS AND USAGE
Wir empfehlen die Verwendung einer zusätzlichen Bodenplane oder einer zusätzlichen Abdeckung,
um Schäden an Ihrem Vorzelt zu vermeiden, welche während der Montage an Ihrem Wohnwagen,
Wohnmobil oder Fahrzeug entstehen können.
Bitte machen Sie sich mit dem Vorzelt vertraut, bevor Sie Ihre erste Reise antreten. Wir empfehlen
einen Probeaufbau.
Legen Sie das Vorzelt auf einer sauberen und ebenen Fläche aus. Entfernen Sie Steine und Äste, um
mögliche Schäden zu vermeiden. Achten Sie auf aufkommenden Wind um Schäden zu vermeiden.
Versuchen Sie, Ihr Vorzelt in einem windgeschützten Bereich aufzubauen.
Vermeiden Sie es, Ihr Vorzelt unter Bäumen aufzustellen, da Baumharz und andere Fremdkörper
Ihr Vorzelt dauerhaft beschädigen oder verschmutzen können.
Bei allen beschichteten und nicht atmungsaktiven Materialien kommt es immer zu Kondensation.
Auf der kältesten Oberfläche des Vorzeltes bildet sich Kondenswasser, welches auf der Innenseite
des Vorzeltes sichtbar sein kann. Kondensation, ist kein Herstellungsfehler oder Reklamationsgrund.
Kondenswasser kann durch gute Belüftung reduziert werden.
Das Vorzelt ist nur für den privaten Gebrauch und nicht für eine gewerbliche Nutzung entwickelt.
Ebenfalls ist das Zelt nicht für den Dauereinsatz hergestellt.
Bitte vermeiden Sie jegliche Schneelast. Vorzelte sind nicht für die Schneelast ausgelegt.
Bei starken Winden und Stürmen muss das Vorzelt abgebaut werden, um Schäden am Produkt zu
vermeiden.
Öffnen Sie niemals die Reißverschlüsse an einem aufgeblasenen Luftschlauch, da sonst die Luftschläu-
che beschädigt werden können.
Die Ventile an den Luftschläuchen können sich mit der Zeit lösen, prüfen Sie vor jedem Einsatz, ob
die Ventile fest verschraubt sind.
We recommend the use of an additional groundsheet or covering to avoid any damage to yourawning whilst
fitting it to your caravan, motor home or vehicle.
Please familiarize yourself with the awning before you go on your first trip. We recommend a test set-up before
your trip.
Install your awning on a clean and even surface. Remove stones and branches to avoid possible damage to your
awning and make a note about the direction and strength of the wind and always try to build your awning up
in a wind-protected area.
Avoid setting up your awning under trees as tree sap and other debris can permanently mark or damage your
awning.
On all coated, non-breathable materials you will always get some condensation. This is when condensed water
forms on the coldest surface of the awning which can sometimes be inside the awning. Condensation is often
mistaken for leaking and is not a reason for complaint or a fault of the awning.
This can be lessened by ensuring the awning has adequate ventilation to allow increased air flow and thus, reduce
the condensation.
This awning is not built for permanent pitching or commercial use.
Please avoid any snow load. Air awnings are not built for snow load.
In the case of strong winds and storms, the awning must be taken down in order to avoid storm damage.
Never open the zips on any of the air tubes when they are inflated. This can lead to damage to the air tubes
and your awning.
The valves on the air tubes can become loose over time even when not used, so before you inflate your awning
you should always check that the valves are tight otherwise they could leak.

PREMIUMSERIES
PLUTO
PLUTO GRÖßE/ SIZE 7/8/9/10/11
AAS KIT
ANNEX
ANNEX
Advanced Air System® (AAS)
2
250cm
ab/from 490cm
Gr.7/Size 7: 490 cm
Gr.8/Size 8: 525 cm
Gr.9/Size 9: 560 cm
Gr.10/Size 10: 595 cm
Gr.11/Size 11: 630 cm
Gr.7/Size 7: 911~945cm
Gr.8/Size 8: 946~980cm
Gr.9/Size 9: 981~1015cm
Gr.10/Size 10: 1016~1050cm
Gr.11/Size 11: 1051~1085cm
Umlaufmaß/ A-measurement
250cm
250cm
490cm ~ 630cm
3
PREMIUMSERIES
www.westfieldoutdoors.eu
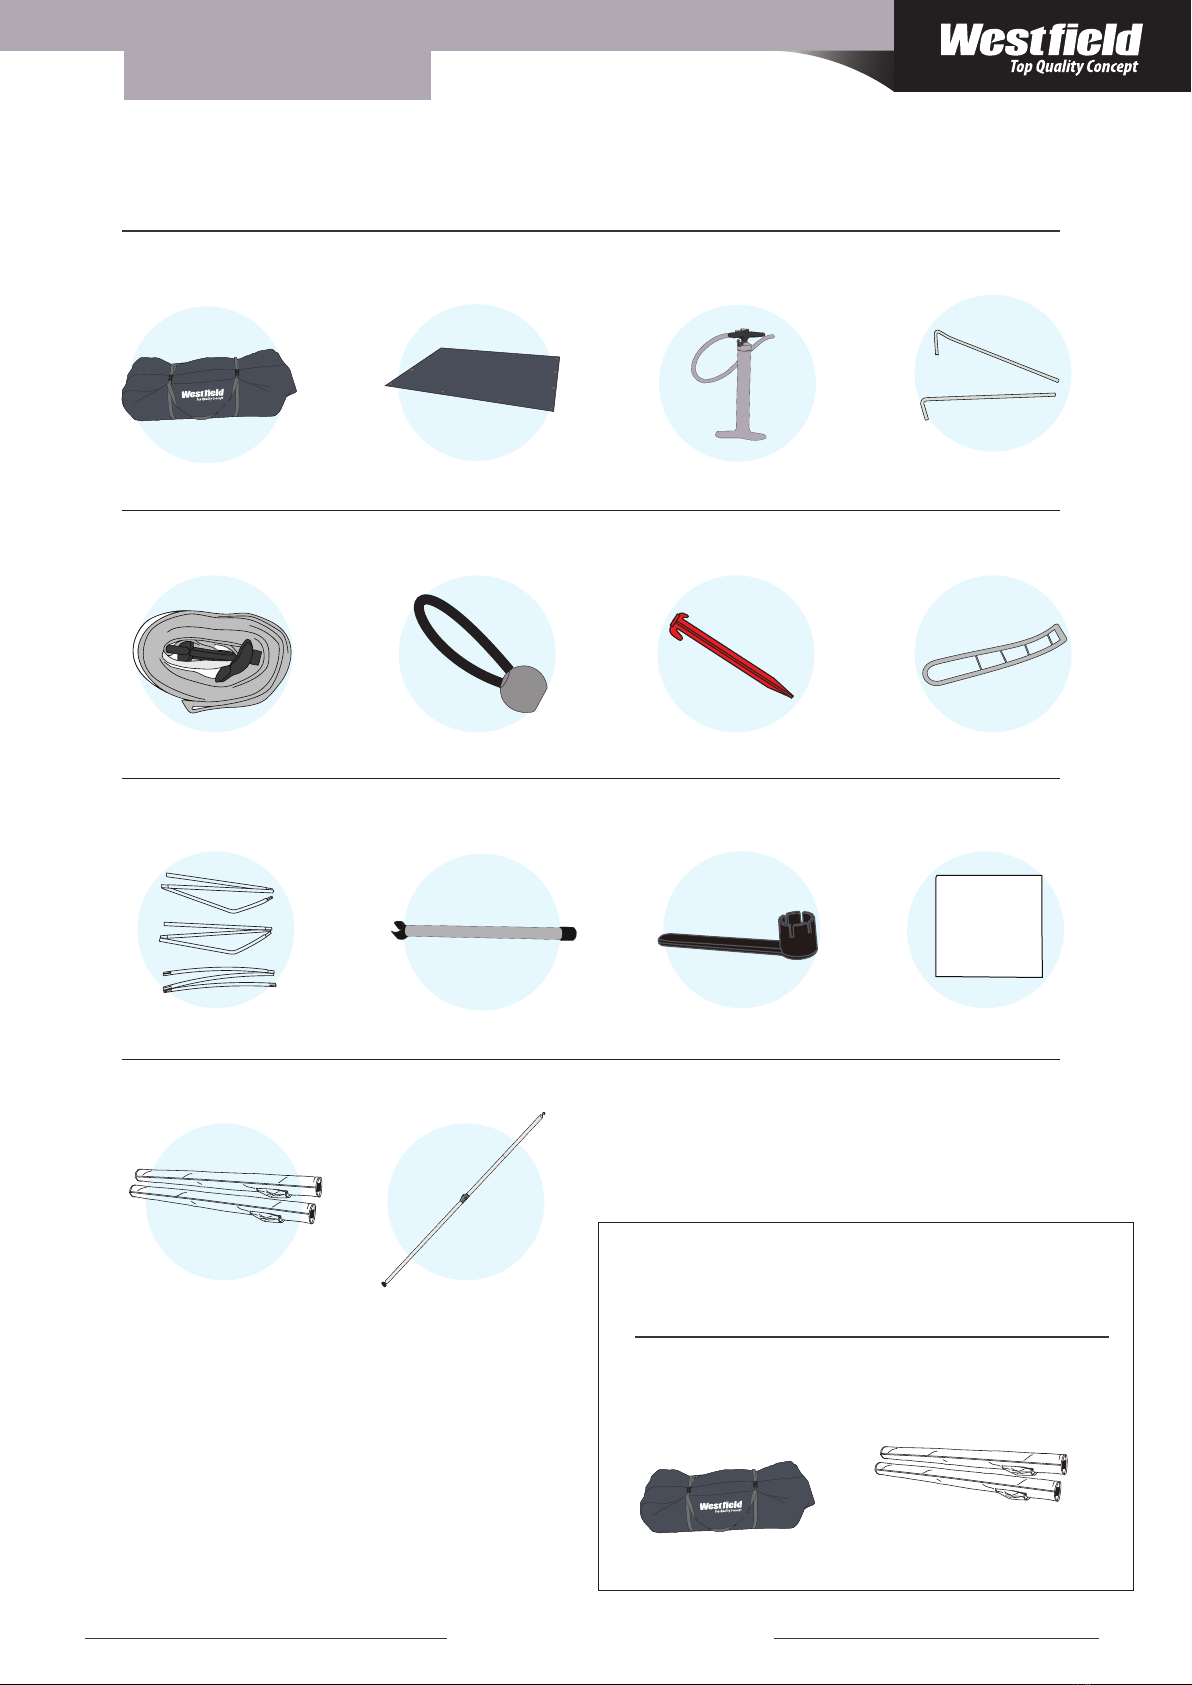
STÜCKLISTE/PARTS LIST
OPTIONAL/OPTIONAL
x 8
x 2x 1
x 8
x 1
52(Gr.7/Size 7)
56(Gr.8~11/Size 8~11)
40(Gr.7/Size 7)
44(Gr.8~11/Size 8~11)
x 12~16
je nach der Größe/depending on the size
nur für Gr.11/only for Size 11
optional für Gr. 7~10/optinal for Size 7~10
für Gr. 7~10/for Size 7~10
TPU
1.Clean repair area thoroughly
2.Press patch fiemly over puncture
3.Do not inflate for four(4)hours to
allow repair to set
x 3
Frontstützen
Short Front Canopy Pole
x 1
Verandastange
Veranda Pole
x 2
Luftgestange
Front Air Tube
x 2
Luftgestange
Front Air Tube
STÜCKLISTE/PARTS LIST
x 2
Tragetasche
Carry Bag
Gr.7/Size 7: 490 cm
Gr.8/Size 8: 525 cm
Gr.9/Size 9: 560 cm
Gr.10/Size 10: 595 cm
Gr.11/Size 11: 630 cm
x 1
Windschürze und Radblende
Draft Skirt and Wheel Cover
x 1
Pumpe mit Sicherheitsventil
Pump & Safety Pressure Valve
Stahlerdnägel
Steel Pegs
Sturmleinen
Storm Strap
Elastikspanner
Elastic Ring
ABS Heringe
ABS Peg
Leitergummis
Pegging Ladder
Frontgestänge
Front Canopy Pole
Plastikspanner
Plastic spanner
TPU Reparaturset
TPU Repair Patch
Anbau
Annex
x x

4
PREMIUMSERIES
PLUTO
Nutzen Sie immer eine Plane oder einen Zeltteppich als Unterlage. Um Beschädigungen und Verschmu
tzungen beim Einfedeln zu vermeiden.
Always use a groundsheet or a tent carpet as a base. To avoid damage and avoiding contamination during assembling.
Bei Bedarf schieben Sie die Windschürze in die dafür vorgesehene Kederschiene unten am Fahrzeug.
Befestigen Sie dann die Radabdeckung in der vorgesehenen Halterung oder verbinden Sie diese mit der
Windschürze mittels der mitgelieferten Doppelkederschiene.
If nequired fit the draft skirt by sliding it into the lower rail on the bottom of your caravan, motorhome or vehicle. The
wheel cover either slides into the rail on the wheel arch or uses the figure of eight tubing and connects to the top of
the draft skirt.
AUFBAUEN/ INSTALLATION
1Vorbereiten/ Preparation
Vorzelt/Awning
Wände/Panels

5
PREMIUMSERIES
www.westfieldoutdoors.eu
2Zelt einziehen/ Insert Awning
Für einen erleichterten Aufbau beim einkedern empfehlen wir alle Wandelemente zu entfernen. Ziehen
Sie das Vorzelt in die Kederschiene ein und richten Sie es aus.
For an easy sliding the awning into the caravanrail we advise to take out all side and front elements. Slide the aw-
ning beading into the caravanrail and align to the desired position.
Achten Sie darauf das Sie das Zelt nach dem Einziehen gleichmäßig ausrichten. Ein nachträgliches an-
passen ist nachher nicht mehr möglich.
Please note that you align your awning equally. Afterwards changing the position is not possible.
6
PREMIUMSERIES
PLUTO
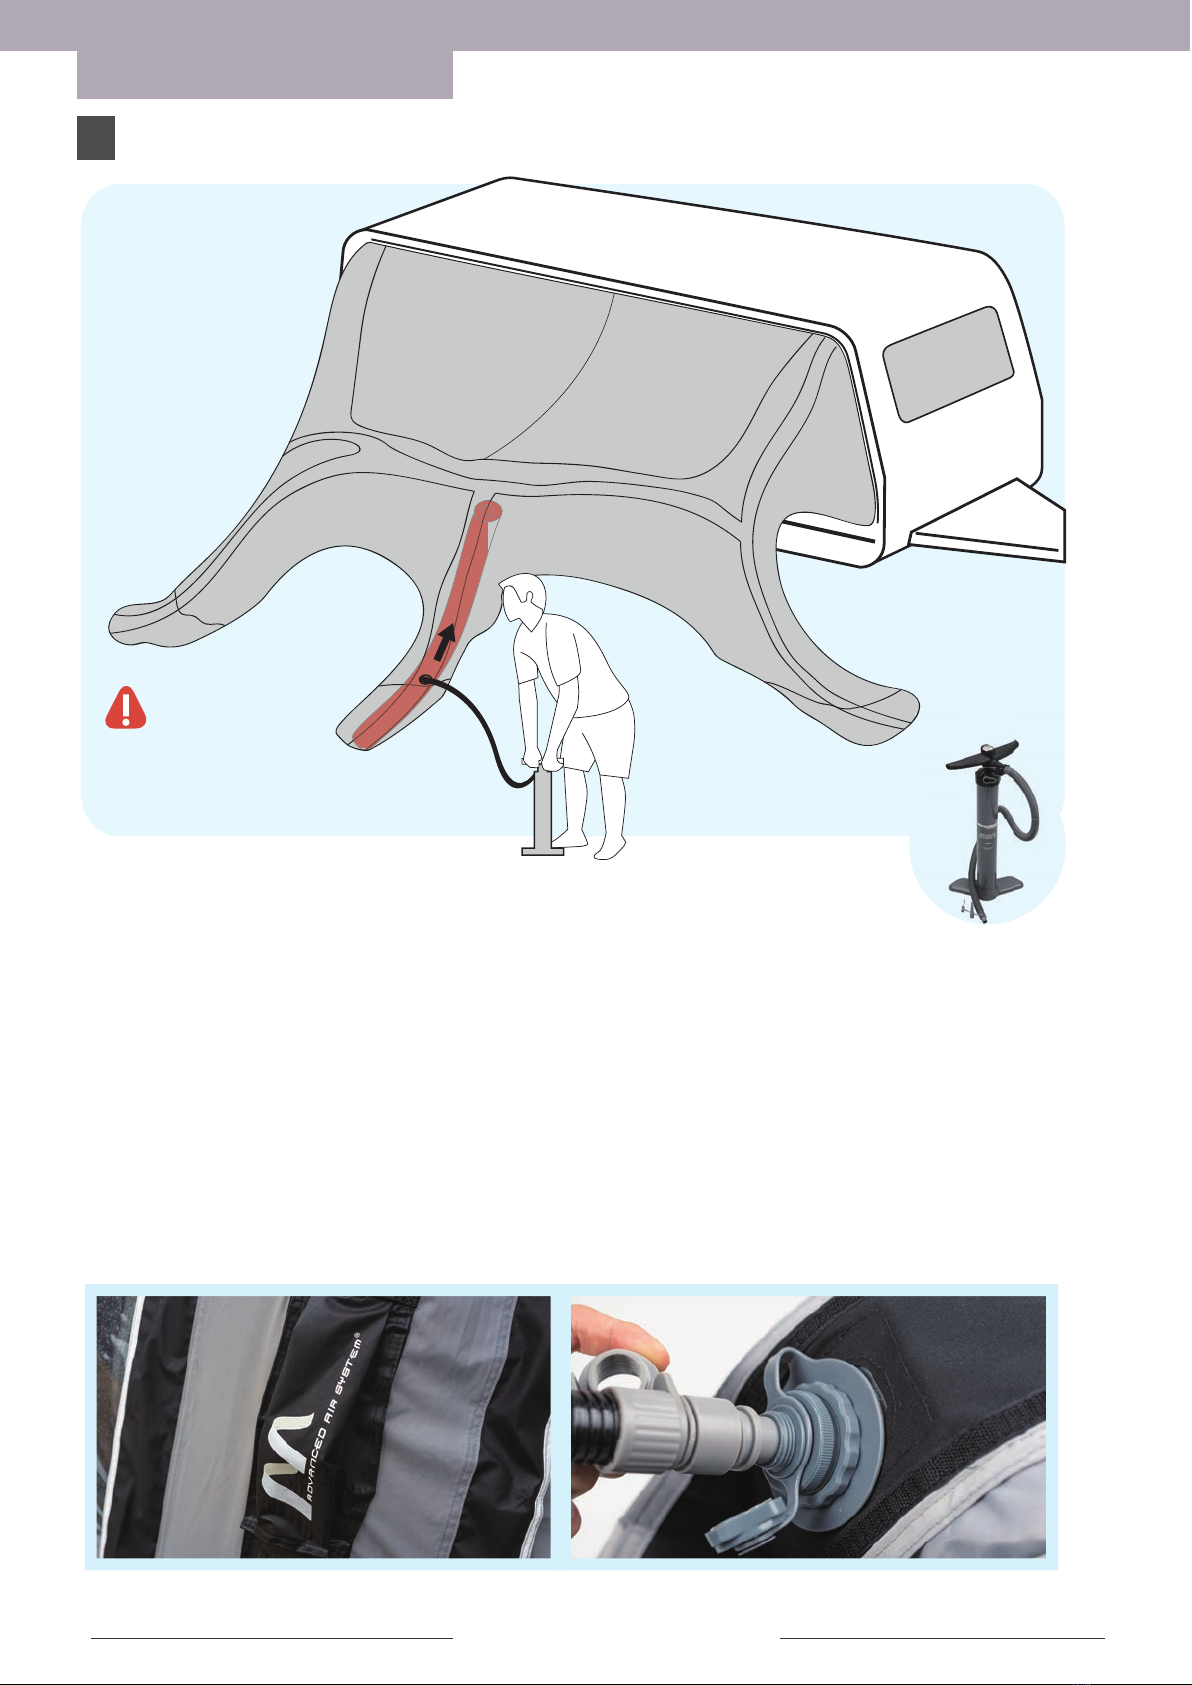
Pumpen Sie zuerst den
mittleren Luftschlauch auf.
Pump the middle airtube at first.
AUFBAUEN/ INSTALLATION
1. Verwenden Sie zum Aufpumpen nur die mitgelieferte Pumpe.
Only use the original pump delivered together with your awning.
2. Pumpen Sie das Vorzelt vorsichtig mit etwa 50 % der Luftmenge auf (ca.3-4 PSI)
Please pump carafully with only about 50% pressure about 3 to 4 PSI.
3. Prüfen Sie im Inneren des Zeltes ob sich die Luftschläuche verdreht haben, um Beschädigungen zu
vermeiden.
Check inside of the awning whether the airtubes are twisted, in order to avoid damages.
4. Pumpen Sie Ihr Vorzelt nun vollständig auf. Wenn Sie den erforderlichen Druck von 7 PSI erreicht
haben öffnet sich das Überdruckventil der Pumpe.
Now you can pump the tubes to the full pressure of 7 PSI. Above 7 PSI the pressure valve from the airpump will
automatically open to avoid overpressure.
5. Schliessen Sie die Schutzkappe des Ventiles um einen Luftverlust zu vermeiden.
Close the protective cap on the valve to avoide loss of pressure.
6. Je nach Bodenbeschaffenheit, empfehlen wir die Luftgestänge mittels Distanzstücken auszurichten.
Depending on the soil texture we recommend the use of distance sets to align your airtubes.
3Aufpumpen/ Pumping

7
PREMIUMSERIES
www.westfieldoutdoors.eu
Durch unser AAS System können Sie Ihr gesamtes Zelt an nur einem Ventil aufpumpen.
Our AAS system enables you to pump up your awning using only one valve point.
x 2
Luftgestange
Front Air Tube
OPTIONAL
8
PREMIUMSERIES
PLUTO
4
AUFBAUEN/ INSTALLATION
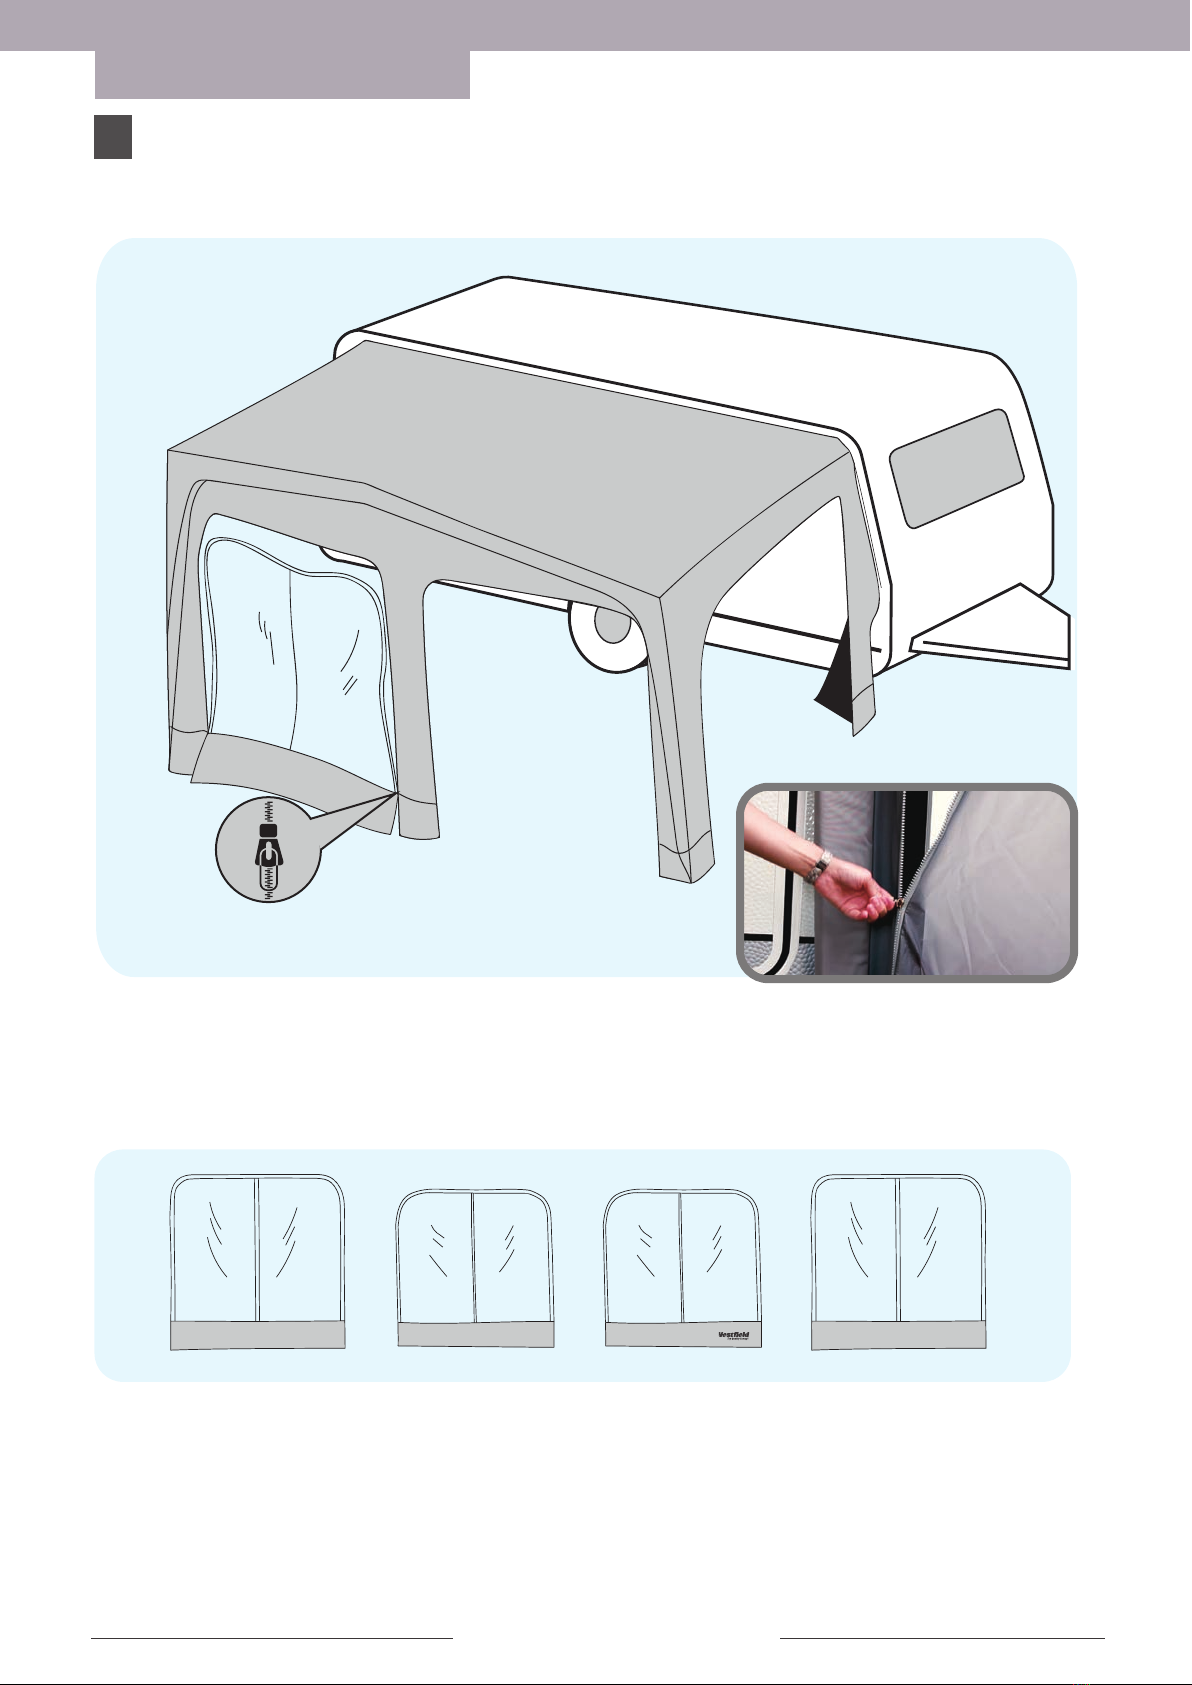
Seiten und Frontwände
Side and Front Panels
Bei Bedarf Seiten und Frontwände einziehen
Zip side and front panels on if required
Nach dem Aufpumpen setzten Sie bitte alle Seiten und Frontelemente in das Vorzelt ein. Achten Sie bitte
darauf das Zelt nicht vorher abzuspannen.
After pumping up your awning all front and side pannels can be zipped in. Please note that you do not peg your
awning before zipping in the panels.
This manual suits for next models
10
Other Westfield Tent manuals


