Weston 33-0822 User manual

ATTENTION!
If any components of this unit are broken, do not operate properly, or for product returns,
please contact Weston Products LLC
Phone: 1-800-814-4895 (Outside the U.S. 440-638-3131)
Mail: 20365 Progress Drive, Strongsville, Ohio 44149
E-Mail: [email protected]
Web Site: WestonProducts.com
All Trademarks and Registered Trademarks are property of the respective companies.
SAVE THESE INSTRUCTIONS!
Refer to them often and use them to instruct others.
REV041312
SHREDDER/
SLICER
ATTACHMENT
MODEL NO. 33-0822
Fits Weston #8 Meat Grinders*
Due to constant factory improvements, the product pictured
might differ slightly from the product received.
ADDITIONAL ACCESSORIES AVAILABLE
Food-Grade Silicone Spray 03-0101-W
Traditional Style Pasta Machine 01-0201
5-Piece Ravioli Maker Kit 16-0101-W
Food Strainer & Sauce Maker 07-0801
15-1/2” Bamboo Wide Spatula 70-2006-W
Multi-Function Manual Mixer 16-0301-W
#8 Heavy-Duty Electric Meat Grinder 33-0201-W
These products and many more products can be ordered by visiting
WestonProducts.com or by calling
Weston Products LLC Toll Free at 1-800-814-4895
Monday thru Friday 8:00am-5:00pm EST. Outside the U.S. call 440-638-3131
E-Mail: [email protected]
If any components of this unit are broken or the unit does not operate
properly, call Weston Products LLC Toll Free at
1-800-814-4895
Monday thru Friday 8:00am-5:00pm EST. Outside the U.S. call 440-638-3131
E-Mail: [email protected]
NOTE: It is IMPORTANT TO FOLLOW ALL of the manufacturers
instructions for the grinder that will be used. Failure to do so may
cause injury!
1. Remove and disassemble the Shredder/Slicer Attachment.
2. Wash all parts thoroughly with warm soapy water. Use a
toothpick or a ne brush to remove debris from the crevasses
and holes. Rinse with clear water. Dry immediately.
3. To extend the life of the Shredder/Slicer Blades, it is best to
coat the metal parts with a food-grade silicone spray before
storage and after cleaning.
3. Return the Shredder/Slicer Attachment to it’s original box, store in a cool, dry area.
CLEANING INSTRUCTIONS
WARNING! Before cleaning, assembling or disassembling the grinder,
make sure the PLUG IS REMOVED FROM THE OUTLET/POWER SOURCE!
ALWAYS unplug the grinder when not in use.
FOR WARRANTY INFORMATION, Log onto www.WestonProducts.com -Customer Care
Grinder sold separately
WARNING!
Protective/cut-resistant
Kevlar Gloves are
recommended whenever
handling
the Blades!
* Model No. 33-0101-W and 33-0201-W

-2-
NOTE: It is IMPORTANT TO FOLLOW ALL of the manufacturers instructions
for the grinder that will be used. Failure to do so may cause injury!
1. Align the external splines on the Shredder/Slicer
Head with the tabs on the motor unit (Figure A).
3. Press the Shredder/Slicer Head against the motor
unit and rotate it counterclockwise until it locks into place.
2. Align the Blade to the internal splines in the
Shredder/Slicer Head. Insert the Blade of choice
into the Shredder/Slicer Head until it is fully seated
(Figure B).
3. The Shredder/Slicer Attachmnet is ready
for use (Figure C).
4. Place the Stomper into the Shredder/Slicer
Head. CAUTION! ALWAYS use the Stomper to
push food into the Shredder/Slicer Attachmnet.
NEVER push food with hands.
ASSEMBLY INSTRUCTIONS
FIGURE A
Shredder/Slicer
Head
Motor Unit
External
Splines
NOTE: It is IMPORTANT TO FOLLOW ALL of the
manufacturers instructions for the grinder that will be used.
Failure to do so may cause injury!
1. Install the Blade of choice.
2. Turn on the grinder.
3. Place the food that will be cut into the throat of the
Shredder/Slicer Head (Figure D).
4. Gently push the food into the Shredder/Slicer
Head using the Stomper. CAUTION! ALWAYS use
the Stomper to push food into the Shredder/Slicer
Attachmnet. NEVER push food with hands.
5. The cut food will form and fall into the Blade. The
rotation of the Blade will make the cut food fall out.
CAUTION! NEVER reach into the Blade. ALWAYS
turn the grinder off, wait until the Blade has
stopped, then scoop food out with a utensil.
USING THE SHREDDER/SLICER ATTACHMENT
WARNING! Before cleaning, assembling or disassembling the grinder,
make sure the PLUG IS REMOVED FROM THE OUTLET/POWER SOURCE!
ALWAYS unplug the grinder when not in use.
FIGURE D
Stomper
SHREDDER/SLICER BLADES
Grater Coarse Shredder Slicer Blade
Blade Blade
CLASSIC MACARONI & CHEESE
12 oz dried elbow macaroni 1 1/2 cups milk
1/4 cup butter, melted 1/2 tsp ground white pepper
1/4 tsp salt 8 oz American cheese
8 oz sharp cheddar cheese 2 oz mozzarella cheese
20 buttery crackers, crushed
.Shred the American, cheddar and mozzarella cheese with the Coarse Shredder Blade
and the Shredder/Slicer Attachment
.Preheat oven to 350oF (177oC)
.In a large pot cook macaroni according to package directions; drain, return to pot
.Add milk, melted butter, pepper and salt
.Stir in cheeses
.Transfer to a greased 2-quart casserole
.Bake, uncovered, for 15 minutes
.Carefully stir
.Sprinkle with crushed crackers
.Bake 5 minutes more or until crackers are browned and mixture is just heated through (don’t
overheat or mixture will curdle)
.Let stand 10 minutes before serving
RECIPES
WARNING!
Protective/cut-resistant
Kevlar Gloves are
recommended whenever
handling
the Blades!
FIGURE B
Shredder/Slicer
Head
Blade
Internal
Splines
FIGURE C Stomper
Shredder/Slicer
Assembly
-3-

ATTENTION!
If any components of this unit are broken, do not operate properly, or for product returns,
please contact Weston Products LLC
Phone: 1-800-814-4895 (Outside the U.S. 440-638-3131)
Mail: 20365 Progress Drive, Strongsville, Ohio 44149
E-Mail: [email protected]
Web Site: WestonProducts.com
All Trademarks and Registered Trademarks are property of the respective companies.
SAVE THESE INSTRUCTIONS!
Refer to them often and use them to instruct others.
REV042012
FRUIT & TOMATO
JUICER
ATTACHMENT
MODEL NO. 33-0821
Fits Weston #8
Meat Grinders*
Due to constant factory improve-
ments, the product pictured might
differ slightly from the product
received.
ADDITIONAL ACCESSORIES AVAILABLE
Food-Grade Silicone Spray 03-0101-W
Traditional Style Pasta Machine 01-0201
5-Piece Ravioli Maker Kit 16-0101-W
Food Strainer & Sauce Maker 07-0801
15-1/2” Bamboo Wide Spatula 70-2006-W
Multi-Function Manual Mixer 16-0301-W
#8 Heavy-Duty Electric Meat Grinder 33-0201-W
These products and many more products can be ordered by visiting
WestonProducts.com or by calling
Weston Products LLC Toll Free at 1-800-814-4895
Monday thru Friday 8:00am-5:00pm EST. Outside the U.S. call 440-638-3131
E-Mail: [email protected]
If any components of this unit are broken or the unit does not operate
properly, call Weston Products LLC Toll Freeat
1-800-814-4895
Monday thru Friday 8:00am-5:00pm EST. Outside the U.S. call 440-638-3131
E-Mail: [email protected]
NOTE: It is IMPORTANT TO FOLLOW ALL of the manufacturers
instructions for the grinder that will be used. Failure to do so may
cause injury!
1. Remove and disassemble the Juicer Attachment.
2. Wash all parts thoroughly with warm soapy water. Use a
toothpick or a ne brush to remove debris from the crevasses
and holes. Rinse with clear water. Dry immediately.
3. To extend the life of the Juicer Attachment, it is best to
coat the metal parts with a food-grade silicone spray before
storage and after cleaning.
3. Return the Juicer Attachment to it’s original box, store in a cool, dry area.
CLEANING INSTRUCTIONS
WARNING! Before cleaning, assembling or disassembling the grinder,
make sure the PLUG IS REMOVED FROM THE OUTLET/POWER SOURCE!
ALWAYS unplug the grinder when not in use.
FOR WARRANTY INFORMATION, Log onto www.WestonProducts.com -Customer Care
Grinder sold separately
WARNING!
Protective/cut-resistant
Kevlar Gloves are
recommended whenever
handling
the Blades!
* Model No. 33-0101-W and 33-0201-W

-2-
NOTE: It is IMPORTANT TO FOLLOW ALL of the
manufacturers instructions for the grinder that will
be used. Failure to do so may cause injury!
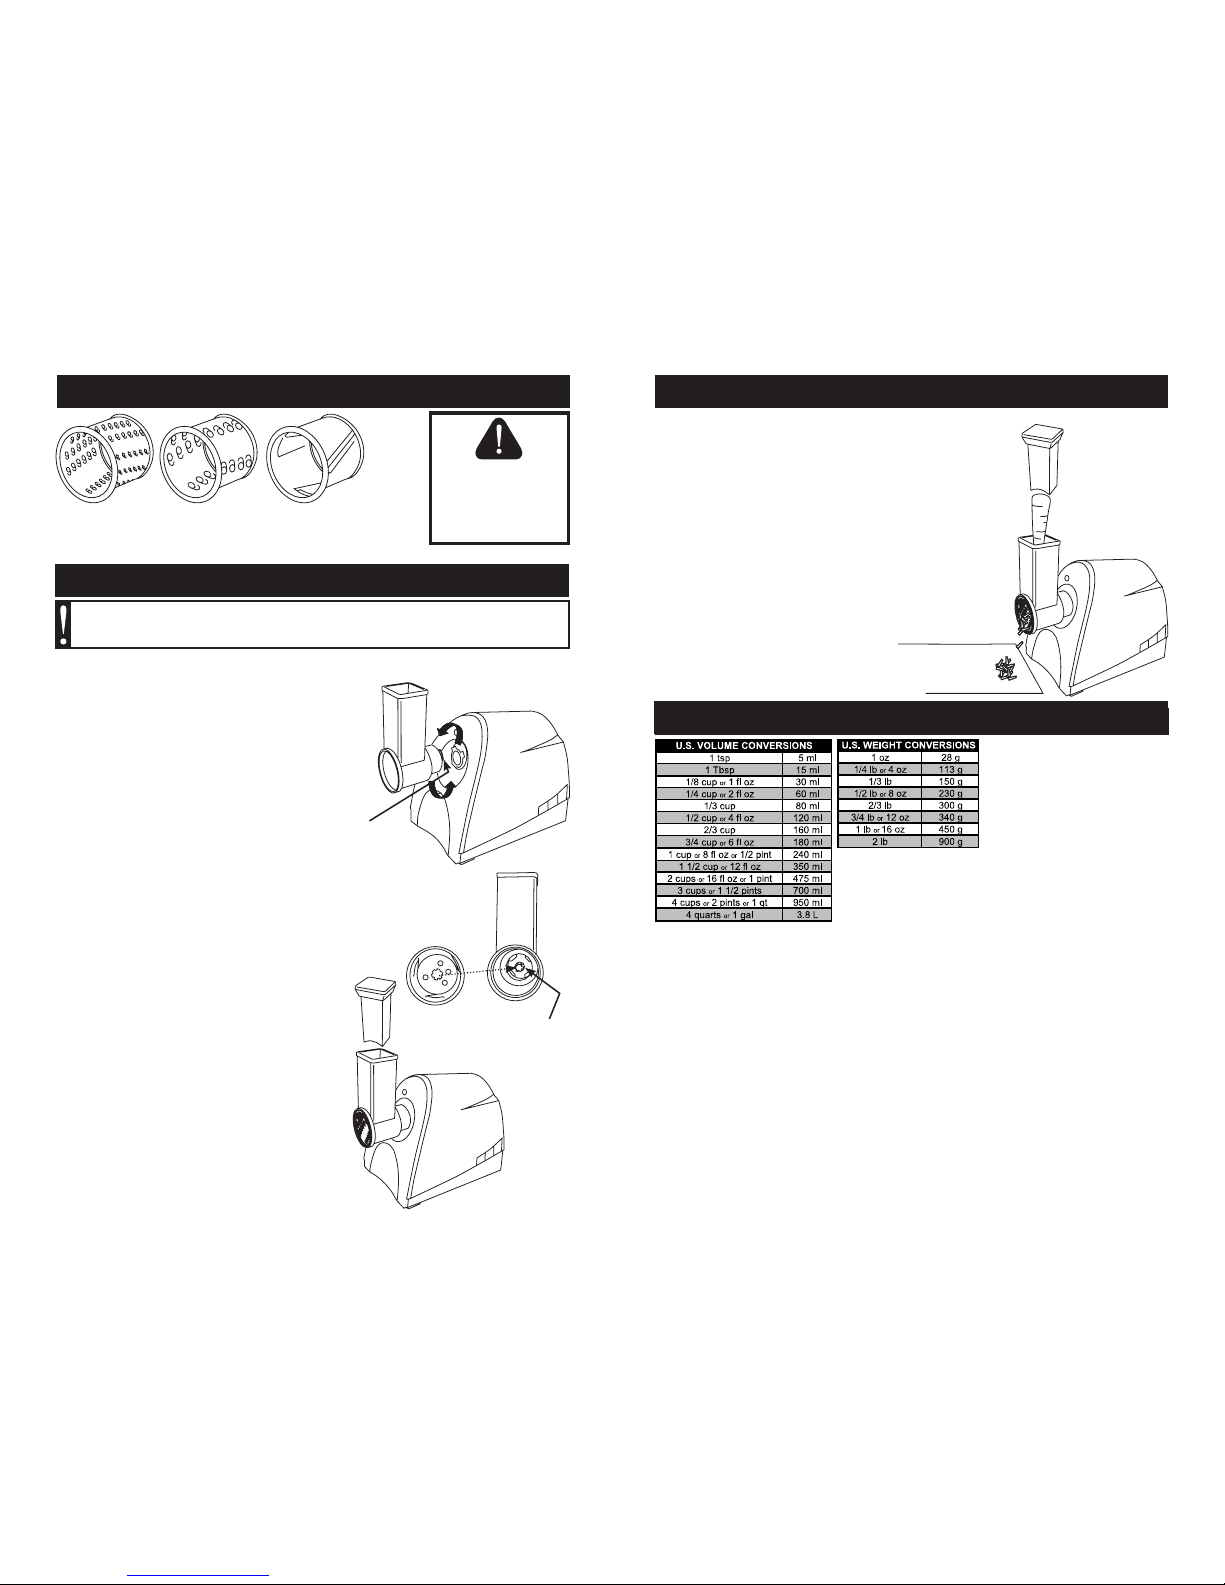
1. Place the Auger, spline end rst, into the
Juicer Head (Figure A).
2. Align the tabs on the Screen with the
notches in the opening on the Juicer Head.
Place the Screen onto the Auger.
3. Align the tabs on the Adjuster Cap with
the notches in the opening on the Juicer
Head. Place the Adjuster Cap onto the
Auger (Figure B). Twist the Adjuster Cap
counter-clockwise to lock the Adjuster Cap on
the Juicer Head.
4. Align the tabs on the Cap with the notches
on the Adjuster Cap. Twist the Cap counter-
clockwise to lock the Cap onto the Adjuster
Cap.
5. The Juicer Atachment is now assembled
(Figure C).
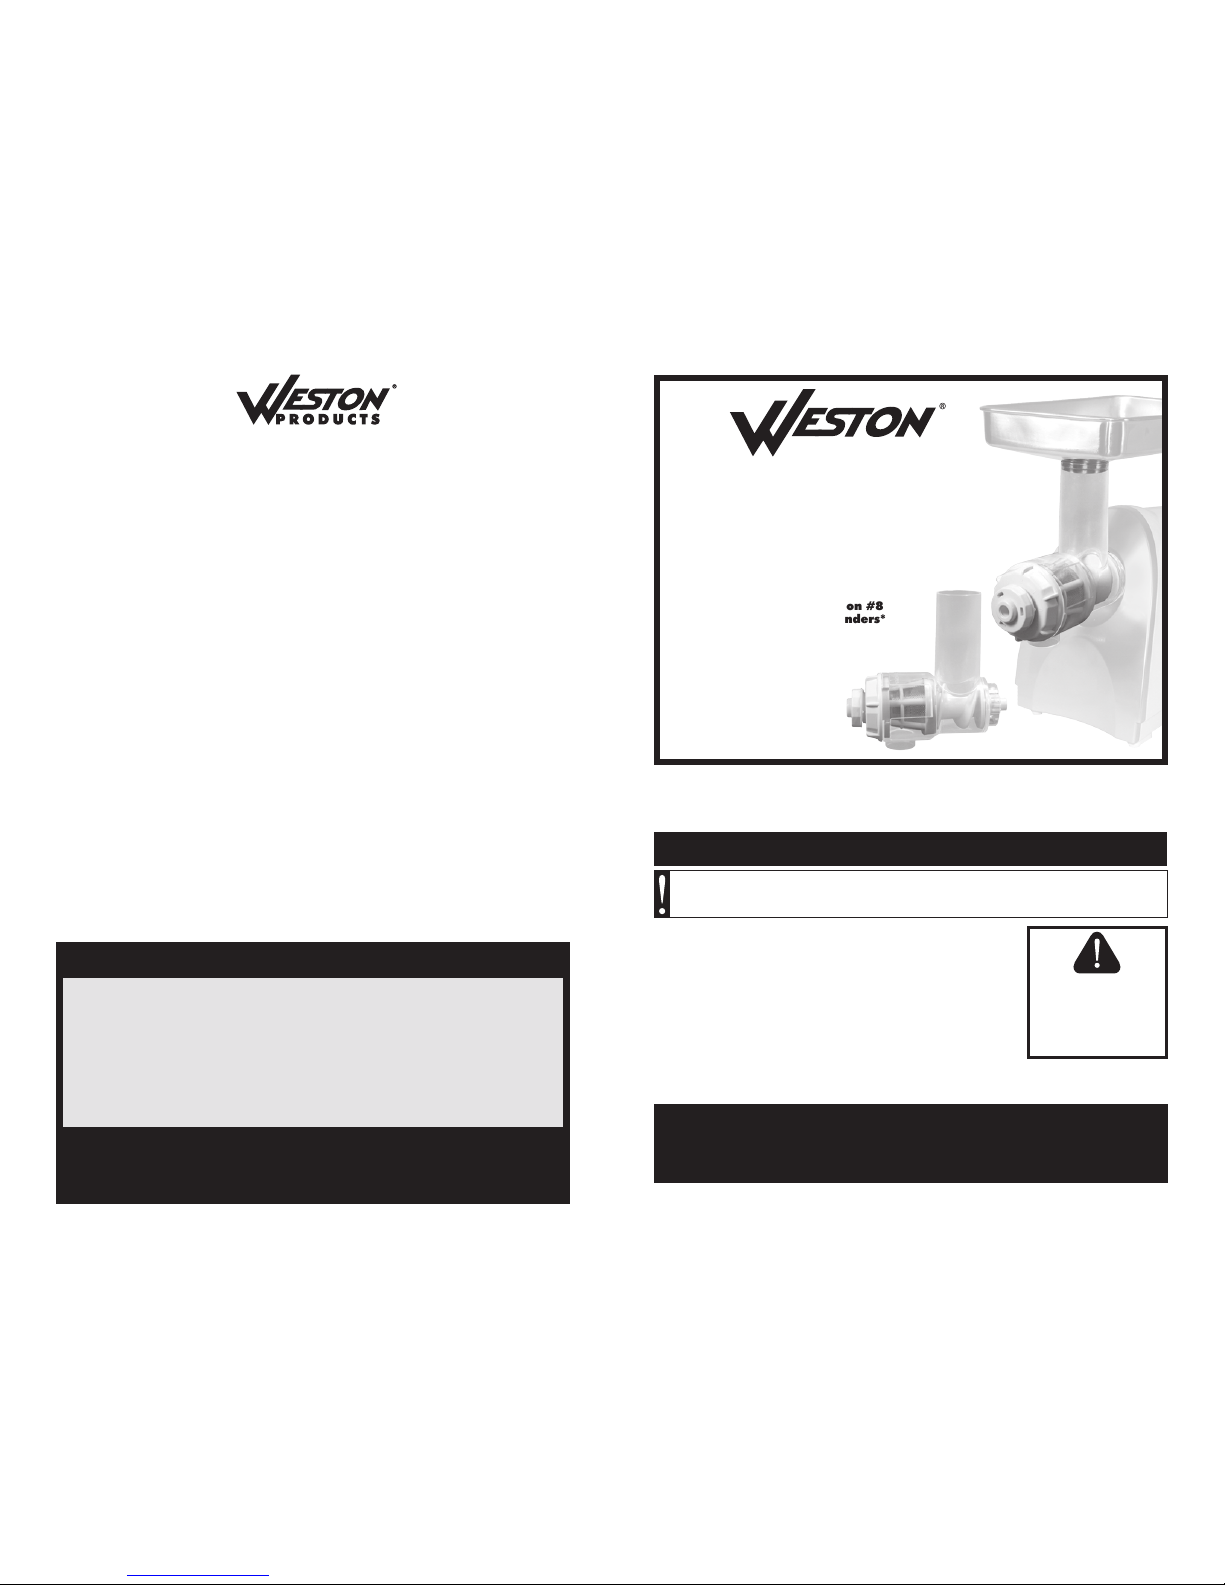
6. Align the splines on the Juicer Attachment
with the tabs on the motor unit (Figure D).
7. Press the Juicer Attachment against the
motor unit and rotate it counterclockwise until it
locks into place.
8. The Juicer Atachment is now ready for
use (Figure D).
9. Place the grinder tray (supplied with
the grinder) into the throat of the Juicer
Attachment. CAUTION! ALWAYS use the
stomper (supplied with the grinder) to push
food into the Juicer Attachmnet. NEVER
push food with hands.
ASSEMBLY INSTRUCTIONS
FIGURE A
NOTE: It is IMPORTANT TO FOLLOW ALL of the
manufacturers instructions for the grinder that will be used.
Failure to do so may cause injury!
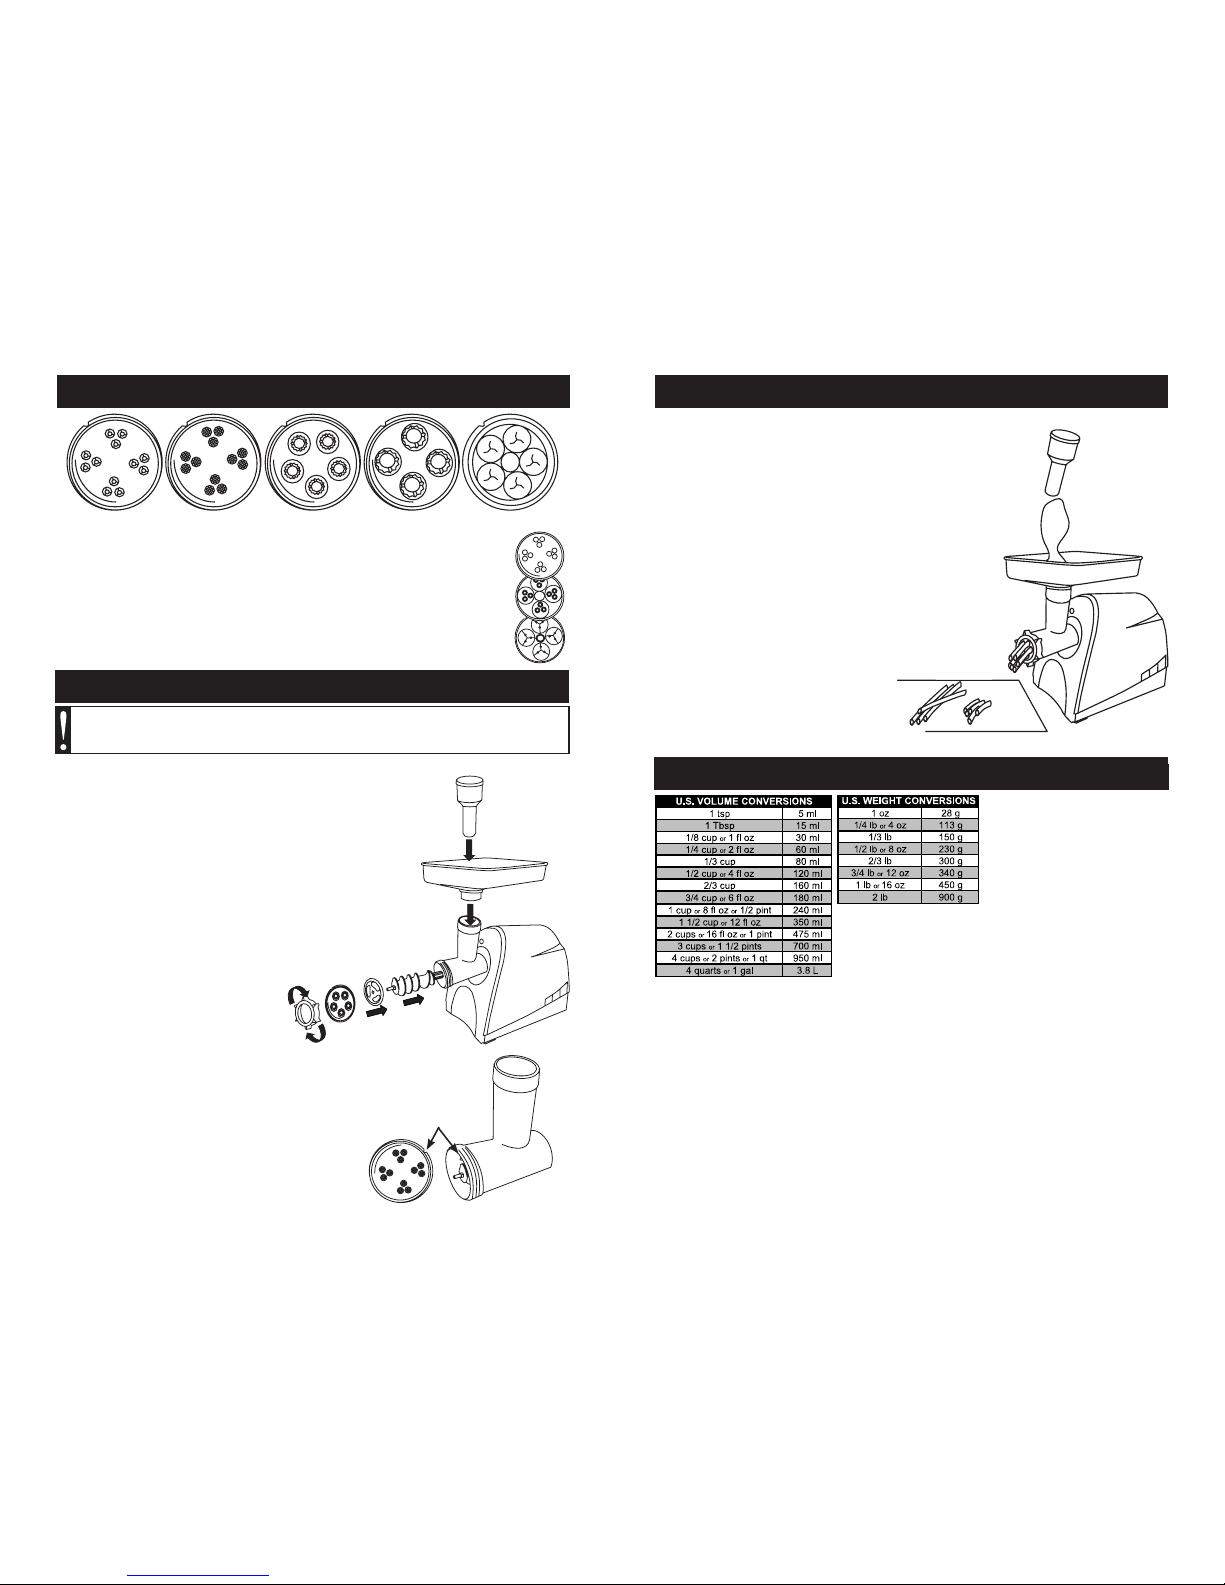
1. Turn on the grinder.
2. Place the food that will be juiced into the throat of
the Juicer Attachment (Figure E).
3. Gently push the food into the Juicer Attachment
using the stomper. CAUTION! ALWAYS use the
stomper to push food into the Juicer Attachment.
NEVER push food with hands.
4. As the food is processed, the juice will come out
of the bottom Chute and any skin and seeds will come
out of the Cap. Place a bowl under the bottom Chute
and a bowl under the Cap to catch the juice and the
pulp. CAUTION! NEVER reach into the Juicer
Head.
HELPFUL HINTS: Rerun the skin and seeds through
the Juicer Attachment to extract any leftover pulp &
juice. Repeat as necessary.
NOTE: Twist the Cap to control the amount of
moisture in the pulp. The Adjuster Cap is marked “0”,
“1” or “2”. Be careful not to loosen the Cap from the
Adjuster Cap and the assembled Juicer Attachment
(Figure F).
USING THE JUICER ATTACHMENT
WARNING! Before cleaning, assembling or disassembling the grinder,
make sure the PLUG IS REMOVED FROM THE OUTLET/POWER SOURCE!
ALWAYS unplug the grinder when not in use.
FIGURE E
Stomper
RECIPES
Cap
-3-
Adjuster
Cap Screen Auger
Juicer
Head
FIGURE C
Auger
Splines
FIGURE B
Adjuster
Cap
(Back)
Screen
Auger
Juicer
Head
Tabs
Notches
FIGURE D
Splines
Assembled
Juicer
Attachment
Motor
Unit
Juicer
Attachment
Grinder
Tray
Stomper
Bottom
Chute
Cap
LARGE BATCH ITALIAN TOMATO SAUCE
1/2 cup olive oil 3 medium onions, chopped 2 cloves garlic, minced
3 Tbsp brown sugar 1 Tbsp dried oregano 4 tsp salt
2 tsp dried basil 1 tsp black pepper 12 cups fresh tomato puree
• Heat the olive oil in a large pan
• Sauté the onions and garlic until tender, do not overly brown
• Add the rest of the ingredients
• Bring mixture to a boil, reduce heat and simmer partially covered for 2 hours or until
sauce has reduced to desired consistency
• Stir occasionally
• Serve or allow to cool then refrigerate or freeze
• Ingredients like sliced mushrooms, cooked/drained sausage, hamburger,
etc. can be added to taste
FIGURE F
Cap
Adjuster Cap

ATTENTION!
If any components of this unit are broken, do not operate properly, or for product returns,
please contact Weston Products LLC
Phone: 1-800-814-4895 (Outside the U.S. 440-638-3131)
Mail: 20365 Progress Drive, Strongsville, Ohio 44149
E-Mail: [email protected]
Web Site: WestonProducts.com
All Trademarks and Registered Trademarks are property of the respective companies.
SAVE THESE INSTRUCTIONS!
Refer to them often and use them to instruct others.
REV040912
5-PIECE
PASTA
ATTACHMENT
MODEL NO. 33-0819
Fits Weston #8 Meat Grinders
Due to constant factory improvements, the product pictured
might differ slightly from the product received.
ADDITIONAL ACCESSORIES AVAILABLE
Food-Grade Silicone Spray 03-0101-W
Traditional Style Pasta Machine 01-0201
5-Piece Ravioli Maker Kit 16-0101-W
Food Strainer & Sauce Maker 07-0801
15-1/2” Bamboo Wide Spatula 70-2006-W
Multi-Function Manual Mixer 16-0301-W
#8 Heavy-Duty Electric Meat Grinder 33-0201-W
These products and many more products can be ordered by visiting
WestonProducts.com or by calling
Weston Products LLC Toll Free at 1-800-814-4895
Monday thru Friday 8:00am-5:00pm EST. Outside the U.S. call 440-638-3131
E-Mail: [email protected]
If any components of this unit are broken or the unit does not operate
properly, call Weston Products LLC Toll Freeat
1-800-814-4895
Monday thru Friday 8:00am-5:00pm EST. Outside the U.S. call 440-638-3131
E-Mail: [email protected]
NOTE: It is IMPORTANT TO FOLLOW ALL of the manufacturers instructions for the grinder that will be
used. Failure to do so may cause injury!
1. Disassemble the grinder head, removing the Pasta Disc. Disassemble the Pasta Disc.
2. Washallpartsthoroughlywithwarmsoapywater.Useatoothpickoranebrushto
remove debris from the crevasses and holes. Rinse with clear water. Dry immediately.
3. To extend the life of the Pasta Attachment, it is best to coat the metal parts with a food-
grade silicone spray before storage and after cleaning.
3. Return the Pasta Attachment to it’s original box, store in a cool, dry area.
CLEANING INSTRUCTIONS
WARNING! Before cleaning, assembling or disassembling the grinder,
make sure the PLUG IS REMOVED FROM THE OUTLET/POWER SOURCE!
ALWAYS unplug the grinder when not in use.
FOR WARRANTY INFORMATION, Log onto www.WestonProducts.com -Customer Care
COOKING THE PASTA
Whenever cooking pasta, keep the following points in mind:
• Alwaysuseplentyofboilingwatersothepastadoesnotstick.
• One-halfpoundofnoodleswillrequireatleast2quartsofwater,1poundof
pastawillrequire6quarts.
• Add1tspofsaltforeachquartofwater.
• Alwaysbringthewatertoafull,rollingboilbeforeaddingpastaoritwillnotcook
properly.
• Cookingtimewillvarybasedonthesize,weightandingredientsofthenoodles.
• Homemadenoodlestakeverylittletimetocookandshouldbetestedafter3-4
minutes.
• Pastashouldbecookedaldente.Thismeansitshouldnotbemushy,but
tender,yetslightlyhardtobite.Testthepastafrequentlytotestfordoneness.
• Itisbetterthatthenoodlesbeslightlyunder-cookedthanovercooked.
• Oncepastaiscooked,drainitbutneverrinse.
• Forthebestpastadishes,addsaucetothedrainednoodlesandserve
immediately.
Grinder sold separately

-2-
NOTE: It is IMPORTANT TO FOLLOW ALL of the manufacturers instructions
for the grinder that will be used. Failure to do so may cause injury!
1. Attachthegrinderheadtothemotorunit(FigureB).
2. Insert the auger into the grinder head.
3. Placethestufngspacerintothegrinderhead.
4. Place the Pasta Disc through the front ring nut.
5. AlignthenotchinthePasta Disc with the
notch in the grinder head (Figure C).
6. Screw the front ring
nut onto the grinder head.
DO NOT OVER-TIGHTEN
the front ring nut.
7. Install the grinder tray to
the grinder head.
8. ALWAYSusethestomper
to push food into the grinder
head.
ASSEMBLY INSTRUCTIONS
FIGURE B
FIGURE C
Grinder Head
Auger
Stufng
Spacer
Pasta
Disc
Front
Ring Nut
Stomper
Grinder
Tray
NOTE: It is IMPORTANT TO FOLLOW ALL of the
manufacturers instructions for the grinder that will be used.
Failure to do so may cause injury!
1. Install the Pasta Attachment of choice.
2. Turn on the grinder.
3. Form the pasta dough into a tubular form.
4. Drop the pasta dough slowly into the grinder head.
Push down as needed with the stomper (Figure D).
5. The pasta dough will begin to extrude out of the
Pasta Disc. Once the pasta reaches the desired length,
cut the pasta off of the Pasta Disc using a hard plastic
spatula.
6. Lay the cut pasta on a cheesecloth or non-stick
surface and let it dry for about an hour.
If making pasta to store, extra drying time is needed.
USING THE PASTA ATTACHMENT
WARNING! Before cleaning, assembling or disassembling the grinder,
make sure the PLUG IS REMOVED FROM THE OUTLET/POWER SOURCE!
ALWAYS unplug the grinder when not in use.
FIGURE D
Stomper
The Pasta Discs (except for the Fusilli Disc, this disc is a single piece unit)
separate into 3 sections. The Metal Cap, the Outer Tube Disc and the Inner
Tube Disc(FigureA).Aligntheholesandsnapthe3sectionsofthePasta Disc
together.
PASTA DISCS
BucatiniDiscMezzePenneDiscTortiglioniDiscRigatoniDiscFusilliDisc
FIGURE A
Align
Notch
Pasta
Disc
Grinder
Head
TRADITIONAL PASTA DOUGH
3 cups our 2 eggs 1 Tbsp olive oil
1/4 tsp salt 1-3 cup water
. AddallofthepastadoughingredientstotheBodyofthePastaMachine
. Turn the Handle at a consistent pace to mix the ingredients together
. Follow the “Mixing Dough” instructions as outlined in this manual
FLAVORED PASTA DOUGH
Pureed vegetablescan beaddedtopasta doughtoenhance thenoodlecolor. Generally,
theavorofthevegetableisnotverypronouncedinthepasta.
RECIPES
-3-

ATTENTION!
If any components of this unit are broken, do not operate properly, or for product returns,
please contact Weston Products LLC
Phone: 1-800-814-4895 (Outside the U.S. 440-638-3131)
Mail: 20365 Progress Drive, Strongsville, Ohio 44149
E-Mail: [email protected]
Web Site: WestonProducts.com
All Trademarks and Registered Trademarks are property of the respective companies.
SAVE THESE INSTRUCTIONS!
Refer to them often and use them to instruct others.
REV040912
COOKIE
ATTACHMENT
MODEL NO. 33-0823
Fits Weston #8 Meat Grinders
Due to constant factory improvements, the product pictured
might differ slightly from the product received.
ADDITIONAL ACCESSORIES AVAILABLE
Food-Grade Silicone Spray 03-0101-W
Traditional Style Pasta Machine 01-0201
5-Piece Ravioli Maker Kit 16-0101-W
Food Strainer & Sauce Maker 07-0801
15-1/2” Bamboo Wide Spatula 70-2006-W
Multi-Function Manual Mixer 16-0301-W
#8 Heavy-Duty Electric Meat Grinder 33-0201-W
These products and many more products can be ordered by visiting
WestonProducts.com or by calling
Weston Products LLC Toll Free at 1-800-814-4895
Monday thru Friday 8:00am-5:00pm EST. Outside the U.S. call 440-638-3131
E-Mail: [email protected]
If any components of this unit are broken or the unit does not operate
properly, call Weston Products LLC Toll Freeat
1-800-814-4895
Monday thru Friday 8:00am-5:00pm EST. Outside the U.S. call 440-638-3131
E-Mail: [email protected]
NOTE: It is IMPORTANT TO FOLLOW ALL of the manufacturers instructions for the grinder that will be
used. Failure to do so may cause injury!
1. Disassemble the grinder head, removing the Cookie Cap and the Cookie Slider.
2. Wash all parts thoroughly with warm soapy water. Rinse with clear water. Dry immediately.
3. To extend the life of the Cookie Attachment, it is best to coat the metal with a food-grade
silicone spray before storage and after cleaning.
3. Return the Cookie Attachment to it’s original box, store in a cool, dry area.
CLEANING INSTRUCTIONS
WARNING! Before cleaning, assembling or disassembling the grinder,
make sure the PLUG IS REMOVED FROM THE OUTLET/POWER SOURCE!
ALWAYS unplug the grinder when not in use.
FOR WARRANTY INFORMATION, Log onto www.WestonProducts.com -Customer Care
Grinder sold separately

-2-
NOTE: It is IMPORTANT TO FOLLOW ALL of the manufacturers instructions
for the grinder that will be used. Failure to do so may cause injury!
1. Attach the grinder head to the motor unit (Figure A).
2. Insert the auger into the grinder head.
3. Placethestufngspacerintothegrinderhead.
4. Place the Cookie Cap through the front ring nut.
5. Position the Cookie
Cap so that the Cookie
Slider Slots are vertical
(Figure B).
6. Screw the front ring
nut onto the grinder head.
DO NOT OVER-TIGHTEN
the front ring nut.
7. Slide the Cookie Slider
into the Cookie Slider Slots in
the Cookie Cap.
8. Install the grinder tray to
the grinder head.
9. ALWAYS use the stomper
to push food into the grinder
head.
ASSEMBLY INSTRUCTIONS
/
FIGURE A
FIGURE B
Grinder Head
Auger
Stufng
Spacer
Cookie
Cap
Front
Ring Nut
Cookie
Slider
Cookie
Cap
Slider
Slots
Stomper
Grinder
Tray
FIGURE C
Cookie
Slider Cookie
Cap
NOTE: It is IMPORTANT TO FOLLOW ALL of the
manufacturers instructions for the grinder that will
be used. Failure to do so may cause injury!
1. With the Cookie Attachment installed,
slide the Cookie Slider over to the desired
cookie style.
2. Turn on the grinder.
3. Form the cookie dough into 1” (2.5cm)
balls.
4. Drop the cookie dough balls one by one
into the grinder head. Push down as needed
with the stomper (Figure D).
5. As the cookie dough extrudes, place the
longcookieshapesontoaclean,atsurface.
Cut the cookie dough into workable strips as
needed.
6. Cut the cookie dough strips into the
desired thickness.
7. Bake as directed.
USING THE COOKIE ATTACHMENT
WARNING! Before cleaning, assembling or disassembling the grinder,
make sure the PLUG IS REMOVED FROM THE OUTLET/POWER SOURCE!
ALWAYS unplug the grinder when not in use.
FIGURE D
Stomper
Cookie
Cap
Cookie
Slider
RECIPES
SUGAR COOKIE DOUGH
1-1/2 cups all-purpose our 1/2 tsp baking powder
1/8 tsp salt 1/2 cup (1 stick) unsalted butter, softened
3/4 cup sugar 1 egg
3/4 tsp vanilla extract
. Inamedium-sizebowl,whisktogetherour,bakingpowderandsalt,setaside
.In a large bowl, beat butter and sugar until smooth, about 2 minutes
.Beat in egg and vanilla
. Onlowspeed,beatinourmixtureuntiljustcombined
.Divide the dough in half and form each half into a disk
.Wrap in plastic wrap and refrigerate 4 hours or overnight
.Heat oven to 350oF
. Onalightlyouredsurface,rolloutonedisktostrip
.Break off pieces and form the cookie dough into 1” (2.5 cm) balls
.Attach the Cookie Attachment to a grinder, following the provided instructions
.Drop the cookie dough balls one by one into the grinder head, push down as
needed with the stomper
. Asthecookiedoughextrudes,placethelongcookieshapesontoaclean,at
surface, cut the cookie dough into workable strips as needed.
.Cut the cookie dough strips into the desired thickness
.Bake for 10 to 12 minutes, or until lightly golden around edges
.Remove cookies to wire racks to cool completely
.Repeat with remaining half of dough
.When completely cool, cookies may be stored in an airtight container up to 2 weeks
ROYAL ICING
1 lb confectioner’s sugar 2 Tbsp powdered egg whites
5-6 Tbsp water food coloring
.In large bowl, with mixer on low, beat together all ingredients until well combined
.Increase speed to high, continue to beat until stiff peaks form
.Pipe icing onto the cookies
.If not using immediately, press plastic wrap directly onto surface of icing and store
in refrigerator for up to 1 week (bring icing to room temperature before using)
-3-
Other Weston Meat Grinder manuals

Weston
Weston 33-0201-W User manual

Weston
Weston 16-0201-W User manual

Weston
Weston 33-1301-W User manual

Weston
Weston 08-0801-W User manual

Weston
Weston 07-3801-W-A User manual

Weston
Weston pro Series User manual

Weston
Weston 33-0801-RT User manual

Weston
Weston 82-0101-W User manual

Weston
Weston BUTCHER Series User manual

Weston
Weston 36-0801-W User manual

Weston
Weston 08-0801-W User manual

Weston
Weston 36-0801-W User manual

Weston
Weston 82-0103-W User manual

Weston
Weston 82-0103-W User manual

Weston
Weston 35-3201 User manual

Weston
Weston 5 User manual

Weston
Weston 82-0301-W User manual

Weston
Weston 82-0301-W User manual

Weston
Weston BUTCHER Series User manual

Weston
Weston 33-0301-W User manual