Weston 07-0801 User manual

TOMATO PRESS &
SAUCE MAKER
07-0801
REV121114
PATENTED

COMPONENT LIST
ASSEMBLY INSTRUCTIONS
FOOD TIPS
CLEANING INSTRUCTIONS
HELPFUL HINTS
RECIPES
WARRANTY
LISTA DE COMPONENTES
INSTRUCCIONES DE ENSAMBLADO
CONSEJOS DE COMIDA
INSTRUCCIONES DE LIMPIEZA
CONSEJOS ÚTILES
RECTAS
INFORMACIÓN DE GARANTÍA WESTON
LISTE DES PIÈCES
DIRECTIVES D’ASSEMBLAGE
CONSEILS ALIMENTAIRES
DIRECTIVES CONCERNANT LE NETTOYAGE
CONSEILS PRATIQUES
RECETTES
INFORMATION SUR LA GARANTIE
5
6-7
8
9
9
10
12
15
16-17
18
19
19
20
22
25
26-27
28-29
29
29
30
31
TABLE OF CONTENTS / ÍNDICE / TABLE DES MATIÈRES
2


ENGLISH INSTRUCTIONS
4
5
63
17
1
12
10
2
34
5
18 11
16
15
14
9
13
6
7
8
19

5
ENGLISH INSTRUCTIONS
COMPONENT LIST
DIAGRAM NUMBER PART DESCRIPTION PART NUMBER
1 LARGE HOPPER 07-0834
2 BODY 07-0832
3* DRIVE SHAFT O-RING SEAL 07-0820
4* DRIVE SHAFT CLIP 07-0821
5 TOMATO PRESS 200P DRIVE
SHAFT ASSEMBLY
(SPRING, E-CLIP, O-RING INCLUDED)
07-0835
6 SUCTION CUP BODY 07-0840
7 SUCTION CUP 07-0841
8 C-CLAMP 07-0842
9 SPIRAL 07-0823
10 HANDLE 07-0829
11 SCREEN THUMBSCREW 07-0843
12 SQUIRT GUARD/CHUTE 07-0838
13 SUCTION CUP LEVER 07-0830
14* DRIVE SHAFT SPRING 07-0822
15 MULTI-PURPOSE SCREEN 07-0836
16 WASTE FUNNEL 07-0837
17 STOMPER 07-0844
18 SCREEN GASKET 07-0824
19 PLASTIC BUSHING 07-0825
If any components of this unit are broken, the unit does not operate properly or you
need a replacement instruction manual, visit us on the web at
WestonProducts.com
Or call Weston Products LLC Toll Free at 1-800-814-4895
Monday thru Friday 8:00am-5:00pm ET. Outside the U.S. call 001-440-638-3131
*07-0820, 07-0821 & 07-0822 ARE ASSEMBLED ON PART 07-0835.

6
ENGLISH INSTRUCTIONS
1. Apply a few drops of vegetable oil to the
rubber Drive Shaft O-Ring.
2. Slide the drive shaft clip and Drive
Shaft O-Ring seal over the back end of the
preassembled Drive Shaft. FIGURE A
3. Insert the Screen Gasket into the large
end of the Screen making sure the Gasket
is under the Thumbscrew. FIGURE B
4. Slide the Drive Shaft Spring over the
Drive Shaft.
5. Slide the red plastic Spiral onto the Drive
Shaft over the Spring. Be sure to match
the ats on the Drive Shaft to the metal
insert in the inside of the Spiral.
FIGURE C
6. Align the notches of the Body with
grooves in the Drive Shaft Assembly.
FIGURE D
7. Holding the Body rmly in one hand,
push the Drive Shaft Assembly rmly, then
turn the Drive Shaft Assembly 1/8th of a
turn counter-clockwise to lock it in place
(NOTE: The “ON” - ”OFF” direction arrows
are on the base of the Screen).
8. Tighten the Screen Thumbscrew to
lock the Screen in place (NOTE: Finger
tighten only, do not over tighten). FIGURE
ENOTE: Operating the Tomato Press
& Sauce Maker while empty is NOT
recommended. The juice from the fruits
and vegetables act as a lubricant for the
mechanism and reduces wear on the
components.
FIGURE C
FIGURE D
FIGURE B
FIGURE A
FIGURE E
ASSEMBLY INSTRUCTIONS

7
ENGLISH INSTRUCTIONS
9. At this point you can attach the Tomato
Press & Sauce Maker to your work space.
If utilizing the Suction Cup, be sure the area
you wish to adhere to is smooth, clean, and
dry. Simply raise the Suction Cup Lever and
hold the Tomato Press & Sauce Maker rmly
in place with the Suction Cup in contact with
the table surface, then press the Suction
Cup Lever down. The Suction Cup Lever
will require rm pressure to lock it into place.
NOTE: If you have a rough or dirty surface,
the Suction Cup may not adhere to the
surface.
10. If utilizing the C-Clamp, simply position
the Tomato Press & Sauce Maker near the
edge of a table or counter. Slide the top end
of the C-Clamp into the slot at the base of the
Tomato Press & Sauce Maker and tighten the
screw to the underside of the work surface.
11. Slide the Handle into the Tomato Press &
Sauce Maker making sure to align the slots in
the Drive Shaft to the tabs on the Handle.
12. Attach the Waste Funnel to the end of
the Screen by pushing the small end with the
tabs over the end of the Screen. NOTE: Use
caution not to break the Waste Funnel when
attaching or detaching.
13. Attach the Squirt Guard/Chute to the
Screen by sliding the Squirt Guard/Chute
over the Screen with the larger opening of the
Squirt Guard/Chute closest to the Hopper.
Snap it into place. FIGURE F
14. Attach the Hopper to the top of the Roma
by sliding the small neck section of the Hopper
into the throat of the Body.
15. Before placing any food in the Hopper
be sure to have a bowl or jar under both
the Waste Funnel and the Squirt Guard/
Chute. FIGURE G
NEVER use
ngers to
push food into
the Hopper.
ALWAYS use
the provided
Stomper.
FIGURE F
WARNING!
FIGURE G

TOMATOES: The Tomato Press &
Sauce Maker will easily puree fresh
tomatoes, remove the seeds, core and
skin with no pre-cooking whatsoever.
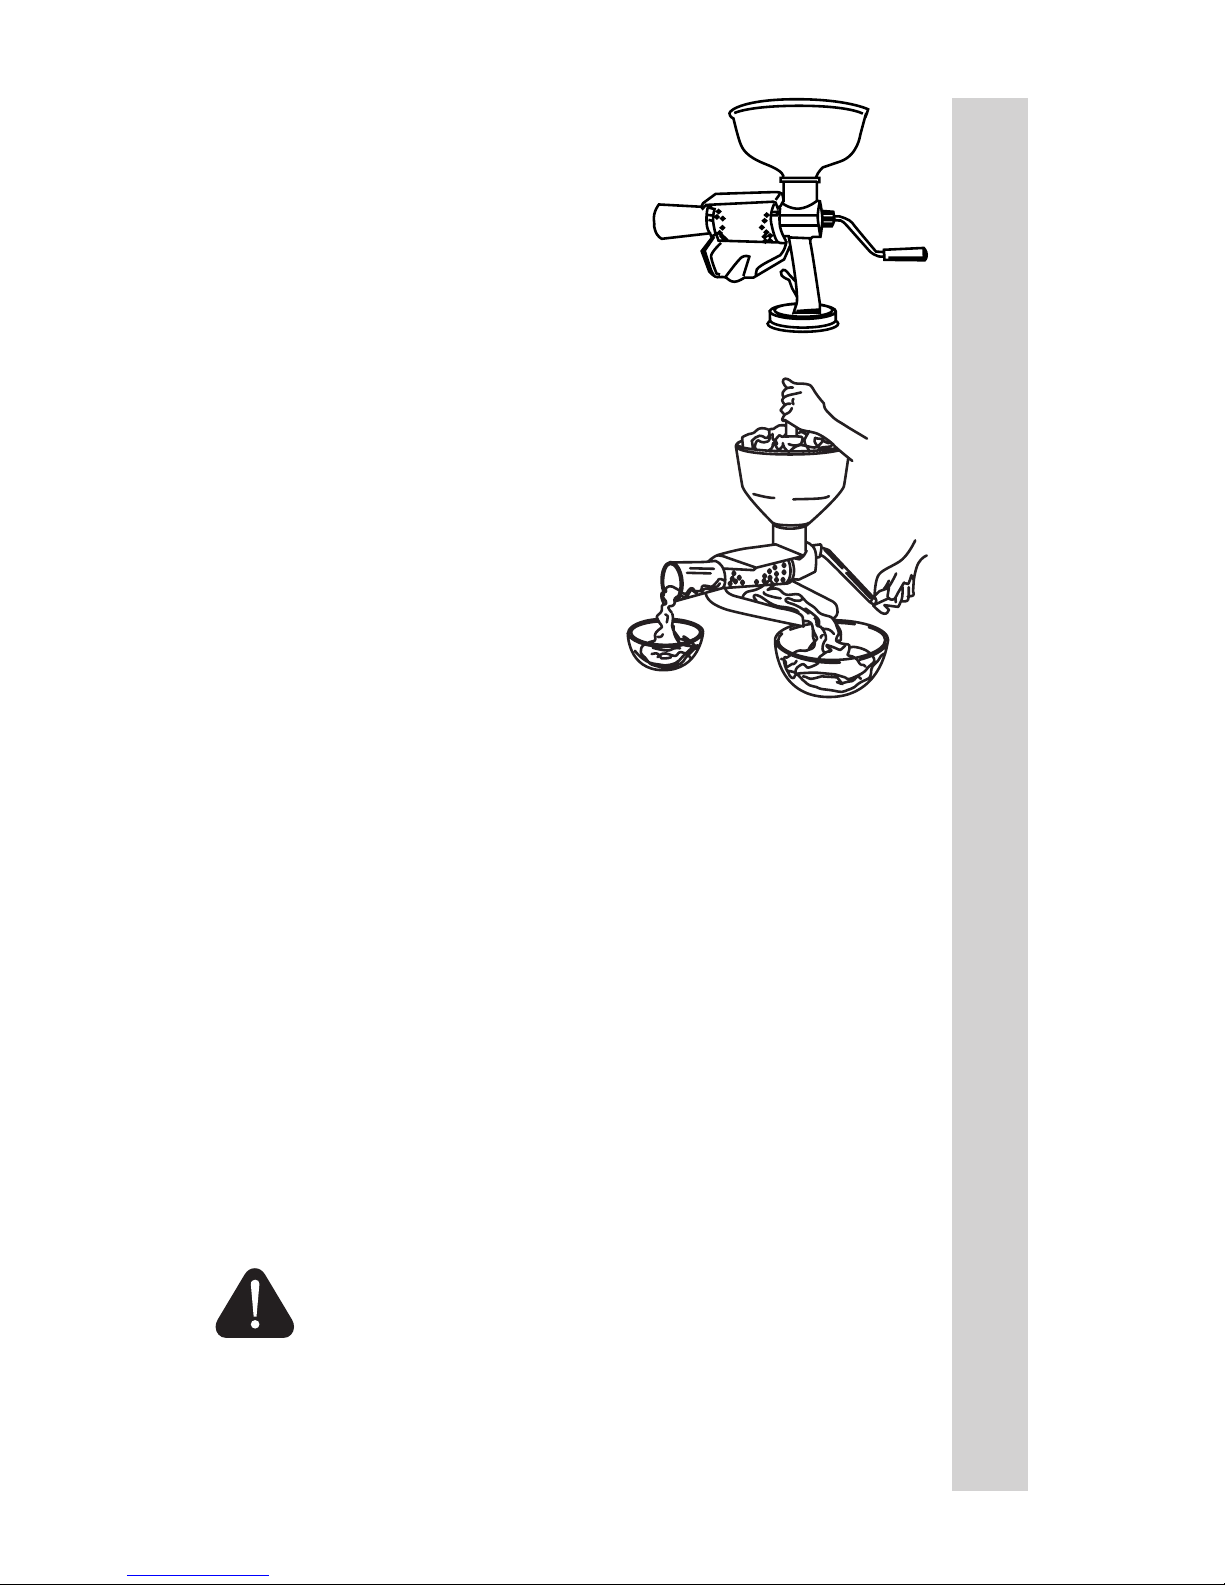
Fresh vine ripened tomatoes work
best. Remove the stems, wash and
quarter the tomatoes, then load the
Hopper half way full with the quartered
tomatoes. Guide the tomatoes into
the neck of the Tomato Press & Sauce
Maker using the Stomper, turn the
Handle in a clockwise direction. The
skins and seeds will come out of the
Waste Funnel, while the delicious
puree slides into your bowl ready to be
seasoned and eaten. If the tomatoes
are extra pulpy, a little unripe or difcult
to strain, parboil them to make them
softer. After par boiling, allow to cool before straining. If excessive liquid backs up
into the Hopper continue turning the Handle until the liquid runs through the machine
before guiding more tomatoes into the neck of the Strainer.
APPLES AND PEARS: For best results apples and pears should be softened before
processing with the Tomato Press & Sauce Maker. This is easily accomplished
without peeling or even coring the apples! Quarter the fruit before or after softening.
Place the fruit in a pot with about 1/2 full of water. Set the heat to medium, cover,
and let them steam until they are soft. For a little extra avor you can use cider to
steam the apples. After removing the fruit from the pot, strain it through the Tomato
Press & Sauce Maker using the standard Screen. The cores, skins and seeds will
come out of the Waste Funnel, while the delicious puree slides into your bowl ready
to be seasoned and eaten. If the Tomato Press & Sauce Maker is too hard to turn,
or it jams, the fruit may need further softening.
BERRIES: The Tomato Press & Sauce Maker will make it easy to create homemade
jams and jellies. Combine different berries and fruits to create custom avors. With
the optional Berry Screen (Model No. 07-0855 sold separately) you can easily
separate even the tiniest seeds from raspberries and strawberries. If you like your
jellies thicker just add a few crushed berries to the puree or use a Screen with larger
holes.
PUMPKIN, SQUASH, POTATOES, ETC: Using the optional Pumpkin Screen (Model No.
07-0857 sold separately) creates incredibly smooth pie llings or purees. Use this
Screen to also make breads, cakes, or even mashed potatoes without peeling. Just
cut these products into 1” (2.5 cm) squares or slices. Boil or bake until tender. Allow
to cool. For pumpkin and squash scoop the pulp out of its skin and run it through the
Tomato Press & Sauce Maker. Potatoes can be cut into cubes, boiled until tender
then run right through the Tomato Press & Sauce Maker for super smooth or chunky
mashed potatoes with no peeling.
GRAPES: Using the optional Grape Spiral (Model No. 07-0856 sold separately) and
standard Screen, to create gallons of delicious grape juice in just minutes. Just wash
the grapes, pull them from the stems, and the Tomato Press & Sauce Maker does
the rest. Great for the home wine maker.
FRUITS WITH LARGER PITS: For fruits like peaches, cherries, mangos, avocados*, and
anything else with a large seed, you must remove the seed to prevent jamming the
mechanism. Don’t worry about the skin or the core, the Tomato Press & Sauce Maker
will easily remove them and send them out through the Waste Funnel. If the fruit is rm
like an apple or pear, remember to soften them by steaming or baking slightly before
loading them into the Tomato Press & Sauce Maker. * Avocados must be peeled
before straining.
FOOD TIPS
8
ENGLISH INSTRUCTIONS

FOOD TIPS
9
ENGLISH INSTRUCTIONS
1. Fully disassemble the Tomato Press & Sauce Maker.
2. Wash all parts in hot soapy water. A stiff-bristled bottle brush may be needed
to clean the Screen. Pay extra attention to the seams of the Screen as seeds and
skin may gather there.
3. Before storing or reassembling the Tomato Press & Sauce Maker be sure all
the parts are thoroughly dry. It is recommended to apply a drop of vegetable oil on
the rubber Screen Gasket to keep it from drying and becoming brittle.
4. Keep the box the Tomato Press & Sauce Maker came in for easy storage.
CLEANING INSTRUCTIONS
• It is normal when straining large quantities of food with a high moisture content
like tomatoes, to see liquid back up into the Hopper. Simply continue turning the
Handle until all the liquid disappears from the Hopper and neck of the Tomato
Press & Sauce Maker.
• Depending on the food you are processing, it may be necessary to occasionally
scrape pulp from the Screen of the Tomato Press & Sauce Maker. A rubber
spatula is ideal for this.
• The Tomato Press & Sauce Maker is equipped with an extra Large Hopper. It is
best to ll the Hopper half full leaving space around the middle to guide food into
the throat of the Tomato Press & Sauce Maker using the Stomper.
• If there is excessive pulp exiting the Waste Funnel, run the pulp through the
Tomato Press & Sauce Maker a second time to fully extract every bit of juice. To
get the most out of the fruits and vegetables, strain the skins and seeds from the
Waste Funnel a second time.
• Operating the Tomato Press & Sauce Maker while empty is not recommended.
The juice from the fruits and vegetables act as a lubricant for the mechanism and
reduces wear on the components.
• The standard Screen that comes with the Tomato Press & Sauce Maker is
ideal for most foods, such as: Apples*, Tomatoes, Apricots*, Avocados (must be
peeled), Carrots*, Cherries, Cranberries*, Peaches (remove pit before straining),
Potatoes*, Pears*. *These foods should be softened by steaming, par boiling or
baking before straining.
•IMPORTANT NOTE: ALWAYS FOLLOW RECOMMENDED CANNING,
FREEZING AND DEHYDRATING PROCEDURES WHEN PRESERVING ANY
FOODS.
HELPFUL HINTS

10
INSTRUCCIONES EN ESPAÑOL
INSTRUCTIONS
.Run the fresh tomatoes through the Tomato Press & Sauce Maker using the
Multi-Purpose Screen to yield 12 cups of fresh tomato puree
.Heat the olive oil in a large pan
.Sauté the onions and garlic until tender, do not overly brown
.Add the rest of the ingredients
.Bring mixture to a boil, reduce heat and simmer partially covered for 2 hours or
until sauce has reduced to desired consistency
.Stir occasionally
.Serve or allow to cool then refrigerate or freeze
.Ingredients like sliced mushrooms, cooked/drained sausage, hamburger,
etc. can be added to taste
LARGE BATCH ITALIAN TOMATO SAUCE
INGREDIENTS
1/2 CUP OLIVE OIL 3 MEDIUM ONIONS, CHOPPED
3 TBSP BROWN SUGAR 1 TBSP DRIED OREGANO
2 TSP DRIED BASIL 1 TSP BLACK PEPPER
2 CLOVES GARLIC, MINCED 4 TSP SALT
FRESH TOMATOES
RECIPES
INSTRUCTIONS
.Heat the olive oil in a large saucepan
.Cover and cook the onions, celery, and carrots over medium-low heat for about
15 minutes, stir occasionally
.Uncover and stir over heat for an additional 5 to 10 minutes, or until the vegetables
are soft and slightly golden
.Add the tomato sauce, sugar, and pepper
.Cover and simmer gently for 15 minutes
.Serve or allow to cool then refrigerate or freeze
MARINARA SAUCE
INGREDIENTS
1 CUP CARROTS, FINELY MINCED 6 LBS RIPE ITALIAN-STYLE TOMATO
PUREE
1 CUP ONION, FINELY MINCED 1/2 CUP CELERY, FINELY MINCED
1/2 CUP OLIVE OIL 1 TSP SUGAR
2 CLOVES GARLIC, MINCED 4 TSP SALT
FRESH TOMATOES GROUND WHITE PEPPER, TO TASTE
OPTIONAL SEASONING (ANY ONE OF THE FOLLOWING):
2 TSP GROUND CORIANDER
1/2-1 TSP DRIED MARJORAM
1 TSP DRIED BASIL
1/4 TO 1/2 TSP DRIED OREGANO
1 TO 2 TSP SALT


Weston Products LLC warrants to the ORIGINAL RETAIL PURCHASER of this product that if operated in accordance
with the printed instruction accompanying it, then for a period of 1 year from the date of purchase, the product shall be free
from defects in material and workmanship.
The Warranty Card, along with a copy of the original receipt, must be received by Weston Products LLC within 30
days from purchase date for the warranty to apply. Failure to send the completely lled out Warranty Card, along with a
copy of the original receipt, will void the warranty.
The product must be delivered to or shipped freight prepaid to Weston Products LLC for warranty services, in either
its original packaging or similar packaging affording an equal degree of protection. Damage due to shipping is not the
responsibility of the company. Weston Products LLC charges a $35.00 per hour bench charge. NOTE: No repairs will
be started without the authorization of the customer. The return shipping cost to the customer will be added to the repair
invoice.
Prior to returning the product for Warranty Repair, the product must be thoroughly cleaned and free from any food
particles or other debris. Failure of the purchaser to comply with this standard will result in the unit being returned without
repair. In some cases, a $50 cleaning surcharge may apply.
Weston Products LLC will repair (or at its discretion, replace) the product free of charge, if in the judgment of the
company, it has been proven to be defective as to seller’s labor and material, within the warranty period.
New or rebuilt replacements for factory defective parts will be supplied for one (1) year from the date of purchase.
Replacement parts are warranted for the remainder of the original warranty period.
For non-warranty repairs, contact Weston Products LLC’s Customer Service at 1-800-814-4895 M-F 8am-5pm ET
(outside of the United States 001-440-638-3131) to obtain a Return Merchandise Authorization Number (RMA Number).
Weston Products LLC will refuse all returns that do not contain this number. DO NOT RETURN THE UNIT WITHOUT
PROPER AUTHORIZATION FROM WESTON PRODUCTS LLC.
LIMITATIONS: The warranty is void if the product is used for any purpose other than that for which it is designed.
The product must not have been previously altered, repaired, or serviced by anyone else other than Weston Products
LLC. If applicable, the serial number must not have been altered or removed. The product must not have been subjected
to accident in transit or while in the customer’s possession, misused, abused, or operated contrary to the instructions
contained in the instruction manual. This includes failure caused by neglect of reasonable and necessary maintenance,
improper line voltage and acts of nature. This warranty is not transferable and applies only to U.S. and Canadian sales.
Except to the extent prohibited by applicable law, no other warranties whether expressed or implied, including
warranty merchantability and tness for a particular purpose, shall apply to this product. Under no circumstances shall
Weston Products LLC be liable for consequential damages sustained in connection with said product and Weston
Products LLC neither assumes nor authorizes any representative or other person to assume for it any obligation or liability
other than such as is expressly set forth herein. Any applicable implied warranties are also limited to the one (1) year
period of the limited warranty.
This warranty covers only the product and its specic parts, not the food or other products processed in it. Weston is
not responsible for missing or damaged parts on discounted/clearance, resale or nal sale items where the seller may not
be able to guarantee full functionality or completeness of the unit.
CUT ALONG THE DOTTED LINE AND SEND THE WARRANTY CARD ALONG WITH A COPY OF YOUR
ORIGINAL PURCHASE RECEIPT TO:
Weston Products LLC / WARRANTY
20365 Progress Drive, Strongsville, OH 44149 USA
Customer Name:
Address:
City/State/Zip/Country:
Telephone Number:
E-Mail Address:
Original Date of Purchase:
Product Model #:
Serial # (if applicable):
I have read the warranty information. Initial here:
WESTON WARRANTY INFORMATION
SAVE THIS WARRANTY INFORMATION FOR YOUR RECORDS!
WESTON WARRANTY CARD
SEND THIS CARD ALONG WITH A COPY OF YOUR ORIGINAL PURCHASE RECEIPT TO:
WESTON PRODUCTS LLC / WARRANTY, 20365 PROGRESS DRIVE, STRONGSVILLE, OH 44149 USA
Copy of Receipt
Included

COLADOR DE ALIMENTOS
Y SALSERA
07-0801
REV121114
PATENTADO
Debido a constantes mejoras en la fábrica,
el producto que se muestra puede ser
ligeramente diferente del producto en
esta caja.

14
INSTRUCCIONES EN ESPAÑOLINSTRUCCIONES EN ESPAÑOL
5
63
17
1
12
10
2
34
5
18 11
16
15
14
9
13
6
7
8
19

15
INSTRUCCIONES EN ESPAÑOL
LISTA DE COMPONENTES
NÚMERO DE DIAGRAMA DESCRIPCIÓN DE LA PIEZA NÚMERO DE PIEZA
1 EMBUDO GRANDE 07-0834
2 CUERPO 07-0832
3* SELLO EN O DEL EJE DE
TRANSMISIÓNL 07-0820
4* CLIP DEL EJE DE TRANSMISIÓN 07-0821
5 COLADOR DE ALIMENTOS 200P EJE DE
TRANSMISIÓN (PRIMAVERA, E-CLIP,
SELLO EN O INCLUIDO)
07-0835
6 CUERPO DE LA COPA DE SUCCIÓN 07-0840
7 COPA DE SUCCIÓN 07-0841
8 TORNILLO DE BANCO 07-0842
9 ESPIRAL 07-0823
10 MANGO 07-0829
11 TORNILLO PANTALLA DE AJUSTE
MANUAL
07-0843
12 GUARDA DEL CHORRO / VERTEDOR 07-0838
13 PALANCA DE LA COPA DE SUCCIÓN 07-0830
14* RESORTE DEL EJE DE TRANSMISIÓN 07-0822
15 DISCO MULTIUSOS 07-0836
16 EMBUDO DE DESECHOS 07-0837
17 PISÓN 07-0844
18 JUNTA DEL DISCO 07-0824
19 COJINETE DE PLÁSTICO 07-0825
Si cualquier componente de esta unidad está roto, si no funciona debidamente, o si necesita un
instructivo de repuesto, visítenos en la Web en
WestonProducts.com
O llame a Weston Products LLC larga distancia sin costo 1-800-814-4895
De lunes a viernes, de 8:00 am a 5:00 pm tiempo del ET. Fuera de Estados Unidos llame
al 001-440-638-3131
*07-0820, 07-0821 & 07-0822 SE ENSAMBLAN EN PIEZA 07-0835.

16
INSTRUCCIONES EN ESPAÑOLINSTRUCCIONES EN ESPAÑOL
1. Aplique unas cuantas gotas de
aceite vegetal al aro en O del eje de
transmisión.
2. Deslice el clip del eje de transmisión
y el sello del aro en O por el extremo
trasero del eje de transmisión, que ya
viene ensamblado. FIGURA A
3. Inserte la junta del disco en el extremo
grande del disco asegurándose de que
quede por debajo del tornillo de ajuste
manual. FIGURA B
4. Deslice el resorte del eje de
transmisión por encima del eje de
transmisión.
5. Deslice la espiral roja de plástico en
el eje de transmisión por encima del
resorte. Haga coincidir la parte plana
del eje de transmisión con el inserto de
metal adentro de la espiral. FIGURA C
6. Alinee las muescas del cuerpo con
los surcos del conjunto del eje de
transmisión. FIGURA D
7. Sostenga el cuerpo rmemente en una
mano y empuje el conjunto del eje de
transmisión; después gira el conjunto del
eje de transmisión 1/8 de vuelta contra
las manecillas para dejarlo bloqueado en
su lugar (NOTA: Las echas de dirección
“ON” - “OFF” están en la base del disco).
8. Apriete el tornillo de ajuste manual
para dejar el disco bloqueado en su lugar
(NOTA: Apriete solo con los dedos; no
apriete demasiado). FIGURA E NOTA:
NO se recomienda hacer funcionar el
colador de alimentos y salsera cuando
esté vacío. El jugo de las frutas y
verduras actúa de lubricante en el
mecanismo y reduce el desgaste de sus
componentes.
INSTRUCCIONES DE ENSAMBLADO
FIGURA C
FIGURA D
FIGURA B
FIGURA A
FIGURA E

17
INSTRUCCIONES EN ESPAÑOL
INSTRUCCIONES DE ENSAMBLADO 9. Ahora ya puede jar el colador de alimentos
y salsera en su lugar de trabajo. Si utiliza la
copa de succión, revise que el área en donde
la vaya a adherir sea pareja y esté limpia y
seca. Simplemente levante la palanca de la copa
de succión y sostenga el colador de alimentos y
salsera rmemente en su lugar con la copa de
succión en contacto con la supercie de la mesa;
después baje la palanca de la copa de succión. La
palanca de la copa de succión requiere una presión
rme para bloquearse. NOTA: Si la supercie es
rugosa o está sucia, la copa de succión podría no
adherirse.
10. Si va a utilizar el tornillo de banco,
simplemente coloque el colador de alimentos
y salsera cerca del borde de la mesa o mesón.
Deslice el extremo superior del tornillo de banco
en la ranura de la base del colador de alimentos
y salsera y apriete el tornillo contra la parte
inferior de la supercie de trabajo.
11. Deslice el mango en el colador de alimentos
y salsera procurando alinear las ranuras del eje
de transmisión con las pestañas del mango.
12. Fije el embudo de desechos al extremo del
disco empujando el extremo pequeño con las
pestañas por encima del disco. NOTA: Tenga
cuidado de no romper el embudo al jarlo o
quitarlo.
13. Fije la guarda del chorro / vertedor al disco
deslizándola encima del disco con la apertura
más grande cerca del embudo. Engánchela en
su lugar. FIGURA F
14. Fije el embudo a la parte superior de la Roma
deslizando la sección del cuello del embudo
pequeño en la garganta del cuerpo.
15. Antes de colocar cualquier alimento en el
embudo asegúrese de tener un cuenco o una
jarra abajo tanto del embudo de desechos como
de la guarda del chorro / vertedero. FIGURA G
NUNCA USE LOS
DEDOS PARA
EMPUJAR
LOS ALIMENTOS
EN EL EMBUDO.
USE SIEMPRE EL
PISÓN ADJUNTO.
WARNING!
FIGURA F
FIGURA G

18
INSTRUCCIONES EN ESPAÑOLINSTRUCCIONES EN ESPAÑOL
TOMATES:El colador de alimentos y salsera hace puré fácilmente con tomates
frescos, elimina las semillas, el corazón y la piel sin necesidad de precocer nada.
Los tomates frescos madurados en rama dan mejores resultados. Retire los tallos,
lave y parta en cuatro los tomates. Después cargue el embudo a la mitad con
los tomates partidos. Dirija los tomates hacia el cuello del colador de alimentos y
salsera usando el pisón, girando el mango en sentido de las manecillas. La piel y las
semillas salen por el embudo de desechos, mientras que el delicioso puré se desliza
en el cuenco, listo para ser sazonado y comido. Si los tomates son muy pulposos,
están un poco verdes o son difíciles de escurrir, sancóchelos para ablandarlos.
Después de sancocharlos, déjelos enfriar antes de colarlos. Si se acumula líquido
excesivo en el embudo, siga girando el mango hasta que el líquido recorra toda la
máquina antes de dirigir más tomates hacia el cuello del colador.
MANZANAS Y PERAS Para obtener los mejores resultados hay que ablandar las
manzanas y peras antes de procesarlas en el colador de alimentos y salsera. Esto
se logra fácilmente sin necesidad de pelarlas y ni siquiera de quitarles el corazón.
Parta la fruta en cuartos antes o después de ablandarla. Coloque la fruta en una olla
con agua más o menos a la mitad. Ponga la olla a fuego mediano, tápela y cueza
las frutas hasta que estén suaves. Si desea un sabor adicional, puede usar sidra
para cocer las manzanas al vapor. Después de sacar las frutas de la olla, cuélelas a
través del colador de alimentos y salsera usando el disco estándar. Los corazones,
la piel y las semillas salen por el embudo de desechos, mientras que el delicioso
puré se desliza en el cuenco, listo para ser sazonado y comido. Si le cuesta trabajo
hacer girar el colador de alimentos y salsera, o si se atora, es posible que necesita
ablandar más la fruta.
BAYAS: El colador de alimentos y salsera hace que sea muy fácil elaborar jaleas
y mermeladas caseras. Combine bayas y frutas variadas para crear el sabor a
su gusto. Con el disco para bayas (Modelo N° 07-0855, opción que se vende por
separado) usted puede separar fácilmente incluso las semillas más pequeñas de las
fresas y frambuesas. Si quiere que su jalea sea más espesa, simplemente agregue
algunas bayas machacadas al puré o use un disco con agujeros más grandes.
CALABAZA, CALABACITA, PAPAS, ETCÉTERA: Use el disco para calabaza (Modelo N° 07-
0857, opción que se vende por separado) para elaborar rellenos de tartas y purés
increíblemente suaves. Use este disco también para elaborar panes, pasteles e
incluso puré de papas sin necesidad de pelar. Simplemente corte estos productos
en cubitos o rebanadas de 2.5 cm (1”). Cuézalos u hornéelos hasta que se ablanden.
Déjelos enfriar. Con la calabaza y la calabacita, sáqueles la pulpa de la cáscara y
pásela por el colador de alimentos y salsera. Las papas las puede cortar en cubitos,
hervirlas para que se ablanden y después pasarlas por el colador de alimentos y
salsera para obtener un puré súper suave o con trocitos de papa sin necesidad de
pelarlas.
UVAS: Usando la espiral para uvas (Modelo n° 07-0856, opción que se vende por
separado) y el disco estándar puede producir litros de delicioso jugo de uva en unos
cuantos minutos. Solo lave las uvas, quíteles el tallo y el colador de alimentos y
salsera se encarga del resto. Es excelente para hacer vino casero.
FRUTASCONHUESOSGRANDES: Con frutas como duraznos, cerezas, mangos, aguacates*
y cualquier otra de hueso grande, hay que quitarles el hueso para evitar que se atasque
el mecanismo. No se preocupe por la piel o el corazón; el colador de alimentos y
salsera los elimina fácilmente y los envía al embudo de desechos. Si las frutas son
rmes, como las manzanas y peras, no olvide ablandarlas al vapor o cociéndolas
ligeramente antes de cargarlas en el Si las frutas son rmes, como las manzanas y
peras, no olvide ablandarlas al vapor o cociéndolas ligeramente antes de cargarlas
en el *Hay que pelar los aguacates antes de colarlos.
CONSEJOS DE COMIDA

19
INSTRUCCIONES EN ESPAÑOL
CONSEJOS DE COMIDA
1. Desarme completamente el colador de alimentos y salsera.
2. Lave todas las partes en agua caliente y jabonosa. Puede necesitar un cepillo
de cerdas duras para limpiar el disco. Ponga especial atención a las uniones del
disco, pues ahí pueden acumularse las semillas y la piel.
3. Antes de guardar o volver a armar el colador de alimentos y salsera revise
que todas las piezas estén bien secas. Se recomienda aplicar una gota de
aceite vegetal a la junta del disco para evitar que el hule se seque y se vuelva
quebradizo.
4. Conserve la caja en la que vino el colador de alimentos y salsera para
guardarlo fácilmente.
INSTRUCCIONES DE LIMPIEZA
• Cuando cuele grandes cantidades de alimento con gran contenido de humedad,
como los tomates, es normal ver que el líquido regrese al embudo. Simplemente
siga dándole vueltas al mango hasta que desaparezca todo el líquido del embudo
y del cuello del colador de alimentos y salsera.
• Dependiendo del alimento que esté procesando, ocasionalmente puede ser
necesario raspar la pulpa del disco del colador de alimentos y salsera. Una
espátula de hule es ideal para esto.
• El colador de alimentos y salsera colador de alimentos y salsera embudo extra
grande. Lo mejor es llenar el embudo hasta la mitad, dejando espacio hacia el centro,
para guiar los alimentos hacia la garganta del colador de alimentos y salsera con el
pisón.
• Si sale demasiada pulpa por el embudo de desechos, pásela una segunda
vez por el pásela una segunda vez por el para extraerle hasta la última gota de
jugo. Para aprovechar al máximo las frutas y verduras, vuelva a colar la piel y las
semillas del embudo de desechos.
• No se recomienda hacer funcionar el colador de alimentos y salsera cuando
esté vacío. El jugo de las frutas y verduras actúa de lubricante en el mecanismo y
reduce el desgaste de sus componentes.
• El disco estándar que viene con el colador de alimentos y salsera es ideal
para la mayoría de los alimentos, como: manzanas*, tomates, albaricoques*,
aguacates (deben pelarse), zanahorias*, cerezas, moras rojas*, duraznos,
(quíteles el hueso antes de colarlos), papas*, peras*. * Hay que ablandar estos
alimentos, al vapor, sancochándolos o cocinándolos o ablandándolos en el horno
antes de colarlos.
•NOTA IMPORTANTE: SIEMPRE SIGA LOS PROCEDIMIENTOS
RECOMENDADOS PARA ENLATAR, CONGELAR Y DESHIDRATAR AL
CONSERVAR CUALQUIER ALIMENTO.
CONSEJOS ÚTILES

INSTRUCCIONES PARA LA MASA
.Pase los tomates frescos por el colador de alimentos y salsera usando el disco
multiusos para sacar 12 tazas de puré de tomate fresco.
.Caliente el aceite de oliva en un sartén grande.
.Saltee las cebollas y el ajo hasta que estén blandos sin que se oscurezcan.
.Vierta el resto de los ingredientes.
.Deje que hierva la mezcla, baje la llama y deje cocinando a fuego lento con el
sartén parcialmente cubierto durante dos horas o hasta que la salsa haya
adquirido la consistencia deseada.
.Remueva ocasionalmente.
.Sírvala caliente o permita que se enfríe y refrigérela.
.Puede reforzar el sabor con ingredientes como champiñones rebanados,
salchichas cocidas y drenadas, hamburguesas, etc.
LOTE GRANDE DE SALSA ITALIANA DE TOMATE
INGREDIENTS
1/2 TAZA DE ACEITE DE OLIVA 3 CEBOLLAS MEDIANAS PICADAS
2 DIENTES DE AJO PICADOS 3 CUCHARADAS DE AZÚCAR
MORENA
1 CUCHARADA DE ORÉGANO SECO 4 CUCHARADITAS DE SAL
2 CUCHARADITAS DE ALBAHACA
SECA 1 CUCHARADITA DE PIMIENTA
NEGRA TOMATES FRESCOS
RECETAS
INSTRUCCIONES PARA LA MASA
.Caliente el aceite de oliva en una sartén grande.
.Cocinelascebollas,elapioylaszanahoriasafuegomedianoduranteunos15minutos
con el sartén tapado; revuelva ocasionalmente.
.Destapeyagitesobre elfuegodurante5 a10minutosmás, ohastaquelas verduras
estén suaves y ligeramente doradas.
.Vierta la salsa de tomate, el azúcar y la pimienta.
.Cubra y cueza a fuego lento durante 15 minutos más.
.Sírvala caliente o permita que se enfríe y refrigérela.
SALSA MARINARA
INGREDIENTS
1 TAZA DE ZANAHORIAS FINAMENTE
PICADAS 6 LIBRAS DE PURÉ DE TOMATE
MADURO ESTILO ITALIANO
1 TAZA DE CEBOLLA FINAMENTE
PICADA 1/2 TAZA DE APIO FINAMENTE
PICADO
1/2 TAZA DE ACEITE DE OLIVA 1 CUCHARADITA DE PIMIENTA
NEGRA TOMATES FRESCOS
1 TSP SUGAR GROUND WHITE
PEPPER, TO TASTE
CONDIMENTOS ADICIONALES (CUALQUIERA DE LOS SIGUIENTES):
2 CUCHARADITAS DE CILANTRO MOLIDO 1/2 A 1 CUCHARADITA DE
MEJORANA SECA
1 CUCHARADITA DE ALBAHACA SECA 1/4 A 1/2 CUCHARADITA DE
ORÉGANO SECO
1 A 2 CUCHARADITAS DE SAL
20
INSTRUCCIONES EN ESPAÑOLINSTRUCCIONES EN ESPAÑOL
Table of contents
Languages:
Other Weston Power Tools manuals