Whirlpool FHT1200 Installation guide

產品安全指引、使用說明及安裝指南
Model 產品型號 : FHT1200

2
繁體中文
1
18
Please read the following instructions carefully before using the device, and keep this user manual for future reference.
為了您能更好地使用本產品,請您在使用前仔細閱讀此使用說明書,以發揮本機的最佳效能,並妥善保管好說明書。

1
EN
USER MANUAL
2-3
4
5
6
7
7
8
8
9-12
13-15
16
16
INDEX
Important Safety Information
Product Overview
Product Features
Product Structure
Touch Control Panel And Remote Display Panel
Before Use
Product Unpacking
Remote Battery Installation
Positioning
Operation Condition
Use Your 2 in 1 Fan Heater
Operation Method of Each Function Button
On/Off Mode
Heating Mode Selection
Fan Mode Selection
Auto Swing
Timer
Temperature Setting For Heating Mode
Continuous Electric Memory Function
Care and Maintenance
Safety Warning & Safety Precautions
Cleaning & Maintenance
Product Specification
9
10
10
10
10-11
11-12
12

2
Important Safety Information
- Please don’t have the wind blow
to the children directly for a
long time. It may influence the
children’s health.
- Please don’t touch the plug by
wet hands.
- Persons (including children)
with reduced physical, sensory
or mental capabilities, or any
individual lacking experience
and knowledge should be
supervised or given instruction
by a person responsible for
their safety when they using
this appliance. Unless being
supervised, children can’t use
this appliance.
Intended Use Of The Product
- Do not use it on outdoor areas.
- This appliance is for household
use only.
Installation
- If there is abnormal smell or
noise when uses the product,
please stop using and pull out
the power cord immediately.
- Please don’t put the wood or
metal stick into the air inlet or
outlet. It may lead to electric
shock, or product damage.
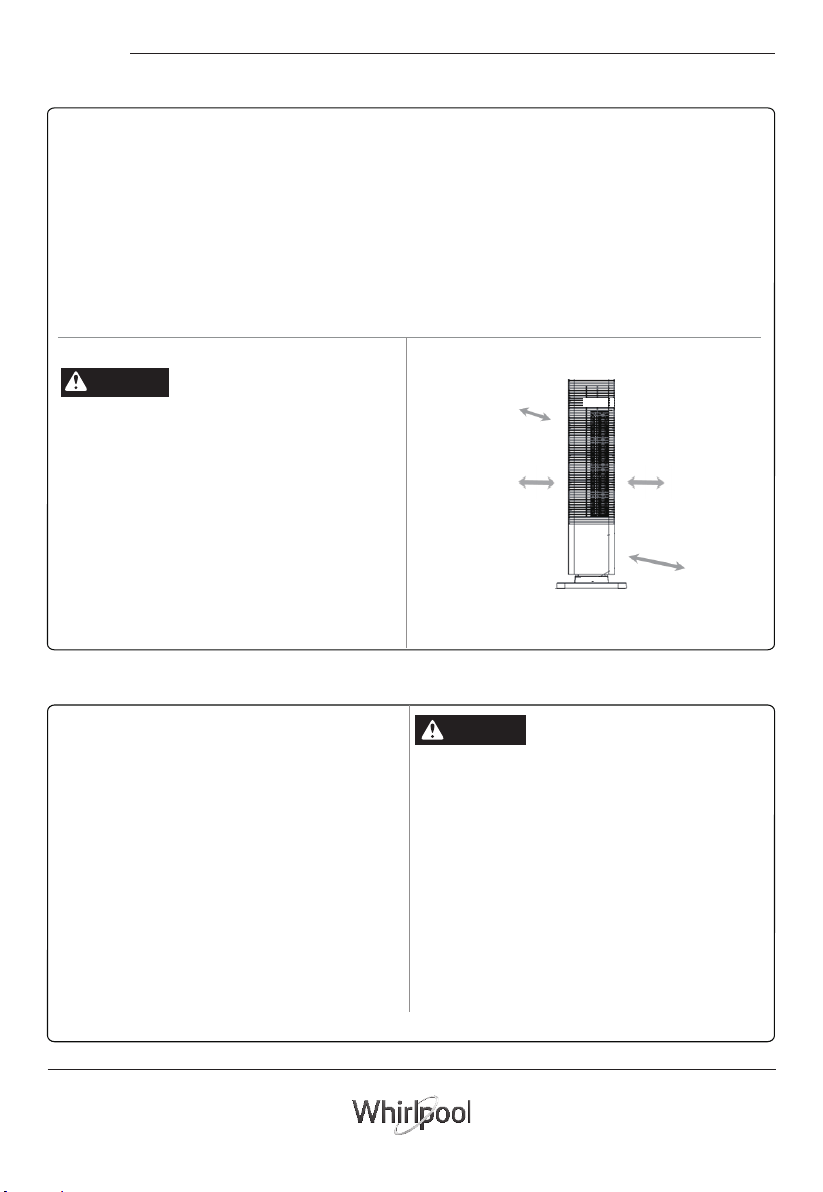
- Place the appliance on a stable
and flat surface to avoid it
tipping over or being knocked
over.
- Do not immerse the appliance
or the electrical cord or plug in
liquids.
- Do not use the 2 in 1 Fan Heater
in front of or close to an open
window.
- Store the appliance away from
direct sunlight and out of the
reach of children.
- Do not insert any objects
into the 2 in 1 Fan Heater.
- When using the 2 in 1 Fan
Heater, keep combustible
materials or explosive objective,
away from 2 in 1 Fan Heater.
- Do not share the dame
circuit receptacle with others
appliances, otherwise may
have burn hazard.
- Do not use extension cord.
- Do not operate the appliance
with a damaged cord or plug.
Send the 2 in 1 Fan Heater
to a suitably qualified or
appointed service agent for
inspection and repair.
- Unplug 2 in 1 heater if it fails to
operate properly and inform
customer service center.
- Filter must be installed in
place appropriately when
using, otherwise, there may
be potential fire hazard.
Your Safety And Safety Of
Others Is Very Important
• Follow all the safety precautions
listed below for safety and
to reduce the risk of injury or
electrical shock.
- Read all the instructions
carefully before using this
appliance and keep then
for future reference.
- Please read all instructions
carefully before using this
product. When using the
appliances, should always
follow this instruction to
reduce the risk of fire, electric
shock, and injury to person.
- Retain the manual. If you pass
the product to a third party,
make sure to include this
manual.
- This appliance is not intended
for use by persons (including
children) with reduced physical,
sensory or mental capabilities,
or lack of experience and
knowledge, unless they have
been given supervision or
instruction concerning use
of the appliance by a person
responsible for their safety.
- Children should be supervised
to ensure that they do not
play with the appliance.
- Unplug the appliance during
cleaning.
- some parts of this product
can become very hot and
may cause burns. Particular
attention has to be given
where children and vulnerable
people are present.
CAUTION

3
EN
Important Safety Information
- The 2 in 1 Fan Heater must not
be located immediately below a
socket outlet or other appliance.
- Do not use this 2 in 1 Fan Heater
in the surrounding of a bath, a
shower or a swimming pool.
- Stop using immediately when
water splash into product,
otherwise, it may have electric
shock hazard.
- Do not use in wet area such as
bathroom.
- Make sure no water inside the
product before you use it.
- Do not use the appliance for any
purpose not expressly specified
in this manual.
- This appliance must be attended
at all times when it is switched
on.
- Do not put clothes or towels
directly on the 2 in 1 Fan Heater
or use it to dry laundry.
- Do not touch hot surface when
in use.
- Do not use the 2 in 1 Fan Heater
near animals or plants.
- Dispose of packaging properly.
- The 2 in 1 Fan Heater only for
personal use, not for heating
any liquids or other danger
things.
- Do not use 2 in 1 Fan Heater with
a programmer, timer, separate
remote-control system or any
other device that switches the 2
in 1 Fan Heater on automatically,
since a fire risk exists if the 2
in 1 Fan Heater is covered or
positioned incorrectly.
- Do not place the power cord on
hot surface when using.
Child Safety
• Do not place the appliance close
to children or pets. Never let
children operate this appliance.
Close supervision is necessary
when this is used near children.
Cleaning And Maintenance
•
Do not use this 2 in 1 Fan Heater
in small rooms when they are
occupied by persons not capable
of leaving the room on their own,
unless constant supervision is
provided.
• In order to use the product
more conveniently and avoid
any danger caused by wrong
operation, please pay attention
to the notices.
- Turn it off and remove plug
until the product stops
working and cool down
completely before clean
the unit.
Electrical Warnings
• Must be supplied with 220V
-240V~/50Hz.
• The plug must be plugged
into an appropriate outlet that
is installed and grounded in
accordance with local law and
regulations.
• Do not modify the plug
provided with the appliance.
If it does not fit the outlet,
please consult with a qualified
electrician for advice.
- If the supply cord is damaged,
it must be replaced by
the manufacture, qualified
persons in order to avoid a
hazard.
- Please do not pull out the
power plug by pulling the
power cord. It may cause
the power cord damage or
electric shock.
- Please don’t put heavy unit
onto the power cord or fold
the power cord. It may lead to
electric shock.
- Disconnect power plug from
power supply when the
appliance is not in use for a
long period of time.
- Do not pull the power supply
cord to remove it from the
socket. Do not twist or press
the power supply cord, and
make sure it is not broken.
Correct Use
- In order to avoid overheating,
do not cover the 2 in 1 Fan
Heater.
WARNING
WARNING

4
1. 2 in 1 Fan Heater include fan and heating function, available in the whole year.
2. PTC ceramic heating element, change the power automatically based on the variation of the
ambient temperature. No oxidation characteristics bring the product longer service life.
3. Two heating and fan mode levels selection.
4. 1-12 hours timer.
5. Automatic swing, comfortable airflow and heating supply, wind downy, heat evenly.
6. Temperature Setting Range 15℃-35℃.
7. Using crossflow cooling fan, low noise (Low Fan Mode).
8. With Tip-over safety protection, double over-heating protection ( Themostat, temperature
fuse), use more safety.
9. Convenient operation with infrared remote control function.
10. Wide-angle air supply.
Product Overview
Product Features

5
EN
Warning Label:
To avoid overheat, Do not
cover the 2 in 1 Fan Heater.
1. Remote control
receiver
2. Wind outlet
3. Front cover
4. Base
5. Filter cover
6. Filter
7. Top cover
8. Control panel
9. Power cord
10. Power switch
11. Remote controller
Product Overview
Product Structure
Front View Side View Back View
11
10
05
01
02
03
04
09 07
08
06
Top View

6
1. ON/OFF button
2. Power indicator.
3. High / Low Fan mode button. Switch the fan mode, High/Low fan mode selection.
4. High Fan mode indicator. When the lights on (Orange Light), the High Fan mode is activated.
5. Low Fan mode indicator. When the lights on (Orange Light), the Low Fan mode is activated.
6. High/Low Heating mode button. Switch the heating mode, High/Low Heating mode selection.
7. High Heating mode indicator. When the lights on (Orange Light), the High Heating mode is activated.
8. Low Heating mode indicator. When the lights on (Orange Light), the Low Heating mode is activated
9. Timer / temperature set button. Setup the operation time & temperature. (P.10 -12)
to set the operation
10. Timer / temperature number button
11. Temperature set indicator. When the lights on, can press
12. Timer indicator. When the lights on, can press to set the operation time .
13. Swing button.
14. Swing indicator.
Button Instructions
Remote Display Panel
Touch Control Panel /
Display Panel
Touch Control Panel And Remote Display Panel
/
Product Overview
9
5
1
2
13
11
14
12
10
9
4
3
8
6
7
10
temperature.

7
EN
Before Use
Product Unpacking
Remote Battery Installation
• Unpack all the packaging materials
• Carton box, foams, plastic bag, stickers must be removed.
• Pull out the battery cover at the back of remote control ( see Picture 3).
• Pay attention to the battery polarity, and insert the battery (see Picture 4).
• Put back the battery cover into the remote control.
Use 3V CR2032 Battery
• Keep children away from the packaging since the folded packing and plastic bag
may cause suffocation.
•Check all accessories and documents. Please check the accessories inside the package
according to packing list, contact the shop from which you purchased if anything is
missing.
Remote Control
Picture 3
Picture 4Battery
CAUTION
WARNING

8
Before Use
Positioning
Operation Condition
• Place the unit in an upright position
• On a stable and flat surface. Carpet or futon is a very unstable place. Do not place above floor
level such as on table.
• Enough space around the unit. Recommended space: Side 90 cm or more; Filter side 90cm or
more; Behind 90cm or more; Front 90cm or more)
• Avoid place in direct sunlight
• Any electric machine in the same space, if there is noise or cannot display correct time, move the
product as far as possible from other electric machine.
Operation ambient temperature -5℃ - 35℃
(Heating Mode).
• Operation ambient humidity RH﹪ < 85﹪
(When 25℃).
• 220V ac power supply only.
• Plugging Power plug into power socket.
-”BiBi” Sounds indicate connect to power
source.
-Only Power indicator light up in the control
panel.
-All keys are no response, except “POWER”
key.
-Press “POWER” to start the machine.
Do not use in the following places
• Directly sunshine
• Outdoor
•Narrow space environment such as inside
cabinet
•With a lot of steam or oil such as kitchen
• Wet place such as bathroom
Do not use the product in
below area
- With a lot of chemicals are used such as
factory, hospital, laboratories
- With a lot of flammable gas or oil
- With a lot of steam or oil such as kitchen
- With a lot of sulfide gas such as hot spring
- With high humidity or wet place such as
bathroom
Behind 90cm
or more
Front 90cm
or more
Filter side 90cm
or more
Side 90 cm
or more
CAUTION
WARNING

9
EN
Use Your 2 in 1 Fan Heater
Operation Method of Each Function Button
On/Off Mode
After connected to power supply and switch on the power, you will hear a “BiBi” sound; the
machine enters to Standby Mode. The power indicator lights up, other functions and
displays are off.
Under the condition of Standby Mode, only on/off button is available to be pressed. Press
button to turn on the machine, and press again to Standby Mode. After turning on the
machine, the machine defaults at:
a) Heat: Low Power, LED lights up.
b) Swing: Stop, LED off.
c) Timer: no setting, LED off.
d) Display Panel: shows room temperature, LED lights up.
e) Temperature setting: automatically set to 25℃.
WARNING
Heat radiation function of fan:
When the machine is on, the PTC heating element and the fan will work together. When the
machine is off, PTC stops and fan will still operate for 10 seconds to lower the temperature of
the PTC heating element. Please do not switch off the power supply unless the fan stopped.
Otherwise, it will shorten the machine lifetime or affect the machine performance. ( This
warning won’t be repeated in the following function description)
WARNING

10
Use Your 2 in 1 Fan Heater
Heating Mode Selection
Fan Mode Selection
Timer
Auto Swing
Press button to set the mode, the mode is changed in sequence:
Low Power, High Power Heating Mode.
a) Low Heating Power: LED lights up.
b) High Heating Power: LED lights up.
Press button to set the mode, the mode is changed in sequence:
Low Power, High Power Fan Mode.
a) Low Fan Power: LED lights up.
b) High Fan Power: LED lights up.
Press button to set the “Timer” function.
a) Timer function: Press button and LED lights up. You can press “ “ button to set the
timer with a range of 0 to 12 hours. Press “ “ button once to raise time setting by 1 hour,
press “ “ button once to lower time setting by 1 hour, hold the “ “ button to change
the number rapidly.
b) Previous timer setting will not change when enter to setting mode unless you press “
“
button to reset the time, and press button to confirm the changes.
c) If you don’t set the time in 5 seconds or you press other buttons except “ “, the display
panel will exit the Timer function and will show room temperature immediately.
Press button to start/stop the “Swing” function.
a) On: Press button, LED light up.
b) Off: Press button again, LED off.
nCautioCAUTION : : If the room temperature is higher than the temperature setting, PTC heating
elements and mode indicator on the panel will stop automatically while fan will operate
for another 10 seconds before it stops. When the room temperature is below the
temperature setting 1℃, PTC heating elements restart and heating mode will show on the
display panel. The machine continues to work. This is not malfunction.

11
EN
Press button once to set the temperature.
a) Temperature setting: press button and LED lights up. You can press “ “ button to set
the temperature on a range of 15℃to 35℃. Press “ “ button once to raise temperature
setting by 1℃, press “ “ button once to lower temperature setting by 1℃, hold the “ “
button to change the number rapidly.
b) Previous temperature setting will not change when enter into setting mode unless your
press “ “ button to reset the temperature, and press button to confirm the
changes.
c) If you don’t set the temperature in 5 seconds or you press other button except ““, the
display panel will exit the temperature setting and will show room temperature
immediately. When room temperature is -10℃ or below, the panel shows “LO”; when
room temperature is higher than 40℃, the panel shows “HI”. In a range of -10℃to
40℃, t he panel shows actual temperature.
Use Your 2 in 1 Fan Heater
Timer
d) When you set the timer within 1-12 hour(s), the timer function will start (not show
countdown number). After finished, the machine will stop and enter to Standby mode
automatically.
e) If the timer set to 0 hour, timer function off, the machine works at normal.
f) When both set the timer function and the desired temperature, display panel will show
the timer and the room temperature respectively in every 30 seconds. If the timer is not
set, the panel only shows the room temperature.
Temperature Setting For Heating Mode
d) If the room temperature is higher than the temperature setting, PTC heating elements
and mode indicator on the panel will stop automatically while fan will operate for another
10 seconds before it stops. When the room temperature is below the temperature setting
within 1℃, PTC heating elements restart and heating mode will show on the display
panel. The machine continues to work.

12
When you press button to restart the machine on Standby Mode, the machine will operate
at previous setting (except the timer function), given power supply keep connecting.
Remark: If the previous setting is High Power, when you restart the machine, LED lights
up, the machine will operate at Low Power first for 10-20 seconds, and then change to
High Power.
If the machine operate more than 1 minute, the LED indicated lights will automatically
turn to 1/3 dimmer to avoid influences in night time, the lights will back to normal when
you press any button.
Use Your 2 in 1 Fan Heater
Remark: Under below conditions:
1) First Time Use, or
2) User did not set the desire temperature in heating mode, or
3) User turns off the machine with the power switch (at the back of the machine).
If the room temperature is higher than pre-set temperature (25℃). The PTC
(Heating Element) will stop (No heat will be generated); When the room
temperature is below the pre-set temperature 1℃, PTC heating elements restart.
If turn off the machine, the fan will continuous for 10 seconds. This is normal
phenomenon and not a problem at all.
e) When both set the timer function and the desired temperature, display panel will show
the timer and the room temperature respectively in every 30 seconds. If the timer is not
set, the panel only shows the room temperature.
Continuous Electric Memory Function
Temperature Setting For Heating Mode
NTC over-heating protection function
NTC (Temperature sensor) over-heating protection instruction: when the NTC
temperature is too high, machine will be forced to turn off (all the LED light off, the timer
and auto swing will stop, the PTC(heating element) will stop heating and the fan will
continuous for 10 seconds before it turns off). Place the machine on the ambient
temperature 25℃ and last for 5-7 minutes to cool down the NTC Temperature, the
machine can be start again by manual , but pay attention the machine will not restart and
restore any functions automatically. When NTC is malfunction, the machine will not
operate. In the normal opening the machine without setting the timer, the machine will
turn off automatically after continue operating 12 hours. (Start Counting from the last
press button, unless it will reset the counter if you press any buttons.)

13
EN
Care and Maintenance
Safety Warning & Safety Precautions
In order to use the product more conveniently and avoid any danger caused by wrong operation,
please pay close attention to the notices instructed by sign hereinafter. And then read the
instructions carefully.
• Symbolic meaning
• With any indication of malfunction, contact
service center repairs. Do not attempt to
disassemble the product or replace faulty
parts with unauthorized components because
it will damage the unit.
• Do not put stickers, metal or other object
into the outlet, because it will cause electric
shock or short circuit or even damage the
device.
• Do not hand the plug or product with wet hands.
Or it may cause electric shock.
• Do not use pesticide or other flammable spray
around the product. Because it will catch fire
easily.
Warning Something that maybe result in severe damage to the units or your life.
Forbidden Some action that must be absolutely prohibited.
Must be Obey The content or actions that must execute absolutely as it said.
CAUTION This mark indicates the behaviors is strictly prohibited, which may result in
injuries or damage to product or property
No Disassembly Do not touch
General forbidden
General forbidden
Electric shock
Electric shock

14
Care and Maintenance
• Do not face the wind outlet to baby directly
for long time. Or it will be bad to baby’s
health.
• Make sure there are no abnormal items in
the wire, and the plug is absolutely plug in.
Otherwise it will cause electric shock.
• Do not use broken power cord, or it can result
it electric shock, short circuit and fire. Please
contact service center for repair.
• Where there is unusually smell or unusual
sound from the device, then stop operating
the device, and unplug the plug.
Remark: There will be “new” smell/little smoke
since the protective substances to be applied
on heating element before transportation. It is
entirely normal and not a cause for concern.
• Do not fold power cord or place heavy object
on it, because it can cause electric shock.
• Do not pull the wires when unplug the power
cord plug, because it will damage the wire or
lead to electric shock.
General forbidden General forbidden
Must be obey
Must be obey Must be obey
Electric shock
Electric shock
Electric shock Electric shock
Must be obey

15
EN
Care and Maintenance
• Power off the device and unplug the power
cord when not using for a long time.
• Should avoid using the device, if there is any
child or animal or disable people or people
who are lack of self-control.
• Forbid to use the device around the tub,
sprinkler or swimming pool.
• Forbid to use the device directly below the
power outlet.
Do not make the device close to the walls,
• Curtains or other combustible materials,
cause it may cause a fire.
• Do not touch hot surface when in use.
• Using the power outlet that meets the inspection
requirements and the carrying capacity of the
socket is no less than 13A/220V.
• Ensure the power supply voltage is consistent
with the specified voltage in the machine (220-
240Vac).
• Make sure the service voltage when relocation.
• To avoid overheating, do not cover the device
with the heater.
• Never place any objects in the device.
Must be obey
General forbidden
General forbidden hot surface
Do not cover !
Must be obey

16
Care and Maintenance
Cleaning & Maintenance
a) Make sure that the device is unplugged and chill-down before cleaning or maintenance.
b) Please use soft cloth to wipe the dust on the heater’s surface; If the surface is too dirty, it
is better to wipe it within the water lower than 50℃ mixed with neutral detergent.
c) Don’t use the gasoline, thinner and other materials to clean the device which will damage
the surface of the device.
d) When storage, the heater should be firstly cold, dried, and packaged in dry and ventilated
place.
If there is any inconsistency or ambiguity between the English version and Chinese version, the
English version shall prevail.
Model No. FHT1200
Voltage 220-240Vac
Frequency 50Hz
Power 2000W
Dimension (W*D*H*) 210mm x 210mm x 688mm
(with base cover)
Product Specification

17
EN

18
使用說明書
感謝您購買惠而浦產品
為了獲得更完善的服務,
請於www.whirlpool.com.hk註冊您的產品
索引
重要安全資訊 19-20
產品概述
產品特點 21
產品結構示意圖 22
輕觸式控制面板及遙控器 23
使用前準備
包裝卸除 24
遙控器使用安裝 24
擺放位置 25
操作條件 25
使用方法
各功能按鍵的使用方法 26-29
開機 / 關機 26
27
27
27
27-28
28-29
29
30-32
33
暖風風速調校
涼風風速調校
自動搖擺功能
時間設定功能
室內溫度設定功能(暖風模式)
不斷電記憶功能
安全注意事項
維修保養方法
規格表 33
Table of contents
Other Whirlpool Heater manuals
Popular Heater manuals by other brands

EOS
EOS VITAE Assembly Instruction and instructions for use

Johnson
Johnson Caminetto Instructions for use

Desa
Desa B50G owner's manual

UNMAK
UNMAK 10 P 300 Installation and user manual

Pinnacle Climate Technologies
Pinnacle Climate Technologies REMINGTON REM-16-TTC-O User's manual & operating instructions

Korona
Korona 60002 instruction manual