White 8000 User manual
TABLE
OF
CONTENTS
NAMES
OF
PARTS
.
1
2.
ACCESSORIES
3
3.
PRiMARY
PREPARATION
4
Unpacking
the
Machine
4
Connecting
Foot
Controller
and
Power
Cord
4
Attaching
the
Extension
Table
5
Detaching the
Extension
Table
5
Changing
the
Light
Bulb
6
Removing
the
Bobbin
Case
6
Winding
the
Bobbin
7
Inserting
the
Bobbin
8
Threading the
Lower
Thread
8
Checking
the
Tension
8
Inserting
the
Bobbin
Case
9
Checking
the
Needle
9
Changing
the
Needle
9
Fabric,
Thread
and
Needle
Table
9
Changing
the
Foot
10
Threading
the
Upper
Thread
11
Drawing
up
the
Lower
Thread
12
Thread
Cutter
12
4.
FUNCTION
OF
DEVICES
13
Pattern
Selection
Dial
13
Stitch
Length
Dial
13
Zigzag
Width
Control
13
Reverse
Sewing Button
14
Drop
Feed
Lever
14
Foot
Pressure
Regulator
14
Reverse
Stitch
Control
14
Chart
of
Stitch
Application
15
5.
STRAIGHT
SEWING
16
Starting
Sewing
16
Foot Controller
17
Turning
Corners
17
Ending
a
Seam
17
Cloth
Guide
18
Thread
Tension
Adjustment
18
6.
ZIGZAG
SEWING
19
Needle
Position
Control
19
Thread
Tension
for
Zigzag
Stitching
19
7.
TWIN
NEEDLE
SEWING
20
Twin
Needle
Threading
..........
20
8.
PIN
TUCKING
....,
21
9.
ROLL
HEMMING
21
With
Striight
Shtch
21
With
/uj
;t(
h
22
lu
IMJ
HI
t
1
1’
Hi
23
Hf
tnt
4
24
24
•
25
25
-4
4.
.‘-i
i
:.IU
Material
25
—
it
ight
Material
26
-
x-
26
13.
PATCHING
.27
Patching
Non-Elastic
Material
27
Patching
Jersey
Material
27
14,
EDGE-TO-EDGE
STITCHING
. . .
27
15.
FAGOTING
.
.
.28
16.
ELASTIC
STITCH
.
.
.
28
For
Heavy
Stretch
Material
.
.
.
28
For
Light
Stretch
Material
.
.
.
28
17.
ATTACHING ELASTIC
..
.29
18.
ZIPPER
SEWING
..
.29
19.
MAKING
BUTTONHOLES
..
.30
Determine
the
Length
.
..
30
Width
of
the
Buttonhole
31
Corded
Buttonholes
32
Cutting
the
Buttonhole
33
20.
SEWING
ON
BUTTONS
33
21.
CORDING
34
22. QUILTING
35
23.
EMBROIDERY
36
24.
SCALLOPING
37
25.
APPLIQUE
WORK
38
26. DARNING
39
Changing
a
foot
41
Screw-snap presser
foot
Idarning
footl
41
27.
MAINTENANCE 42
Cleaning
42
Oiling
42
28. PACKING
THE
MACHINE
43
29.
TROUBLE
CHART
44
WHITE
SEWING
MACHINE
Record
in
space
provided
below
the
Serial
No.
and
Model
No.
of
this
appliance.
The
Serial
No.
is
located
Rear
of
arm.
The
Model
No.
is
located
Rear
of
arm.
Serial
No.
Model
No.
8000
Retain
these
numbers
for
future
reference.
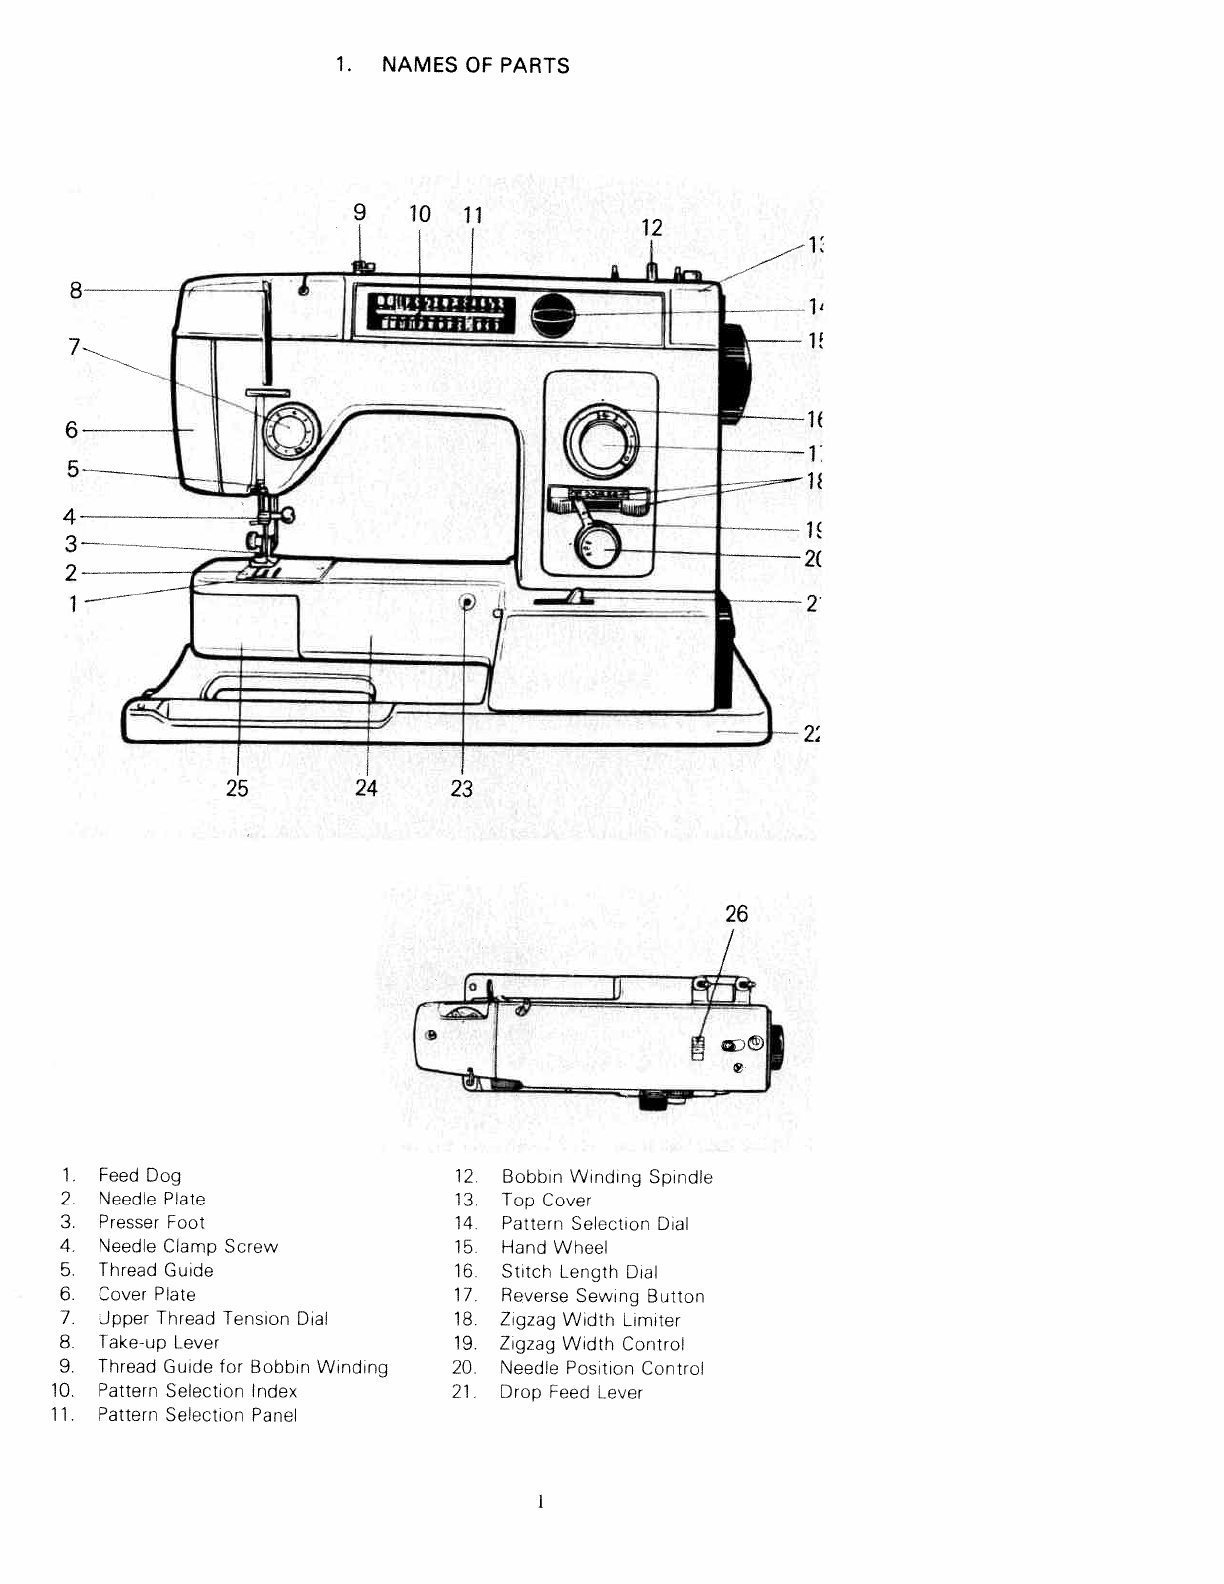
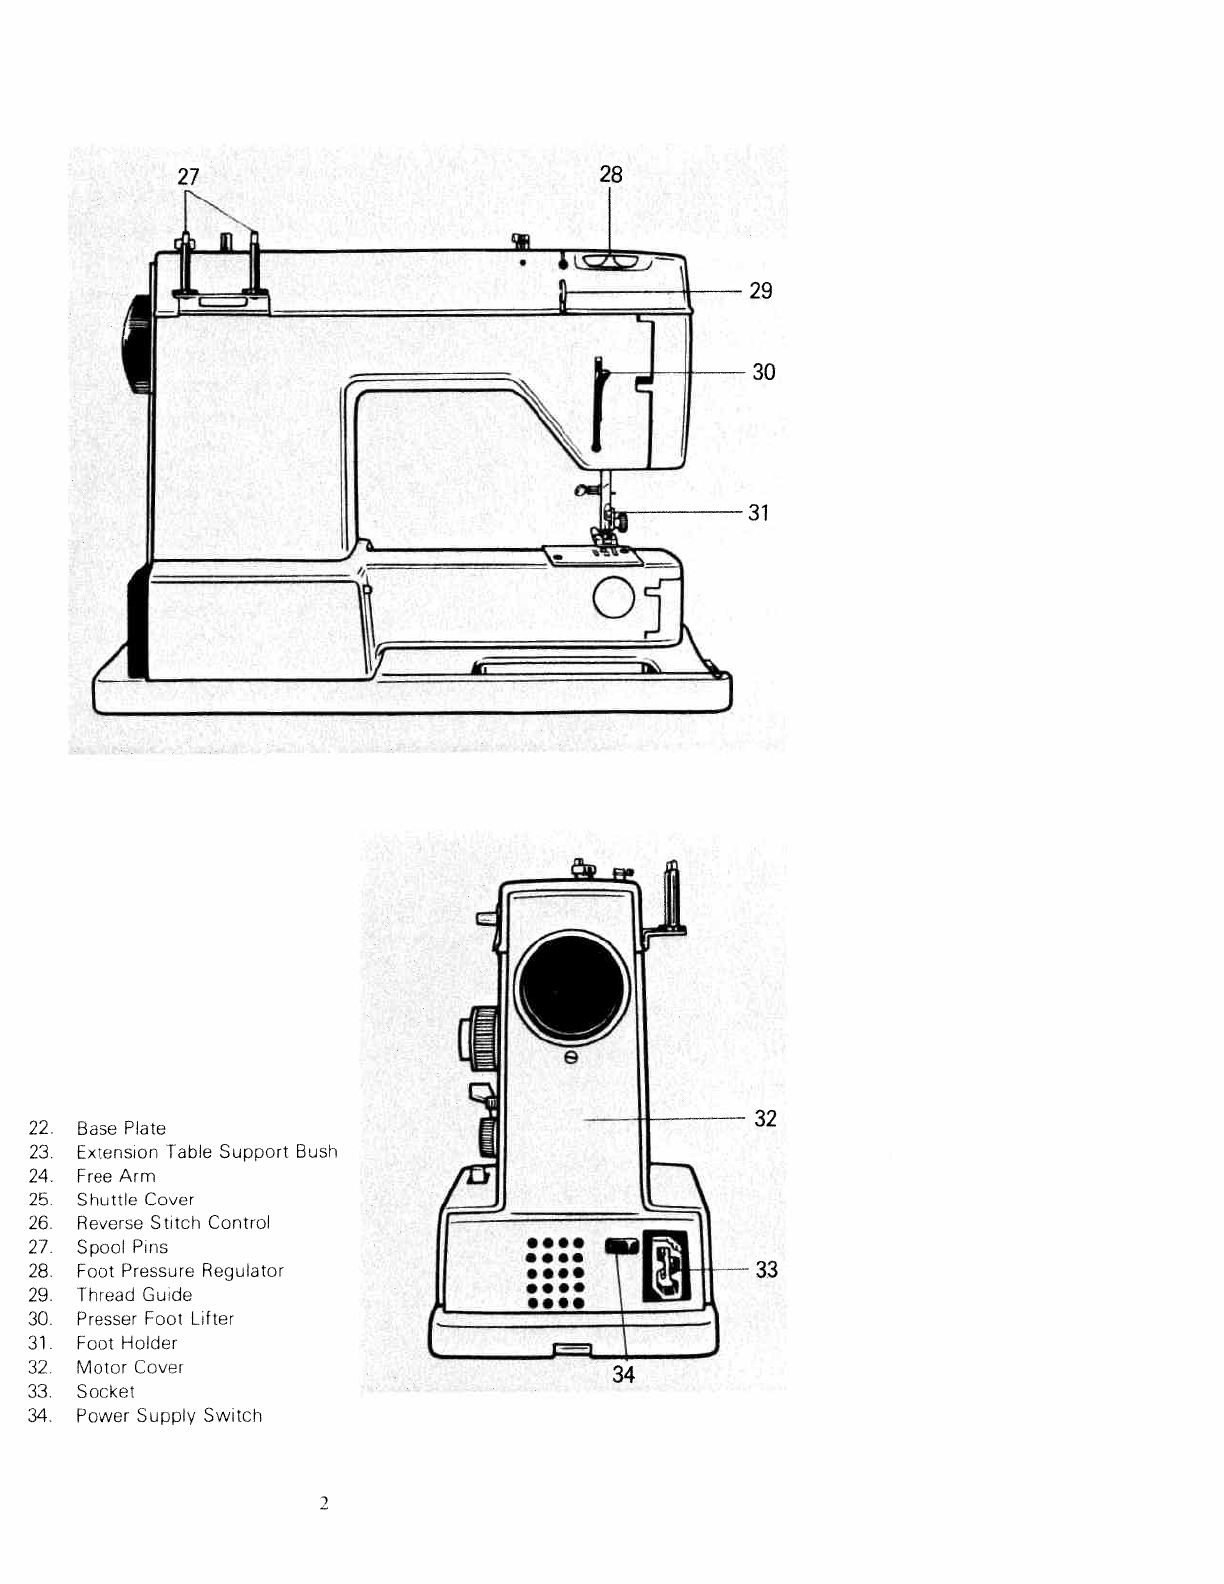
1.
NAMES
OF
PARTS
1.
Feed
Dog
2.
Needle
Plate
3.
Presser
Foot
4.
Needle
Clamp
Screw
5.
Thread
Guide
6.
Cover
Plate
7.
Upper
Thread Tension
Dial
8.
Take-up
Lever
9.
Thread
Guide
for
Bobbin
Winding
10.
Pattern Selection
Index
11.
Pattern
Selection
Panel
Bobbin
Winding
Spindle
lop
Cover
Pattern
Selection
Dial
Hand
Wheel
Stitch
Length
Dial
Reverse
Sewing
Button
Zigzag
Width
Limiter
Zigzag
Width
Control
Needle
Position
Control
Drop
Feed
Lever
26
12.
13.
14.
15.
16.
17.
18.
19.
20.
21,
27
28
Base
Plate
Extension
Table
Support
Bush
Free
Arm
Shuttle
Cover
Reverse
Stitch
Control
Spool
Pins
Foot
Pressure
Regulator
Thread
Guide
Piesser
Foot
Lifter
Foot
Holder
Motor
Cover
Socket
Power
Supply
Switch
29
30
31
32
-
—
33
22
23
24
25
26
27
28
29.
30.
31.
32
33.
34.
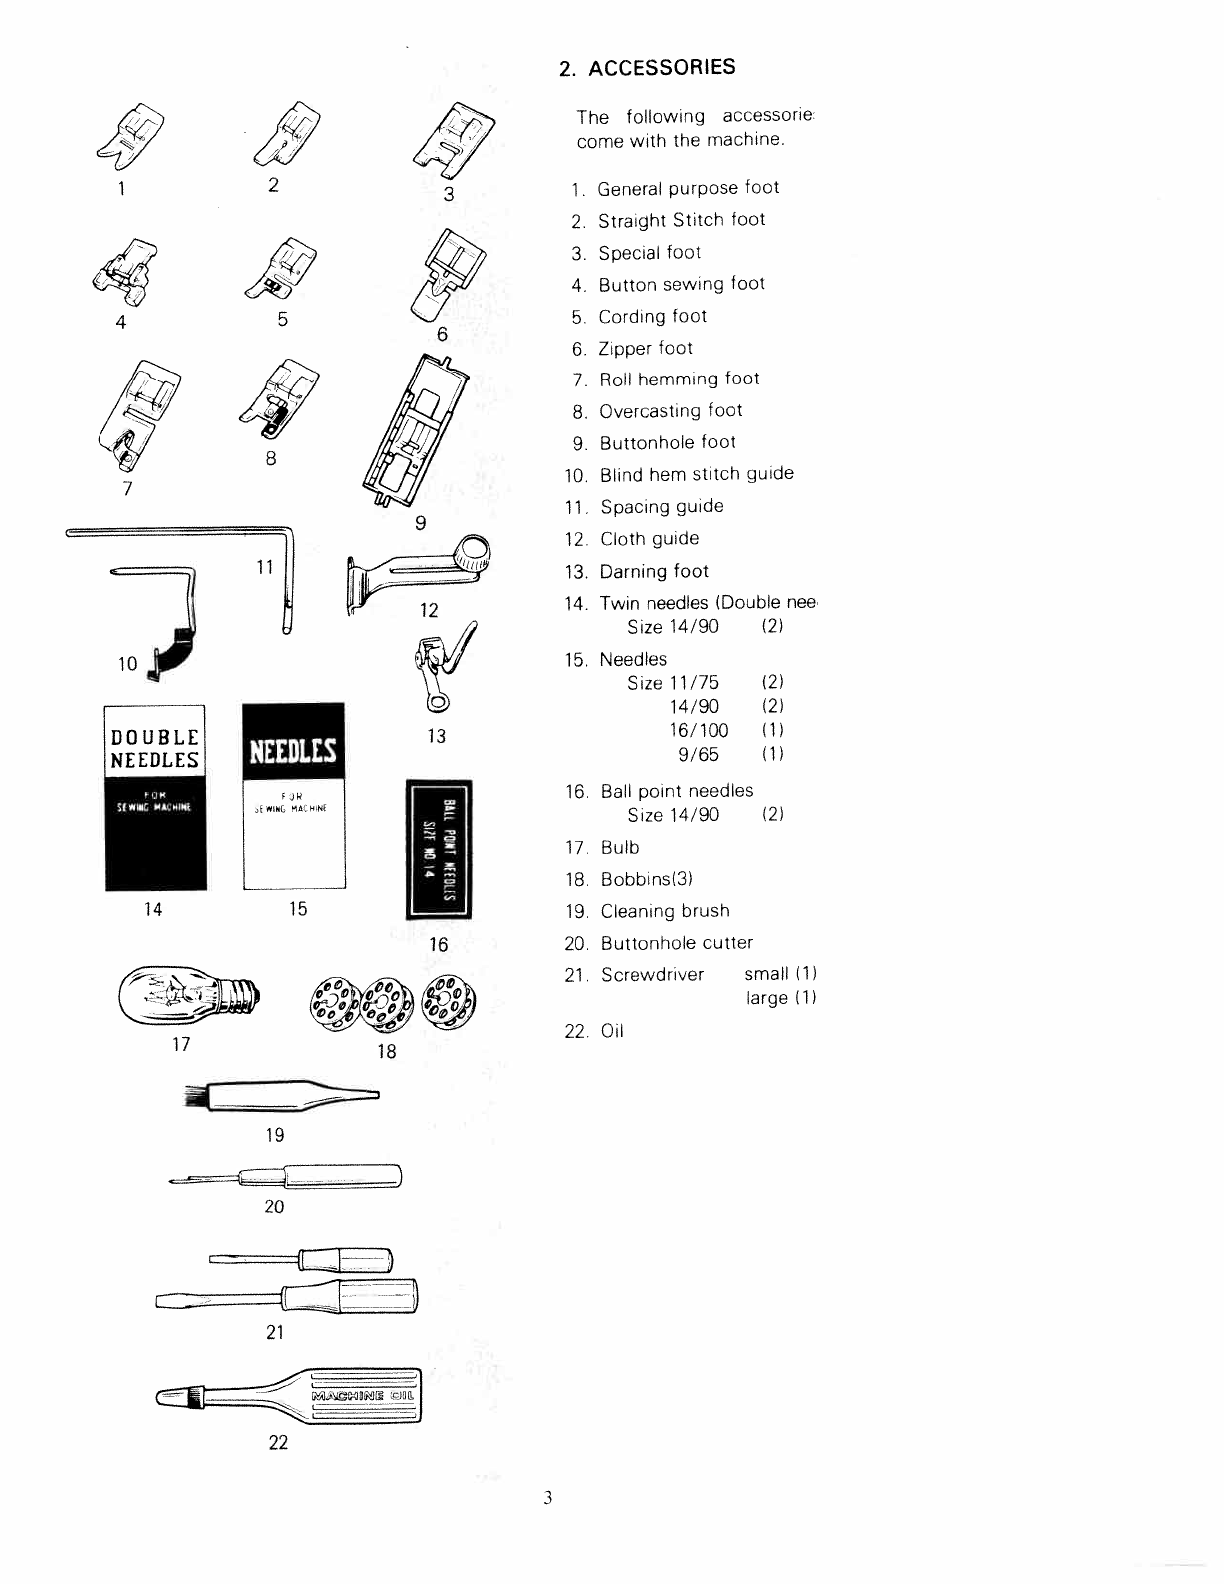
2.
ACCESSORIES
DOUBLE
NEEDLES
17
The
following
accessorie
come
with
the
machine.
1.
General
purpose
foot
2.
Straight Stitch
foot
3.
Special
foot
4,
Button
sewing
foot
5.
Cording
foot
6.
Zipper
foot
7.
Roll
hemming
foot
8.
Overcasting
foot
9.
Buttonhole
foot
10.
Blind
hem
stitch
guide
11.
Spacing
guide
12,
Cloth
guide
13.
Darning
foot
14.
Twin
needles
lDouble
nee
Size
14/90
121
15.
Needles
Size
11/75
14/90
16/100
9/65
16.
Ball
point
needles
Size
14/90
(2)
17.
Bulb
18.
Bobbins(3l
19.
Cleaning
brush
20.
Buttonhole
cutter
21.
Screwdriver
small
lii
large
Ill
22.
Oil
21
4,
4,
NEEDLES
F
OFF
Sf
WG
MACIN
(21
(2)
Ill
(1)
14
F
JFF
LJ
16
&EE
19
20
3
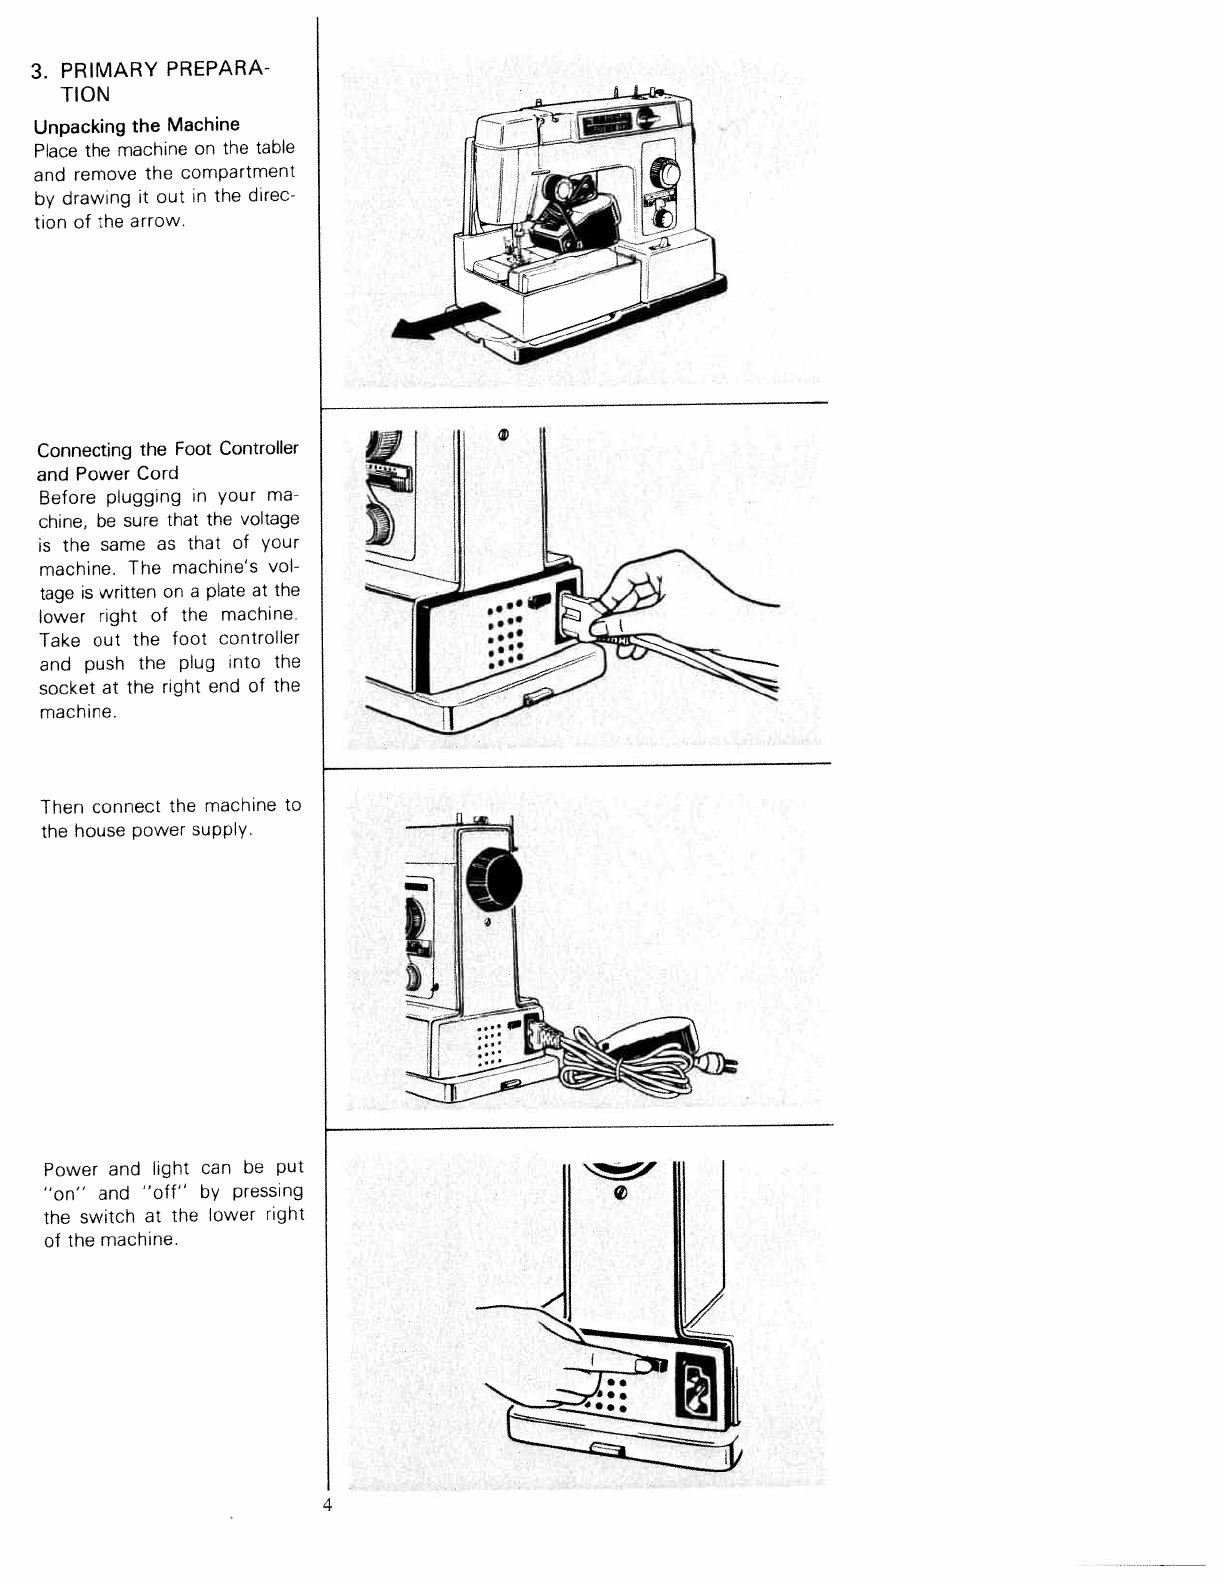
3.
PRIMARY
PREPARA
TION
Unpacking
the
Machine
Place
the
machine
on
the table
and remove
the
compartment
by
drawing
it
out
in
the
direc
tion
of
the
arrow.
Connecting
the
Foot
Controller
and Power
Cord
Before
plugging
in
your
ma
chine, be
sure that
the voltage
is
the
same
as
that
of
your
machine.
The machine’s
vol
tage
is
written
on
a
plate
at
the
lower right
of
the machine.
Take
out
the
foot
controller
and
push
the
plug
into
the
socket
at
the
right
end
of
the
machine.
Then
connect
the
machine
to
the
house
power
supply.
Power and
light
can
be
put
“on”
and
“off”
by
pressing
the
switch
at
the
lower
right
of
the machine.
4
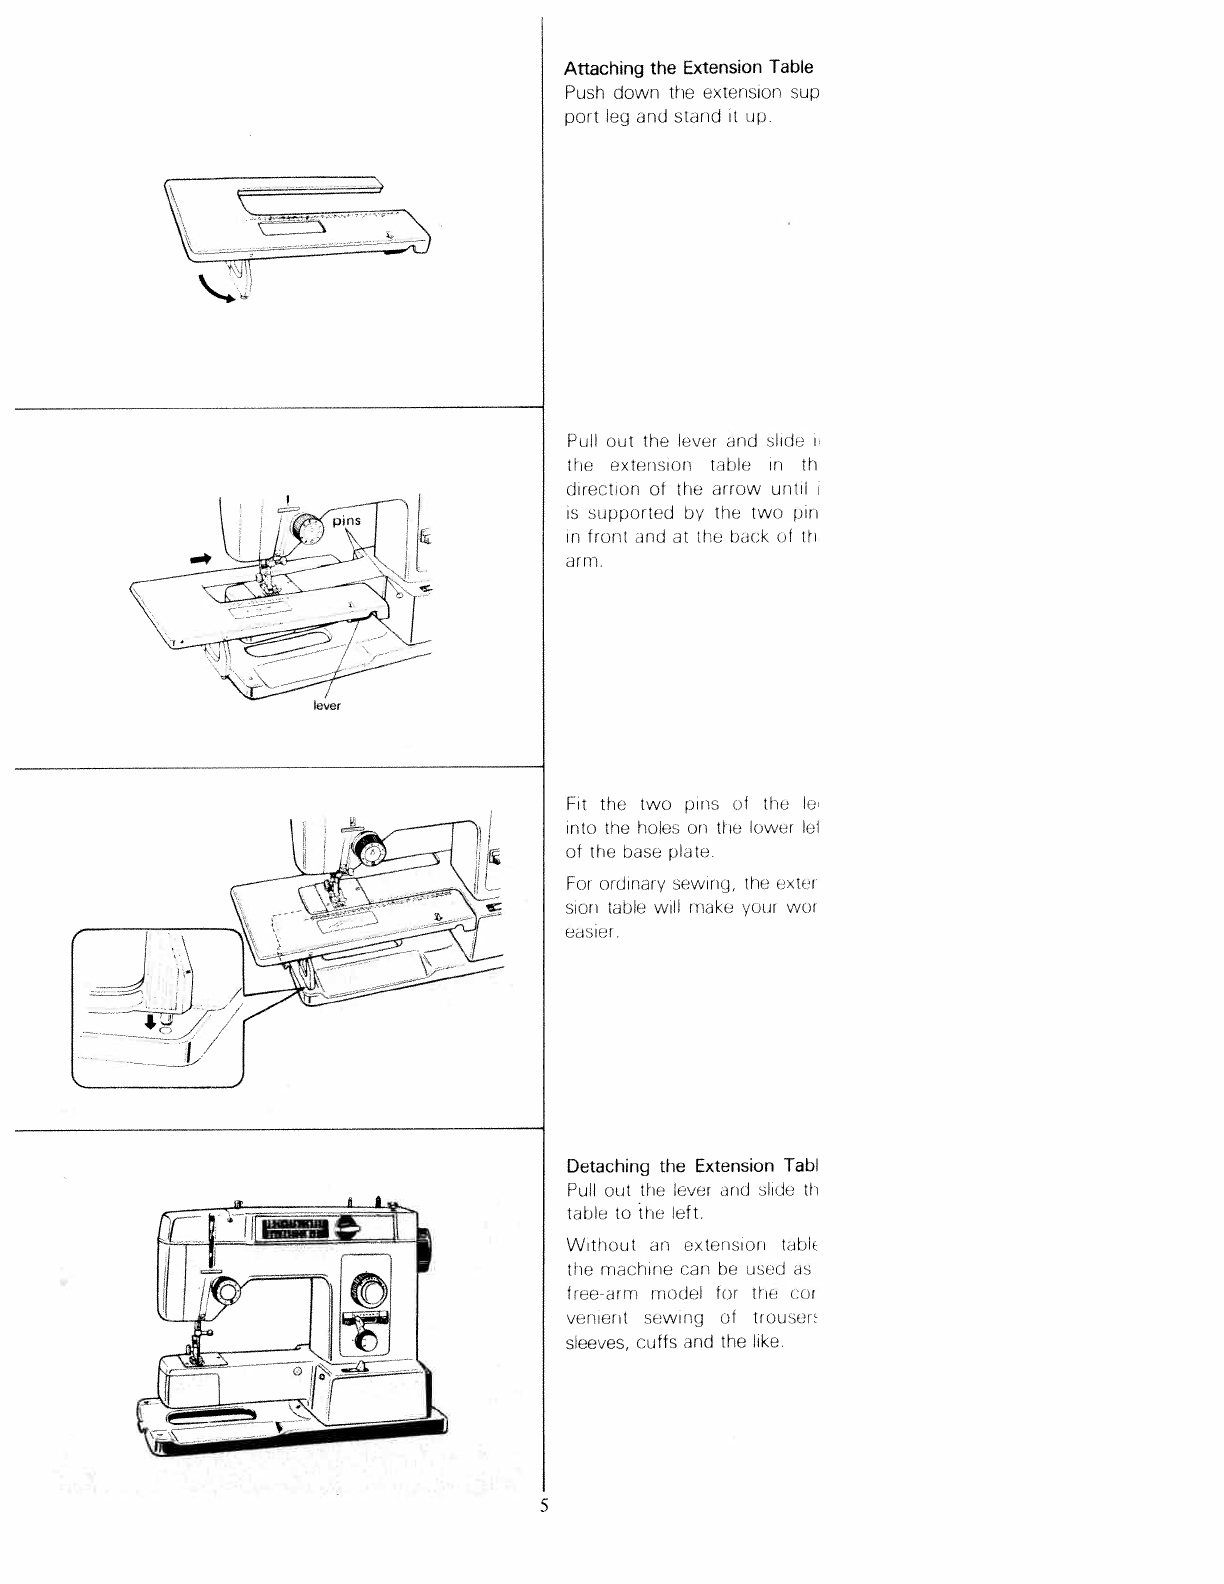
Attaching
the
Extension
Table
Push
down
if
C
extensior
sup
port
leg
and
StoOd
it
up
Full
out
tnt
ltvor
and
nlult
the
exteronon
tJblEi
in
Hi
direotior
o
the
arrow
uritu
is
nupperted
by
the
two
pin
ri
front
and
at the
bai
k
of
th
dill
Ft
the
two
pinn
t
tie
In
ito
the
holes
on
if
re
lnw
‘r
El
of
the
base
plate
For
ord
r
ary
sewir
p.
tin
o
tnr
eon
table
w
Il
ii
ake
your
wor
can
er
Detaching
the
Extension
Tab!
Pt
II
out
the
lever
arid
liee
tI
table
to
the
left
Without
an
extension
tabln
the
riiachir
e
can
be
used
as
free
arm
rriedel
for
tint
(
or
venierit
sewing
of
trou’er
sleeves,
cuffs
arid
the
like
lever
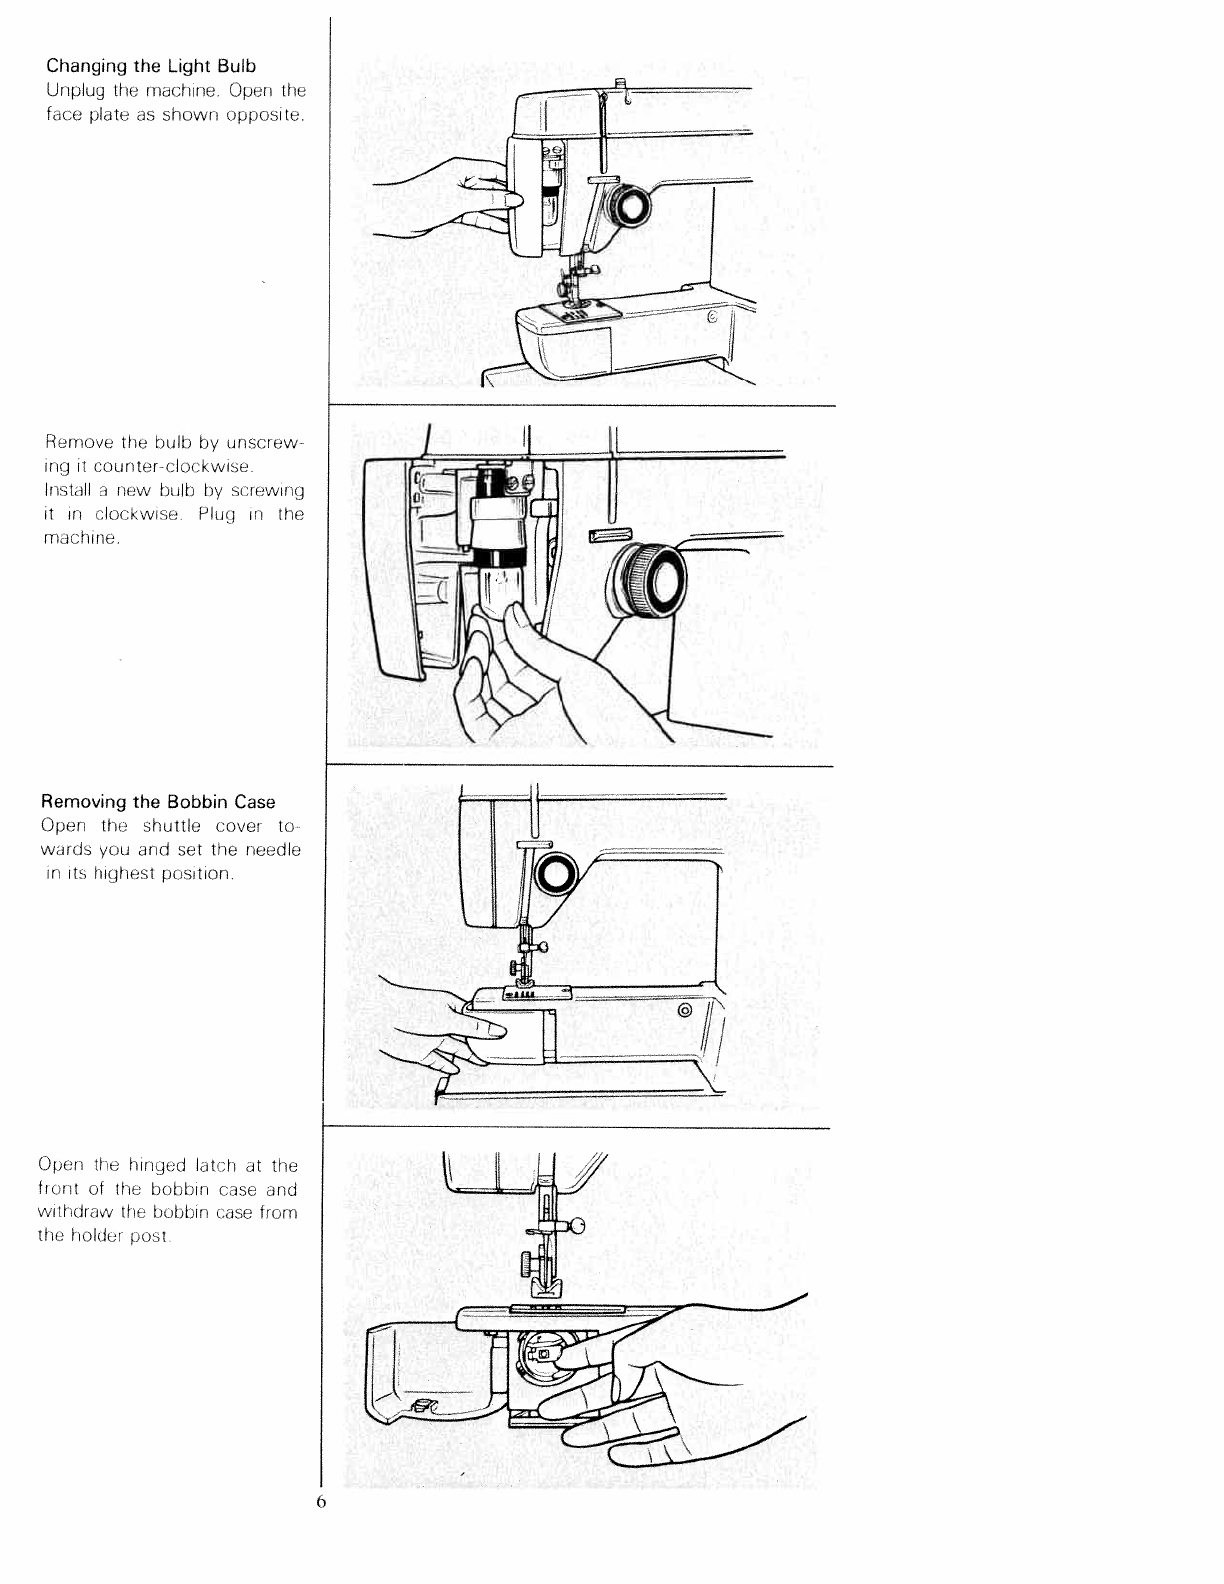
Changing
the
Light
Bulb
Unplug
the
machine.
Open the
face plate
as
shown
opposite.
Remove
the
bulb
by
unscrew
rig
it
Counter
dec
kwise.
Install
d
new
blb
by
sJewing
it
in
clockwise.
Plug
ir
the
machine
Removing
the
Bobbin
Case
Open
If
ie
shuttle
cover
to
wards
you
arid
Set
the
needle
in
its
highest
position.
CifjenI
tI
o
hinged
H
it
the
front
of
tIe-
bobbin
ase
and
vvitlidnuw
the
bobbin
d5e
frorTi
the
I
olden
post
6

II
Ill
Place
an
empty
bobbin
on
tht
winding spindle.
Put
a
spoo
on
the
spool
pin.
Draw
th€
thread
from
the
spool
pir
through the
guide
and
thE
pre-tension
device,
followinc
numbers
J
2.
and
to
thr
bobbin.
Wind
the
thread
clockwiss
around
the
bobbin
severai
Omes.
Push the
bobbin
towards
the
hand
wheel and
press
down
the
foot
controller.
The
machine
stops
autornati
cally
when
winding
is
finished.
Return the
spindle
to
its
for
mer
position
and
tighten
the
stop
motion
knob.
lf
you
notice
that
the
bobbir
is
wound
unevenly,
as
in
Fig
I
and
III,
loosen
the
set-screv
of
the
pre-tension
device
wib
the
small
screwdriver,
arc
adjust
by
letting the
pre
tension
device
up
or
dowr
until
the
winding
become:
even.
Fig.
II
shows
a
correcil’
wound
bobbin.
0
/
-
7
Table of contents
Other White Sewing Machine manuals

White
White 1787 User manual

White
White 762 Owner's manual

White
White Snow Boss 750 User manual

White
White 1866 User manual

White
White 1855 User manual

White
White Style-Maker 3100 User manual

White
White SEW E-Z W338 User manual

White
White Super Lock 734 User manual

White
White 1455 User manual

White
White 1810 User manual


