widos RSR 630 User manual

WIDOS Einsteinstr. 5 Phone +49 7152 9939 0
Wilhelm Dommer Söhne D-71254 Ditzingen Fax +49 7152 9939 40
GmbH E-Mail: info @ widos.de Internet: www.widos.de
Headquarters: D-71254 Ditzingen Country Court Stuttgart HRB 200973 Managing directors: Jürgen Dommer, Dr. Kai Dombrowski
Working Instructions
Translation
Radial band saw RSR 630
Keep for further use!

Product identification
10.04.17 Working instructions WIDOS RSR 630 Page 2 of 28
Type: Band saw RSR 630
Serial number, year of construction: See type label
Customer entries
Inventory no.:
Location:
Order of spare parts and after sales service:
Manufacturer’s address WIDOS
Wilhelm Dommer Söhne GmbH
Einsteinstr. 5
D -71254 Ditzingen
Phone: +49 7152 9939 0
Fax: +49 7152 9939 40

Introduction
10.04.17 Working instructions WIDOS RSR 630 Page 3 of 28
Purpose of the document
These working instructions give you information about all important questions which refer to the
construction and the safe working of your machine.
Just as we are, you are obliged to engage in these working instructions, as well.
Not only to run your machine economically but also to avoid damages and injuries.
Should questions arise, contact our service team in the factory or in our subsidiary companies.
We will help you with pleasure.
According to our interest to continuously improve our products and working instructions, we kindly ask
you to inform us about problems and defects which occur in exercise.
Thank you.
Structure of the working instructions
This manual is arranged in chapters, which belong to the different using phases of the machine.
Due to this structure, the searched information can be easily found.
4/10/2017 WIDOS
Wilhelm Dommer Söhne GmbH
Einsteinstraße 5
D-71254 Ditzingen
All rights reserved.
Reprinting only allowed with permission of the corporation.
Any changes are subject to technical innovations.

Contents
10.04.17 Working instructions WIDOS RSR 630 Page 4 of 28
1.PRODUCT DESCRIPTION .................................................................................................... 6
1.1.Usage and purpose-oriented use......................................................................................................6
1.1.Safety measures ..............................................................................................................................6
1.1.Conformity........................................................................................................................................6
1.2.Designation of the product ...............................................................................................................7
1.2.1.Technical data ............................................................................................................................7
1.2.2.Electrical data.............................................................................................................................7
1.3.Equipment and accessories..............................................................................................................7
1.4.List of wear parts .............................................................................................................................7
2.SAFETY RULES................................................................................................................... 8
2.1.Explanation of symbols and indications ............................................................................................8
2.2.Obligations of the owner ..................................................................................................................9
2.3.Obligations of the worker .................................................................................................................9
2.4.Measures of organization.................................................................................................................9
2.5.Information about safety precautions ...............................................................................................9
2.6.Instructions for the staff...................................................................................................................9
2.7.Dangers while handling the machine............................................................................................. 10
2.8.General safety indications............................................................................................................. 10
2.9.Specific dangers ........................................................................................................................... 11
2.9.1.Danger of cutting or catching clothes......................................................................................... 11
2.9.2.Danger of stumbling over electric wire ....................................................................................... 11
2.9.3.Danger of being injured by chips / oddments............................................................................... 11
2.9.4.Risk of injury of noise ................................................................................................................ 11
2.10.Maintenance and inspection, repair ............................................................................................ 11
2.11.Remaining risks ........................................................................................................................... 11
2.12.Warranty and liability .................................................................................................................. 12
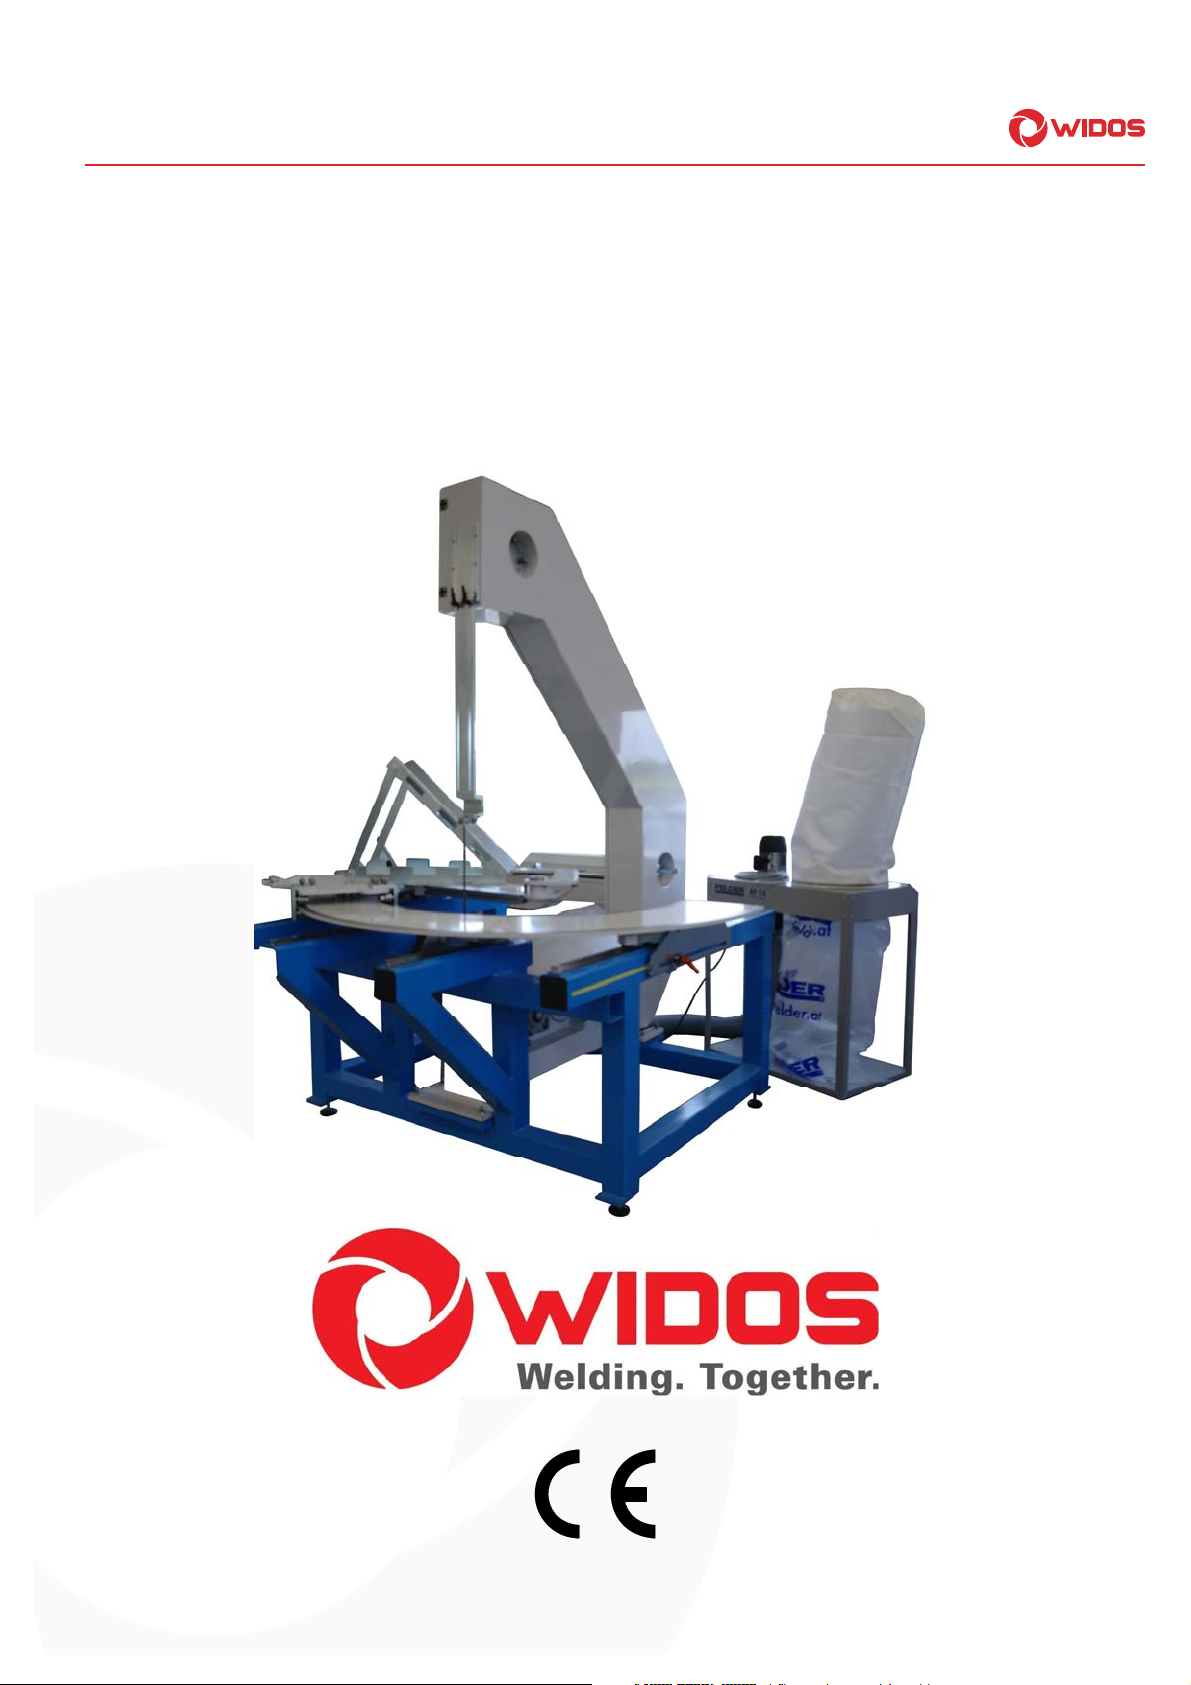
3.FUNCTIONAL DESCRIPTION............................................................................................. 13
4.OPERATING AND INDICATING ELEMENTS ....................................................................... 14
4.1.Machine overview......................................................................................................................... 14
4.1.1.Fuse ..................................................................................................................................... 15
4.2.Saw blade guiding and saw blade cover........................................................................................ 15
4.3.Adjust the cutting radius ............................................................................................................... 16
4.4.Vacuum device.............................................................................................................................. 17
5.STARTING AND OPERATING ............................................................................................ 18
5.1.Starting ......................................................................................................................................... 18
5.2.Clamp the pipes............................................................................................................................. 19

Contents
10.04.17 Working instructions WIDOS RSR 630 Page 5 of 28
5.2.1.Adjust angle for branch pipe 45° and 60° .................................................................................... 20
5.3.Cutting radiuses ............................................................................................................................ 21
5.4.Cutting angled radiuses................................................................................................................. 21
6.MAINTENANCE / STORAGE / TRANSPORT........................................................................ 22
6.1.In general...................................................................................................................................... 22
6.2.Storage ......................................................................................................................................... 22
6.3.Remove cutting chips from the saw arm ........................................................................................ 23
6.4.Set and tension the saw blade....................................................................................................... 23
6.5.Replace saw blade ........................................................................................................................ 24
6.6.Disposal........................................................................................................................................ 25
7.ELECTRIC DIAGRAMS ...................................................................................................... 26
8.DECLARATION OF CONFORMITY ...................................................................................... 28

WIDOS Einsteinstr. 5 Phone +49 7152 99 39 0
Wilhelm Dommer Söhne D-71254 Ditzingen Fax +49 7152 99 39 40
GmbH E-Mail: info @ widos.de Internet: www.widos.de
10.04.17 Working instructions WIDOS RSR 630 Page 6 of 28
1. Product description
This chapter gives important basic information about the product and its prescribed use.
All technical details of the machine are put together as a general arrangement.
1.1. Usage and purpose-oriented use
The WIDOS radial band saw RSR 630 is a special machine destined for the cutting of plastic pipes up to
Ø 630 mm and a cutting radius up to 600 mm as described in the following manner.
The purpose-oriented use also includes the connection of a sufficiently dimensioned and operational
vacuum device to the machine.
All use going beyond is not purpose-oriented.
The described cutting device for plastic material may only be operated, maintained and repaired by
persons being familiar with the device and informed on the dangers.
The machine is a workshop device and not suitable for being operated in areas exposed to explosion
hazards.
The cutting of wood and wooden sheet material (e.g. MDF sheets) is not allowed.
The manufacturer is not responsible for damages caused by misuse.
The risk is held only by the user.
Also part of the purpose oriented use is
respecting all the indications of the working instructions and
performing the inspection and maintenance work.
1.1. Safety measures
In case of wrong use, wrong operation or wrong maintenance, the machine itself or products standing
nearby can be damaged or destroyed.
Persons being in the endangered area may be injured.
Therefore these working instructions have to be thoroughly read and the corresponding safety
regulations must be necessarily adhered to.
1.1. Conformity
The machine corresponds in its construction to the valid recommendations of the European Community
as well as to the according European standard specifications.
The development, manufacturing and mounting of the machine were made very carefully.

Product description Chapter 1
10.04.17 Working instructions WIDOS RSR 630 Page 7 of 28
1.2. Designation of the product
The product is designated by type labels.
They contain the type, the serial number and the year of construction of the machine.
1.2.1. Technical data
Saw blade thickness: 0.65 mm
Saw blade width: 13 mm
Saw blade length: 6295 mm
Total height: appr. 2710 mm
Total depth: appr. 2435 mm
Total width: appr. 2080 mm
Length of pipe support: 700 mm
max. pipe diameter: 630 mm
max. cutting radius: 600 mm
Weight: appr. 610 kg
1.2.2. Electrical data
Voltage: 230V AC
Connection: CEE 16 A
Power: 1,4 kW
Frequency: 50 Hz
Current: 3,7 A
1.3. Equipment and accessories
Piece Denomination
1 Door key (saw arm); hand over key only to authorized persons
2 Spanner wrench SW 19
1 Spanner wrench SW 27 long
1 each Spanner wrench SW 10, SW 13 and SW 17
1 each Allen key SW 5 and SW 6
2 Saw blade 6295x13x0.65 mm / 4 ZpZ, K
1 Tubular socket wrench SW 55
1 Clamping belt 4m, 2000 daN
1.4. List of wear parts
Piece/mach. Denomination Article no.
1 Bimetal saw blade 6295x13x0.90 mm / 4 H – S on request
1 Gear wheel D400 (replacement) 5442105
2 Deflection pulley D400 (replacement) 5442104
2 Saw blade guide pulley 6002 2 Z (rear) on request
4 Saw blade guide pulley 6201 2 Z (lateral) on request

WIDOS Einsteinstr. 5 Phone +49 7152 99 39 0
Wilhelm Dommer Söhne D-71254 Ditzingen Fax +49 7152 99 39 40
GmbH E-Mail: info @ widos.de Internet: www.widos.de
10.04.17 Working instructions WIDOS RSR 630 Page 8 of 28
2. Safety rules
The base for the safe handling and the fault-free operation of this machine is the knowledge of the
basic safety indications and rules.
These working instructions contain the most important indications to run the machine safely.
The safety indications are to be followed by all persons working on the machine.
2.1. Explanation of symbols and indications
In the working instructions, the following denominations and signs are used for dangers:
This symbol means a possibly danger for the life and the health of persons by electrical
energy.
The disrespect of these indications may have heavy consequences for the health.
This symbol means a possible dangerous situation.
The disrespect of these indications may cause slight injuries or damages on goods.
This symbol means a possible dangerous situation by moving parts of the machine.
The disrespect of these indications may cause heavy crushing of hands or parts of the
body resp. damages of parts of the machine.
This symbol means a possible risk of injury by noise exceeding 80 dB(A).
Ear protection is obligatory.
This symbol means a possible risk of injury by drilling chips.
Eye protection is obligatory.
This symbol gives important indications for the proper use of the machine.
The disrespect of these indications may conduct to malfunctions and damages on the
machine or on goods in the surrounding.
Under this symbol you will get tips and particularly important information.
This shall help you to use all functions of the machine in an optimal way and makes the
work easier for you.
The regulations for the prevention of accidents are valid (UVV).

Safety rules Chapter 2
10.04.17 Working instructions WIDOS RSR 630 Page 9 of 28
2.2. Obligations of the owner
The owner is obliged only to let persons work at the machine, who
know about basic safety and accident prevention rules and are instructed in the handling of the
machine, as well as who
have read and understood the safety chapter of this manual and certify this by their signature.
The safety-conscious working of the staff has to be checked in regular intervals.
2.3. Obligations of the worker
All persons who are to work at the machine are obliged before working:
To follow the basic safety and accident protection rules.
To have read and understood the safety chapter and the warnings in this manual and to confirm by
their signature that they have well understood them.
To inform themselves about the functions of the machine before using it.
2.4. Measures of organization
All equipment required for personal safety is to be provided by the owner.
All available safety equipment is to be inspected regularly.
2.5. Information about safety precautions
The working instructions have to be permanently kept at the place of use of the machine. They are
to be at the operator's disposal at any time and without effort.
In addition to the manual, the common valid and the local accident protection rules and regulations
for the environmental protection must be available and followed.
All safety and danger indications on the machine have to be in a clear readable condition.
Every time the machine changes hands or is being rent to third persons, the working instructions
are to be sent along with and their importance is to be emphasized.
2.6. Instructions for the staff
Only skilled and trained persons are allowed to work at the machine.
It must be clearly defined who is responsible for transport, mounting and dismounting, starting the
operation, setting and tooling, operation, maintenance and inspection, repair and dismounting.
A person who is being trained may only work at the machine under supervision of an experienced
person.

Safety rules Chapter 2
10.04.17 Working instructions WIDOS RSR 630 Page 10 of 28
2.7. Dangers while handling the machine
The band saw WIDOS RSR 630 is constructed according to the latest technical standard and the
acknowledged technical safety rules.
However, dangers for the operator or other persons standing nearby may occur. Also material
damages are possible.
The machine may only be used:
according to the purpose-oriented usage
in safety technical impeccable status
Disturbances which may affect the safety of the machine must be cleared immediately.
2.8. General safety indications
A working area without obstacles around the machine and a non-slip and plane floor are of basic
importance for a safe operation.
The working area must be well lightened and free of waste (cuttings, residues).
Before starting the operation, make sure that the saw blade is tightened properly and that the band
guidance is adjusted correctly, as well as that the door situated over the saw blade guidance is
closed.
During the operation, wear tight clothes only.
Keep the handles dry and free from oil and grease.
Wear safety glasses during the cutting operation.
Do not wear rings, bracelets etc.
Protect long hair by means of a sufficient headgear.
During work, the pipe must be clamped firmly.
Do never remove reminders as long as the saw is working.
In case of irregular running behaviour of the saw blade, switch off the saw immediately and check the
saw blade for correct course, correct tension and possible fractures.
Replace dull or badly set saw blades by orderly installed saw blades.
Before elimination of any disturbances, and before any repair or maintenance work, switch off the
saw and disconnect the mains plug in any case.
Only skilled persons are allowed to work at electrical appliances.
The electrical equipment of the machine has to be checked regularly. Loose
connections and damaged cables have to be replaced or repaired immediately.
Protect the machine from wetness and humidity.

Safety rules Chapter 2
10.04.17 Working instructions WIDOS RSR 630 Page 11 of 28
2.9. Specific dangers
2.9.1. Danger of cutting or catching clothes
You can cut yourself during sawing or when exchanging the saw blade!
Before starting the cutting operation, take care that no person is standing in the
operating, swiveling or cutting area.
Always wear safety gloves when exchanging the saw blade.
2.9.2. Danger of stumbling over electric wire
Make sure that no person has to step over the wire. Lay the wire in such a way that the
danger is kept at a minimum. Do not squeeze, buckle the wires or such.
2.9.3. Danger of being injured by chips / oddments
Wear safety glasses during cutting.
Adjust saw blade covering onto the pipe diameter.
Never remove oddments as long as the saw is running.
2.9.4. Risk of injury of noise
Noises exceeding 80 dB (A) may occur; during planing it is obligatory to wear ear
protection!
2.10. Maintenance and inspection, repair
All maintenance and repair work has to be basically performed with the machine in off
position.
During this, the machine has to be secured against unauthorized switching on.
2.11. Remaining risks
Even at purpose-oriented use and even if following all the relevant safety instructions, the following
risks remain due to the construction conditional on the purpose of operation of the machine:
Injuries caused by parts of the work pieces which are squirting away.

Safety rules Chapter 2
10.04.17 Working instructions WIDOS RSR 630 Page 12 of 28
2.12. Warranty and liability
Fundamentally our "General Sales and Delivery Conditions" are valid.
They are at the owner's disposal latest when signing the contract.
Warranty and liability claims referring to personal injuries or damages on objects are excluded if they
are caused by one or several of the following reasons:
not using the machine according to the prescriptions
inexpert transport, mounting, starting, operating, and maintenance of the machine
ignoring the information given in this manual
structural modifications on the machine without permission
unsatisfactory checking of parts of the machine that are subject to wear and tear
repairs performed in an inexpert way
In case of catastrophes and force majeure.

WIDOS Einsteinstr. 5 Phone +49 7152 99 39 0
Wilhelm Dommer Söhne D-71254 Ditzingen Fax +49 7152 99 39 40
GmbH E-Mail: info @ widos.de Internet: www.widos.de
10.04.17 Working instructions WIDOS RSR 630 Page 13 of 28
3. Functional description
Basically, the international and national process guidelines are to be followed.
Set the saw to the desired radius and secure it by clamping.
Lay the pipe on the pipe support and clamp it (check the distance to the saw blade!).
Having completed all settings switch the saw motor on cut the radius by moving the swiveling plate.
When the cutting operation is finished, switch off the saw blade motor.
Unclamp the pipe.

WIDOS Einsteinstr. 5 Phone +49 7152 99 39 0
Wilhelm Dommer Söhne D-71254 Ditzingen Fax +49 7152 99 39 40
GmbH E-Mail: info @ widos.de Internet: www.widos.de
10.04.17 Working instructions WIDOS RSR 630 Page 14 of 28
4. Operating and indicating elements
4.1. Machine overview
No. Denomination / Function
1 Saw arm
2 Saw blade guiding
3 Handle with button, the button starts the drive motor
4 Lever to move the swiveling plate
5 Clamping lever to set the radius, on both sides of the swiveling plate
6 Prism to support the pipe, adjustable to radius
7 Swiveling plate to cut radiuses
8 Deflection pulley with set screws
9 Cover for saw blade
10 Saw blade
11 Deflection pulley with set screws and eccentric for saw blade tension
12 Switch cabinet with fuse
13 Drive motor and drive wheel
14 Leveling foot (4 pieces) to adjust the saw
1
6
4
5
3
2
8
11
9
14
7
13
12
10

Operating and indicating elements Chapter 4
10.04.17 Working instructions WIDOS RSR 630 Page 15 of 28
4.1.1. Fuse
The motor protective is located within the switch
cabinet F40, 2.8 – 4A.
It is the overloading protection for the drive motor.
In case the motor protective has been triggered, clear
the cause of the overloading and reactivate the fuse
afterwards.
4.2. Saw blade guiding and saw blade cover
The saw blade guiding is mounted to the saw blade cover. Adjust the saw blade guiding for cutting at
the top in a way that only minimal space remains between the lower edge of the saw blade guiding and
the upper edge of the pipe.
Hold tight to the saw blade guiding, release the fixing handles and shift the saw blade
guiding to the necessary height.
Fix the saw blade cover by the fixing handles.
Upper saw blade guiding
Saw blade
Saw blade cover
Motor protective 2.8-4A
Fixing handles

Operating and indicating elements Chapter 4
10.04.17 Working instructions WIDOS RSR 630 Page 16 of 28
(Upper saw blade guiding)
The saw blade runs through the identical saw blade guidings on top and bottom.
It is lead through the two rollers and supported to the rear by the larger roller on one side.
The roller with eccentric can be adjusted. It is adjusted correctly if both rollers can still be turned
somewhat towards each other and if the saw blade runs even.
For setting the guiding, release the left-hand counter nut by means of fork wrench size 24.
Now the eccentric is turned with hexagon socket wrench size 6 until the rollers have the desired
distance.
Secure the eccentric by means of the counter nut.
4.3. Adjust the cutting radius
In order to adjust the cutting radius,
release both clamping levers.
Shift the swiveling plate until the desired
radius is shown on the measuring tape.
Fix setting with both clamping levers.
Left + right guide rollers
Support roller
Counter nut
Eccentric
Clamping lever
Reading edge

Operating and indicating elements Chapter 4
10.04.17 Working instructions WIDOS RSR 630 Page 17 of 28
4.4. Vacuum device
It is indispensable to exhaust the cutting chips. The guidings for the swiveling plate as well as the saw
blade guiding may become sluggish resp. get damaged by the cutting chips.
Special feature: the vacuum device has two extraction hoses in
order to exhaust the chips at the saw blade and the second one to
exhaust the machine surroundings.
Solid hose at the saw blade: Detachable hose at the base frame:
E.g. shift the extraction hose from one of the vacuums below the guard plate just in front of the saw
blade.
Necessarily secure the vacuum against shifting e.g. by vibration during cutting.
Always activate the vacuum device while cutting.
Extraction hose
Guard plate
Extraction hose
Detachable
extraction hose
Solid extraction
hose

WIDOS Einsteinstr. 5 Phone +49 7152 99 39 0
Wilhelm Dommer Söhne D-71254 Ditzingen Fax +49 7152 99 39 40
GmbH E-Mail: info @ widos.de Internet: www.widos.de
10.04.17 Working instructions WIDOS RSR 630 Page 18 of 28
5. Starting and operating
The instructions of this chapter are supposed to initiate in the operation of the machine and lead
through the appropriate starting of the machine.
This includes: - the safe operation of the machine
- economic operation of the machine.
5.1. Starting
The saw RSR 630 must be adjusted by means of the leveling screws in the machine feet in such a way
that the swiveling plate is horizontal and the saw arm is vertical.
Connect the mains plug to the local power supply 230 V / 16 A / 50 Hz.
It is necessary to attach a vacuum device (chapter: 4.4).
In situations of danger for man and machine immediately release the button resp. pull the
power plug!
Cut only tightly clamped pipes!
Take care that no unauthorized person has access to the band saw.
Protect the band saw from wetness and humidity!
Clean the saw arm regularly with the saw switched-off! (see chapter 6.3 )
Do not saw without safety glasses and ear protection!
Replace the screw plug by the enclosed venting screw before
starting the band saw.
Do not throw away the screw plug, you need it again when
transporting the band saw.

Starting and operating Chapter 5
10.04.17 Working instructions WIDOS RSR 630 Page 19 of 28
5.2. Clamp the pipes
If the swiveling retainer is not at the left limit stop, thus
swivel it there.
Lay the pipe onto the prism and clamp it by the
clamping belt in near to saw-cut.
Lay the clamping belt around the pipe and the prism.
Lead the belt from the inside to the outside through the
aperture of the ratchet and tighten it.
Clamp the pipe firmly onto the prism by moving several
times the grip of the ratchet into direction of the
arrow.
The ratchet snaps in at both ends.
Attention! Do not deform pipes with thin walls!
Release the belt by pulling the safety gripper into
direction of the ratchet grip.
In order to make pipe clamping easier, the machine
features a limit stop. The pipe must be shifted towards
this limit stop and then be fixed by the belt.
Safety gripper
Ratchet grip
Limit stop

Starting and operating Chapter 5
10.04.17 Working instructions WIDOS RSR 630 Page 20 of 28
5.2.1. Adjust angle for branch pipe 45° and 60°
If you want to cut branch pipes with 45° or 60° angles, you must swing the prism accordingly upwards.
Detach both rear hexagon screws “1” and
detach the front hexagon screws “2”.
Mount the fixtures for angle 45° branch or for
angle 60° branch between support and prism
and fix the hexagon screws „2“.
Depending on pipe size and angle it is
necessary to shift the prism in order to minimize
the unprotected pipe overhang.
Release the hexagon screws „3“ and shift
the support including prism on the
necessary distance.
Hexagon screw „1“
Fixture for 45° / 60°
Support
Prism
Hexagon screw „2“
Hexagon screws „3“
Other manuals for RSR 630
1
Table of contents
Other widos Saw manuals
Popular Saw manuals by other brands

Senix
Senix PSRX2-M1 Operator's manual

Bosch
Bosch Professional GCM 254 Original instructions

EINHELL
EINHELL TC-MS 3017 T Original operating instructions

HOLZMANN MASCHINEN
HOLZMANN MASCHINEN HBS 700 user manual

EINHELL
EINHELL TC-SB 245 L operating instructions

Norton
Norton Clipper TR 232 S operating instructions