manuals.online logo
Brands
  1. Home
  2. •
  3. Brands
  4. •
  5. WILDSYDE
  6. •
  7. Bicycle
  8. •
  9. WILDSYDE E-Cruisers The Beast User manual

WILDSYDE E-Cruisers The Beast User manual

Unpacking &
Assembly Instrucons
Wildsyde®Electric Bicycles
A guide to unpacking & assembling your new Wildsyde ebike
E-Cruisers & E-Classics
The Beast | Hunni Bunni | Shadow
Paree | Roam
wildsyde.com
PLEASE READ THIS DOCUMENT CAREFULLY
2
HOW THE BOX IS PACKED:
1. Documentaon (packed in foam block): Greeng Leer; Unpacking &
Assembly Instrucons; Quick Start Guide; Manual. Parts: Fender Stay;
Pedals; Quick Release Skewer; Charger; Touch-Up Paint.
2. Main pre-assembled equipment: Frame, Baery & main componentry;
Seat assembly; Rear Wheel assembly; Handlebar assembly – not yet xed
into stem, but is connected to frame by electronic & hydraulic cables.
3. Front Wheel with Front Fender (packed together & zip ed to frame).
4. Headlight: Packed separately in brown box.
TOOLS YOU’LL NEED:
Box cuers or scissors / Allen wrenches/hex keys, sizes: 3, 4, 5 & 6mm
Open-ended socket or adjustable wrenches, sizes: 8, 10, 14 & 15mm.
UNPACKING INSTRUCTIONS:
1. Prepare to remove the front wheel and front fender which have been
packed together and zip-ed to the frame of the bike. Locate the zip e and
very carefully cut using scissors or box cuer, then remove the wheel and
fender as one package, together.
2. Now carefully li the rest of the bike out of the box, being sure to support
the handlebar and bike together simultaneously to prevent cables from
being pulled or damaged. Also make sure NOT to pull brake levers before the
front wheel is securely installed. Somemes the plasc brake caliper shim
(designed to stop calipers from closing during transit) falls out.
3. Remove remaining items from the box, checking thoroughly to ensure
nothing has fallen loose. Check you have all items before beginning assembly.
2
3
41
Protecve wrapping not shown
B
C
D
E
A
Handlebar Clamp
Fender Stay
Pedals
Fork Dropouts
Shim (remove)
Brake Calipers
Fender & Assembly Point
Rotor
Quick Release Skewer
Headlight Bracket & Cable
ITEMS INVOLVED IN ASSEMBLY
Stem
UNPACKING INSTRUCTIONS IT IS STRONGLY RECOMMENDED HAVING TWO PERSONS FOR UNPACKING.
3
A. FRONT WHEEL INSTALLATION
Unpack Quick Release Skewer (QRS), unscrew nut from thread and gently
push skewer through front wheel axle, ensuring lever is on opposite side to
brake rotor. Once through, lightly screw nut back onto thread .
Next, remove plasc brake caliper shim from between brake caliper on front
fork (if not already fallen out during shipping). Remember NOT to pull brake
lever unl wheel is securely installed to avoid locking calipers together.
Now have your assistant hold front of bike o the ground and place wheel
into forks – ensuring wheel is the correct way round so rotor is lined up with
calipers. Lower forks so wheel axle sits centered inside fork dropouts and
brake rotor is perfectly seated between calipers. Now carefully ghten nut
on QRS and fold lever ghtly unl wheel is completely secure.
WARNING
DO NOT ATTEMPT THIS ASSEMBLY UNLESS YOU ARE EXPERIENCED IN CYCLE OR MECHANICAL EQUIPMENT ASSEMBLY.
WILDSYDE LLC WILL NOT BE LIABLE FOR ANY DAMAGE, INJURY OR DEATH TO PERSONS OR PROPERTY AS A RESULT.
WE HIGHLY RECOMMEND SEEKING PROFESSIONAL HELP FROM A SPECIALTY BICYCLE STORE OR MOBILE MECHANIC SUCH AS VELOFIX.COM
FOR THE ASSEMBLY OF YOUR NEW WILDSYDE BICYCLE. IT IS CRITICALLY IMPORTANT THAT ALL COMPONENTS ARE INSTALLED CORRECTLY,
NUTS AND BOLTS SECURED TO THE CORRECT TIGHTNESS AND THE BICYCLE IS IN PERFECT WORKING ORDER PRIOR TO RIDING. WILDSYDE
LLC WILL NOT BE LIABLE FOR ANY DAMAGE, INJURY OR DEATH TO PERSONS OR PROPERTY AS A RESULT OF ASSEMBLING YOUR OWN BIKE.
ASSEMBLY INSTRUCTIONS IT IS STRONGLY RECOMMENDED HAVING TWO PERSONS FOR ASSEMBLY.
KICKSTAND You might now nd it useful to rest bike on its kickstand
for the remainder of the assembly. To adjust, loosen screw on back, then
manually lengthen and ghten so ebike will stand securely on its own.
4
B. HANDLEBAR DISASSEMBLY/ASSEMBLY
Using 4mm wrench, remove the 2 or 4 bolts (varies between ebike models)
from handlebar clamp assembly on stem and detach clamp. Have your
assistant posion bars into stem, whilst replacing clamp and bolts, lightly
securing handlebar into place. Now use LCD display to help nd handlebar
center, then ghten bolts securely (5-8N.m) unl there is zero movement.
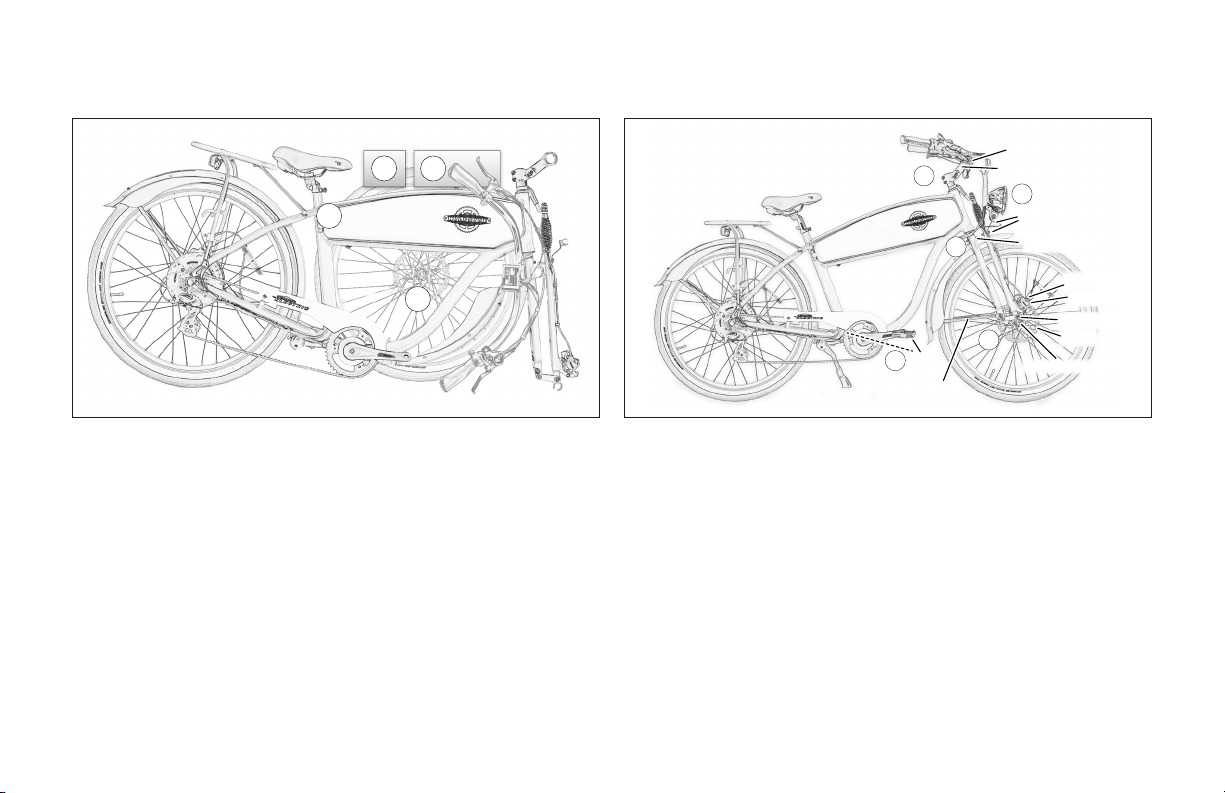
C & D. FITTING FRONT FENDER & HEADLIGHT
First aach fender stay and fender together before ng to forks. Unscrew
bolts on fender, posion closed end of stay to inside fender, then reinsert
bolts and ghten securely. Now the fender and stay are ready to be ed to
the forks, along with the headlight.
For Hunni Bunni & Shadow: Remove bolt at top of rear front fork, slide
fender over front wheel. Locate aachment tab on fender and posion to
rear of rear front fork. Reinsert bolt and ghten securely. Next remove bolt at
top of front fork, posion headlight bracket in front of fork, center and angle
headlight, reinsert bolt and ghten securely. Connect cable from light to
bike cable connector, located where headlight mounts to fork. Finally aach
fender stay rods to rear (or only) fork each side using the bolts provided.
For The Beast: The fender on the Beast uses a pillar with a nut channel in it,
in which the nut of the bolt for the headlight drops into. Once nut, fender
and headlight bracket are correctly posioned, ghten bolt. The nut will hold
ght within the pillar. Connect light cable and fender stay rods, as above.
For Paree & Roam: Remove bolt at top of front fork, slide fender over front
wheel. Locate aachment tab on fender and posion into place behind fork.
Posion light bracket in front of fork, center and angle light, reinsert bolt and
ghten rmly, securing both fender and light. Connect light cable and fender
stay rods, as above.
E. ATTACHING PEDALS
Once the pedals are unwrapped, idenfy le and right
pedals marked ‘L’ & ‘R’. First apply a lile grease to both
pedal threads before ng, then carefully hand-thread
one at a me onto cranks, always turning thread towards
front of bike. Once both pedals are on, ghten securely
with a pedal wrench or 15mm adjustable wrench.
Once the bike is securely assembled, we recommend
fully charging the baery before going on a long ride. Please now read the
accompanied Quick Start Guide and follow the instrucons carefully on how
to operate your ebike.
FOR TROUBLESHOOTING PLEASE REFER TO MANUAL.
For quesons, please email inf[email protected], or for urgent assistance
please call (970) 949 3261.
Hunni Bunni & Shadow The Beast Paree & Roam

This manual suits for next models

4

Other WILDSYDE Bicycle manuals

WILDSYDE Vintage E-Classics Paree User manual

WILDSYDE

WILDSYDE Vintage E-Classics Paree User manual

WILDSYDE E-Cruisers The Beast User manual

WILDSYDE

WILDSYDE E-Cruisers The Beast User manual

Popular Bicycle manuals by other brands

Trek FX SPORT CARBON 2022 Service manual supplement

Trek

Trek FX SPORT CARBON 2022 Service manual supplement

VelectriX Rear hub Series instruction manual

VelectriX

VelectriX Rear hub Series instruction manual

Focus Designs SBU V3 owner's manual

Focus Designs

Focus Designs SBU V3 owner's manual

Fisher-Price BLT72 user manual

Fisher-Price

Fisher-Price BLT72 user manual

Giant GIANT HALF WHEELER manual

Giant

Giant GIANT HALF WHEELER manual

Spinta Urbano user manual

Spinta

Spinta Urbano user manual

Scott LUMEN 2023 manual

Scott

Scott LUMEN 2023 manual

Rotwild R.X275 quick start guide

Rotwild

Rotwild R.X275 quick start guide

lehman Trikes CROSSFIRE installation guide

lehman Trikes

lehman Trikes CROSSFIRE installation guide

Vuly Balance Bike manual

Vuly

Vuly Balance Bike manual

Felt BruHaul owner's manual

Felt

Felt BruHaul owner's manual

Velotric Nomad Series quick start guide

Velotric

Velotric Nomad Series quick start guide

BMW MOTORRAD K 1200 R Sport Rider's manual

BMW

BMW MOTORRAD K 1200 R Sport Rider's manual

Chillafish FIXIE CPFX01 user manual

Chillafish

Chillafish FIXIE CPFX01 user manual

Rose electronics XTRA WATT owner's manual

Rose electronics

Rose electronics XTRA WATT owner's manual

MBM LA RUE 28 user manual

MBM

MBM LA RUE 28 user manual

Moustache LUNDI 20 quick start

Moustache

Moustache LUNDI 20 quick start

Giant ESCAPE CITY datasheet

Giant

Giant ESCAPE CITY datasheet

manuals.online logo
manuals.online logoBrands
  • About & Mission
  • Contact us
  • Privacy Policy
  • Terms and Conditions

Copyright 2025 Manuals.Online. All Rights Reserved.