Winegard Togo Roadlink C2 User manual

1
Place label here
2452430
Register your product at winegard.com/myantenna
For help, email help@winegard.com or call 1-800-320-9992.
For help relating to your AT&T
®
Data plan please call 1-800-331-0500
2452430
Rev1 4 -19
Get started!
ROADLINK™C2
4G LTE ROUTER + WIFI EXTENDER
DOWNLOAD
Winegard Connected App
SCAN
QR code with App for Setup
Free at App Store
and Google Play
QR code
found in manual
POWERED BY WINEGARD®
Installation & Operation Manual
Model WF2-TH2

2
Welcome
Congratulations on your Togo Roadlink™C2 purchase!
Togo Roadlinkis your complete connectivity solution. From advanced hardware to exclusive data plans and
more, you now have the freedom to stay connected no matter your destination. Engineered for RVs, Roadlink C2
connects all of your devices through a secure hotspot that maximizes speed and range. It’s reliable internet for
your on-the-go lifestyle. With exclusive data plans from AT&T*, you’re now free to stream entertainment, surf the
internet, and more. Stay connected at the campground or while en route to your next adventure!
*Visit att.com/togo for latest plan pricing and details. Eligible vehicle/AT&T wireless account required. Service & coverage not available everywhere.
Other charges & restrictions apply. Plan pricing and terms subject to change.
Contents
Welcome .............................................................2
Contents ..............................................................2
Warnings .............................................................2
Togo Roadlink C2 Installation ....................3
Initial Setup Process ...................................... 6
Operating Features ........................................ 9
Over the Air Antenna Operation ...............11
Troubleshooting ..............................................11
FCC Statement ...............................................12
Warranty Statement ....................................12
• You must have a compatible tablet or cellular
device running iOS or Android in order to download
the Winegard App.
• In order to use the app you must allow for camera
access. The camera will need to scan the QR
code, located on the front of this manual, as part
of the initial setup process.
• Read this manual carefully and completely
before attempting to assemble, install or operate
this product. Togo and Winegard recommend
the installation of this equipment be done by a
professional technician familiar with the vehicle in
which it is installed.
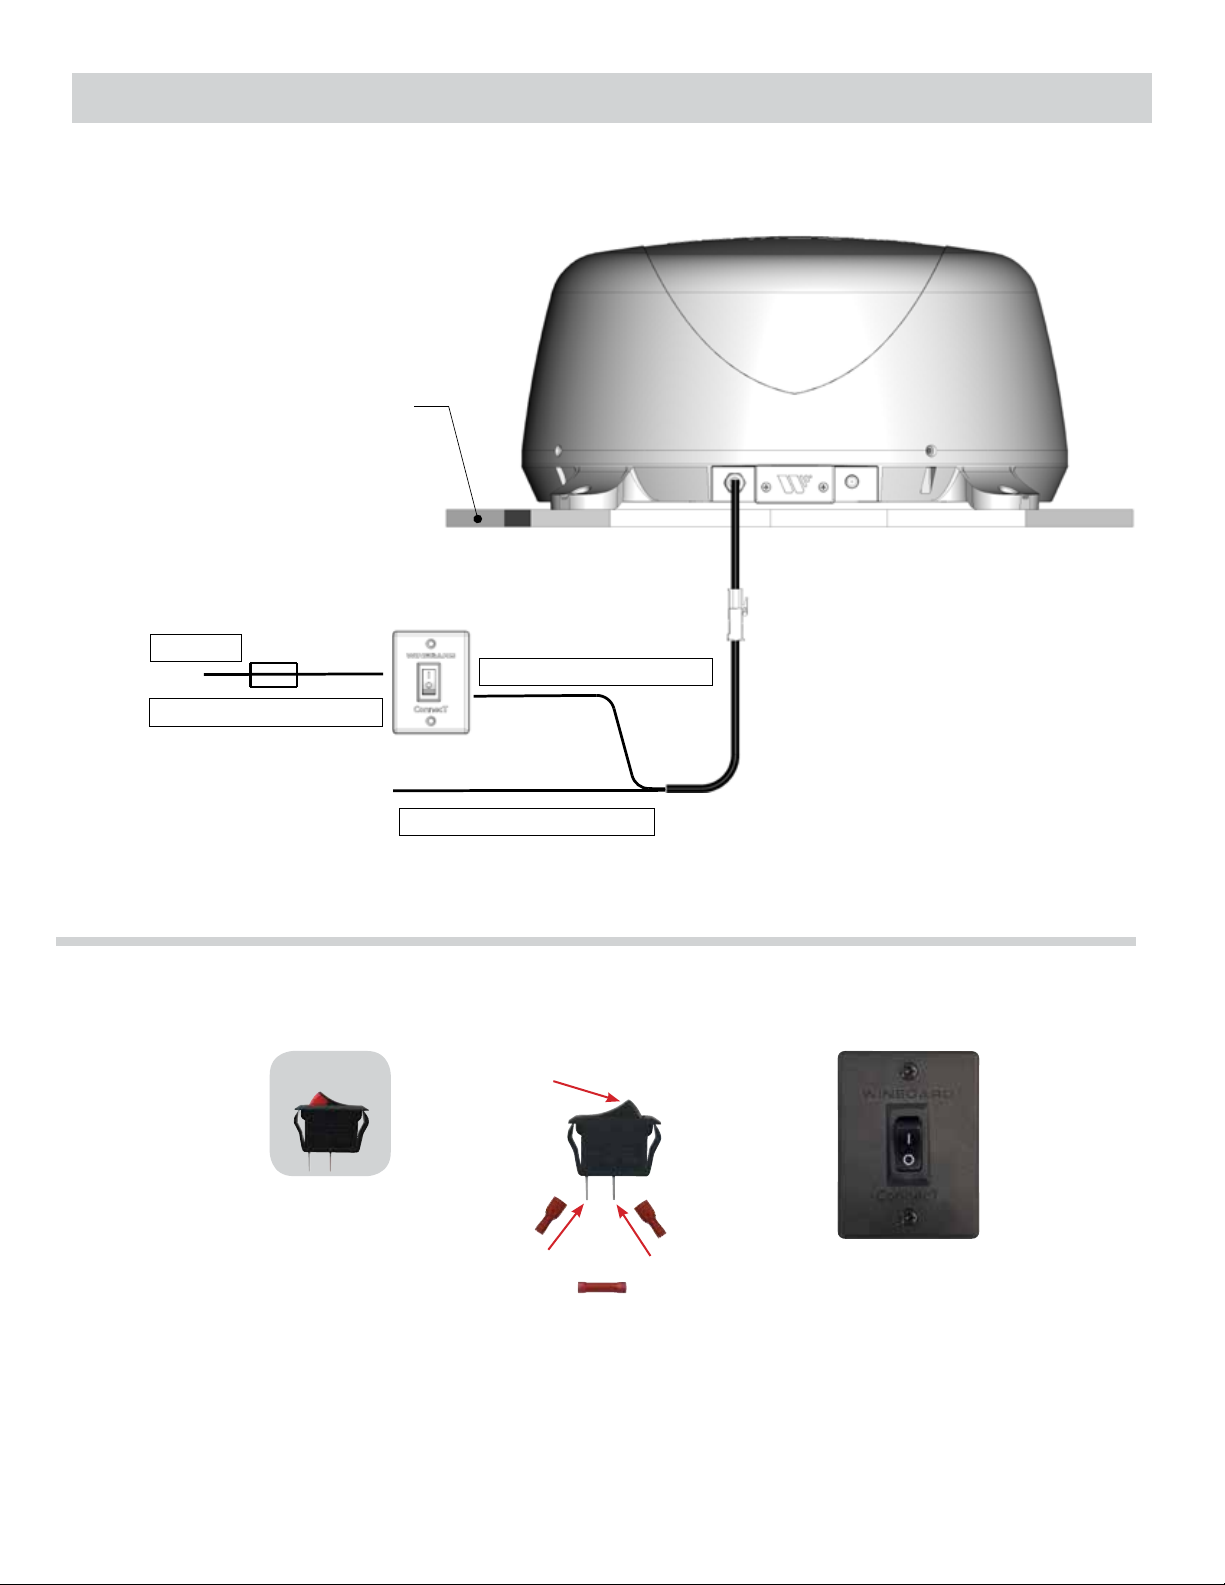
• It is recommended to wire directly to a fused
panel or fused box. However, if you are wiring to
the battery, understand that batteries may expel
explosive gases when not properly ventilated,
therefore, special care and consideration is
required. Consult your vehicle manufacturer
for additional information on safely installing
accessories.
• Save these instructions.
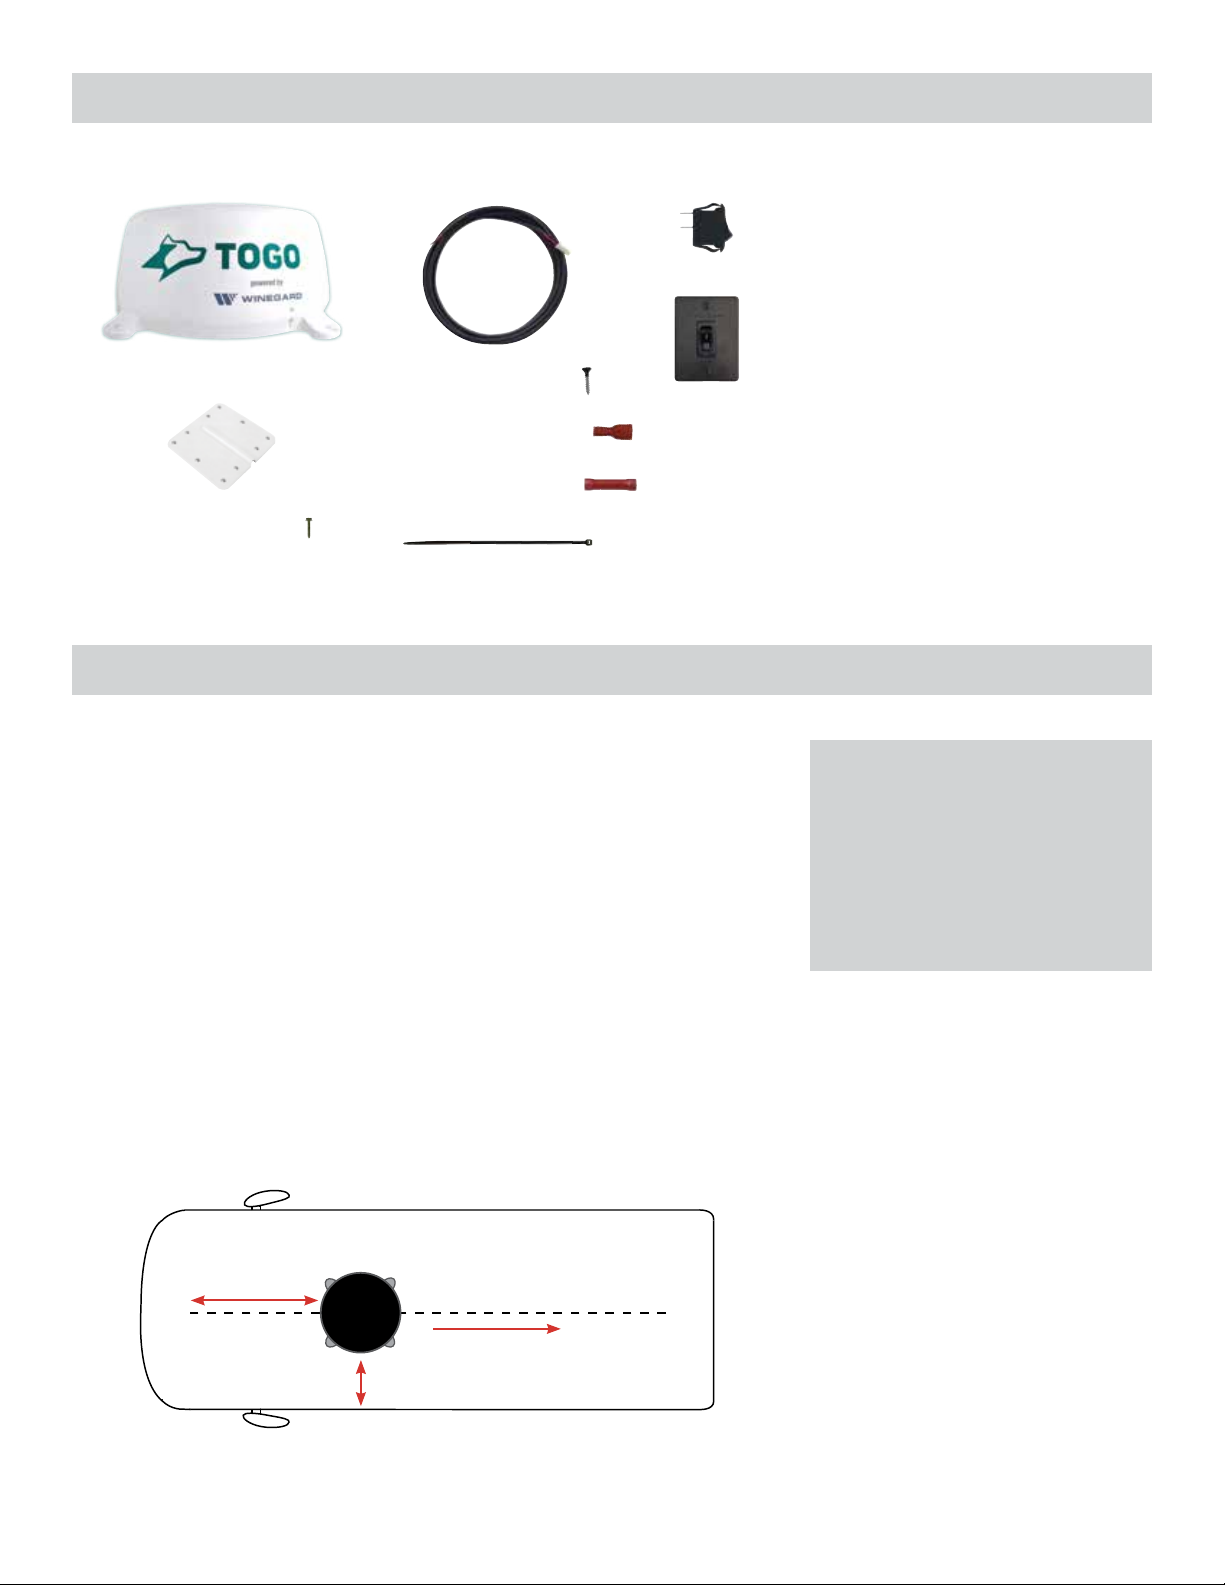
• Do not mount closer than 12 inches from the edge
of the roof or any adjacent devices.
• Do not paint any portion of the Roadlink C2 device.
Painting could damage the system and will void
the warranty.
• Check with vehicle manufacturer on
recommended screws and sealant to use on this
product
Disclaimer:
Although every effort has been made to ensure that the information in this manual is correct and complete, no
company shall be held liable for any errors or omissions in this manual. Changes and technological advances
are continuously being made in the wireless market. Information provided in this manual was accurate at time of
printing. If the Roadlink C2 antenna does not function as expected, please contact Winegard Company at 1-800-
Warnings
2

3
Togo Roadlink™C2 Installation
Choosing a Location for the Antenna & Power Supply
Before mounting the antenna, determine a location for the wall plate/
power supply. Keep in mind 12 V connection must be made from
the Roadlink C2 to the back of the power supply and from the power
supply to a RV power source. It is recommended to use 18 gauge wire
no longer than 50 feet with a dedicated 12VDC circuit and a 3A in-line
fuse. Then, choose a location on the roof of the RV for the antenna that
meets the following requirements:
• Offers enough support for a secure installation
• Maintains adequate clearance from the edge of the roof and any
obstructions
– clearance distance of 24" needed from the antenna to front of the
vehicle
– clearance distance of at least 12" needed from the antenna to
nearest obstruction and to the edge of the roof.
12V DC Wiring Requirements
• Supply voltage – 9-16V
• Max operating current – 1A
• Max operating temperature – 60C
• Max power cable length – 50 ft
(18 gauge wire recommended)
• 3A Fuse
3
Parts List
Tools required for unpacking
& installation:
• Drill with 3/4” bit
• 1-1/4” hole saw (if mounting
switch in wall)
• Phillips screw driver #2 3/8”
• Sealant (consult RV
manufacturer for proper type for
your roof material)
• Crimping tool
• Power wire 18 gauge, 50’
maximum recommended
• Wire Stripper
Specs:
• Dimensions: 16” diameter, 8” tall,
3.75 lbs.
Front of Vehicle
Cable connections must
face back of vehicle
At least 12”
Mount on or parallel to
center line of coach
Back of Vehicle
At least 24”
Mounting Screw (20)
Wall Plate
Terminal Insulator (2)
Wall Plate Screw (2)
Cable Tie (2)
Cable Entry Plate
Power Switch20’ Power Cable
Barrel Crimp Splice
Antenna

4
Togo Roadlink™C2 Installation (cont)
Exterior
STEP 1 – Select a level spot on your roof for installation. Level the base
front-to-back and side-to-side.
STEP 2 – After selecting a location for the antenna, make sure that
the centerline of the antenna is on or parallel to the centerline of the
vehicle; the centerline of the antenna runs through the point between
the two feet where cable connections are located.
STEP 3 – Position the antenna with cables exiting toward the rear of
the vehicle. To ensure proper installation, verify that the distance from
the edge of the roof to any foot is at least twelve inches.
STEP 4 – Place the unit on the roof in its permanent location, and mark
around each base foot. Remove the unit.
STEP 5 – Apply sealant (not provided) in the areas marked for the
base feet. Place the base feet on top of the sealant. Screw down each
foot and put sealant around the edge of feet and over each screw.
STEP 6 – Decide the best location for the power cable to enter the
vehicle, as well as, the location of the wall plate power switch inside
your vehicle. Drill a ¾” hole in the roof, and push the power cable
making sure the cable is accessible from the area where the power
switch will be located.
STEP 7 – Place the provided cable entry plate over the hole and cable.
Screw the plate in place. Seal the plate and screw holes with sealant.
Interior
STEP 8 – Choose a location to install the ConnecT Wall Plate with
power On/Off switch. When selecting a location, remember that you
will need to run the supplied +12VDC power cable from the Roadlink
C2 antenna to the switch along with power from your vehicle. It is
recommended to use 18 gauge wire no longer than 50 feet with a
dedicated 12VDC circuit and a 3A in-line fuse.
STEP 9 – For a wall or panel mount, drill or use a hole saw to create a
1¼” hole. Pull the power wires through the wall or panel.
STEP 10 – Be sure the switch is in the OFF position before continuing.
Step 11 – Slide the power switch into the wall plate.
STEP 12 – Connect the +12V power wire from the vehicle to a small red
terminal insulator (included). Crimp the connector.
STEP 13 – Connect this small red terminal insulator to the isolated
spade of the power switch. (See diagram on next page).
STEP 14 – Connect the red wire from the Roadlink C2 to the other small
red terminal insulator (included). Crimp the connector.
STEP 15 – Connect this small red terminal insulator to the other spade
on the switch.
STEP 16 – Slide the ground wire from the vehicle into one end of the
barrel crimp splice (included), and slide the black ground wire from
the C2 antenna into the opposite end of the splice. Crimp the splice.
STEP 17 – Slide the power switch back into the hole created in Step 9.
Mount the wall plate with the two supplied wall plate screws.
STEP 18 – Turn the switch to the ON (I) position and verify that the LED
on the outside of the dome, located under the SIM Card/LED cover
plate, has turned on.

5
Togo Roadlink™C2 Installation (cont)
STEP 10
On/Off Rocker
Switch (shown
in Off Position)
STEP 12 & 13
+12V from
vehicle
STEP 14 & 15
+12V from
Roadlink C2
STEP 16
Barrel crimp splice
ON Position STEP 11
Power switch
into wall plate
RED WIRE - TO SWITCH
+12V DC
3A FUSE RECOMMENDED
BLACK WIRE - TO GROUND
Vehicle's Roof

Initial Setup Process
The Winegard – Connected app must be downloaded first
before using the product.
WARNING: FOR FIRST TIME USERS – The initial setup requires an internet
connection to pair the device with a newly created account. Do not
connect directly to the local network (shown on the front of this manual)
of your Togo Roadlink C2 Device. You will be instructed when to connect
during the initial account setup process.
1. From your mobile device or tablet, download the free Winegard –
Connected app either in the iOS App Store or the Google Play Store.
Once the download is complete, open the app.
2. Turn the power switch to the Roadlink C2 to the ON position. This will
either be a rocker (on/off) switch or a push button on the right side of
the wall plate as seen in the previous Installation (Option A) section of
this manual (pg. 4).
NOTE: Not all RVs are wired the same way. Consult your RV
manufacturer if either this switch or button cannot be found.
3. In order to use the Togo Roadlink C2 unit you must accept
Winegard's Terms and Conditions. To view the full Privacy Policy and
Terms of Use please select the link in the app or visit http:www.
winegard.com/about/privacy-policy.
4. After the Terms and Conditions are accepted, a screen with
the message “No devices have been detected. Please choose
a method to connect to a new device.” will appear. Once this
message disappears, click on the Add Device QR Code button.
NOTE: You may get a message asking to allow the Connected app
access to your device’s camera. You will need to allow access in order
to complete
the setup.
5. After selecting the Add
Device icon, a message
will appear stating “You
must be signed in order
to use this feature. You
will automatically be
taken to the account
page to sign in with
Togo.” Click on the Sign
in with Togo ID button.
Review Togo’s Privacy
Policy (you must agree
to the terms of use). If
you already have a Togo
account simply sign in
and skip to step 7. If not,
click on the link to create
one (see step 6).
6
Winegard
Connected App

7
6. If you need to create a Togo ID fill out the information, agree to the
Terms of Service and Privacy Policy, then click the Continue button.
You will be sent an email to verify the email address is correct. Click
on the Click to Verify button within the email. You’re now verified!
7. Reopen the Winegard app and sign into your Togo account.
Winegard will now request personal information to improve the overall
experience of the Roadlink C2. Click on the Allow button.
NOTE: Clicking on the Disallow button will force close the app. You will
need to reopen the app and start the Initial Setup Process over.
8. You have successfully signed in! Your camera should appear
with a message to Scan the Winegard QR Code. The Winegard QR
Code can be found on the front of your manual, in a cabinet or glove
compartment, or under the dome. Please scan the Winegard code
and complete the registration process.
NOTE: Account must be verified
before you may continue.
Initial Setup Process (cont)
NOTE: If you are unsure of where the QR code is located, please contact Winegard
or your vehicle manufacturer. Also, if your camera does not appear to operate
properly, make sure that the Winegard Connected app has access to your
device’s camera. You can verify this in your phone or device's settings.

8
9. After you complete the registration questions, you will get your
Device Information. Verify that the Network Name and Network
Password match what is labeled on your manual (if it is not please
stop and confirm the device
is powered on or contact
Winegard Company at
1-800-320-9992). Next, open
up your device’s wireless
settings and select the
correct Network Name (ex.
Winegard2ghzXXXXXX). Enter
the correct password and
once connected move back
to the app and select the
Continue button.
10. Your device is now paired with your Togo account. At this point
you can buy Togo Roadlink 4G LTE data from AT&T by selecting the
Buy Data button or choose the Not Now button. Continue on to step
11 to buy data. If you choose the Not Now button, please move to the
Operating Features Section on page 9 of this manual. You may now
use the product as a WiFi extender.
11. A message will appear indicating "No active internet connection
detected". In order to buy data for the Roadlink C2 device, there must
be an internet connection. Review the three options to connect your
cellular device or tablet to the internet.
1) Skip 4G Setup. You can setup and buy data a later time.
2) Scan for WiFi. Selecting this option will use the Roadlink C2
WiFi extender. A scan of your current location’s available WiFi
signals will appear. Connect to an available WiFi network within
the list provided. Once connected you will be able to buy data.
3) Buy Data. Turn your phone or tablet’s WiFi connection off
in order to buy data over your cellular connection. Once the
purchase is complete you can turn the WiFi connection back on
and reconnect to the device.
12. Once you have a internet connection and you click the Buy Now
button, you will be directed to an AT&T website to create a new
account and purchase data. Fill in the necessary information and
after purchase the SIM card in your device will become activated.
Initial Setup Process (cont)

Initial Setup Process (cont)
9
13. After purchasing data and reopening the Winegard App you will
have a message that you have finished setting up the Roadlink C2
unit. Click on the Close button.
14. Be sure that your device is connected to the Togo Roadlink C2
system and that your Internet source is 4G as shown below. Once the
Signal Strength indicator shows a signal and you are connected to
Togo Roadlink AT&T, you are ready to use the previously purchased
data plan.
NOTE: Activation can take up to 30 minutes.
15. You may now connect all other wireless
enabled devices to your Roadlink C2 by
selecting the correct SSID and entering
the correct password. Once an internet
connection has been made, all devices that
are connected to the Roadlink C2 will have
access to the internet.
Operating Features
Slideout Menu -
Test Internet Speed,
Find My Device (GPS),
Account Information,
Support and more.
Tap to see signal
strength of the 4G or WiFi
connection.
Information Icon -
Helpful hints and tips
can be found here.
Connection Information -
Device name,
Local Network name,
Internet Source,
and software version.
In the Settings screen you
are able to change the Local
and Guest Network Name
(SSID) and passwords.
In the Advanced Settings
screen you are able to
change the IP address,
modify saved WiFi networks,
perform a factory reset, and
reboot the system if needed
(recommended to NOT
make changes).
Before 4G Connection After 4G Connection
4G Signal
ConnecT + Widgets
Tower Finder
Setup
Manual
Channel Strength
Settings

10
Health Check –
If you believe your system is having problems you can
click on the Download Logs button (and with an internet
connection will be able to send directly to Winegard for
review). If no internet connection is available, the file can be
saved to your device and sent via email at a later time.
Product Manual –
This link will send you to the Winegard website where you
can find your correct manual.
Submit Help Request –
Fill out the Contact Form and include a message with what
you need help with and a Winegard Support agent will
respond. Or call Winegard Technical Support 1-800-320-
9992.
Link will open your default email provider and start a new
email.
All the device information can be found in the About
screen. You are also able to check for software updates
which typically update every couple months for added
improvements.
Selecting the Buy Data button will link to the AT&T portal
to purchase data. An internet connection must be present
in order to access this website. See step 11.3 on page 8.
Internet Source -
Switch between WiFi, 4G
LTE, or turn off internet.
Switching between
internet options will
prompt the message
to the left. Make sure
your phone or tablet
is set to auto connect
and that a connection to
another network has not
been made during this
change.
10
If WiFi is selected as the Internet Source, a Scan for WiFi button will
appear. Click this button and a scan of the available WiFi in your
location will take place. Connect to an available WiFi network
within the list provided. If there is a lock next to the available
network, a password is required to log on.
Operating Features (cont)
NOTE: Some WiFi sources do not require a password to connect but do require consent before they will
let you use their network. In these cases, they will often have a “SPLASH” page that requires you to either
agree to their rules and/or enter a password before they will allow you to use their network. These pages
will not always automatically load on the web browser that you select. Sometimes browsing to a web
page will help load this splash page.
4G Signal
ConnecT + Widgets
Tower Finder Setup
Manual
Channel Strength
Information About Terms/Conditions
Quickstart Advanced Settings Phone
No WiFi Signal No 4G LTE Signal Email Channel Strength
Speed Test
Ethernet No Internet
Buy Data
Internet Source
Scan for WiFi
Support

11
Found in the slide out menu, the Test
Internet Speed option will initiate a
speed test for you to understand what
your download speed is.
Also found in the slide out menu, the Find
My Device option will locate your Roadlink
C2’s location. The unit must be powered
on and have an internet connection in
order to locate the correct location.
Test Internet Speed Find My Device
Troubleshooting
LED DEFINITION (LOCATED UNDER THE SIM CARD/LED COVER) :
LED OFF System is powered down.
SOLID RED System is booting up.
FAST BLINKING GREEN System is initializing.
FAST BLINKING ORANGE System is up and waiting for an Internet connection.
SOLID GREEN System is connected to the Internet.
ALTERNATING GREEN/ORANGE System is being updated with new software
PROBLEM TROUBLESHOOTING
Can’t access Internet If you believe you have data contact AT&T at 1-800-331-0500. Service & coverage not available
everywhere. If you don’t have data see the Buy Data section of this manual.
You have forgotten
your router login and/or
password
If you haven’t changed your factory preset SSID or password have some options to recover these:
1. Located on the side of the dome is a SIM card /LED cover plate. Inside this plate there will be a white
label with your factory preset SSID and password. 2. Contact Winegard at 1-800-320-9992.
If you have changed your password you have 3 options: 1. Inside the SIM Card/LED cover plate there is
a reset button on the left hand side. Press and hold the reset button for 30 seconds. This will restore the
unit to the original factory settings. Then you may log in using the factory SSID and password located
on the front of this manual or inside the cover plate. 2. If you are unable to gain access to the outside
antenna you can also do a power cycle to get the unit back to the factory defaults. If you are unable
to gain access to the outside antenna, you may perform a power cycle from the power switch. In order
to do this, start with the power switch in the off position. You will need to turn the switch on, wait 90
seconds and then turn off. Repeat 3 consecutive times. On the next power on, the system will begin a
reset. 3. Contact Winegard at 1-800-320-9992.
What is the No Internet
button on the main
screen used for?
The No Internet button allows the user to turn off auto connect if there is no WiFi around. When auto
connect searches for nearby saved WiFi networks, it causes the local AP to turn off making the user's
device(s) disconnect and reconnect.
I am not seeing the SSID
for my Roadlink system. Check that the LED, located under the SIM Card/LED cover entry plate, is powered on. If not, with a
voltage meter, verify that 12V is getting from the vehicle power to the dome. If t is powered on and you
do not see the SSID, reset the unit by pressing and holding the reset button under the SIM Card/LED
cover plate for 30 seconds.
Am I able to paint the
Roadlink C2? No, do not paint any portion of the C2 system. Painting the system could impact the performance and
possibly cause damage, which would void the warranty.
Please contact Winegard Technical Services at 1-800-320-9992 for all other questions.
Operating Features (cont)
11

12
Disclaimer: Although every effort has been made to ensure that the information in this manual is correct and complete, no company shall be held liable for any errors or omissions
in this manual. Information provided in this manual was accurate at time of printing. If the antenna does not function as expected, please contact Winegard Co. Winegard Company
Winegard is a registered trademark of Winegard Company. TOGO and ROADLINK are trademarks owned or used under license by TH2 Connect, LLC. Apple & the Apple logo are
trademarks of Apple Inc., registered in the U.S. and other countries. App Store is a service mark of Apple Inc., registered in the U.S. and other countries. Google Play & the Google Play
logo are trademarks of Google LLC. All trademarks, registered trademarks and logos are the property of their respective owners and are not affiliated with Winegard Company.
• 2736 Mt. Pleasant Street • Burlington, IA 52601 • 1-800-288-8094 • Fax 319-754-0787 • www.winegard.com
Printed in U.S.A. ©2019 Winegard Company Rev1 4-19 2452430
WINEGARD MOBILE PRODUCTS LIMITED WARRANTY
(2 YEARS PARTS; 1 YEAR LABOR)
Winegard Company warrants this product against defects in materials or workmanship for a period of two (2) years
from the date of original purchase. During year one (1) of such warranty, Winegard Company will also pay authorized
labor costs to an authorized Winegard dealer to repair or replace defective products. No warranty claim will be
honored unless at the time the claim is made, Customer presents proof of purchase to an authorized Winegard dealer
(to locate the nearest authorized Winegard dealer, contact Winegard Company, 3000 Kirkwood Street, Burlington,
Iowa 52601, Telephone 800-288-8094 or visit www.winegard.com). Customer must provide proof of purchase with a
dated sales receipt for the Winegard product to verify the product is under warranty. If the date of purchase cannot be
verified, the warranty period shall be considered to begin thirty (30) days after the date of manufacture.
If a defect in material or workmanship is discovered, Customer may take the product to an authorized Winegard
dealer for service. Customer must provide proof of purchase to verify the product is under warranty. If the product
is brought to an authorized Winegard dealer for service prior to expiration of year one (1) of the warranty period and
a defect in material or workmanship is verified by Winegard Technical Services, Winegard Company will cover the
Winegard dealer’s labor charges for warranty service. The Winegard dealer must contact Winegard Technical Services
in advance for pre-approval of the service. Approval of the service is at the sole discretion of Winegard Company.
Alternatively, Customer may ship the product prepaid to Winegard Technical Services (located at 2736 Mt.
Pleasant Street, Burlington, Iowa 52601, Telephone 800-788-4417). Customer must return the product along with
a brief description of the problem and provide Winegard Technical Services with Customer’s name, address, and
phone number. Customer must also provide proof of purchase to verify the product is under warranty. If the product
is returned before the expiration of the warranty period, Winegard Company will (at its option) either repair or replace
the product.
This Limited Warranty does not apply if the product has been damaged, deteriorates, malfunctions or fails
from: improper installation, misuse, abuse, neglect, accident, tampering, modification of the product as originally
manufactured by Winegard in any manner whatsoever, removing or defacing any serial number, usage not in
accordance with product instructions or acts of nature such as damage caused by wind, lightning, ice or corrosive
environments such as salt spray and acid rain. This Limited Warranty also does not apply if the product becomes
unable to perform its' intended function in any way as a result of the television signal provider making any changes in
technology or service.
RETURN AUTHORIZATION POLICY
A Return Material Authorization (RMA) is required prior to returning any product to Winegard Company or Winegard
Warranty Services under this warranty policy. Please call our Technical Services Department at 800-788-4417 or send
an email to [email protected] to obtain the RMA number. Please furnish the date of purchase when requesting
an RMA number. Enclose the product in a prepaid package and write the RMA number in large, clear letters on the
outside of the package. To avoid confusion or misunderstanding, a shipment(s) without an RMA number(s) or an
unauthorized return(s) will be refused and returned to Customer freight collect.
WINEGARD COMPANY DOES NOT ASSUME ANY LIABILITIES FOR ANY OTHER WARRANTIES, EXPRESS OR
IMPLIED, MADE BY ANY OTHER PERSON.
ALL OTHER WARRANTIES WHETHER EXPRESS, IMPLIED OR STATUTORY INCLUDING WARRANTIES OF FITNESS
FOR A PARTICULAR PURPOSE AND MERCHANTABILITY ARE LIMITED TO THE TWO YEAR PERIOD OF THIS
WARRANTY.
In states that do not allow limitations on implied warranties, or the exclusion of limitation of incidental or
consequential damages, the above limitations or exclusions do not apply.
Some states do not allow limitations on how long an implied warranty lasts, or the exclusion of limitation of
incidental or consequential damages, so the above limitations or exclusions may not apply to you.
This warranty gives Customer specific legal rights. Customer may also have other rights that may vary from state
to state. WS-MOBWARREV3
Rev. 10/14
FCC STATEMENT
This device complies with Part 15 of the FCC Rules. Operation is subject
to the following two conditions: (1) This device may not cause harmful
interference, and (2) this device must accept any interference received,
including interference that may cause undesired operation.
This equipment has been tested and found to comply with the limits for a
Class B digital device, pursuant to Part 15 of the FCC Rules. These limits are
designed to provide reasonable protection against harmful interference in a
residential installation. This equipment uses and can radiate radio frequency
energy and, if not installed and used in accordance with the instructions,
may cause harmful interference to radio communications. However, there
is no guarantee that interference will not occur in a particular installation.
If this equipment does cause harmful interference to radio or television
reception, which can be determined by turning the equipment off and on,
the user is encouraged to try to correct the interference by one or more of
the following methods:
• Reorient or relocate the receiving antenna.
• Increase the separation between the equipment and devices.
• Connect the equipment into an electrical outlet on a circuit different
from that which the radio receiver is connected.
• Consult the dealer or an experienced radio/TV technician for help.
FCC Caution
Any changes or modifications not expressly approved by the party
responsible for compliance could void the user’s authority to operate this
equipment.
Only channels 1–11 can be operated. Selection of other channels is not
possible.
This device and its antenna(s) must not be co-located or operating in
conjunction with any other antenna or transmitter.
FCC Radiation Exposure Statement
This equipment complies with FCC radiation exposure limits set forth for an
uncontrolled environment. This equipment should be installed and operated
with a minimum distance of 25 cm between the radiator and your body.
This device and its antenna(s) must not be co-located or operating in
conjunction with any other antenna or transmitter except in accordance
with FCC multi-transmitter product procedures.
This device complies with FCC and Industry Canada license-exempt RSS
standard(s). Operation is subject to the following two conditions: (1) this
device may not cause interference, and (2) this device must accept any
interference, including interference that may cause undesired operation
of the device.
Le présent appareil est conforme à FCC et CNR d’Industrie Canada
applicables aux appareils radio exempts de licence. L’exploitation est
autorisée aux deux conditions suivantes : (1) l’appareil ne doit pas
produire de brouillage, et (2) l’utilisateur de l’appareil doit accepter tout
brouillage radioélectrique subi, même si le brouillage est susceptible d’en
compromettre le fonctionnement.
12
This manual suits for next models
1
Table of contents
Other Winegard Extender manuals

Winegard
Winegard ConnecT 4G1 User manual

Winegard
Winegard WF-200M User manual

Winegard
Winegard ConnecT WF1xT Series User manual

Winegard
Winegard WF2-35B User manual

Winegard
Winegard ConnecT WF1 User manual

Winegard
Winegard WF-4000 User manual

Winegard
Winegard ConnecT 2.0 Plus WF2-695 User manual

Winegard
Winegard ConnecT WF1 User manual

Winegard
Winegard Extreme RW2035W User manual

Winegard
Winegard ConnecT 2.0 User manual