Winter Gardenz PG0812H User manual

www.wintergardenz.com
Assembly Manual
for Polycarbonate Greenhouses, Glasshouses and Shadehouses
MODEL: PG0812H VERSION 3.0 DATE 02.16.15 PART NUMBER: IMPG0812H
8x12 Greenhouse
Model No. PG0812H
Doors: 2x Single, sliding
Vents: 4x Manual opening
Width: 8’6” (2596mm)* at base
Height: 8’7” (2615mm)* to ridge
5’4” (1620mm)* to gutter
Length: 12’7” (3844mm)* at base
Model: PG0812H
Frame: AluminumPolyGlazeprole
Finish: Powdercoated Green
SPECIFICATIONS
*Dimensions are approximate.

Contents
Contents Page 2
Introduction & getting started Page 3-5
• Introduction
• Workingspace
• Weather
• Tools
• Guarantee
• Abouttheglazing
• AbouttheT-headbolts
• Aboutthelocators
• Ifsomethingdoesn’tseemright
• Spareparts
Positioning Page 6
• PositioningyourGreenhouse
Foundations Page 7
• Sitepreparation
• Foundationoptions
Base assembly Page 8-9
Front wall assembly Page 10-13
Backwallassembly Page14-17
Side wall assembly Page 18-20
Bracing Page 21
Vent assembly Page 21
Roofassembly Page22-25
Door assembly Page 26-27
Door mounting Page 28-29
Rubber beading Page 30
Analword Page31
• Cleaningandmaintenance
• Wind
• ResourcesforGreenhousegrowers
• Thankyou
Partsidenticationchart Page32-33
Greenhouseaccessories Page34
WinterGardenzGreenhouseModelNo.PG0812H
2

Introduction & getting started
Introduction
CongratulationsonpurchasingaWinterGardenzGreenhouse,GlasshouseorShadehouse!
Pleasereadtheassemblyinstructionsandfamiliariseyourselfwiththepartsandassembly
sequencebeforeyoubeginconstructingyourGreenhouse.
Workingspace
Thisgreenhouseisdesignedtobeassembledonornearthesiteitistobesituated,
howeverthedoors,roofvents,frontandrearwallpanelscanbeassembledelsewhere(i.e.
garage)andthenmovedintoposition.Youwillrequireadequateworkingspacearound
thestructureonceitisstanding.Youwillneedatleast3ftofclearspacebothsidesofthe
greenhouse,andalsoeither12’6”clearspaceatthefrontofthegreenhousewith18”of
clearspaceattherearofthegreenhouse,oralternatively12’6”ofclearspaceattherearof
thegreenhousewith18”ofclearspaceatthefrontofthegreenhouse.Thisistoenablethe
gutterstoslideintotheframe.
Weather
ItisagoodideatoassembleyourGreenhousewhentheweatherisonyourside.Avoid
windyandrainydays!
Tools
ToassemblethisGreenhouseyouwillrequirethefollowingtools...
-Cordlessdrilltousewiththe10mmnutsetter/socket(NS450)thatissuppliedinthiskit
-Phillipsheadscrewdriver
-Setsquare,levelandtapemeasure
-Scissorsorsharpknife
Ifyouhaveacordlessdrillthattsthe10mmnutsetter(supplied)thenuseit,asitwillmake
assemblysignicantlyeasierandfaster.Asyouworkbecarefulnottoover-tightenthenuts.
WinterGardenzguarantee
WinterGardenzstandbytheirproductsandareproudtooera10yearguaranteeagainst
faultymaterialsandworkmanship.Thisguaranteedoesnotcoverdamagecausedby
severeweatherconditionsorthenaturaldeteriorationofmaterialsovertime.Although
thisGreenhouseisdesignedandconstructedfromquality,durablecomponents,itisnot
designedtowithstandverystrongwindgustsand/orsevereweatherconditionssuchas
storms,tornados,hurricanes,hail,snow,galeforcewinds,etc...Ifyouliveinanexposed
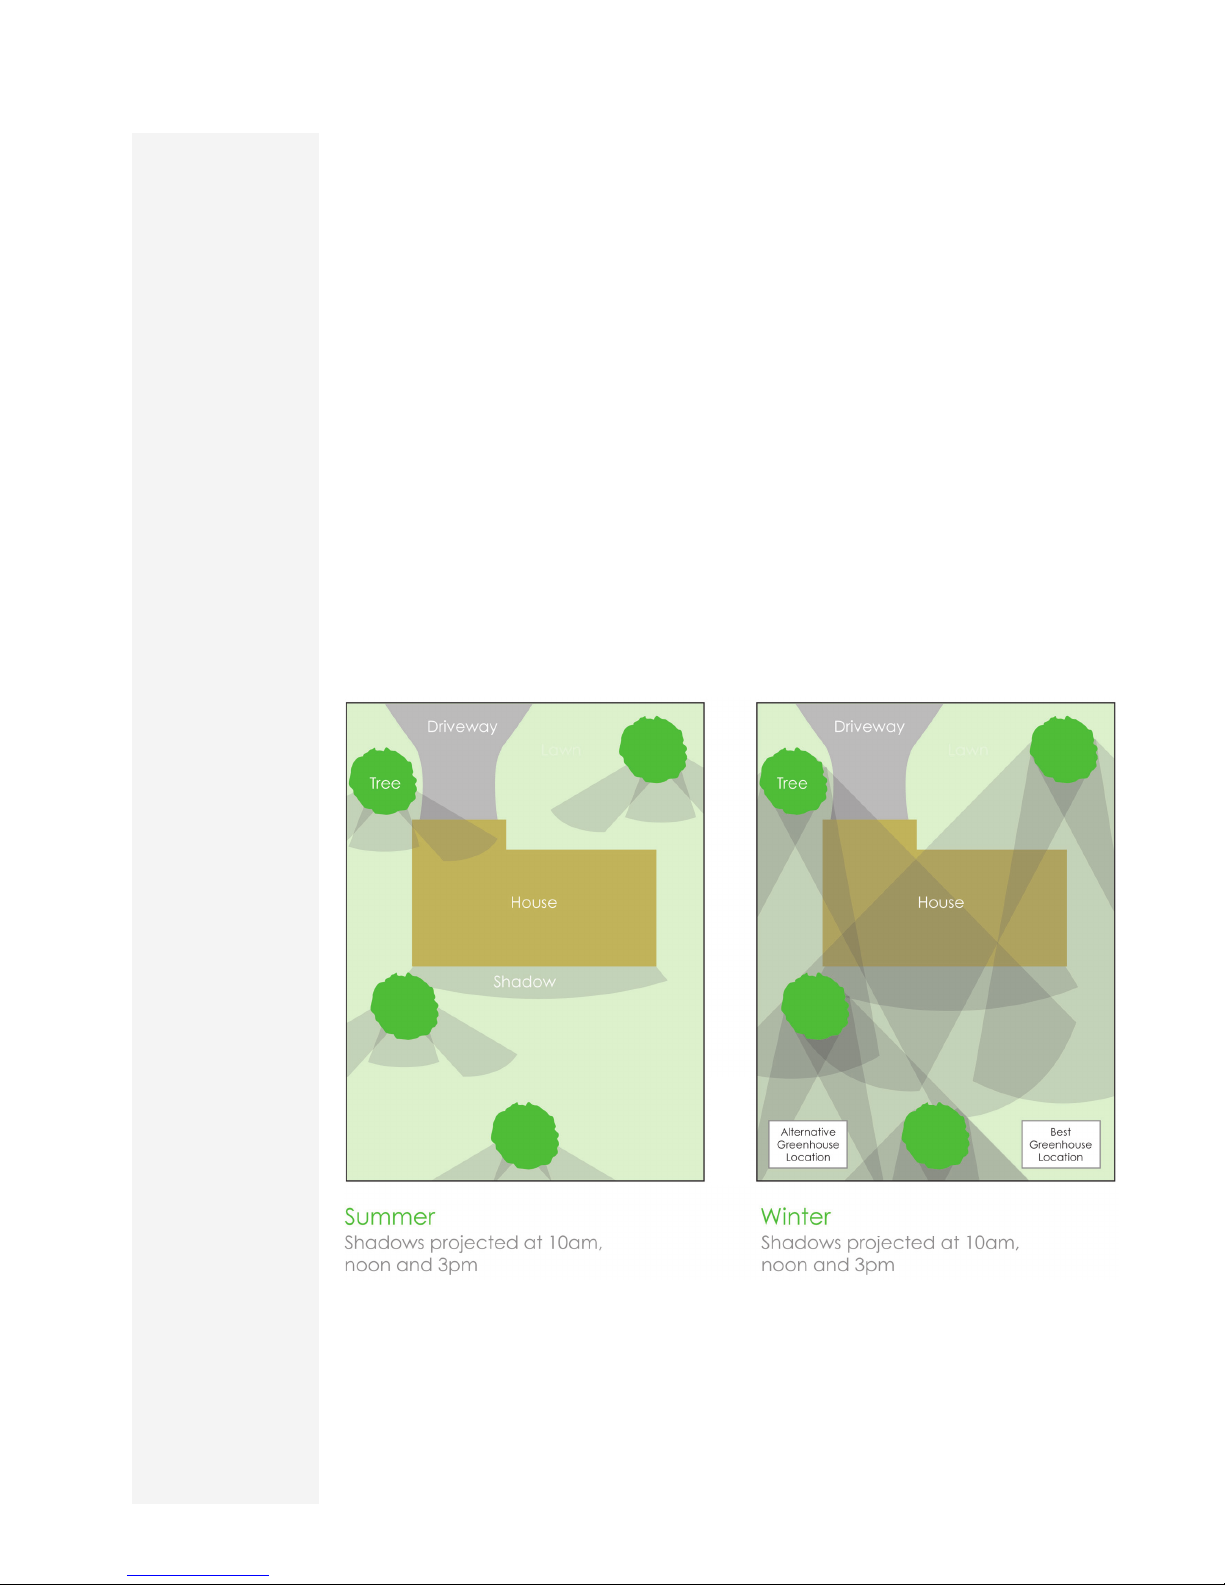
areawesuggestthatyoupositionthisstructureinashelteredlocationthatwillprovide
protectionfrompotentiallydamagingweatherconditions.TheseGreenhousesarestrong
butnotindestructibleagainstnaturesextremeweatherconditions.
USEFUL TIPS
Choose a nice day and
don’t rush.
USEFUL TIPS
If you have a cordless
drill that ts a 10mm nut
(setter) socket then use it,
as it will make assembly
easier and faster.
As you work be careful
not to over-tighten the
nuts.
WinterGardenzGreenhouseModelNo.PG0812H
3

Getting started
WinterGardenzGreenhouseModelNo.PG0812H
4
USEFUL TIPS
Pre-windthenutsontothe
T-Headboltsacoupleof
turns,insertthemintotheir
assemblypositionandthen
useacordlessdrillwiththe
10mmnutsetter/socket(or
spanner)totightenthem.
Asyouworkbecarefulnot
toovertightenthenuts.
AbouttheT-headbolts.
WehavedevelopedtheT-headboltasourstandardfastenerforourrangeofGreenhouses
asitallowsyoutoconstructtheGreenhouseinarelativelyquickandsimplemanner,
withoutanyspecialisedtools.WhenusingtheT-headboltsstartbywindingthenuta
coupleofturnsontotheT-headbolt,theninserttheheadoftheT-headboltintothe
aluminumchannel.Placetheappropriatebrackets,bracesorpartsintopositionandtighten
thenuttosecure.Asyoutightenthenuttheheadwillrotateclockwiseinthechanneland
secureitselfagainsttheinnerwallofthealuminumextrusion.Itisimportantnottoover-
tightentheseboltsastheyareseatedinthealuminumchannel,andcanpull-through
causing damage.
Pre wind nut onto
T-headboltacouple
ofturns
Insert bolt into
channel
Assemble parts into position,
thentightennut.
Abouttheglazing
Thissetofinstructionsiscommontoourrangeofpolycarbonateglazedgreenhouses,
glasshousesandshadehouses.Theframeandassemblymethodarethesameamong
thesethreedierentstructures,itisjusttheglazingpanelsthatdier.Whenworkingthrough
theassemblymanualyouwilloftenseeimagesdisplayingpolycarbonateintheframe.This
isusedasanexampleonly,asyoumightbeusingshade-meshorglassinplaceofthe
polycarbonate.
T
E
M
P
E
R
E
D
S
A
F
E
T
Y
G
L
A
S
S
AMERICAN GLASS
MADE TO ASTM
C-1036 & ASTM C-1048
STANDARD
SPECIFICATIONS
6mm Twinwall
Lexan 10 year+
Polycarbonate
4mm Tempered
SafetyGlass
Expanded
AluminumShade/
ScreenMesh

Getting started
WinterGardenzGreenhouseModelNo.PG0812H
5
Aboutthelocators
WhenassemblingthefrontandrearendwallsoftheGreenhouse,noticethatyouwillbe
requiredtousetheL507XroofanglelocatorandL509Xwallanglelocator.Theseare
usedforsettingthecorrectspacingandalignmentofthewallandroofpartsduringthe
assemblyprocess.Theyareusedtemporarilyasaguide/toolandarenotrequiredonce
yourGreenhouseiscompleted.Whenusingtheselocators,particularlytheL509X,please
ensurethatyouusethemuptherightway,otherwiseyouwillencounterproblemsfurther
downthetrack(iegutternotttingcorrectly).
L507X
L509X
Ifsomethingdoesn’tseemright?
Everythingshouldt,butifforsomereasonitdoesn’t,takeabreakandhaveathinkabout
itandreadthroughtheassemblyinstructionsagainthoroughly.Oftentheproblemisdue
tomisinterpretationoftheinstructions.Ensureyouhavethecorrectparts,inthecorrect
orientation.Ifitstilldoesn’tseemrightpleasefeelfreetogiveusacall.
Spare parts
IfyoudamageapartofyourGreenhousepleasefeelfreetocontactusforreplacement
parts.
38
Correct way up Wrongwayup
(upside down)
Table of contents
Popular Greenhouse Kit manuals by other brands

Vitavia
Vitavia GAIA JUMBO Assembly instructions

Palram
Palram Harmony 6'x4' Assembly instructions

ClearSpan
ClearSpan Storage Master 104598 instruction manual

Sproutwell
Sproutwell GRANGE - 5 Assembly instructions

STC
STC Easy Grow 6x12 Greenhouse Assembly instructions

Growhouse
Growhouse Lean To 6 x 8 Erection and Glazing Instructions