wiREVO D1000V User manual

http://www.wirevo.com
Printed in Korea
Wireless Revolution

PAIRING & CONNECTING
Pairing a Bluetooth Dongle is easier than you think!
First read this quick guide instruction for pairing.
Please refer to User Manual for more detail instructions.
You can also visit http://www.wirevo.com
Blue & Red flash
in turn with one another
Turn ON with pressing
Menu ( ) button
Turn ON with pressing
Talk ( ) button
Blue & Red flash
in turn with one another
STOP
Blue flash per 6 seconds Blue flash per 6 seconds
Put them
close


Table of Contents
Introduction
Guidelines for your safety
Before Using
1. What’s in the box?
2. Features at a glance
3. Usage cases
4. Charging
5. Turning the dongle ON/OFF
6. Indicator Light
Pairing/Connecting
1. Paring & Connecting the dongle with a Bluetooth headset
2. Connecting to the latest connected Bluetooth headset
3. How to change the passkey
Using the dongle
Mode Setting
Analog audio + Internet chatting mode
Analog audio mode
USB audio mode
Specification & Certifications
07
08
09
09
09
09
10
11
11
12
12
13
13
14
14
14
17
18
19

7
Introduction
Limited Liability
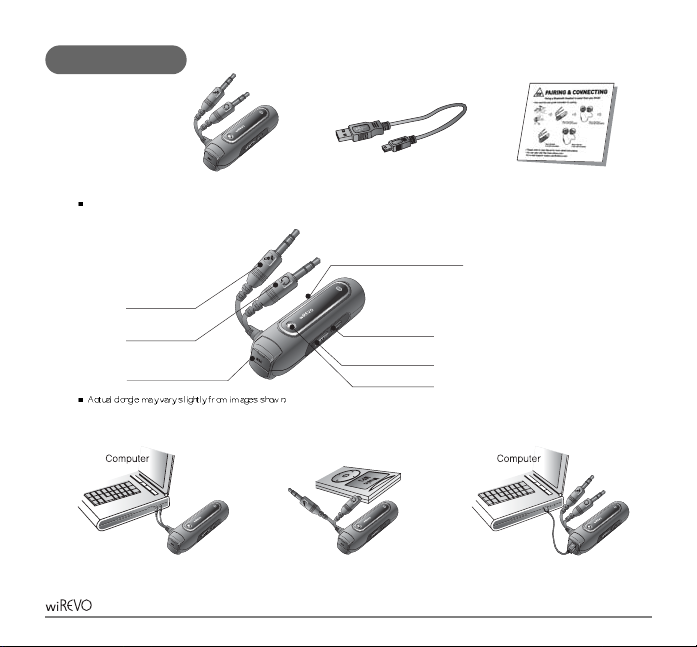
wiREVO Dongle series will turn your old-fashioned audio players to state-of-the-art ones. The Bluetooth stereo function can be enabled by just
plugging wiREVO D1000V into the audio jack of your audio players- MP3 player, CD player, Walkman, Computer, PDA, TV, Audio system etc.-.
Moreover, you can use Internet chatting programs – Skype, MSN Voice messenger, Yahoo messenger etc.- by plugging it into the audio jack and
microphone jack of your computer.
The main functions of wiREVO D1000V are as follows;
Wireless stereo source (A2DP Source)
Wireless remote control (AVRCP Target)
Wireless hands-free (HSP)
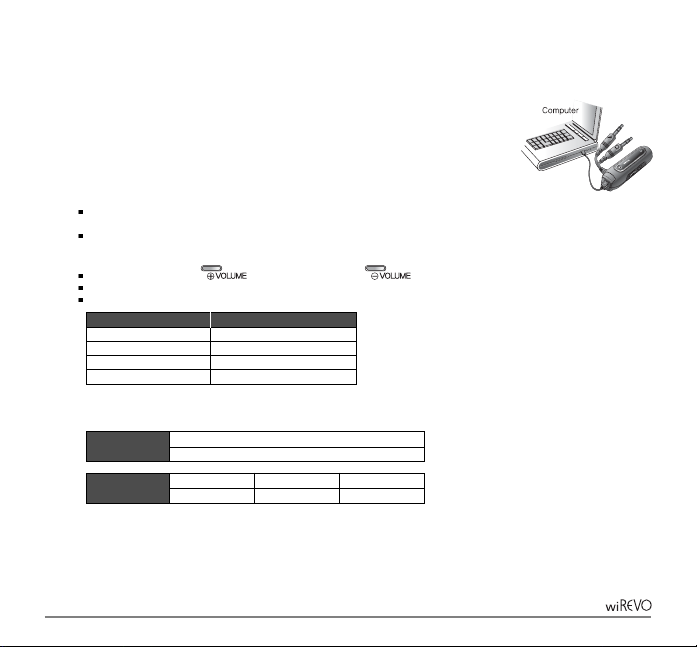
Supports Analog audio + Internet chatting mode, Analog audio mode and USB audio mode
Can change passkey (PIN code)
Can adjust volume level of D1000V (in the analog audio mode)
Read this user manual carefully before using the dongle.
Bluetooth Wireless Technology
wiREVO D1000V is specially designed for any compatible Bluetooth devices that support the following profiles. (Profile is a set of Bluetooth
commands that the devices use to control the dongle)
Advanced Audio Distribution profile (A2DP)
Audio Video Remote Control profile (AVRCP)
Headset profile (HSP)
The Bluetooth technology makes it possible to connect compatible communication devices without using cables. The Bluetooth connection does not
require that your Bluetooth headset and the dongle are in line of sight, but both devices should be 10 meters of each other, although the connection
can be subject to interference from obstructions such as walls or other electronic devices.
wiREVO D1000V is compliant with and adopts the Bluetooth Specification 2.0. For more information on the compatibility between wiREVO D1000V
with other Bluetooth-enabled products, please check with your dealer.
wiREVO D1000V has a perfect compatibility with wiREVO stereo headset series.
The manufacturer, importers, and the dealers are not responsible for any accidental damages; including bodily injury or any damage resulting from
misuse or unsuitable operation by a user. The information on this manual is prepared with the current stereo headset specifications. The manufacturer
is adding new features to the product and may persistently apply new technologies hereafter. All standards may be changed at any time without
notice.

8
Guidelines for your safety
Before use, read the warnings and other information in this manual.
Please check for any information on RF exposure in usage of a dongle. When your dongle is turned on, it transmits and receives radio frequency
electromagnetic fields in the frequency range 2.402 ~ 2.480 GHz.
Your dongle is designed to operate in compliance with the RF exposure guidelines and limits that are set by national authorities and international
health agencies when used with any compatible devices.
[Dongle]
Keep the dongle dry. Humidity and all types of liquids or moisture can cause harmful interface with electronic circuits.
Do not place heavy object on the device.
Do not use harsh chemicals, cleaning solvents, water or strong detergents to clean the dongle. To clean external surfaces, use a clean dampened
cloth.
Do not use excessive force on the buttons or attempt to disassemble the device.
Do not drop or subject the device to impact.
Do not paint the dongle. Paint can clog the moving parts and prevent proper operation.
Keep the dongle away from strong magnets.
Do not disassemble or modify.
Do not dry the dongle with heater or microwave.
Keep all accessories out of the reach of small children.
[Battery]
Your dongle is equipped with a high-performance Lithium battery. Observe the maintenance guidelines and your battery should give you a long
service life.
To charge, use USB cable only provided and approved by the manufacturer.
Before using the device for the first time, charge it fully.
Do not leave the device as it is turned on when you do not use it. It may cause harmful damage to the battery.
The batteries are consumables and will eventually wear out.
Avoid charging in strong heat or extreme cold. Ambient room temperature is preferable. The battery has its optimum performance at an ambient
temperature (+5 ºC to +50 ºC).

9
Before Using
1. What’s in the box?
2. Features at a glance
3. Usage cases
wiREVO D1000V
Analog audio +Internet charting mode Analog audio mode USB audio mode
Microphone Jack
Audio Jack
USB cable User manual
The contents are subject to change without notice and may vary from image shown.
USB Charging Connector
Volume Up button
Volume Down button
Menu button
ON/OFF Switch
Indicator Light

10
4. Charging
Before using the dongle for the first time, make sure the dongle is fully charged.
Connect the USB cable to the dongle and the indicator light will be purple.
[Charging]
When the battery is fully charged, the blue indicator light will turn on if power is off, or the indicator light will
display normal operation if power is on.
[Low battery indication]
When the battery needs to be recharged, the red indicator light flashes three times every 10 seconds. While charging, the purple indicator light
will be steady on.
As soon as you detect the low battery you should charge the dongle.
[Check battery level]
Press and hold Volume Up ( ) button and Volume Down ( ) button together.
The red indicator light flashes from 1 to 4 times according to the remaining battery amount.
The more it flashes, the more the battery is remained.
[Charging & operation time]
Low battery warning
Flashes once
Flashes twice
Flashes three times
Flashes four times
Approx. under 5% charged
Approx. 5~20% charged
Approx. 20~50% charged
Approx. 50~80% charged
Approx. 80~100% charged
Charging Time With USB cable
2.5 hrs
Operation Time Standby Time
120 hrs
Talk Time
11 hrs
Play Time
8 hrs

11
6. Indicator Light
Power On as Analog audio + Internet chatting mode or as
Analog audio mode
Power On as USB audio mode
On pairing state [Pairing mode]
On connecting state [Connecting mode]
On connected state [Connected mode / Audio status ]
When waiting for connection from the peer Bluetooth device
[Connectable mode]
While talking
While charging
Charging is completed
Blue & Purple flash in turn with one another 3 times
Red & Purple flash in turn with one another 3 times
Blue & Red flash in turn with one another
Blue flashes per 1 second
Blue flashes per 6 seconds
Blue flashes per 3 seconds
Purple flashes per 3 seconds
Solid purple indicator light is on
Blue indicator light is on (when it’s off) or normal operation
(when it’s on)
Indicator light status
5. Turning the dongle ON/OFF
To turn on the dongle, push the ON/OFF
Switch ( ) to the direction for ‘ON’.
To turn off the dongle, push the ON/OFF
Switch ( ) to the direction for ‘OFF’.

12
You need to pair the dongle with the Bluetooth headset that you intend to use it with. This process is to set-up a unique wireless link between
two devices.
Once you have paired your dongle with the Bluetooth headset, you don’t need to pair it again. Once it is paired with a Bluetooth headset, it will
try to connect to the Bluetooth headset when you turn it on.
[When you use the dongle for the first time]
It’s better to try to pair your dongle with the Bluetooth headset close-by.
1. If the dongle is turned on for the first time, it will automatically be ready for pairing. In this case, the blue and red indicator lights flash in turn
with one another. [Pairing mode]
2. Prepare your Bluetooth headset according to its user manual on pairing.
3. The dongle and stereo headset will be paired and connected automatically.
4. When pairing and connecting have been completed successfully, the blue indicator light will flash per 6 seconds. [Connected mode]
[When you want to use it with another Bluetooth headset]
When you want to use your dongle with another Bluetooth headset that isn’t the device that you paired your dongle with, you need to pair it
again.
1. Switch ON ( ) with pressing and holding Menu ( ) button. In this case, the blue and red indicator lights flash in turn with one
another if it is ready to be paired. [Pairing mode]
2. The following steps are the same with [When you use the dongle for the first time].
The default passkey of the dongle is [0000].
To change the passkey according to your stereo headset’s one, follow the 3. How to change the passkey section.
Pairing/Connecting
1. Paring & Connecting the dongle with a Bluetooth headset
In Pairing mode, if it’s not paired for 1 minute, the indicator light will be off. In that case, you need to turn it off and turn it on to try pairing &
connecting from the first step.
When connecting is failed, the blue indicator light will flash per 3 seconds. [Connectable mode] In this mode, the dongle is ready to accept
connection from the latest connected Bluetooth headset so you may try to make connection from the stereo headset or you may turn it off
and turn it on to try pairing & connecting from the first step,.
If pairing or connecting is failed, check whether the peer Bluetooth device supports A2DP and its passkey is correct.

13
2. Connecting to the latest connected Bluetooth headset
1. Switch ON ( ) and the dongle will try to connect to the latest connected Bluetooth headset and the blue indicator light will flash per 1
second. [Connecting mode]
2. When connecting has been completed successfully, the blue indicator light will flash per 6 seconds.
3. When connecting is failed, the blue indicator light will flash per 3 seconds. [Connectable mode] In this case, you may try to make connection
from the stereo headset.
3. How to change the passkey
1. Press and hold Menu ( ) button when it’s not connected to any Bluetooth headset.
2. Purple indicator light will blink once and the indicator light will be off.
3. You need to input new 4 digits.
4. To input the number, press Volume Down ( ) button as many as the number.
You can see a blue indicator light blink whenever you press Volume Down ( ) button.
5. To input the next digit, press Volume Up ( ) button. You can see a red indicator light blink.
6. If you press Volume Up ( ) button after inputting the 4th digit, the new passkey is set and saved with two purple blinks.
[Example]
Passkey = 0000
#### # : Icon for Volume Up button
Passkey = 1234
# # # # : Icon for Volume Down ( ) button
# : Icon for Volume Up ( ) button
To input ‘0’, just press Volume Up ( ) button to go to the next digit.
In this case, you don’t have to press Volume Down( ) button.
To cancel changing the passkey, press and hold Menu ( ) button, then purple indicator light will blink twice.

14
Using the dongle
Mode Setting
Analog audio + Internet chatting mode
Pairing Mode
Analog audio +Internet chatting mode
Analog audio mode
USB audio mode
ON+Menu
ON+Vol(-)+Vol(+)
ON+Vol(-)
ON+Vol(-)+Menu
Summary
Power ON Menu button Volume Down button Volume Up button
To listen to music, you should use a Bluetooth stereo headset with the dongle.
Just for using the wireless internet chatting, you can use a Bluetooth mono headset.
: Factory default mode
This function is for wireless calling via the Internet chatting programs such as Skype, MSN voice messenger, Yahoo messenger, etc in your
computer.
Plug the dongle into the audio jack and microphone jack of a computer.
You need to control the Internet chatting programs using your mouse first like when you use a wired headset.
In this mode, you can remote control Play/Pause for music.
1. How to set
1. Switch ON ( ) with pressing and holding Volume Down ( ) button and Volume Up ( ) button together until the
first indicator light is on.
2. When the dongle is turned on as this mode, blue and purple indicator lights flash in turn with one another 3 times before going to the normal
state.
3. The dongle will keep this mode if you don’t change it to another mode.

15
2. Make/Answer call
[Making a call]
Input the phone number in the internet chatting program of your computer and click the call button.
Press Talk button of the headset. The purple indicator light will flash every 3 seconds. [Talking status]
[Ending a call]
Click the end button of the internet chatting program.
Press Talk button of the headset. The blue indicator light will flash every 6 seconds. [Audio status]
Even in case that the other side hangs up the call, you should press Talk button of the headset.
[Answering a call]
After hearing a ring ton, click the call button of the internet chatting program.
Press Talk button of the headset. The purple indicator light will flash every 3 seconds. [Talking status]
Making a call
In the contacts tap, locate and click the contact who you want to make a call.
Click green ‘Call’ button to start the call.
Press Talk button of the stereo headset.
Answering a call
When you hear a ring ton, click green ‘Call’ button to start the call.
Press Talk button of the stereo headset
Ending a call
Click red ‘End call’ button.
Press Talk button of the stereo headset.
Regardless of the status of the internet chatting program in a computer, the dongle just operates doing a call (making/answering) and
hanging up a call in turn with one another according to the pressing a Talk button of a headset because the dongle cannot detect the
current status of the program. You need to be cautious of using it. Check the flash of purple indicator light.
SKYPE Call

16
Making a call
Initiate a call.
- In the main Windows Live Messenger window, click ‘Actions’, point to ‘Call’, and then click one of the following:
- Call a contact's computer. Select the contact you want to call or type an e-mail address in the box at the bottom of the window, and
then click ‘OK’ button. Your call invitation will be sent, and your contact's computer will ring.
- Call a contact's phone. Select the contact you want to call or type a phone number in the box at the bottom of the window, and then
click ‘OK’ button. The phone dialer will appear with the contact's phone number already entered, and your contact's phone will ring.
- Call a phone. When the phone dialer appears, enter the number you want to call and then click ‘Call’ button.
Press Talk button of the stereo headset.
Ending a call
Click ‘Hang up’ to end the call.
Press Talk button of the stereo headset.
Answering a call
When you find the ringing message, click ‘Answer’.
Press Talk button of the stereo headset.
Making a call
Initiate a call in a Yahoo Messenger program.
- Begin typing the person's name in the Contact Search Bar. If the name is in your Messenger List, Messenger displays the full name
and communication options. Select ‘Call Computer’ from the drop-down list.
- Click the Call computer button on a friend's contact card and select ‘Call Computer’ from the displayed menu.
- If you're already having an IM conversation with the contact you want to call, simply click the ‘Call’ button in your IM window.
Press Talk button of the stereo headset.
Ending a call
Click the ‘End Call’ button.
Press Talk button of the stereo headset.
Answering a call
When you hear a ring tone, click ‘Accept’ button.
Press Talk button of the stereo headset.
MSN Messenger call
Yahoo Messenger call

17
3. Play Music
Check the dongle is Audio status, not Talking status.
[Play/Pause music]
Press Play/Pause/Stop button of the stereo headset or press Menu ( ) button of the dongle.
1. How to set
1. Switch ON ( ) with pressing and holding Volume Down ( ) button until the first indicator light is on.
2. When the dongle is turned on as this mode, blue and purple indicator lights flash in turn with one another 3 times before going to the normal
state.
3. The dongle will keep this mode if you don’t change it to another mode.
[Volume control]
Press Volume Up ( ) button or Volume Down ( ) button to adjust the volume of the dongle while listening to music.
When it reaches the maximum or minimum volume level, purple indicator light flashes once.
You may need to adjust non-Bluetooth device’s - Computer, PDA, Mobile phone, etc. - volume level not to be saturated.
In this mode, if you have the music paused by operating as above, it makes the dongle paused, does not make the device, that the dongle
is plugged into, paused.
Analog audio mode
In this mode, you can connect your stereo headset to the dongle [Audio function] and to the Bluetooth mobile phone [Hands-free function] at the
same time.
In this mode, you can remote control Play/Pause for music.

18
When you plug the dongle into the USB port of a non-Bluetooth device for the first time, it will install USB Audio Device Drivers automatically
and additional USB Driver is not needed. Installed Audio Device’s name is “wiREVO Bluetooth Stereo Audio”. If it is not selected
automatically when plugged in, you may need to select the Audio device by manual.
When you do not listen to music, press and hold Menu ( ) button of the dongle or do STOP operation (press and hold Play/Pause/Stop
button) of the wiREVO stereo headset to save power consumption of both the dongle and the stereo headset.
USB audio mode
Plug the Bluetooth dongle into the USB port of a non-Bluetooth device using the USB cable supplied with the dongle.
Possible function:
- wireless stereo & wireless remote control (Play/Pause/Stop, Forward/Backward)
Cannot adjust volume level of the dongle. Adjust non-Bluetooth device’s volume level.
Can be charged while using.
Better audio quality compared to the Analog audio mode.
2. Volume control
1. Press Volume Up ( ) button or Volume Down ( ) button to adjust the volume of the dongle while listening to music.
2. When it reaches the maximum or minimum volume level, purple indicator light flashes once.
3. You may need to adjust non-Bluetooth device’s - Computer, PDA, Mobile phone, etc. - volume level not to be saturated.
1. How to set
1. Switch ON ( ) with pressing and holding Volume Down ( ) button and Menu ( ) button together until the first
indicator light is on.
2. When the Bluetooth dongle is turned on as USB audio mode, red and purple indicator lights flash in turn with one another 3 times before going
to the normal state.
3. The dongle will keep this mode if you don’t change it to another mode.

19
Specification & Certifications
Bluetooth Compliance
Frequency Range
Transmission output power
Maximum Cordless Distance
Dimension
Operating Temperature
Relative Humidity
Standby Time
Talk Time
Play Time
Charging Time
Battery Type
Bluetooth 2.0 with A2DP, AVRCP, HSP
2.402 ~ 2.480 GHz
0.25 ~ 2.5Mw
30 feet (10 meters)
0.7 x 2.4 x 0.7 inch
-10 ~ 50 °C
0 ~ 95%
Max. 120 hours
Max. 11 hours
Max. 8 hours
(USB cable) 2.5 hours
Rechargeable Lithium battery
- Standby time, Talk Time and Play time are dependent on the connected devices.
1. Specification
2. Certifications
The Bluetooth® word mark and logos are owned by the Bluetooth SIG, Inc. and any use of such marks by manufacturer is under
license. Other trademarks and trade names are those of their respective owners.
This These products are WEEE marked according to the provisions of the Directive 2002/96/EC. Dispose of the product according
to local standards and regulations.
These products are CE marked according to the provisions of the R&TTE Directive 1995/05/EC. These products are in compliance
with the essential requirements and other relevant provisions of Directive 1995/05/EC. For more information please consult
http://www.wirevo.com.
These devices comply with part 15 of the FCC Rules. Operation is subject to the following two conditions:
(1) These devices may not cause harmful interference, and (2) these devices must accept any interference received, including
interference that may cause undesired operation.

20
Thank You.
To receive sales literature and technical assistance, please contact the following address.
USA
Address: 2480N, First Street, Suite 100, San Jose, CA 95131-1030, USA
Visit our Web site at www.wirevo.com
Printed in Korea
Table of contents
Other wiREVO Headset manuals