Wolf E Series User manual

Guía de uso y mantenimiento
Guide d’utilisation et d’entretien
Guida all’uso e alla manutenzione
Bedienungs- und Pflegeanleitung
Gids voor gebruik en onderhoud
使用和维护指南
60 cm E Series Oven
Use and Care Guide

2 | English
Contents
3Safety Precautions
560 cm E Series Oven Features
5Oven Operation
9Care Recommendations
10 Troubleshooting
11 Wolf Warranty
60 cm Series Oven
Customer Care
The model and serial number are listed on the product
rating plate. Refer to page 5 for rating plate location. For
warranty purposes, you will also need the date of installa-
tion and name of your authorized Wolf dealer. Record this
information below for future reference.
If your product ever needs attention, be sure to use a Wolf
Factory Certified Service provider.
SERVICE INFORMATION
Model Number
Serial Number
Date of Installation
Certified Service Name
Certified Service Number
Authorized Dealer
Dealer Number
Important Note
To ensure this product is installed and operated as safely
and eciently as possible, take note of the following types
of highlighted information throughout this guide:
IMPORTANT NOTE highlights information that is especially
important.
CAUTION
Indicates a situation where minor injury or product
damage may occur if instructions are not followed.
WARNING
States a hazard that may cause serious injury or
death if precautions are not followed.

wolfappliance.com | 3
Safety Precautions
IMPORTANT SAFEGUARDS
When using electrical appliances, basic safety precautions should
always be followed including the following:
• Read this guide carefully before using this appliance to reduce
risk of fire, electric shock, or injury.
• This appliance must be properly installed and serviced by a
qualified installer or service agency and grounded by a quali-
fied technician.
• Do not touch hot surfaces. Use handles or knobs.
• Close supervision is necessary when any appliance is used by
or near children.
• Children should be supervised to ensure that they do not play
with the appliance.
WARNING
Accessible parts may become hot during use. Young children
should be kept away.
SAFETY PRECAUTIONS
This oven was built to achieve recognized standards in technol-
ogy and safety regulations and is designed for use in the home
for preparing food. It is not intended for use by persons with
reduced physical, sensory or mental capabilities, or lack of expe-
rience and knowledge, unless supervised or unless they have
been given instruction concerning the use of the appliance by a
person responsible for their safety. Proper use is essential to avoid
damage or accidents.
Installation and connection to power supply must be performed
by a qualified electrician in accordance with provided installation
instructions.
Before first use, please perform related duties as outlined in the
‘Prior To Use’ section.
Please retain this guide for future reference. If you sell the appli-
ance or pass it on to a third party, please ensure these instruc-
tions accompany the appliance, together with the instructions
on installation.

4 | English
IMPORTANT SAFEGUARDS
• This appliance can be used by children aged from 8 years and
above and persons with reduced physical, sensory or mental
capabilities or lack of experience and knowledge if they have
been given supervision or instruction concerning use of the
appliance in a safe way and understand the hazards involved.
Children shall not play with the appliance. Cleaning and user
maintenance shall not be made by children without supervision.
• Only use the temperature probe recommended for this oven.
• Do not use aluminum foil to line any part of this appliance.
• Be sure the oven cool air intake (located below the door) and
oven exhaust vent (located above the door) are unobstructed
at all times.
• When using the oven pan, position the tapered edge toward
the back of the cavity.
• When using the oven rack, position the extra cross strut toward
the back of the cavity.
WARNING
The appliance and its accessible parts become hot during
use. Care should be taken to avoid touching heating ele-
ments. Children less than 8 years of age shall be kept away
unless continuously supervised.
CAUTION
Before using self-clean, remove any excess spillage as well
as the broiler pan, oven racks, oven rack guides, and any
other utensils.
• During self-clean, surfaces may get hotter than during normal
operation. Children should be kept away during self-clean.
• Do not use harsh abrasive cleaners or sharp metal scrapers to
clean the oven door glass since they can scratch the surface,
which may result in shattering of the glass.
• Never use a steam cleaner to clean the appliance.
• Do not clean oven gasket; rubbing or moving the gasket may
compromise the door seal.
• Incorrect handling and use of accessories could cause
damage. Do not use knives or cutting wheels on the oven pan.
• Do not use appliance for other than intended use.
WARNING
Ensure the appliance is switched o before replacing the
lamp to avoid the possibility of electric shock.
SAVE THESE INSTRUCTIONS
Safety Precautions

wolfappliance.com | 5
60 cm Series Oven Features Oven Operation
Touchscreen
The touchscreen utilizes touch technology to select cook-
ing modes and other functions. Refer to the illustration
below.
To reposition modes, press and hold the mode on the
display, then move to the desired location.
NOTE: If an existing mode is in the desired location, it must
be moved first.
Getting Started
We know you are eager to start cooking, but before you
do, please take some time to read this use and care guide.
Whether you are an occasional cook or an expert chef, it
will be to your benefit to familiarize yourself with the safety
practices, features, operation, and care recommendations
of your Wolf E Series Oven.
To ensure the best results, review the cooking modes and
special features on page 8.
Prior to Use
Follow the steps below to ensure all residual oil from the
manufacturing process has been removed.
Prior to Use:
1 Clean the oven thoroughly with hot water and a mild
detergent.
2 Rinse and dry with a soft cloth.
3 Turn on ventilation. Some smoke and odor is normal.
4 Select the desired language, date, clock, temperature
units, and initiate the burn-in process. The burn-in
process takes approximately 30 minutes.
Home screen
Extended Options
Touch to access the extended options, then touch the
desired option.
SETTING OPTIONS
Language Select: English, Spanish, French, Italian,
German, Dutch, or Chinese.
Display Lock Lock touchscreen for cleaning.
Display Select brightness and standby screen.
Signals and Tones Select quiet mode, frequencies, touch
pad volume, and feedback tones.
Individual Settings Adjust temperature units.
Assistance Functions Select illumination and preheat tone.
Date and Clock Set date and select 12 hour or 24 hour.
Appliance Information Access product information.
Factory Settings Reset to factory settings.
Service For service only.
Setting Extended Options:
1 With the oven on, touch .
2 Touch the desired setting.
3 Follow the instructions on the display.
60 cm Series Oven Features
FEATURES
1Product Rating Plate
2Touchscreen
3All O Button
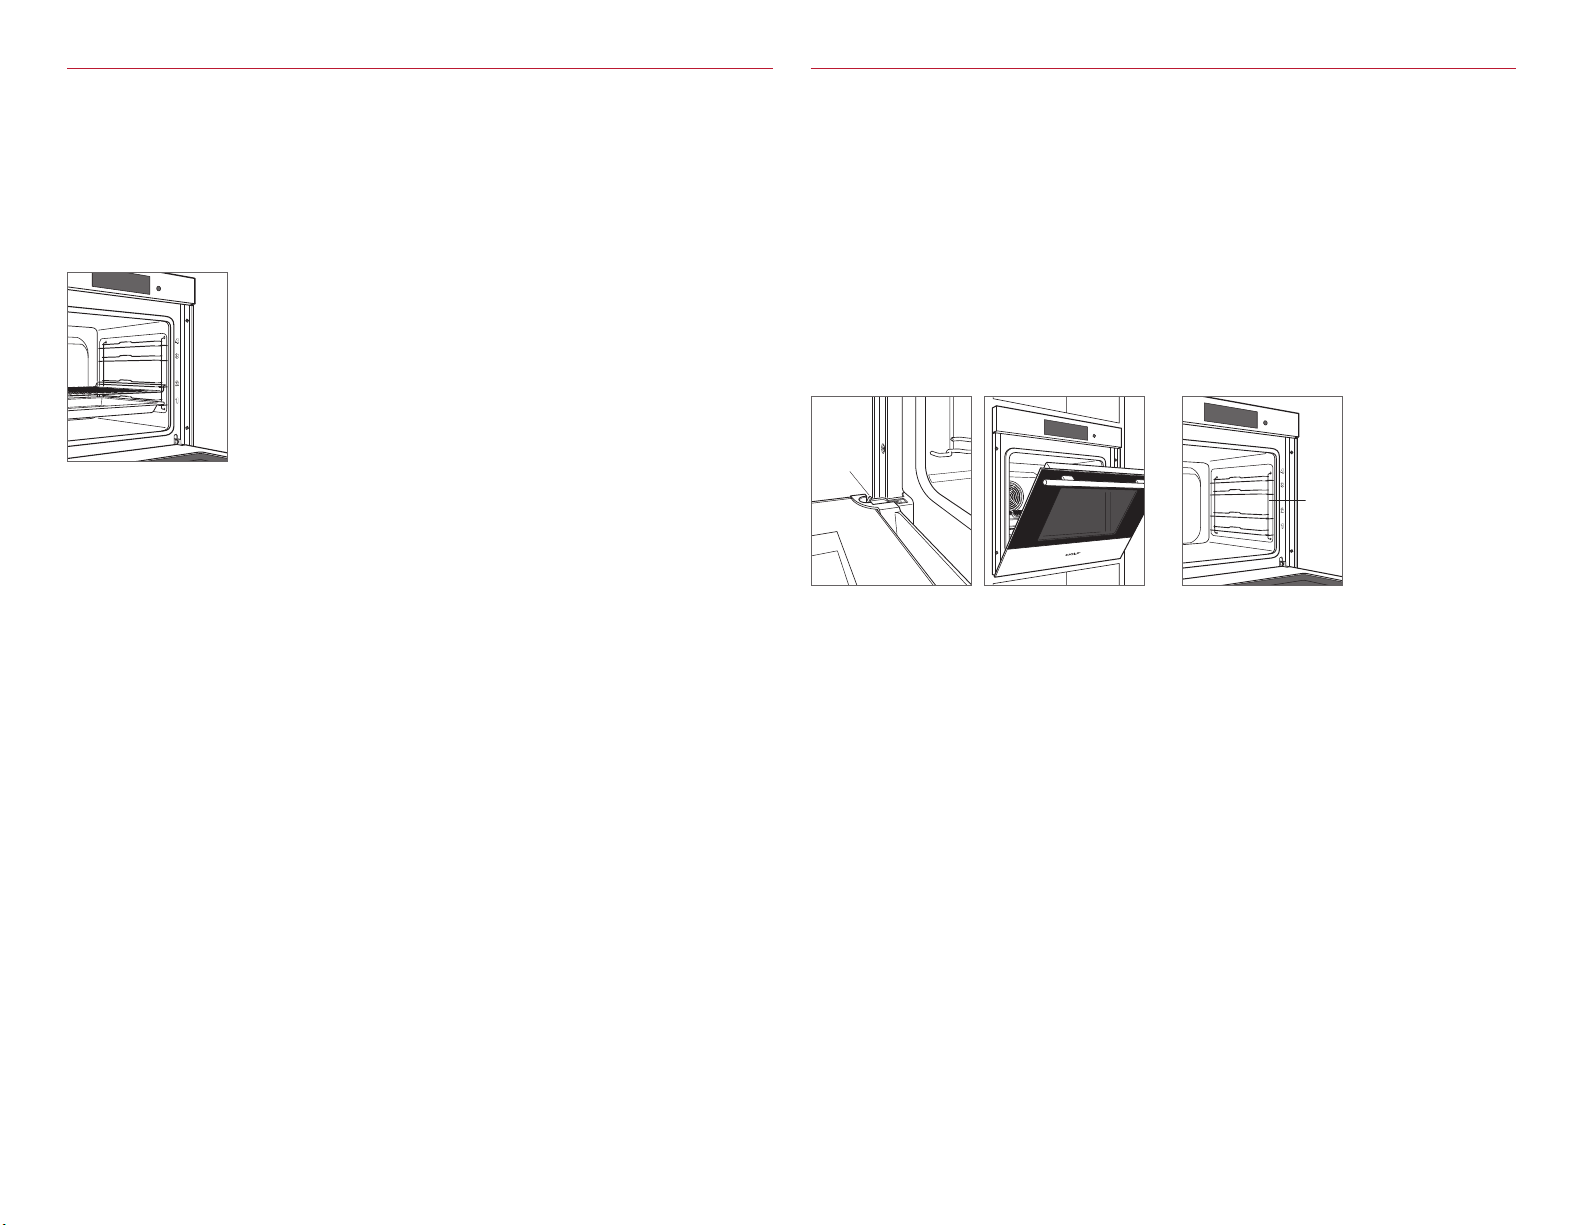
4Adjustable Oven Rack
5Adjustable Oven Pan
6Convection Fan
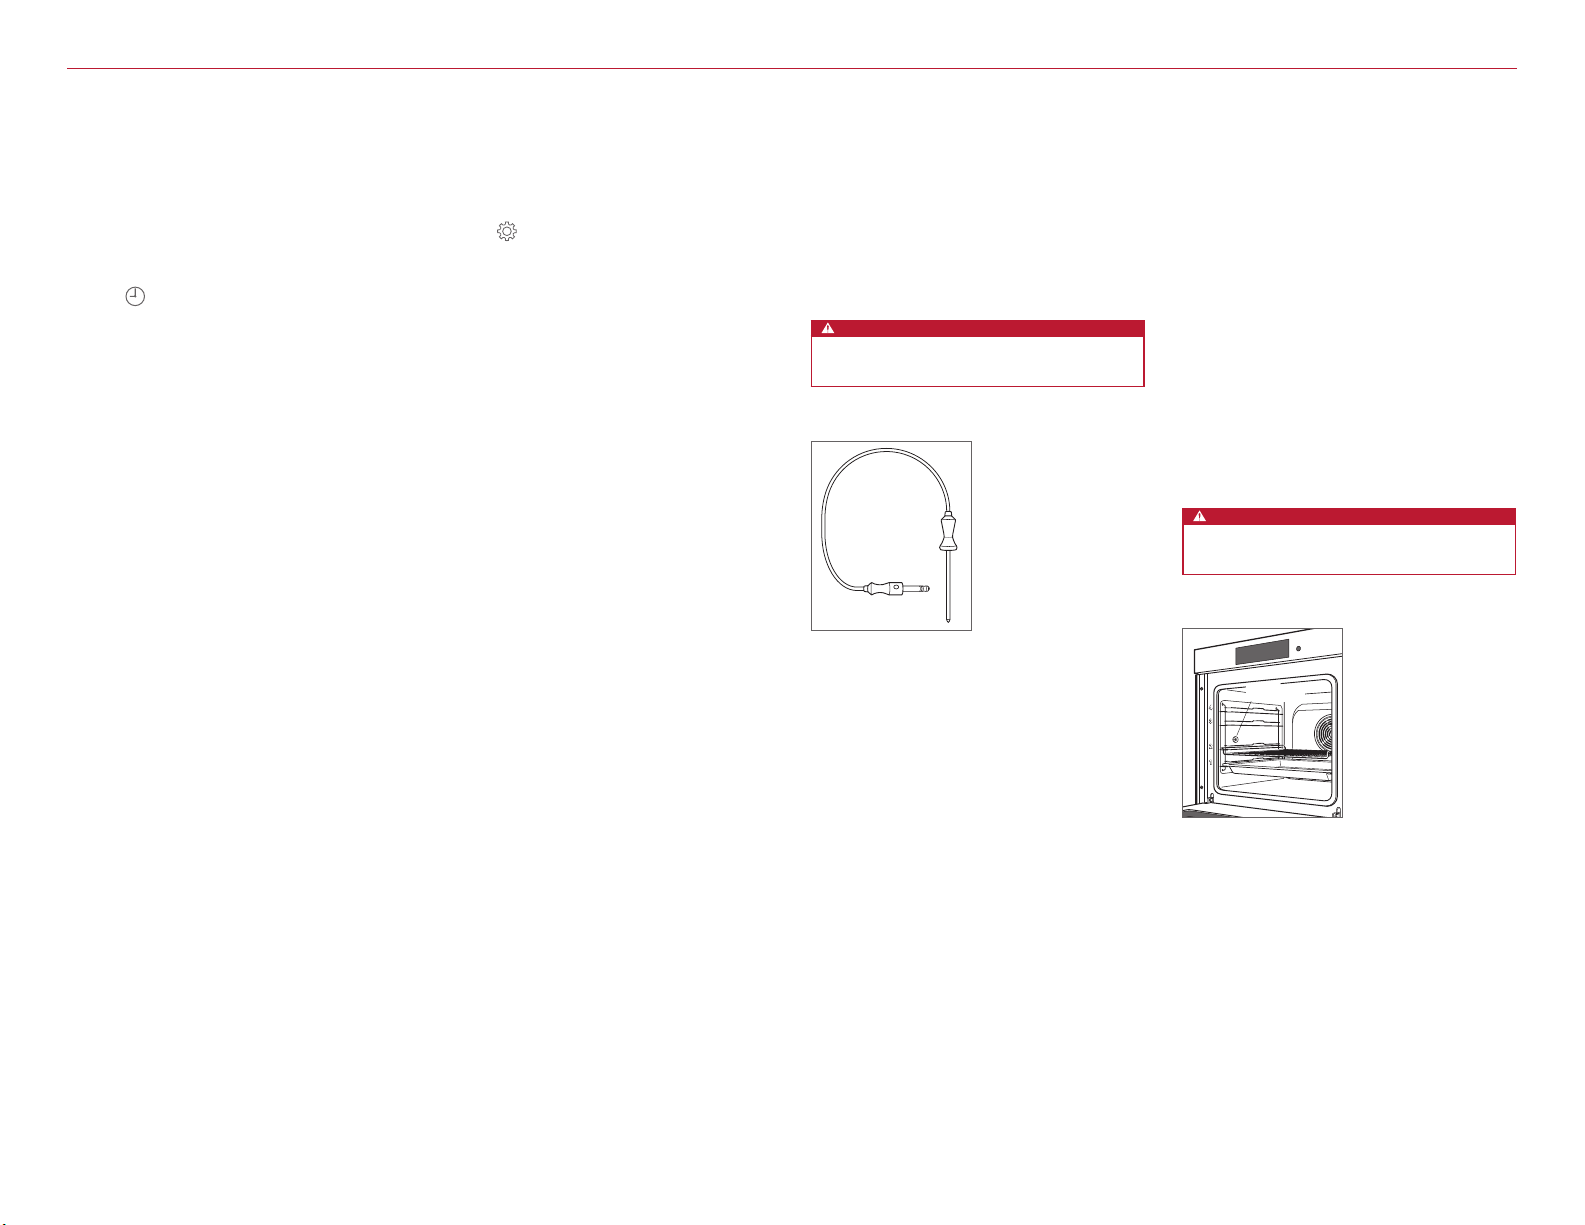
7Temperature Probe Receptacle
8LED Lighting
60 cm Series Oven
6
3
1
4
7
8
5
2

6 | English
Oven Operation
Options
Timed Cook: Set a timed cook or delayed start.
Preheat: Turn preheat on or o (not available on all modes).
Food Probe Temperature: Set food probe temperature.
DELAYED START
Delayed start automatically turns the oven on and o at
specified times. The oven remains idle until the desired
start time and turns o at the desired stop time. If preheat
is required, the preheat time must be accounted for when
determining the cooking duration. The clock must be set
to the correct time to function properly. Use in any cook-
ing mode except Warm.
Setting Controls:
1 Touch the desired mode, then enter the desired
temperature.
2 Touch Options.
3 Touch Timed Cook.
4 Enter the desired stop time and cooking duration,
then touch Set.
5 Touch Ok, then touch Start.
6 The oven turns o automatically when the cook time
is complete.
Auto Program
TIMED COOK
Timed Cook automatically turns the oven o at a specified
time. The oven begins to heat immediately and turns o
at the desired stop time. If preheat is required, the pre-
heat time must be accounted for when determining the
cooking duration. The clock must be set to the correct
time to function properly. Use in any cooking mode except
Gourmet+.
Setting Controls:
1 Touch the desired mode, then enter the desired
temperature.
2 Touch Options.
3 Touch Timed Cook.
4 Enter the desired cooking duration, then touch Set.
5 Touch Ok, then touch Start.
6 The oven turns o automatically when the cook time
is complete.
Cooking Modes
Selecting a Cooking Mode:
1 Select the desired cooking mode.
2 Touch the red box containing the current temperature
set point.
3 Use the number pad to input the desired temperature,
then touch Set. "---" appears for temperature outside of
the temperature range.
4 Touch Start.
FAVORITES
Commonly used cooking modes or foods can be saved for
easy access. Up to 50 favorites can be stored at a time.
Creating a Favorite:
1 Select the desired cooking mode and temperature.
2 Touch .
3 Use the keypad to enter a name.
4 Touch Set.

wolfappliance.com | 7
TEMPERATURE PROBE
Use only the black temperature probe shipped with this
appliance. Refer to the illustration below. The temperature
probe measures the internal temperature of food while
cooking. It can be used with all cooking modes except
Gourmet+ and Warm. When the temperature probe is
installed, the actual probe temperature will be displayed.
CAUTION
Use only the probe shipped with this oven. Do not
use a probe from any other appliance.
Setting controls:
1 Insert the probe into the thickest area of food.
2 Place food in the oven and insert the connector into
the receptacle. Refer to the illustration below.
3 Select the desired cooking mode.
4 Touch Enter.
5 Use the arrows to select Set Food Probe Temperature.
6 Touch Enter.
7 Use the arrows to select the desired probe temperature.
8 Touch Enter.
The probe set point appears on the display above the icon.
To adjust the probe temperature, select Set Food Probe
Temp, use the arrows to select the desired temperature,
then touch Enter.
CAUTION
The probe and probe receptacle will be very hot.
Handle with care.
Oven Operation
Temperature probe
SABBATH
Setting controls:
1 Touch .
2 Touch Individual Settings.
3 Touch Sabbath Mode.
4 Touch On or O.
When On, Sabbath Mode appears on the display. Select
between Sabbath Bake and Sabbath Bake Humid. The oven
will remain on for up to 78 hours while in Sabbath Mode.
Oven Operation
TIMER
The timer can be set for a maximum of 9 hours and 59
minutes. Once the timer is set, the countdown appears on
the display. The timer is independent from the oven.
Setting Timer:
1 Touch .
2 Touch the user input box.
3 Use the keypad to enter the desired time.
4 Touch Start.
5 Touch Stop to cancel the timer.
To adjust the timer, touch the countdown timer count-
down on the display. Enter the desired time, then touch
Start.
PROBE
RECEPTACLE
Probe receptacle

8 | English
Oven Operation
Cooking Modes
MODE ICON RANGE DESCRIPTION
Convection 30–280°C Evenly cooks and browns food while reducing cook time. Enables multi-
rack cooking.
Convection Humid 30–250°C Oven seals to retain moisture and uses convection. Ideal for quick breads
and casseroles.
Convection Bake 30–280°C The bake element cooks food while the convection fan circulates hot air
to brown and crisp.
Broil* Low, Medium, High Uses broil element to intensely sear and brown food.
Convection Broil 30–280°C Uses broil element and convection to sear, brown, and crisp.
Bake 30–280°C Cooking space is heated by top and bottom elements. Standard operating
mode for cooking and baking on a single rack.
Bake Humid 30–250°C Uses bake and broil elements. Oven seals to retain moisture. For quick
breads and casseroles.
Slow Cook Low, Medium, High Uses the bake element to create slow cooker results. Best when used with
heavy-bottomed cookware.
Gourmet –Provides recommendations for cooking mode and rack position for select
foods. Temperature and cook time are dependent on desired doneness.
Gourmet+ –Optimizes cook time, temperature, and humidity throughout the cooking
cycle to automatically cook select foods.
Slow Roast †Automatically roasts food, optimizing to selected doneness and desired
completion time.
Warm 60–100°C Uses convection to hold food at an ideal serving temperature.
Clean Light, Medium, Heavy For routine oven cleaning.
*Allow to preheat for three minutes. †Probe required. Cook time and temperature adjust automatically to achieve desired doneness.
GOURMET
Use Gourmet and Gourmet+ to prepare any of the foods
listed below, fresh or refrigerated. Select the food and
desired doneness, and the sensor adjusts time, tempera-
ture, and humidity so no baking instructions are required.
FOOD
Baked Dishes and Gratins
Bakery Products
Fish and Seafood
Fruit and Berries
Meat
Poultry
Sides
Vegetables
Setting Gourmet:
1 Touch .
2 Touch the desired food.
3 Follow the instructions on the display.
4 Touch Set.
5 The required mode settings appear on the screen.
Touch Start.
GOURMET+
FOOD
Fresh Appetizers
Braided Bread
Bread
Gratin
Pie
Fresh Pizza
Setting Gourmet+:
1 Touch .
2 Touch the desired food.
3 Follow the instructions on the display.
4 Touch Set.
5 The required mode settings appear on the screen.
Touch Start.

wolfappliance.com | 9
RACK GUIDE REMOVAL
To remove rack guides, push the top of the rack guide
towards the rear of the oven cavity. Tip the top of the
guide in towards the center of the oven and lift the bottom
posts of the guide out of the positioning holes.
To reinstall, insert the bottom posts into the positioning
holes and tip the rack guide up into position. Gently pull
the guide forward until it engages the top holes. Refer to
the illustration below.
Care Recommendations
OVEN DOOR REMOVAL
The oven door can be removed for a thorough cleaning.
To remove, open the oven door completely. Rotate both
hinge latches forward to the open position. Close the door
to approximately 30° open, then lift up and out. Refer to
the illustrations below.
To reinstall, insert door hinges into the frame openings.
Open the oven door completely and rotate both hinge
latches back to the closed position.
Care RecommendationsOven Operation
Clean
During Clean, the oven is heated to an extremely high
temperature to burn o food soil. Remove the oven rack,
oven pan and rack guides. They will discolor if left in during
Clean.
The duration of the Clean cycle can be adjusted for the
level of cooking residue. For light soil, the duration of the
cleaning cycle is 1.5 hours and 2 hours for heavy soil. The
complete cycle can take up to 5 hours including cool
down.
Setting Clean:
1 Touch Settings.
2 Select Clean and touch Enter.
3 Use the arrows to select the desired level of cleaning,
then touch Enter. The door locks automatically once
the cycle begins.
The unit starts 20 seconds after the last key touch. To
start the mode immediately, use the arrows to select Start
Operation, then touch Enter.
Setting Delayed Start Clean:
1 Touch Settings.
2 Select Clean and touch Enter.
3 Use the arrows to select the desired level of cleaning,
then touch Enter.
4 Select Set End and touch Enter.
5 Use the arrows to select desired switch-o time, then
touch Enter.
To cancel Clean mode at any time, touch O. The oven
door locks and remains locked until the Clean cycle is
complete and the oven temperature has cooled below
300°C.
Oven Rack Position
The oven rack and oven pan can be placed in any of the
four positions labeled on the front face of the oven. Refer
to the illustration below.
RACK
GUIDE
Rack guide removal
Oven rack position
CLOSED
POSITION
Oven door hinge latch
Door open 30°

10 | English
TroubleshootingCare Recommendations
SERVICE
• Maintain the quality built into your product by contact-
ing Wolf Factory Certified Service.
• When contacting service, you will need the model and
serial number of your product. Both numbers are listed
on the product rating plate. Refer to page 5 for rating
plate location.
• For warranty purposes, you will also need the date of
installation and name of your authorized Wolf dealer.
This information should be recorded on page 2.
SERVICE (FOR AUSTRALIA ONLY)
• Yearly maintenance is recommended.
• Maintain the quality built into your product by contact-
ing Wolf Factory Certified Service.
• When contacting service, you will need the model and
serial number of your product. Both numbers are listed
on the product rating plate. Refer to page 5 for rating
plate location.
• For warranty purposes, you will also need the date of
installation and name of your authorized Wolf dealer.
This information should be recorded on page 2.
• For Australia only, contact:
Sub-Zero Group Australia Pty Ltd
Level 10, 469 La Trobe Street
Melbourne Victoria 3000
Phone 03 9600 2218
subzero-wolf.com.au
SERVICE (FOR UNITED KINGDOM ONLY)
• Sub-Zero & Wolf Ltd
9 The Street, Heybridge, Maldon, Essex, CM9 4XB
020 8418 3800
www.subzero-wolf.co.uk
Troubleshooting
OPERATION
Oven does not operate.
• Verify power is on.
• Verify electrical power to the oven and home circuit
breaker is on.
Oven temperature issue.
• Contact Wolf Factory Certified Service.
Oven makes sounds during operation.
• The oven may emit switching sounds during operation.
Such sounds are normal.
Oven pans are dicult to remove.
• Some combinations of heat, moisture, and food place-
ment may cause oven pans to warp. Pans will return to
their original shape when cool.
Care Recommendations
CLEANING
Stainless steel Use a nonabrasive stainless steel cleaner and apply with a soft lint-free cloth. To bring out the natural
luster, lightly wipe the surface with a water-dampened microfiber cloth followed by a dry polishing
chamois. Always follow the grain of stainless steel.
Door front Spray glass cleaner on a cloth to clean.
Touchscreen Use a spray degreaser to remove fingerprints and food soil. Spray on a cloth before wiping the touch-
screen. Do not spray cleaners directly on the touchscreen.
Interior For light cleaning, remove any cooking debris while the oven is still warm using a soft cloth dampened
with water and a mild detergent. Wipe dry with a soft cloth.
Oven rack, rack guides,
and oven pan
Oven rack, rack guides, and stainless steel oven pan can be cleaned in the dishwasher.
Temperature probe Wipe with a cloth and water. Mild detergent may be used for tough stains. Do not submerge the probe in
water or clean in the dishwasher.

wolfappliance.com | 11
Wolf Appliance International Limited Warranty
FOR RESIDENTIAL USE
FULL TWO YEAR WARRANTY*
For two years from the date of original installation, this Wolf Appliance product warranty covers all parts and labor to repair or
replace, under normal residential use, any part of the product that proves to be defective in materials or workmanship. All service
provided by Wolf Appliance under the above warranty must be performed by Wolf Factory Certified Service, unless otherwise speci-
fied by Wolf Appliance, Inc. Service will be provided during normal business hours.
LIMITED FIVE YEAR WARRANTY
For five years from the date of original installation, Wolf Appliance will repair or replace the following parts that prove to be defective
in materials or workmanship: stainless steel briquette trays, gas valves, drip pans, electronic control boards and electric heating ele-
ments. If the owner uses Wolf Factory Certified Service, the service provider will repair or replace these parts with the owner paying
for all other costs, including labor. If the owner uses non-certified service, the owner must contact Wolf Appliance, Inc. (using the
information below) to receive repaired or replacement parts. Wolf Appliance will not reimburse the owner for parts purchased from
non-certified service or other sources.
For more information regarding your Wolf product warranty, contact your authorized Wolf dealer. Warranties must comply to all
country, state, city, local and or ordinance.
*Stainless steel (doors, panels, handles, product frames and interior surfaces) are covered by a limited 60-day parts and labor warranty
for cosmetic defects.
Warranty
Sub-Zero, Sub-Zero & Design, Sub-Zero & Snowflake Design, Dual Refrigeration, The Living Kitchen, Great American Kitchens The Fine Art of Kitchen Design, Wolf, Wolf &
Design, Wolf Gourmet, W & Design, red colored knobs, Cove, and Cove & Design are registered trademarks and service marks of Sub-Zero Group, Inc. and its subsidiaries.
All other trademarks are property of their respective owners in the United States and other countries.

2 | Español
Contenido
3Precauciones de seguridad
5Características del horno de la Serie E de 60 cm
5Funcionamiento del horno
9Recomendaciones de mantenimiento
10 Solución de problemas
11 Garantía de Wolf
Horno de la Serie de 60 cm
Atención al cliente
La información relativa al número de serie y el modelo se
muestra en la placa de datos del producto. Consulte la
página 5 para ver la ubicación de la placa de datos. Para
cuestiones relacionadas con la garantía, también necesita
saber la fecha de instalación y el nombre de su distribuidor
autorizado de Wolf. Guarde la siguiente información para
tenerla como referencia en el futuro.
Si alguna vez su producto necesita asistencia, asegúrese de
acudir a un servicio técnico autorizado de Wolf.
INFORMACIÓN DE SERVICIO
Número de modelo
Número de serie
Fecha de la instalación
Nombre del servicio
certificado
Número del servicio
certificado
Distribuidor autorizado
Número del distribuidor
Aviso importante
Para garantizar que este producto se instala y funciona de
la forma más eficaz y segura posible, tenga en cuenta la
información que se destaca en esta guía:
AVISO IMPORTANTE resalta información que es
especialmente importante.
PRECAUCIÓN
Indica una situación en la que se pueden sufrir
heridas leves o provocar daños al producto si no se
siguen las instrucciones especificadas.
ADVERTENCIA
Indica peligro de que se produzcan heridas personales
graves o incluso puede provocar la muerte si no se
siguen las precauciones especificadas.

wolfappliance.com | 3
Precauciones de seguridad
INSTRUCCIONES DE SEGURIDAD
IMPORTANTES
Cuando utilice aparatos eléctricos, siempre debe seguir ciertas
precauciones de seguridad básicas, entre las que se incluyen
las siguientes:
• Lea con detenimiento esta guía antes de utilizar el aparato para
reducir el riesgo de que se produzca un incendio, una descarga
eléctrica o de sufrir lesiones.
• Este aparato debe ser instalado y revisado de manera correcta
por un instalador cualificado o por una agencia de mantenimiento
y conectado a tierra por un técnico cualificado.
• No toque las superficies calientes. Utilice los tiradores o pomos.
• Es necesario realizar una estrecha supervisión cuando el aparato
sea utilizado por niños o cerca de ellos.
• Es obligatorio supervisar a los niños para asegurarse de que no
jueguen con el aparato.
ADVERTENCIA
Las zonas accesibles pueden calentarse durante su uso.
Debe mantener a los niños pequeños alejados del aparato.
PRECAUCIONES DE SEGURIDAD
Este horno ha sido diseñado para cumplir con estándares
reconocidos en las regulaciones sobre tecnología y seguridad,
y ha sido creado para que se utilice en el hogar en la preparación
de alimentos. No está indicado para que lo usen personas con
capacidades físicas, sensoriales o mentales reducidas o que
carezcan de experiencia o conocimiento, a menos que una persona
responsable de su seguridad los supervise o les haya dado
instrucciones sobre el uso del electrodoméstico. Es imprescindible
utilizarlo de la manera correcta para evitar que se produzcan
daños o accidentes.
La instalación y la conexión a un suministro eléctrico debe ser
realizada por un electricista cualificado siguiendo las instrucciones
de instalación que se proporcionan.
Antes del primer uso, realice las tareas relacionadas tal y como se
describe en la sección "Antes de su uso".
Guarde esta guía para consultarla en el futuro. Si vende el aparato
o se lo da a otra persona, asegúrese de que entrega estas
instrucciones junto con el aparato y junto con las instrucciones
de instalación.

4 | Español
INSTRUCCIONES DE SEGURIDAD
IMPORTANTES
• Este aparato puede ser utilizado por niños de más de ocho años
y personas con discapacidades físicas, sensoriales o mentales,
o con falta de experiencia o conocimientos, siempre y cuando
cuenten con supervisión o se les haya enseñado cómo utilizarlo
de forma segura y comprendan los peligros que implica. Los niños
no deben jugar con el aparato. Los niños no pueden realizar las
tareas de limpieza y mantenimiento sin supervisión.
• Utilice solamente el sensor de temperatura que se recomienda
para este horno.
• No utilice papel de aluminio para forrar ninguna parte de
este aparato.
• Asegúrese que la entrada de aire frío (situada encima de
la puerta) y la rejilla extractora del horno (situada debajo de
la puerta) no están nunca obstruidas.
• Cuando utilice la bandeja de hornear, coloque el borde más
fino hacia la parte trasera de la cavidad.
• Cuando utilice la rejilla del horno, coloque el extremo de
la cruz que sobresale hacia la parte trasera de la cavidad.
ADVERTENCIA
El aparato y sus zonas accesibles pueden calentarse durante
su uso. Tenga cuidado de no tocar los elementos caloríficos.
Mantenga alejados a los niños menores de ocho años, salvo que
estén bajo supervisión permanente.
PRECAUCIÓN
Antes de utilizar el modo de limpieza automática, limpie
cualquier posible derrame, y extraiga la bandeja para asar,
las rejillas y las guías de las rejillas y cualquier otro utensilio
que tenga dentro del horno.
• Durante la limpieza automática, las superficies pueden calentarse
más que durante el funcionamiento normal. Los niños deben
mantenerse alejados el tiempo que dure la limpieza automática.
• No utilice limpiadores abrasivos ni espátulas metálicas afiladas
para limpiar el cristal de la puerta del horno ya que pueden
rayar la superficie, lo que podría hacer que el cristal se rompiera.
• No utilice nunca un limpiador de vapor para limpiar el aparato.
• No limpie la junta del horno ya que al frotar o mover la junta,
el sellado hermético de la puerta puede quedar dañado.
• El incorrecto uso y manejo de los accesorios puede causar
daños. No use cuchillos o cortadores circulares en la bandeja
de hornear.
• No utilice el aparato para un uso diferente de aquel para el que
ha sido diseñado.
ADVERTENCIA
Asegúrese de que el electrodoméstico esté apagado antes de
sustituir la lámpara para evitar una posible descarga eléctrica.
GUARDE ESTAS INSTRUCCIONES
Precauciones de seguridad

wolfappliance.com | 5
Características del horno de la Serie de 60 cm Funcionamiento del horno
Pantalla táctil
La pantalla táctil utiliza tecnología táctil para seleccionar
los modos de cocción y otras funciones. Observe la
siguiente ilustración.
Para cambiar los modos, pulse y mantenga pulsado
el modo en la pantalla y, a continuación, muévalo a la
posición deseada.
NOTA: si un modo existente está en la posición deseada,
debe moverse primero.
Características del horno de la Serie
de 60 cm
CARACTERÍSTICAS
1Placa de datos del producto
2Pantalla táctil
3Botón todo apagado
4Rejillas ajustables del horno
5Bandeja ajustable del horno
6Ventilador de convección
7Receptáculo del sensor de temperatura
8Iluminación LED
Primeros pasos
Sabemos que está deseando empezar a cocinar, pero,
antes de hacerlo, debe leer esta guía de uso y manten-
imiento. Tanto si es un cocinero novato como si es un chef
experto, le resultará útil familiarizarse con las prácticas
de seguridad, las características, el funcionamiento y las
recomendaciones de mantenimiento del horno de la serie
E de Wolf.
Para obtener los mejores resultados revise los modos de
cocción y características especiales en la página 8.
Antes de su uso
Realice los siguientes pasos para garantizar que se ha elim-
inado todo el aceite residual del proceso de fabricación.
Antes de su uso:
1 Limpie el horno a fondo con agua caliente y
detergente suave.
2 Aclare y seque con un paño suave.
3 Encienda la ventilación. Es normal que aparezca un
poco de humo y olor.
4 Seleccione el idioma, la fecha, el reloj y las unidades de
temperatura deseados e inicie el proceso de quemado.
El proceso tarda aproximadamente 30 minutos en
llevarse a cabo.
Pantalla de inicio
Opciones avanzadas
Toque para acceder a las opciones avanzadas
y, a continuación, pulse la opción deseada.
OPCIONES DE CONFIGURACIÓN:
Idioma Seleccione: inglés, español, francés,
italiano, alemán, holandés o chino.
Bloqueo de pantalla Bloquee la pantalla para limpiarla.
Pantalla Seleccione el brillo y la pantalla
en espera.
Señales y tonos Seleccione el modo silencioso,
las frecuencias, el volumen del panel
táctil y los tonos de retroalimentación.
Ajustes individuales Ajuste las unidades de temperatura.
Funciones de
asistencia
Seleccione la iluminación y el tono de
precalentamiento.
Fecha y reloj Establezca la fecha y seleccione el reloj
de 12 o 24 horas.
Información
del aparato
Acceda a la información del producto
Configuración
de fábrica
Restablezca la configuración de fábrica.
Mantenimiento Solo para uso del servicio técnico.
Configurar las opciones avanzadas:
1 Con el horno encendido, pulse .
2 Pulse la configuración que desee.
3 Siga las instrucciones que aparecen en la pantalla.
Horno de la Serie de 60 cm
6
3
1
4
7
8
5
2

6 | Español
Funcionamiento del horno
Opciones
Cocción programada: establezca una cocción program-
ada o un inicio programable.
Precalentar: encienda o apague el precalentamiento
(no disponible en todos los modelos).
Temperatura del sensor de alimentos: ajuste la tempera-
tura del sensor de alimentos.
INICIO PROGRAMABLE
El inicio programable enciende y apaga el horno
automáticamente a una hora específica. El horno per-
manece inactivo hasta la hora de inicio deseada y se apaga
a la hora que usted desee. Si es necesario precalentar el
horno, deberá tener en cuenta el tiempo de precalenta-
miento al determinar la duración de la cocción. El reloj
debe configurarse a la hora correcta para que el inicio
programable funcione correctamente. Se puede usar en
cualquier modo de cocción excepto Calentar.
Configuración de los mandos:
1 Toque el modo deseado, luego introduzca la
temperatura deseada.
2 Pulse Opciones.
3 Pulse Cocción programada.
4 Introduzca el tiempo de apagado y la duración de coc-
ción deseados y, a continuación, pulse Configurar.
5 Pulse OK y, a continuación, Iniciar.
6 El horno se apaga automáticamente cuando se ha
completado el tiempo de cocción.
Programa automático
COCCIÓN PROGRAMADA
La cocción programada apaga automáticamente el horno
a una hora determinada. El horno empieza a calentarse
inmediatamente y se apaga a la hora que usted desee que
se apague. Si es necesario precalentar el horno, deberá
tener en cuenta el tiempo de precalentamiento al determi-
nar la duración de la cocción. El reloj debe configurarse a
la hora correcta para que el inicio programable funcione
correctamente. Se puede usar en cualquier modo de
cocción excepto Gourmet+.
Configuración de los mandos:
1 Toque el modo deseado, luego introduzca la
temperatura deseada.
2 Pulse Opciones.
3 Pulse Cocción programada.
4 Introduzca la duración de cocción deseada y, a
continuación, pulse Configurar.
5 Pulse OK y, a continuación, Iniciar.
6 El horno se apaga automáticamente cuando se ha
completado el tiempo de cocción.
Modos de cocción
Seleccionar un modo de cocción:
1 Seleccione el modo de cocción deseado.
2 Toque el cuadro rojo que muestra la temperatura actual
establecida.
3 Use el teclado numérico para introducir la temperatura
deseada, luego pulse Configurar. Aparecerá "---" para
temperaturas fuera del rango de temperatura.
4 Pulse Iniciar.
FAVORITOS
Los modos de cocción o alimentos más frecuentes
se pueden guardar para acceder a ellos rápidamente.
Se pueden guardar hasta 50 favoritos a la vez.
Crear un favorito:
1 Seleccione el modo de cocción y la temperatura
deseados.
2 Pulse .
3 Use el teclado para introducir un nombre.
4 Pulse Configurar.

wolfappliance.com | 7
SENSOR DE TEMPERATURA
Utilice solamente el sensor de temperatura negro enviado
con este aparato. Observe la siguiente ilustración. El sensor
de temperatura mide la temperatura interna de los ali-
mentos durante la cocción. Se puede utilizar con todos
los modos de cocción excepto el Gourmet+ y Calen-
tar. Cuando el sensor de temperatura esté instalado, se
mostrará la temperatura real del mismo.
PRECAUCIÓN
Utilice solamente el sensor enviado con este horno.
No utilice un sensor de cualquier otro aparato.
Configuración de los mandos:
1 Introduzca el sensor en la parte más gruesa del
alimento.
2 Coloque la comida en el horno e inserte el conector
en el receptáculo. Observe la siguiente ilustración.
3 Seleccione el modo de cocción deseado.
4 Pulse Intro.
5 Use las flechas para seleccionar la temperatura deseada
del sensor de alimentos.
6 Pulse Intro.
7 Use las flechas para seleccionar la temperatura del
sensor que desee.
8 Pulse Intro.
El punto definido de la temperatura del sensor aparecerá
en la pantalla encima del icono. Para ajustar la temperatura
del sensor, seleccione Definir la temperatura del sensor de
alimentos, utilice las flechas para seleccionar la tempera-
tura deseada, y luego pulse Intro.
PRECAUCIÓN
El sensor y el receptáculo estarán muy calientes.
Sujételos con cuidado.
Funcionamiento del horno
Sensor de temperatura
RECEPTÁCULO
DEL SENSOR
Receptáculo del sensor
SHABAT
Configuración de los mandos:
1 Pulse .
2 Pulse Ajustes individuales.
3 Pulse Modo Sabbath.
4 Pulse ON/OFF.
Cuando está encendido, el modo Sabbath aparece en
la pantalla. Seleccione horneado Sabbath u horneado
húmedo Sabbath. El horno permanecerá encendido hasta
78 horas mientras esté en el modo Sabbath.
Funcionamiento del horno
TEMPORIZADOR
El temporizador se puede ajustar para un máximo de 9
horas y 59 minutos. Cuando haya programado el tempori-
zador, el cronómetro aparecerá en la pantalla. El tempori-
zador es independiente del horno.
Programar el temporizador:
1 Pulse .
2 Toque la casilla de introducción de datos.
3 Utilice el teclado para introducir el tiempo deseado.
4 Pulse Iniciar.
5 Pulse Detener para cancelar el temporizador.
Para ajustar el temporizador, pulse el tiempo de cuenta
atrás en la pantalla. Introduzca el tiempo deseado y, a
continuación, pulse Iniciar.

8 | Español
Funcionamiento del horno
Modos de cocción
MODO ICONO RANGO DESCRIPCIÓN
Convección 30–280 °C Cocina y dora los alimentos de manera uniforme a la vez que reduce
el tiempo de cocción. Permite la cocción en varias rejillas.
Convección con humedad 30–250 °C El horno se sella para retener la humedad y utiliza convección. Ideal para
hornear panes y guisados rápidamente.
Horneado con convección 30–280 °C
El elemento para horneado cocina la comida a la vez que el ventilador
de convección hacer circular aire caliente para dorar los alimentos y
dejarlos crujientes.
Asar* Bajo, medio, alto Utiliza el elemento para asar para sellar y dorar los alimentos intensamente.
Asado con convección 30–280 °C Usa el elemento para asar y la convección para sellar, dorar y dejar crujientes
los alimentos.
Hornear 30–280 °C El espacio de cocción se calienta con los elementos superiores e inferiores.
Modo de funcionamiento normal de cocción y horneado en una sola rejilla.
Horneado húmedo 30–250 °C Usa elementos para asar y hornear. El horno se cierra herméticamente
para conservar la humedad. Para hornear pan y estofados rápidamente.
Cocción lenta Bajo, medio, alto
Usa elementos para hornear para conseguir los resultados que proporciona
una olla de cocción lenta. El mejor resultado cuando se utiliza con recipientes
de cocina con una base gruesa.
Gourmet –
Proporciona recomendaciones para el modo de cocción y la posición
de la rejilla para alimentos selectos. La temperatura y tiempo de cocción
dependen del punto de cocción que se desee.
Gourmet+ –Optimiza el tiempo de cocción, la temperatura y la humedad durante
el ciclo de cocción para cocinar automáticamente alimentos selectos.
Asado lento †Asa la comida de forma automática, para lo cual optimiza el tiempo de
cocción y el tiempo de finalización deseado.
Calentar 60–100 °C Usa convección para mantener la comida en una temperatura ideal para servir.
Limpieza Ligero, Medio, Fuerte Para limpieza de rutina del horno.
*Permite precalentar durante tres minutos. †Se requiere sensor. El tiempo de cocción y la temperatura se ajustan automáticamente para obtener
el punto de cocción deseado.
GOURMET
Use el modo Gourmet y Gourmet+ para preparar cualqui-
era de las siguientes comidas, frescas o refrigeradas. Selec-
cione la comida y el punto de cocción deseado y el sensor
ajustará la hora, la temperatura y la humedad, por lo que
no se requieren instrucciones de horneado.
ALIMENTOS
Platos horneados y gratinados
Productos para hornear
Pescado y mariscos
Fruta y bayas
Carne
Aves
Guarniciones
Verduras
Configurar el modo Gourmet:
1 Pulse .
2 Pulse la comida deseada.
3 Siga las instrucciones que aparecen en la pantalla.
4 Pulse Configurar.
5 Los ajustes de modo requeridos aparecen en la
pantalla. Pulse Iniciar.
GOURMET+
ALIMENTOS
Aperitivos frescos
Pan de trenza
Pan
Gratinado
Tarta
Pizza fresca
Configurar el modo Gourmet+:
1 Pulse .
2 Pulse la comida deseada.
3 Siga las instrucciones que aparecen en la pantalla.
4 Pulse Configurar.
5 Los ajustes de modo requeridos aparecen en la pan-
talla. Pulse Iniciar.

wolfappliance.com | 9
EXTRACCIÓN DE LAS GUÍAS DE REJILLA
Para retirar las guías de la rejilla, empuje la parte supe-
rior de la guía hacia la parte posterior de la cavidad del
horno. Incline la parte superior de la guía hacia el centro
del horno y levante los apoyos inferiores de la guía de los
orificios de posición.
Para volver a instalar, introduzca los apoyos inferiores
en los orificios de posición e incline la guía de la parrilla
para encajarla en su sitio. Tire suavemente de la guía hacia
delante hasta que encaje los orificios superiores. Observe
la siguiente ilustración.
Recomendaciones de mantenimiento
CÓMO QUITAR LA PUERTA DEL HORNO
La puerta del horno se puede extraer si desea realizar
una limpieza a fondo.
Para quitar la puerta del horno, ábrala completamente.
Gire los pestillos de las bisagras hacia adelante a la
posición abierta. Cierre la puerta hasta que quede abierta
aproximadamente a 30º y luego levante hacia arriba y
sáquela. Observe las siguientes ilustraciones.
Para volver a instalar, inserte las bisagras de la puerta en
las aperturas del marco. Abra la puerta del horno
completamente y gire ambos pestillos de las bisagras
hacia atrás a la posición cerrada.
Recomendaciones de mantenimientoFuncionamiento del horno
GUÍA DE
LA REJILLA
Extracción de las guías de rejilla
POSICIÓN
CERRADA
Pestillo de la bisagra de la
puerta del horno
Puerta abierta a 30°
Limpieza
Durante la limpieza, el horno alcanza una temperatura
extremadamente alta para quemar los residuos de
los alimentos. Retire la rejilla, la bandeja y las guías de
las rejillas del horno. En caso contrario, se decolorarán
durante el proceso de limpieza.
La duración del ciclo de limpieza puede ajustarse según el
nivel de residuos de cocina. Para manchas ligeras, la dura-
ción del ciclo de limpieza es de 1,5 horas y de 2 horas para
manchas difíciles. El ciclo completo puede durar hasta
5 horas incluyendo el enfriamiento.
Configuración de limpieza:
1 Pulse Ajustes.
2 Seleccione Limpieza y presione Intro.
3 Use las flechas para seleccionar el nivel de limpieza
deseado y luego presione Intro. Al comenzar el ciclo,
la puerta se bloquea automáticamente.
La unidad se iniciará una vez que hayan transcurrido
20 segundos desde que pulsó la última tecla. Para iniciar
el modo inmediatamente, use las flechas para seleccionar
Iniciar funcionamiento y luego presione Intro.
Configuración de inicio retardado de limpieza:
1 Pulse Ajustes.
2 Seleccione Limpieza y presione Intro.
3 Use las flechas para seleccionar el nivel de limpieza
deseado y luego presione Intro.
4 Seleccione Definir finalización y pulse Intro.
5 Use las flechas para seleccionar el tiempo de apagado
deseado y presione Intro.
Para cancelar el modo de limpieza en cualquier momento,
pulse OFF. La puerta del horno se bloqueará y per-
manecerá bloqueada hasta que finalice el ciclo de limpieza
y la temperatura del horno se haya enfriado por debajo de
300ºC.
Posición de las rejillas del horno
Las rejillas y la bandeja del horno pueden colocarse en
cualquiera de las cuatro posiciones que aparecen en las
etiquetas de la parte frontal derecha del horno. Observe la
siguiente ilustración.
Posición de las rejillas del horno

10 | Español
Solución de problemasRecomendaciones de mantenimiento
MANTENIMIENTO
• Mantenga la calidad de su producto poniéndose en
contacto con el servicio técnico autorizado de Wolf.
• Cuando se comunique con el servicio técnico, necesi-
tará el modelo y el número de serie de su producto. Los
dos números aparecen en la placa de datos del pro-
ducto. Consulte la página 5 para ver la ubicación de la
placa de datos.
• Para cuestiones relacionadas con la garantía, también
necesita saber la fecha de instalación y el nombre de su
distribuidor autorizado de Wolf. Esta información debe
estar registrada en la página 2.
SERVICIO (SOLO PARA AUSTRALIA)
• Se recomienda realizar un mantenimiento anual.
• Mantenga la calidad de su producto poniéndose en
contacto con el servicio técnico autorizado de Wolf.
• Cuando se comunique con el servicio técnico, necesi-
tará el modelo y el número de serie de su producto. Los
dos números aparecen en la placa de datos del pro-
ducto. Consulte la página 5 para ver la ubicación de la
placa de datos.
• Para cuestiones relacionadas con la garantía, también
necesita saber la fecha de instalación y el nombre de su
distribuidor autorizado de Wolf. Esta información debe
estar registrada en la página 2.
• Solo para Australia, contacte con: Sub-Zero Group
Australia Pty Ltd Level 10, 469 La Trobe Street
Melbourne Victoria 3000 Phone 03 9600 2218
subzero-wolf.com.au
SERVICIO (SOLO PARA REINO UNIDO)
• Sub-Zero & Wolf Ltd 9 The Street, Heybridge, Maldon, Essex,
www.subzero-wolf.co.uk
Solución de problemas
FUNCIONAMIENTO
El horno no funciona.
• Compruebe si está encendido.
• Compruebe la alimentación del horno y que la red
eléctrica de la casa funciona.
Problemas con la temperatura del horno.
• Póngase en contacto con el servicio certificado de
fábrica de Wolf.
El horno hace ruido durante el funcionamiento.
• El horno puede emitir sonidos de intercambio durante
el funcionamiento. Esos sonidos son normales.
Es difícil extraer las bandejas del horno.
• Ciertas combinaciones de calor, humedad y colo-
cación de los alimentos pueden hacer que las bandejas
del horno se enrosquen. Las bandejas volverán a su
posición original cuando se enfríen.
Recomendaciones de mantenimiento
LIMPIEZA
Acero inoxidable Utilice un limpiador no abrasivo para acero inoxidable y aplique con un paño suave que no deje pelusa.
Para que el acero inoxidable adquiera un brillo natural, frote suavemente la superficie con un paño de
microfibra empapado en agua y con una gamuza seca para pulir. Siempre siga la dirección del acabado
del acero inoxidable.
Parte delantera de la puerta Pulverice el limpiacristales en un paño para su limpieza.
Pantalla táctil Utilice un desengrasante en spray para eliminar las huellas y las manchas de alimentos. Aplique el producto
de limpieza sobre un paño antes de limpiar la pantalla táctil. No pulverice los limpiadores directamente
sobre el pantalla táctil.
Interior Para realizar una limpieza suave, retire los residuos de comida con un paño suave humedecido en agua
y detergente suave, mientras el horno esté tibio. Seque con un paño suave.
Rejilla, guías y bandeja
del horno
La rejilla, las guías y la bandeja de acero inoxidable se pueden limpiar en el lavaplatos.
Sensor de temperatura Limpie con un paño y agua. Puede utilizarse un detergente suave para las manchas difíciles. No introduzca
el sensor en el agua ni lo limpie en el lavavajillas.
Other manuals for E Series
7
Table of contents
Languages:
Other Wolf Oven manuals