Wolf e Series User manual

E Series Oven
Use and Care Guide
CLEANING, MAINTENANCE,
AND MORE

2 | Wolf Customer Care 800.222.7820
Contents
4Safety Precautions
6E Series Oven Features
7Oven Operation
18 Cooking Guide
21 Care Recommendations
22 Troubleshooting
23 Wolf Warranty
E Series Oven

wolfappliance.com | 3
Customer Care
The model and serial number are printed on the enclosed
product registration card. Both numbers are also listed
on the product rating plate. Refer to page 6 for rating
plate location. For warranty purposes, you will also need
the date of installation and name of your authorized Wolf
dealer. Record this information below for future reference.
SERVICE INFORMATION
Model Number
Serial Number
Date of Installation
Certified Service Name
Certified Service Number
Authorized Dealer
Dealer Number
If your product ever needs attention, be sure to use a
Wolf Factory Certified Service provider recommended
by our Customer Care Center, or select one from our list
of providers available at wolfappliance.com/locator. All
Factory Certified Service providers are carefully selected
and thoroughly trained by us.
Important Note
To ensure this product is installed and operated as safely
and eciently as possible, take note of the following types
of highlighted information throughout this guide:
IMPORTANT NOTE highlights information that is especially
important.
CAUTION indicates a situation where minor injury or prod-
uct damage may occur if instructions are not followed.
WARNING states a hazard that may cause serious injury or
death if precautions are not followed.
IMPORTANT NOTE: Throughout this guide, dimensions in
parentheses are millimeters unless otherwise specified.
E Series Oven

4 | Wolf Customer Care 800.222.7820
Safety Precautions
• Always use dry pot holders when removing
pans from this appliance. Wet or damp pot
holders can cause steam burns. Do not use a
towel or bulky cloth in place of pot holders.
• Position oven racks in the desired locations
when the oven is cool. If a rack must be repo-
sitioned after the oven is already hot, be sure
the pot holder does not contact a hot heating
element in the oven.
• Do not repair or replace any part of this appli-
ance unless specifically recommended in litera-
ture accompanying this appliance.
• Do not use aluminum foil to line any part of this
appliance.
• Never use this appliance to warm or heat the
room.
• Do not leave children alone or unattended in
the area where this appliance is in use. Never
allow children to sit or stand on the appliance.
• Do not store items of interest to children above
or at the back of this appliance, as they could
climb on the appliance to reach items and be
injured.
CAUTION
Before using self-clean, remove broiler pan,
oven racks, oven rack guides, and any other
utensils.
IMPORTANT INSTRUCTIONS
GENERAL SAFETY PRECAUTIONS
• Read this guide carefully before using this
appliance to reduce risk of fire, electric shock,
or injury.
• This appliance must be properly installed
and serviced by a qualified installer or service
agency and grounded by a qualified technician.
• Clean only those parts listed in this guide.
• Do not use oven cleaners. No commercial oven
cleaner or oven liner protective coating of any
kind should be used in or around any part of
the oven.
• Do not touch heating elements or interior
surfaces of oven. Heating elements may be
hot even though they are dark in color. Interior
surfaces become hot enough to cause burns.
During and after use, do not touch or let cloth-
ing or other flammable materials contact heat-
ing elements or interior surfaces of the oven
until they have had sucient time to cool.
• Exercise caution when opening the oven door.
Let hot air or steam escape before looking or
reaching into the oven.
• Be sure that the oven cool air intake and oven
exhaust vent (located below the door) are
unobstructed at all times.

wolfappliance.com | 5
Safety Precautions
IMPORTANT INSTRUCTIONS
GENERAL SAFETY PRECAUTIONS
• Do not use water on grease fires. Smother
the flame or use a dry chemical or foam-type
extinguisher.
• Do not heat unopened food containers, such as
baby food jars and cans. Pressure build-up may
cause the container to burst and cause injury.
• Do not store or use gasoline or other flam-
mable vapors and liquids in the vicinity of this or
any other appliance.
• Do not clean the oven gasket; rubbing or
moving the gasket may compromise the door
seal.
• Wear proper apparel. Loose-fitting or hanging
garments should never be worn while using this
appliance.
WARNING
PROPOSITION 65 FOR CALIFORNIA RESIDENTS
Cancer and Reproductive Harm—
www.P65Warnings.ca.gov

6 | Wolf Customer Care 800.222.7820
E Series Oven Features
FEATURES
1Product Rating Plate (lower oven for double ovens)
2Adjustable Oven Rack
3Full-Extension Oven Racks
4Control Panel
5Touchscreen
6Convection Fans
7Temperature Probe Receptacle
8Halogen Lighting
Getting Started
We know you are eager to start cooking, but before you
do, please take some time to read this use and care guide.
Whether you are an occasional cook or an expert chef, it
will be to your benefit to familiarize yourself with the safety
practices, features, operation, and care recommendations
of your Wolf E Series Oven.
To ensure the best results, review the cooking modes and
special features on page 13.
CAUTION
Do not place cookware on the oven floor or use
aluminum foil or other material to line the oven
floor or side walls. Failure to adhere to this notice
will damage the porcelain interior and will void your
warranty.
E Series Oven Features
E Series Single Oven
4
7
8
3
62
1
5

wolfappliance.com | 7
Oven Operation
To insert a full-extension rack, place the two rear tabs onto
the rack guide (one tab above and one below). Refer to
the illustration below. Angle the rack slightly and slide back
until the front rack notch engages the front rack guide.
Oven Racks
OVEN RACK GUIDES
To install the rack guides in the oven, locate the mount-
ing screws on the oven side walls. Place the rack guide
mounting tabs over the top screws, pivot inward, and slide
down until fully seated. Refer to the illustration below.
OVEN RACKS
To insert a standard rack in the oven, place the rack anti-tip
lock under the side rack guide rails. Slide the rack back
and lift up to clear the rack stops. Continue to slide the
rack back until completely inside the oven. Refer to the
illustration below.
MOUNTING
TA BANTI-TIP
LOCK
RACK
STOP
Oven rack guide
Oven rack anti-tip lock
REAR TA B
Full-extension rack
8 | Wolf Customer Care 800.222.7820
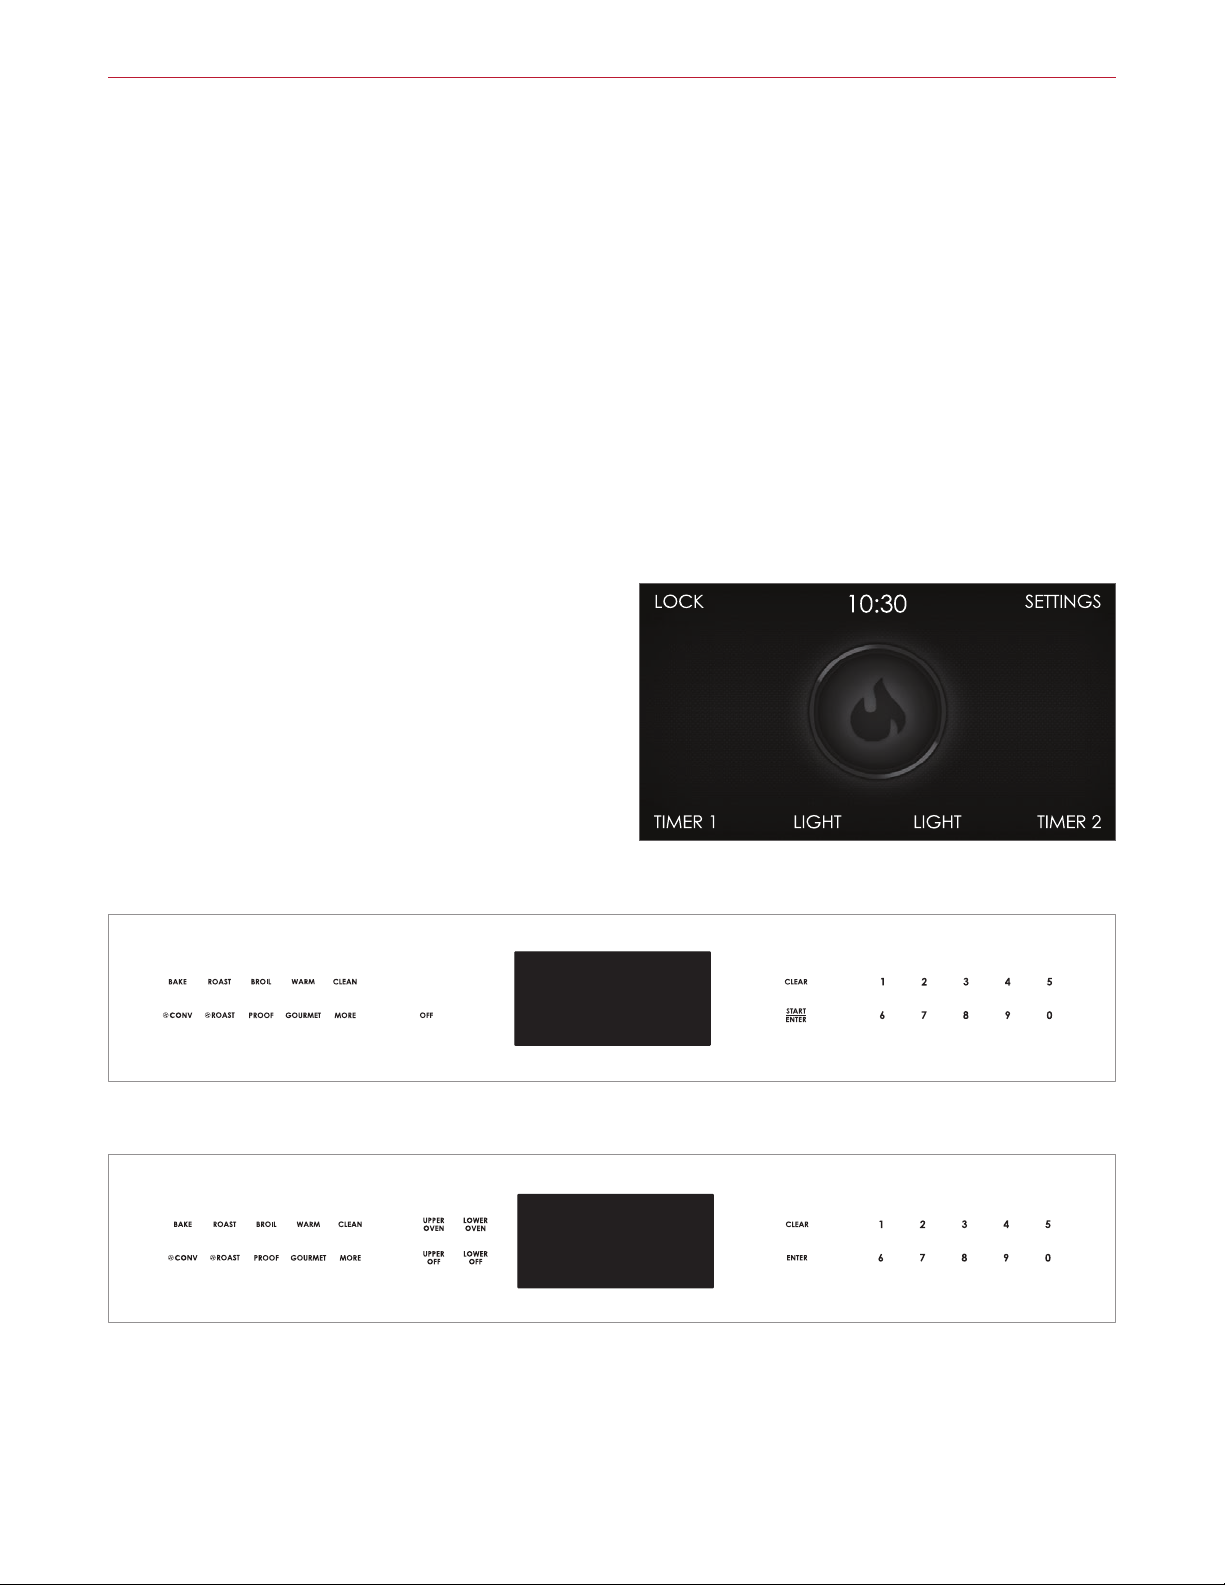
To start cooking:
Touch the desired cooking mode or touch More to access
additional modes. For double ovens, touch Upper On or
Lower On to select the oven.
1 Touch Start/Enter to select the preset temperature
or use the number pads to change the temperature.
NOTE: Touch Clear at any time to go back.
2 Touch Start/Enter.
Touchscreen (double oven shown)
10:30
Control panel (single oven)
Oven Operation
10:30
Control panel (double oven)
Controls
Wolf E Series Ovens use a combination of a control panel
and touchscreen. The oven has ten cooking modes—Bake,
Convection, Roast, Convection Roast, Broil, Proof, Warm,
Gourmet, Stone, and Dehydrate. Convection, Gourmet,
Stone, and Dehydrate are not available for the lower oven
on double ovens. Stone and Dehydrate require accessories.

wolfappliance.com | 9
Oven Operation
Oven Operation
CONTROL LOCK
The lock feature prevents unwanted control panel and
touchscreen operation. The lock feature must be reset
after a power outage.
To lock or unlock:
1 Touch and hold Lock for three seconds.
PRIOR TO USE
To ensure all residual oil from the manufacturing process
has been removed, each oven must go through the fol-
lowing procedure:
1 Clean the oven thoroughly with hot water and a mild
detergent. Rinse and dry with a soft cloth.
2 Turn on ventilation. Some smoke and odor is normal.
3 Touch Roast (Roast for the lower oven) and set the
temperature to 500°F (260°C) for one hour.
4 Touch O and allow the oven to cool with the door
closed.
OVEN LIGHT
The oven light turns on automatically when the door is
open and o when closed. To turn the light on while the
door is closed, touch Light on the touchscreen. For a
double oven, touch Light on the right of the touchscreen
for the lower oven.
PREHEAT
During preheat, the oven is heated as quickly and evenly
as possible and is not ideal for cooking. Preheat should
be used for all cooking modes except Broil, Proof, Warm,
Dehydrate, and some modes in Gourmet. Once preheat
is complete, a chime indicates the oven has reached set
temperature.

10 | Wolf Customer Care 800.222.7820
Oven Operation
Oven Operation
CLOCK
The clock is visible on the touchscreen during all cooking
modes. It is very important the clock be set to the correct
time if a timed cook feature is used. The clock must be
reset after a power outage.
The clock sets automatically if the unit is connected to
Wi-Fi. Refer to Connect This Appliance on the following
page.
Setting clock:
1 Touch Settings, then select Time.
2 Touch 12 Hour or 24 Hour mode and use the control
panel to set the time.
3 Select AM or PM, then touch Start/Enter. A chime
indicates the clock has been set.
Time can also be adjusted by touching the time on the
touchscreen.
TIMER
Each timer can be set for a maximum of 99 hours and 59
minutes. Once a time is set, the countdown is illuminated
on the touchscreen. The timer is independent from the
oven. Setting the timer does not aect cook time or stop
time.
Setting timer:
1 Touch Timer 1 or Timer 2.
2 Use the control panel to set the duration, then touch
Start/Enter. A chime indicates the timer has been set.
3 To cancel or edit, touch the countdown time on the
touchscreen.
4 The timer chimes with one minute remaining. The timer
chimes and flashes when complete.
5 Touch the flashing time to clear.
Other manuals for e Series
22
Table of contents
Other Wolf Oven manuals

Wolf
Wolf DO30U/B User manual

Wolf
Wolf Sub-Zero ICBIG15/S Guide

Wolf
Wolf e Series User manual

Wolf
Wolf L Series SO30F User manual

Wolf
Wolf L Series SO30F User manual

Wolf
Wolf CT15E/S Guide

Wolf
Wolf ICBDF366 User manual

Wolf
Wolf Speed SPO30S User manual

Wolf
Wolf M Series Operating instructions

Wolf
Wolf L Series User manual

Wolf
Wolf CSO30TE/S/TH User manual

Wolf
Wolf ICBSO30-2U/S Owner's manual

Wolf
Wolf e Series User manual

Wolf
Wolf e Series User manual

Wolf
Wolf DO30F Instructions for use

Wolf
Wolf WGCO100S User manual

Wolf
Wolf e Series User manual

Wolf
Wolf E Series DO30-2F/S User manual

Wolf
Wolf DO30PE/S/PH User manual

Wolf
Wolf CSO24TE User manual

 Dual Fuel Ranges Instructions for use")


