Wolfbox i07 User manual

2
Mirror Dash Cam i07
Instruction Manual

02
CONTENT
INTRODUCTION
PRE-CAUTIONS
APPEARANCE
ABOUT THE MICRO SD CARD
INSTALLATION
HOME SCREEN
POWER ON/OFF
MENU SETTINGS
04
04
07
08
09
16
17
19

03
CONTENT
PLAY ON CAMERA
PLAY ON APP
PLAY ON PC
TROUBLE SHOOTINGS
i07 RELATED ACCESSORIES
PRODUCT SPECIFICATIONS
33
35
41
42
45
46

04
INTRODUCTION
PRE-CAUTIONS
Thank you for purchasing WOLFBOX i07 Dash Cam. This product is a triple channel dash cam
which offers 150° front camera, 160° inside camera and 155° rear camera, it can simultaneously
monitor the front, rear, and interior of your vehicle while providing audio at 2.5K + 1080P +
1080P, protecting you from potential accidents and liability issues. When the rear camera is not
inserted, the cam will turn to front and inside dual recording mode automatically. It provides
top 4K 2160P resolution front camera and a 1080P inside camera. The rear cam is easily 360°
adjustable with 20ft extension cable, and it works well for cars, SUVs, jeeps, and truck.
In addition to triple-camera recording and ultra-high definition, i07 dash cam also has other
smart features to provide customers with elegant and convenient services. It has built-in GPS,
built-in WIFI, free APP, split-screen display, rear flip(180°) & rear mirror, DST switch, built-
in G-Sensor, emergency recording, audio recording, loop recording, parking monitoring,
Screensaver mode, and is very easy to use.
If you have any questions, or want accessories, please CONTACT US (service @wolfbox.com),
we will solve it for you.

05
Please check the functionality of dash cam with its all accessories before installation. If you
want to find a professional for installation, please check the function first, so as to prevent
the inconvenience and installation cost loss caused by the machine problem after the
installation.
Please use original accessories provided in the package, just in case of compatible issues
after using others',especially use 2 or 3 in 1cigar socket will lead to 100% insufficient current
supply.
We also have 33feet (Asin:B082RZNJFY) and 50 feet(Asin: B0814ZHHST) rear camera
extension cables sold separately.
If you use micro SD card capacity > 32GB, Please change micro SD card [Class10 (10MB/
sec) required) format to FAT 32 on PC(a 32GB card is included in the package).
If you want 24 parking monitor function to guide your car parking safety, dedicated
hardwire-kit (ASIN:BO9XILIGMX)is needed.
Please format micro SD card termly in case oflocked videos occupied much capacity, release
them necessarily.

06
Please confirm whether your cigar power port is ACC. (if the cigarette lighter is still charged
after the car is turned off, please use the hardwire kit or unplug the car charger after the car
is turned off, otherwise it may exhaust your car's power supply.) (Note: This happens in some
Ford/Audi cars, and electric cars).
The rear camera in the package is for installation on the rear windshield in the car. If you
want to install a rear cam on the rear bumper or the license plate, we have two separate rear
cameras for sale. Rear camera for exterior installation(ASIN:B09H5KBK9X) and Upgraded
WDR Rear Carnera(ASIN: B09KRM9QQ5).
If you have any questions or need accessories, please CONTACT US.

07
APPEARANCE
IPS Screen
In-Car camera
GPS built-in bracket
Rotate to adjust the In-Car camera image
Type-C Power port
Rear Camera input terminal(AV-IN)
TF Card slot
Front Camera(Can rotate to adjust
front camera image)
M button
UP button
Power button
Down button
OK button
NOTE: When inserting the rear camera
cable, please insert it firmly to ensure
that the circuit is unobstructed, so that
the rear camera can detect.
1
2
3
4
5
6
7
8
9
10
11
12
13

08
About the Micro SD Card
When using a new MicroSD card, be sure to format it on the dash cam.
Do not remove or insert a Micro SD card while the power is on.
Use a Micro SD card with Class 10 or higher(32GB-512GB). 32GB card is included in
package.
For stable use,it is recommended to format the micro SD card regularly. Recommend: Once
a month.
Please press the “M" button once to enter the menu settings, then press the UP/DOWN
button to scroll until you see "Storage" setting, press the “OK" button to enter it. Then press
"OK" button again to confirm to format the SD card.
This product will check the Micro SD card at startup and will announce if it is not inserted or
damaged,that can prevent missed shots.

09
NOTE:
When you use the dash cam for the first time, the dash cam comes with factory default settings
and you do not need to set it manually.
Format SD before use! Please refer to page 11 for SD card settings
How to install the main body
1. Installation Position-Please find the most
suitable place to record the picture you
want(such as the back seat) with the In-Car
camera. Note: Front-Cam and In-Car Cam can
be rotated to adjust the angle of the picture.
Installation
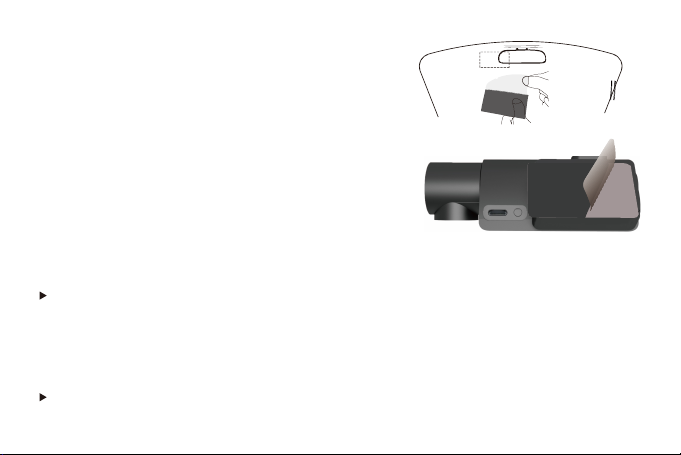
10
2. Make sure to clean your windshield from the dust
particles and attack attach the electrostatic sticker to the
windshield.
3. Peel off the 3M tape attached to the GPS built-in
bracket and attach it on the electrostatic sticker on the
windshield.
About electrostatic Sticker
Since the adhesive strength is strong on both sides and it is difficult to peel off once it is
pasted, it will be troublesome if the pasting position is incorrect. Therefore, we design
the electrostatic sticker to attached to the windshield first,then stick the bracket with 3M
Adhesive on the electrostatic sticker. You can easily readjust location by sticking the 3M
Adhesive on electrostatic sticker and peel it off.
To strengthen the fixing force,do not attach the unit and leave it for 24 hours or more.
Table of contents
Other Wolfbox Dashcam manuals

Wolfbox
Wolfbox G910 User manual

Wolfbox
Wolfbox G930 User manual

Wolfbox
Wolfbox D07S User manual

Wolfbox
Wolfbox G880 User manual

Wolfbox
Wolfbox T10 User manual

Wolfbox
Wolfbox G840S User manual

Wolfbox
Wolfbox G850 User manual

Wolfbox
Wolfbox i03 User manual

Wolfbox
Wolfbox G840H User manual

Wolfbox
Wolfbox T10 User manual


