Woodpecker DTE D2 LED User manual


Contents
1 The installation and components of equipment—————————————1
1.1 Instruction——————————————————————————1
1.2 Components—————————————————————————1
1.3 The main technical specications—————————————————1
1.4 Instruction of the main components————————————————2
2. Installation and adjustment————————————————————3
3. Maintenance and sterilization———————————————————4
4. Precaution——————————————————————————7
5. After service——————————————————————————9
6. Environmental protection—————————————————————9
7. Manufacturer’s right——————————————————————9
8. Symbol instruction———————————————————————9
9. Statement——————————————————————————10

1
1. The installation and components of equipment
1.1 Instruction
Guilin Woodpecker Medical Instrument Co., Ltd. is a high-tech enterprise in
researching, developing, and producing dental equipment, and has a perfect
quality assurance system, main products including ultrasonic scaler, curing light,
micro motor, apex locator and ultrasurgery, automatic water supply system etc.
The ultrasonic scaler D2 LED has scaling, perio functions with the following
features:
1.1.1 The silicon-cover can be autoclaved to high temperature 135℃and high
pressure 0.22Mpa.
1.1.2 Automatic frequency tracking ensures that the machine always works on
the best frequency and more steadily.
1.1.3 Digitally controlled, easy operation and more efcient for scaling.
1.2 Components
1.2.1 The components of machine are listed in the packing list.
1.2.2 Product performance and structural composition
Ultrasonic scaler D2 LED is composed of electrocircuit, water way and ultrasonic
transducer.
1.2.3 Scope of application
Ultrasonic scaler D2 LED is used for the dental calculus elimination.
1.3 The main technical specications
1.3.1 Technical specications of ultrasonic scaler
a) Main unit input: 220-240V~ 50Hz/60Hz 150mA
b) Output primary tip vibration excursion: ≤100μm
c) Output half-excursion force: <2N
d) Output tip vibration frequency:28kHz±3kHz
e) Output power: 3W to 20W
f) Main unit fuse: T0.5AL 250V
g) Water pressure: 0.01MPa to 0.5MPa

2
h) Weight of main unit: 1.56kg
i) Operating mode: Continuous operation
j) Type of protection against electric shock: class II equipment
k) Degree of protection against electric shock: Type BF applied part
l) Applied part of the equipment: handpiece and tip
m) Degree of protection against harmful ingress of water: Ordinary equipment,
the foot switch is drip-proof equipment (IPX1)
n) Degree of safety of application in the presence of a Flammable Anesthetic Mixture
with air, Oxygen or Nitrous Oxide: Equipment not suitable for being used in the
presence of a ammable anesthetic mixture with air, oxygen or nitrous oxide.
1.4 Instruction of the main components
Instruction and component sketch map
1.4.1 Front of the main unit sketch map
picture 1
1.4.2 Back of the main unit sketch map
Picture 2

3
1.4.3 Instruction of using torque wrench
picture 3
2. Installation and adjustment
2.1 Operation
2.1.1 Open the packing box, make sure that all the parts and accessories are
complete according to the packing list, take the main unit out of the box, and put
it on the the stable plane facing to the operator.
2.1.2 Turn the water control knob to the max according to the picture direction[
note 1].
2.1.3 Insert the plug of the foot switch to its socket. (see picture 2)
2.1.4 Connect one end of water pipe to the water pipe to the water entrance, and
the other end to the clean water sourse. (see picture 2)
2.1.5 Choose the scaling tip according to the equirement, and x the scaling tip
with the wrench. ( see picture 3)
2.1.6 Connect the power cord to the main unit, and get through to the power. (
see picture 2)
2.1.7 Press the power switch of the main unit, then the power indicator shines.
2.1.8 Under normal working condition, the frequency of the tips is very high,
light touch and a certain to-and-fro motion will eliminate the tartar without
obvious heating, overexetion and overatay are forbidden.
2.1.9 Vibrating intensity: Adjust the vibrating intensity according to your need,
usually adjust to the middle grade, and adjust the vibrating during the clinical
treatment according to the patient's sensitivity and the rigidity of the tartar.

4
2.1.10 Step on the foot switch, the tip begins to vibrate, and the LED lamp on the
top of the handpiece shines. Release the foot switch, the LED lamp keep shining
for 10 seconds.
2.1.11 Water volume adjustment: Step on the foot switch, and the tip begins to
vibrate, the turn the water control switch to from ne spray to cool down the
handpiece and clean the teeth.
2.1.12 The handpiece can be handled in the same gesture as a pen in hand.
2.1.13 Be sure not to make the end of the tip touch the teeth vertically, and not use
too much pressure when the tip touch the surface of the teeth, in order not to hurt
the teeth and the tip.
2.1.14 After nishing operation, keep the machine working for 30 seconds with
the water supply to clean the handpiece and the tip.
2.1.15 Unscrew the scaling tip and sterilize it.
Note: Don't screw the scaling tips when stepping on the foot switch, and the
machine is working.
3. Maintenance and sterilization
3.1 All the scaling tips can be autoclaved.
3.2 Handpiece can be sterilized by any neutral sterilized liquid for cleaning and
sterilizing. Do not sterilize under the high temperature and pressure.
3.3 The scaling tip and wrench can be cleaned by ultrasonic cleaner.
3.4 Troubles shooting
3.4.1 Trouble shooting
Fault Possible Solutions
The scaling tip doesn’t
vibrate and no water
owing out when
stepping on the foot
switch.
The plug is in loose or
wrong contact.
Connect the power plug
well.
The foot switch is in loose
contact.
Connect the switch well.
The fuse of is broken. Change a new T0.5AL 250V
fuse.

5
Fault Possible Solutions
The scaling tip doesn’t
vibrate, but there is
waterowing out when
stepping on the foot
switch.
The scaling tip is in loose
contact.
Screw it tightly (see picture
3)
The connector plug of the
handpiece with the circuit
board is in loose contact.
Contact with the local
distributor or manufacturer.
Malfunction of the
handpiece.
Contact with the local
distributor or manufacturer.
The scaling tip vibrates
but there is no spray
come out when
stepping on the foot
switch.
The water control switch
is turn off.
Turn on the switch [note 1].
There is impurity in the
solenoid valve.
Contact with the local
distributor or manufacturer.
The water pipe is jammed. Clean water pipe by multi-
function syringe [note 2].
There is water ow
out when turn off the
power.
There is impurity in the
solenoid valve.
Contact with the local
distributor or manufacturer.
The handpiece
generates heat.
The amount of spouting
water is too little.
Turn the water control switch
to a higher grade [note 1].
The potentiometer is
broken.
Change a new one.
The amount of spouting
water is too little.
The water control knob is
a low grade.
Turn the knob to a high grade
[note 1].
The water pressure is not
enough.
Enhance the water pressure.
The water pipe is jammed. Clean water pipe with multi-
function syringe [note2].

6
Fault Possible Solutions
The vibration of the tip
becomes weak.
The tip hasn't been
screwed tightly or
becomes loose because
of vibration.
Screw the scaling tip tightly
(picture 3).
The tip is damaged.[note 3] Change a new one.
The tip is damaged
[ note 3 ].
Change a new one.
The vibrating intensity
control knob is seized
up.
The potentiometer is
damaged.
Contact with the local
distributor or our company.
LED light don’t work something wrong with the
LED light
Contact with the local
distributor or our company.
If the troubles still can't be solved, please contact with the local distributors or
manufacturer.
3.4.2 Notice
[Note 1] The water control knob can adjust the water volume according to the
symbol.
[Note 2] To clean the water pipe with the multi-function syringe of the dental unit (
see picture 4):
picture 4
a) Snip the water pipe at a distance of 10cm to 20cm from the water entrance.
b) Turn on the power switch, get through to the power.
c) Connect the multi-function syringe of the dental unit to the water pipe.
d) Screw off the scaling tip .
e) Step on the foot switch.

7
f) Turn on the switch of the multi-function syringe, press the air or water into the
water pipe to clean and eliminate the impurity.
[Note 3 ] If the scaling tip has been screwed on tightly and there is ne spray too,
the following phenomena show that the scaling tip is damaged:
a) The vibrating intensity and the pulverization degree become weak obviously.
b) During operating, there is some buzz when the scaling tip is working.
4. Precaution
4.1 usage notice
4.1.1 Keep the scaler clean before and after operation.
4.1.2 The scaling tip, wrench and handpiece must be sterilized before each
treatment.
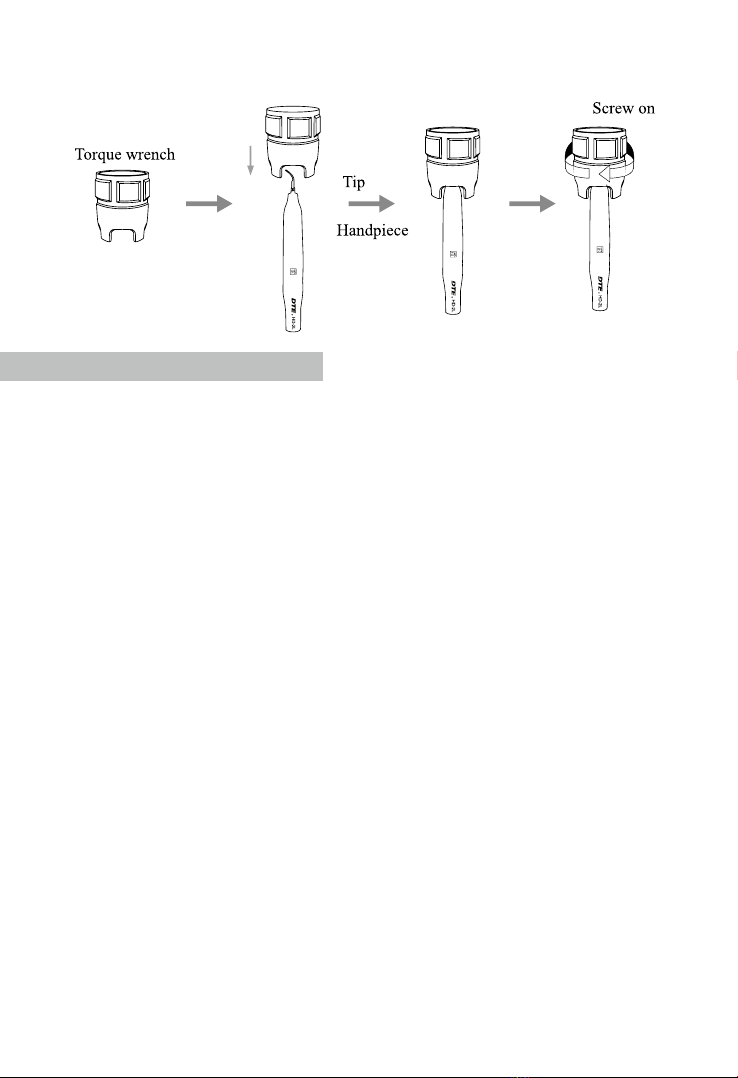
4.1.3 Don't screw the scaling tip when stepping on the foot switch.
4.1.4 The scaling tip must be fastened. There must be ne spray coming out from
the tip when operating.
4.1.5 Change a new one when the tip is damaged or worn excessively.
4.1.6 Don't twist or rub the tip.
4.1.7 Don't use impure water source, and be sure not to use normal brine instead
of pure water source.
4.1.8 If use the water source without hydraulic pressure, the water surface should
be one meter higher than the head of the patient.
4.1.9 Don't knock or rub the handpiece.
4.1.10 Please put the power plug into the socket easy to pull out, to make sure it
can be pulled out in emergency.
4.1.11 When using the equipment, please keep the water get through smoothy,
otherwise patient's tooth surface would be injured by overheat in the handpiece.
4.1.12 After operating, turn off electrical source, and then pull out the plug.
4.1.13 As a professional manufacturer of medical instruments, we are only
responsible for the safety on the following conditions:
Ⅰ.The maintenance, repair and modication are made by the manufacturer or
the authorized dealer.

8
Ⅱ. The changed components are original of "DTE" and operated correctly
according to instruction manual.
4.1.14 The screw thread of the scaling tips produced by other manufacturers maybe
coarse, rusty and collapsed, which will damage the screw thread of the handpiece
irretrievably. Please use "DTE" brand scaling tip.
4.2 Contraindication
4.2.1 The patient who has hemophilia is not allowed to use this equipment.
4.2.2 The patient or doctor who with heart pacemaker is forbidden to use this
equipment.
4.2.3 The heart disease patient, pregnant woman and children should be cautious to
use the equipment.
4.3 Storage and maintenance
4.3.1 The equipment should be handled carefully and lightly. Be sure that it is far
from the vibration, and is installed or kept in a cool, dry and ventilated place.
4.3.2 Don't store the machine together with the articles that are combustible
poisonous, caustic, or explosive.
4.3.3 This equipment should be stored in a room where the relative humidity is
≤ 80%, atmospheric pressure is 50kPa to106kPa, and the temperature is -10℃to
+50℃.
4.3.4 Please turn off the power switch and pull out the power plug when the
equipment is not used. If the machine is not used for a long time, please make it get
through to the power and water once per month for ve minutes.
4.4 Transportation
4.4.1 Excessive impact and shake should be prevented in transportation. Lay it
carefully and lightly and don't invert it.
4.4.2 Don't put it together with dangerous goods during transportation.
4.4.3 Avoid solarization and getting wet in rain or snow during transportation.
4.5 Working condition
Environment temperature: +5℃to +40℃

9
Relative humidity: ≤80%
Atmosphere pressure: 70kPa to106kPa
5. After service
We offer one year free repair to the equipment according to the warranty card.
The repair of the equipment should be carried out by professional technician. We
are not responsible for any irretrievable damage caused by the not professional
person.
6. Environmental protection
There are no harmful factors in our product. You can deal with it based on the local
law.
7. Manufacturer’s right
We reserve the rights to change the design of the equipment, the technique, ttings,
the instruction manual and the content of the original packing list at any time
without notice. If there are some differences between blueprint and real equipment,
take the real equipment as the norm.
8. Symbol instruction
Trademark
Consult the
accompanying documents
Date of manufacture Class II equipment
Drip-proof Type BF applied part
Manufacturer
Atmospheric pressure for
storage

10
Foot switch interface
Temperature limitation
Atmospheric pressure for working
Power input
Humidity limitation
Adjustment for the water ow
Water entrance pressure Can be autoclaved
Appliance compliance WEEE directive
9. Statement
All rights of modifying the product are reserved to the manufacturer without
further notice. The pictures are only for reference. The nal interpretation rights
belong to GUILIN WOODPECKER MEDICAL INSTRUMENT CO., LTD.
The industrial design, inner structure, etc, have claimed for several patents by
WOODPECKER, any copy or fake product must take legal responsibilities.
Used indoor only
Alternating current
Recovery
Keep dry
Handle with care
Serial number

ZMN/WI-04-486 1.2 Edition
Table of contents
Other Woodpecker Media Converter manuals
Popular Media Converter manuals by other brands

Science Image
Science Image NDI HD mini user manual

OBSIDIAN CONTROL SYSTEMS
OBSIDIAN CONTROL SYSTEMS Netron RDM6XL installation guide

StarTech.com
StarTech.com PIB2M21 quick start guide

Simplified MFG
Simplified MFG SP14CAT50 user manual

Converters.TV
Converters.TV 706 Operation manual

Acumen
Acumen AiP-D6 instruction manual