Woody Valley QUADRO Series User manual


QUADRO SERIES - user’s manual
2
EN
Congratulations on your purchase of a WOODY VALLEY product.
We remind you that all our products are the result of meticulous
research in constant collaboration with pilots from all over the
world. That’s why your opinion is so important. Your experien-
ce and collaboration help us constantly improve our products, to
always get the best out of every Woody Valley creation.

QUADRO SERIES - user’s manual
3
EN
MANUFACTURER INFORMATION:
WOODY VALLEY s.r.l.
via Linz, 23 - Loc. Spini,
38121 Trento - ITALY
Tel +39 0461 950811 - Fax +39 0461 950819
Web: www.woodyvalley.eu
E-mail: [email protected]
Weight including container:
Maximum weight in flight:
___ kg
___ kg
Inspection number: EP_
Packing interval: 12 months
Operating period: 15 years
Steerable: NO
___ cm3
Volume:
Flat Area: ___ m 2
Total length of suspension lines: ___ m
Serial number:
Production date (year/month):
Inspected by:
WARNING
Not suitable for use at speed more than 32 m/s (115 km/h)
Read the user's manual before using this equipment!
Woody Valley s.r.l. - via Linz 23 - 38121 - Trento - Italy
A sample has been tested by Air Turquoise SA and certifies
its conformity with the following standard: EN 12491:2015,
and LTF NfL II 91/09 chapter 6, except 6.1.10. This model
corresponds with the tested sample and its airworthiness.
DATA CONTAINED ON THE LABEL

QUADRO SERIES - user’s manual
4
EN
THANK YOU
We would like to thank you for choosing a Woody Valley product. We invi-
te you to carefully read this important document, the User Manual for the
QUADRO series.
Thorough knowledge of your equipment will improve your personal safety
and your level of ying.
Team Woody Valley
SAFETY NOTE
By purchasing Woody Valley equipment, you are responsible for being a
certied paraglider pilot and you accept all risks inherent with paragliding
activities including injury and death. Improper use or misuse of equipment
greatly increases these risks. In no case shall Woody Valley or Woody Valley
equipment resellers be held liable for personal or third party injuries or da-
mages under any circumstances. If any aspect of the use of our equipment
remains unclear, please contact your local reseller or Woody Valley directly.

QUADRO SERIES - user’s manual
5
EN
INDEX
1 - GENERAL INFORMATION
2 - TECHNICAL DATA
3 - TO GET TO KNOW YOUR QUADRO
3.1 - What to do when it happens?
4 - PACKING INSTRUCTIONS
4.1 - Packing preparations
4.2 - Pulling the packing line trough the xing loops
4.3 - Sorting the panels
4.4 - Folding the canopy into thirds
4.5 - S-folding canopy to t into inner container
5- INSTALLATION ON THE HARNESS
5.1 - Connecting the reserve parachute to the harness
5.1.1 - Attachment of the connection bridle to the harness
5.1.2 - Installing your rescue handle
5.1.3 - Installation of the rescue parachute in an external container
5.1.4 - Connection of the tandem reserve parachute
5.1.5 - Specics for paraglider winch launch
5.1.6 - Important points
5.1.7 - Compatibility- check
6 - CARE, MAINTENANCE AND REPAIR
6.1 - Care instructions
6.2 - Repairs
6.3 - Use limitations, packing- and check intervals
6.3.1 - Packing interval
6.3.2 - Check interval
6.3.3 - Use limitation
6.4 - Spare parts
6.5 - Responsible disposal
6.6 - Regulations for behaviour in natural environments
7 - TERMS OF THE WARRANTY
7.1 - WHAT IS NOT COVERED BY THE RESCUE GUARANTEE?
8 - DESCRIPTION OF THE RESCUE SYSTEM
9 - MAINTAINCE AND PACK-INTERVAL OVERVIEW

QUADRO SERIES - user’s manual
6
EN
1 - GENERAL INFORMATION
Congratulations on buying your QUADRO rescue system.
Before you get to know your system please read the manual which includes
important information.
This manual gives you information on the entire specic and general cha-
racteristics of the rescue QUADRO series.
All technical data and instructions in this manual were drawn up with great
care. Woody Valley cannot be made responsible for any possible errors in
this manual.
Should you decide to sell this rescue system at a later date, please pass on
this manual to the new owner.
No guarantee of any kind can be made against accidents, injury, equipment
failure, and/or death. It is assumed that the pilot is in possession of the ne-
cessary qualications and provisions of any relevant laws are observed.
The use of this rescue system is entirely at your own risk.
Every pilot bears the responsibility of his/her own safety. The manufactu-
rer or distributor assumes no responsibility for accidents occurring while
using it.
It is strictly prohibited to use the QUADRO series:
- beyond the maximum recommended weight
- for skydiving
- with damaged canopy, lines, connection belt or seams
- without regular check (check interval).
ATTENTION:
The rescue system is not suitable for speeds in excess of 32 m/s (115 km/h).
Every pilot must ensure that the rescue system is properly checked at re-
gular intervals.

QUADRO SERIES - user’s manual
7
EN
2 - TECHNICAL DATA
Quadro
100 light
Quadro
120 light
Quadro
140 light
Quadro
220 light
Certication LTF / EN LTF / EN LTF / EN LTF / EN
Working load 100 kg 120 kg 140 kg 220 kg
Number of
certication
EP
218.2018
EP
321.2021
EP
242.2018
EP
263.2019
Area (m2) 31.20 35.50 44.80 69
Number of cells 20 24 24 28
Weight including
container (kg)
0,98 1,31 1,45 2,43
Minimum Volume (cm3) 4100 5200 5600 9000
Maximum payload (kg) 100 120 140 220
Minimum payload (kg) 65 80 95 150
Middle line 1 1 1 1
Rate of descent max.
payload
5.47 m/s 5,25m /s 5,49 m /s 5,14 m /s
Opening time (s) 3,23 3.99 3,12 3,99

QUADRO SERIES - user’s manual
8
EN
3 - TO GET TO KNOW YOUR QUADRO
The QUADRO series is a manually deployable rescue system it is for suitable
paragliding pilots in an emergency situation and is made by high quality li-
ght materials and has a quadratic canopy with one middle line which pull
down apex.
Rescue systems from Woody Valley are characterized by a high level of re-
liability and maximum material strength. Fastest ination while maintai-
ning moderate sink rates are features of these systems.
The material is strong nylon. There are bands sewn into the main seams to
strengthen the canopy. The base and side edges are reinforced with bands.
The apex is pulled. The lines are grouped into a strap. This strap generates
the connection between rescue system and harness.
The rescue system is sewn to NATO standards which means that all rescue
systems are sewn by professionals and delivered only after inspection and
approvals..
The specially designed inner container prevents the lines cannot get cau-
ght up in the cap and the opening speed is accelerated with this inner con-
tainer.
ATTENTION:
When using a different inner container it is important to ensure that the re-
scue system can be launched without problems. This parachute system has
been tested and its compliance conrmed using the original manufactu-
rer’s inner container. The use of any other inner container may produce dif-
ferent results, including failures.
3.1 - What to do when it happens?

QUADRO SERIES - user’s manual
9
EN
If you nd yourself in an uncontrollable situation in the air, pull hard on the
deployment handle. This will open the outer reserve container and relea-
se the reserve parachute. Then throw the reserve package forcefully away
from you. As the suspension lines become tight, the container will fall away
and the reserve will open.
In an emergency situation, the handle of the rescue system is given a sharp
pull. If your glider is rotating it pays to throw the reserve against the rota-
tion as this will speed up the inating process. If you have had a collision
and nd yourself entangled with someone else’s glider try to make sure you
don’t throw the reserve into the entanglement, as this will delay the ope-
ning.
When you y, train to reach the rescue handle so you can act promptly in
case of emergency!
If you have enough height, rst try to resolve the problem and stabilize the
glider as far as possible. If you have not enough height, do not wait to pull
the rescue. Do not forget to release the rescue handle!

QUADRO SERIES - user’s manual
10
EN
4 - PACKING INSTRUCTIONS
It is advisable that the reserve parachute be folded by qualied and expe-
rienced folders before installation in the harness. The effectiveness of your
reserve parachute depends on correct folding.
If you wish to perform the folding process yourself, we recommend that
you follow the instructions carefully and, in case of any doubt, contact qua-
lied and experienced staff.
4.1 - Packing preparations
Before you pack the rescue system it is important that the canopy is spread
out on the ground for about six hours.
If possible, it would be even better to air it one night long by hanging it up by
the top lines. Before the rescue system gets packed, a release control must
be carried out. The release force should be between 5 and 7 daN.
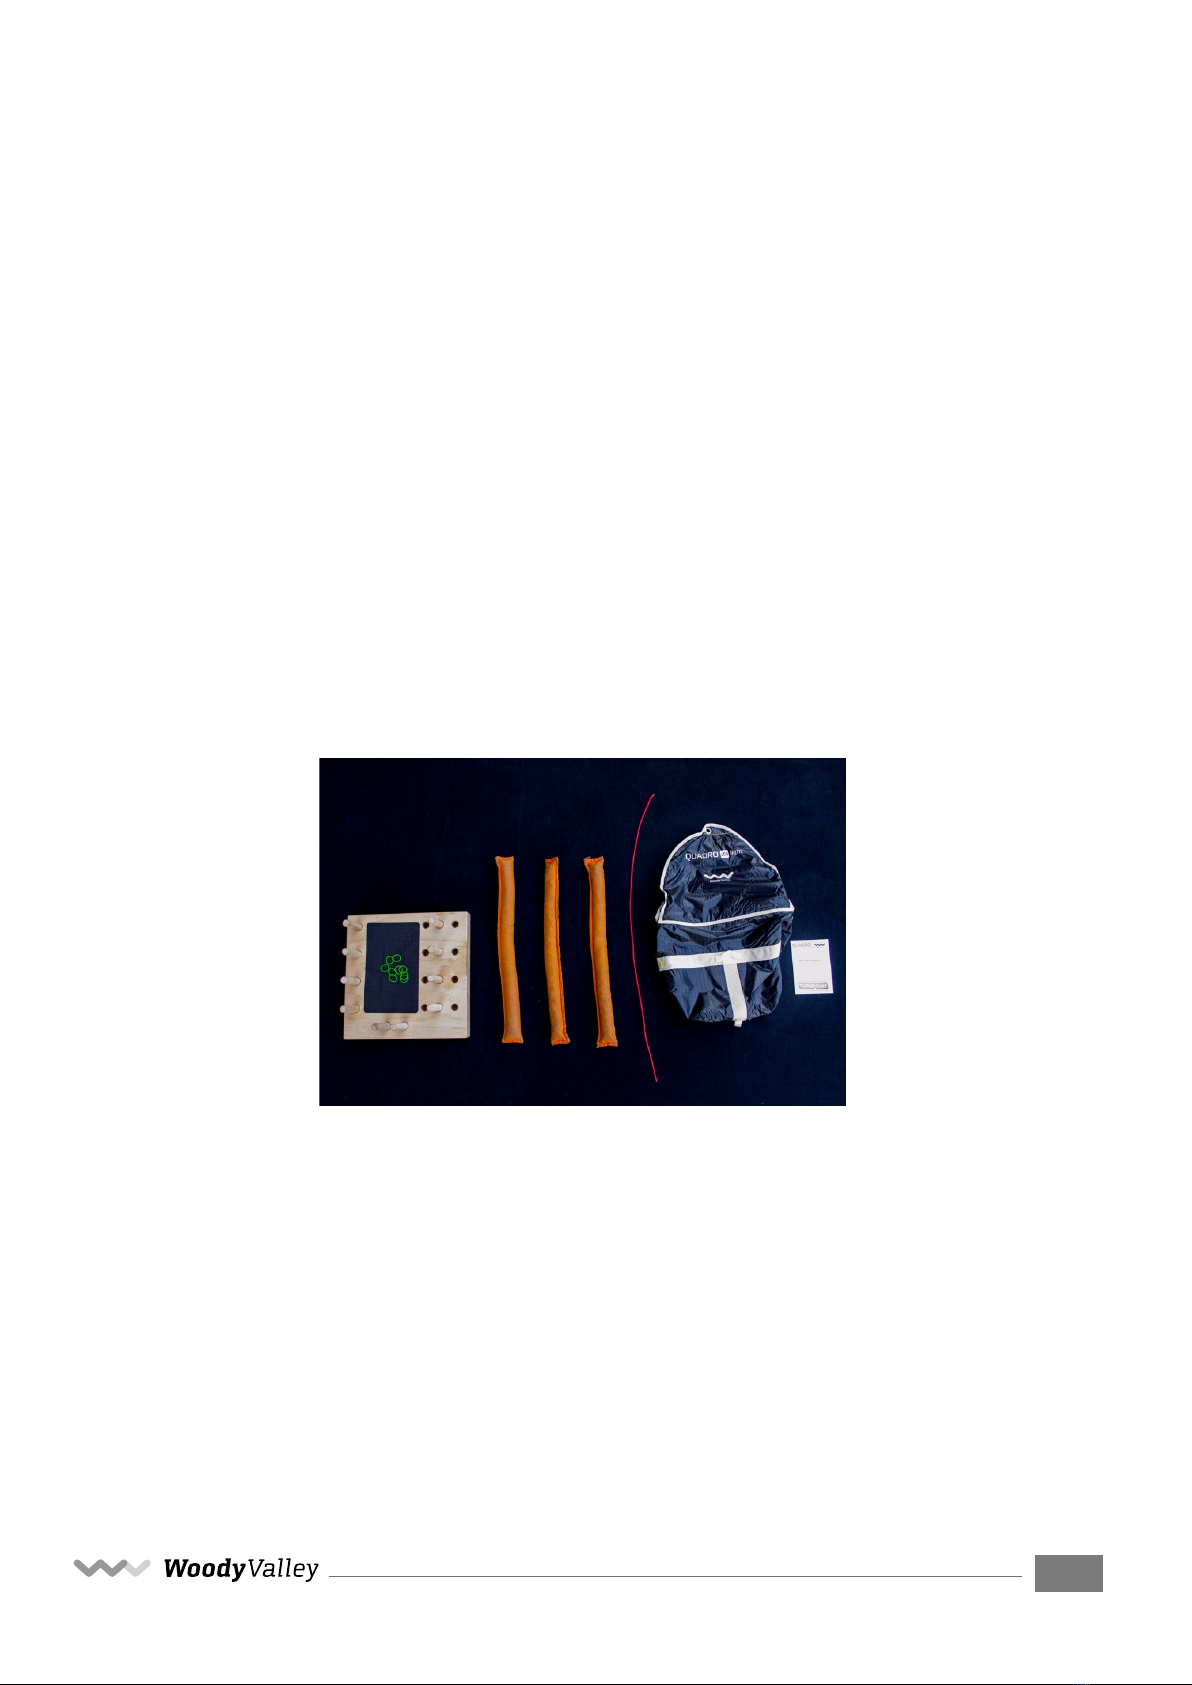
It is helpful to pack the rescue system with two people.
The rescue should be packed on a clean surface and helpful tools are packing
weights, one line to x the packing loops.
Mandatory tools are packing rubbers and the original container or the con-
tainer belonging to the harness in which the QUADRO will be stored.
We suggest having two xing points to tension the lines.
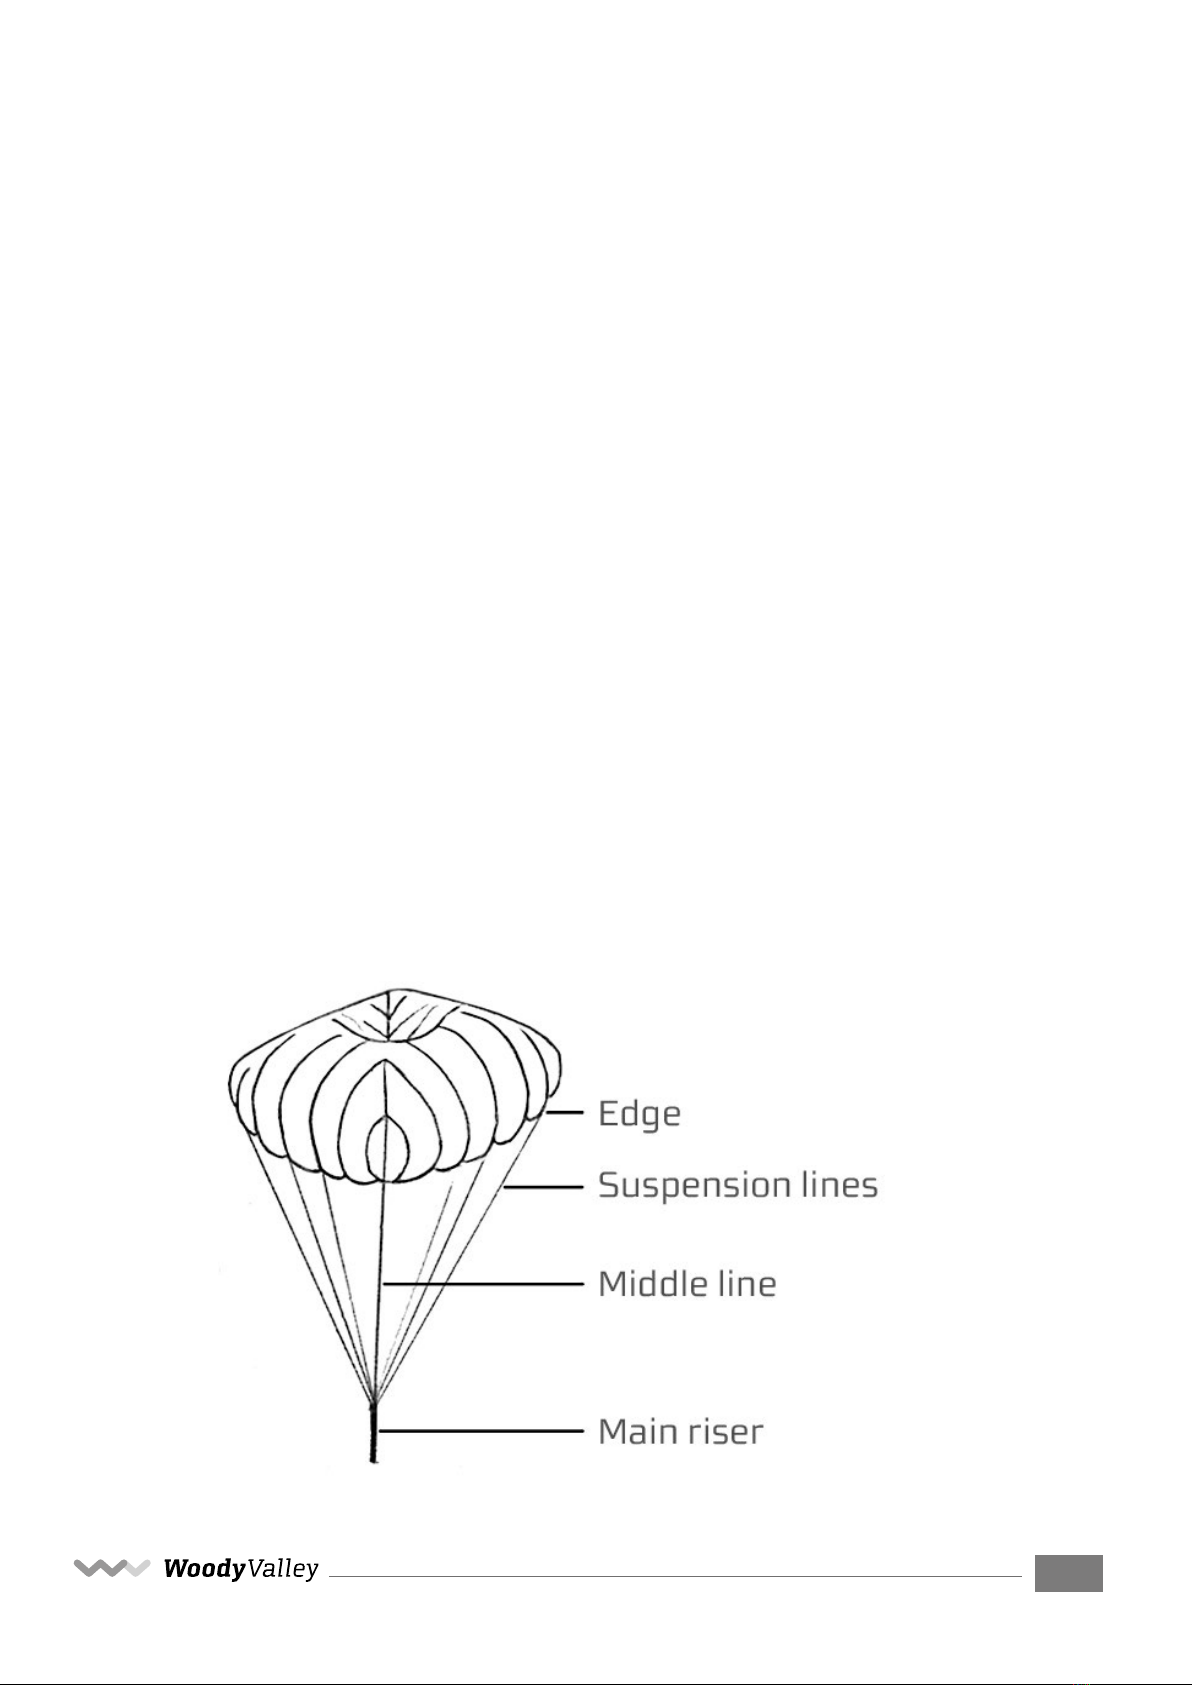
Upwards, used in the following text means toward the apex, downwards
towards the riser. Left and right are meant while looking from the riser to
the apex.

QUADRO SERIES - user’s manual
11
EN
4.2 - Check for the lines and xing the packing loops
Layout the parachute on the ground and keep the parachute rufed.
Secure the main belt on a xed point to keep it stretched and under tension.
Check for the lines to run freely from the main riser loop connection to the
canopy edge.
ATTENTION:
There should not be any tangles or knots in the lines. All lines
must have a straight course and may not have any twists.
For easy control divide the lines in two sections with the same numbers of
lines, the apex line must be placed in the middle.
Start sorting your emergency from the panel:
- number 10 for Quadro 100 light
- number 12 for Quadro 120 light and Quadro 140 light
- number 14 for Quadro 220 light
Hold it to your left, as in the picture below. You do not need to be precise at
this stage; the important thing is to have the same amount of “segments”
on both the left and right side.
In this way, your emergency is already in order for the next steps.

QUADRO SERIES - user’s manual
12
EN
To help you pack the rescue system, use a short piece of old paraglider line
and thread it through all the apex xing loops. The xing loops are sewn on
the canopy.
Depending on the model the Quadro series have different numbers of
packing loops attached to the canopy to enable an easy repack:
Quadro 100 light has 8 packing loops
Quadro 120 light has 10 packing loops
Quadro 140 light has 20 packing loops
Quadro 220 light has 20 packing loops
Quadro 100 light
Quadro 120 light & 140 light
Quadro 220 light

QUADRO SERIES - user’s manual
13
EN
It is advisable to tension the emergency to facilitate folding.
4.3 - Sorting the panels
Put all the panels to the right side and fold over each panel from the right
side onto left side like turning the pages in a book and pull the top of the
opening outward.
Start with panel 10 for Quadro 100 light, instead, respectively, with panel
12 for Quadro 120 light or for Quadro 140 light and panel 14 for Quadro 220
light.
The last one is panel 1, which should be the top panel on the left side.
Panels with slots are laid out as cone.
Put a packing weight for xation on the last panel and than all the panel
from the right side can be shifted to the that side.

QUADRO SERIES - user’s manual
14
EN
Now fold all panels stored above the packing weight to the right side.
The panel on the bottom is panel 11 at Quadro 100 light, panel 13 at Quadro
120 light and Quadro 140 light, panel 15 for Quadro 220 light.
Afterwards check both sides.
On each side there must be the same amount of panels.
Once more check the lines. You can divide the lines in to three parts: the left
ones, the right ones and the middle line.
All lines must have a straight course and may not have any twists.
Take care that the internal edges between the panels are neat and properly
tensioned.

QUADRO SERIES - user’s manual
15
EN
4.4 - Folding the canopy into thirds
The left third is folded into the middle and then the right third is folded un-
der the middle. Do the same on top of the canopy.
Pay attention to the size of the container !
ATTENTION:
Remove the line from the xing loops!

QUADRO SERIES - user’s manual
16
EN
4.5 - S-folding canopy to t into inner container (standard version)
Release the riser from the xing point and fold the canopy in “S” folds from
the top right down to the base, so that it ts into the inner container. This is
the last chance to check, that the line xing the packing loops was removed.
Alternative way to refold:
Fold the whole canopy into the container.

QUADRO SERIES - user’s manual
17
EN
Close both sides of the inner container and the top pocket with the rubber,
which you x with one loop of all the suspension lines.
ATTENTION:
These are special rubber bands which you can buy from the manufacturer
and you must renew them each time you repack.
The suspension lines are sorted in three bundles, which are xed by rub-
bers. These bundles are stored in the pocket of the container.
Use the last 20 cm of the suspension lines for the nal closing of the inner
container with the black rubber.
With the rest of the suspension lines you nalize the closing of the inner
container by pulling the suspension lines through the black rubber loop.
Don’t make the closing loop to big.
Now the packing is nished. Control your packing tools on being complete.
Make a note of the date of packing in the pack control booklet.

QUADRO SERIES - user’s manual
18
EN
5- INSTALLATION ON THE HARNESS
The QUADRO series rescue parachutes are compatible with all WOODY
VALLEY harnesses. They can also be used with most other manufacturers’
harnesses, as long as you rst make sure with your instructor/dealer that
everything works properly.
5.1 - Connecting the reserve parachute to the harness
Follow the instructions from your harness manual to place your rescue sy-
stem inside the container.
5.1.1 - Attachment of the connection bridle with the harness
To attach the reserve parachute bridle to the harness bridle, use a screw-
lock karabiner with a breaking strength of at least 2,400 kg. The bridles
should be held in position within the karabiner using elastic bands, to pre-
vent the karabiner from rotating and taking the strain laterally instead of
vertically. The karabiner’s screw-lock should be tightly screwed shut to
avoid any possibility of it opening accidentally.
5.1.2 - Installing your rescue handle
Most harnesses have their rescue handle connected to their rescue inner
container. The Quadro inner container has three loops to which a handle
can be attached: one in middle and two on the sides. Please read the in-
structions in the harness manual to know exactly which loop you must con-
nect your rescue handle to.
ATTENTION:
Note the instructions for the rescue unit in the operating instructions of
your harness. If there is no handle of the harness or it does not t with your
inner container, please ask the dealer of your harness or your paragliding
school. The handle must be rmly connected to the loop on the inner con-
tainer.

QUADRO SERIES - user’s manual
19
EN
5.1.3 - Installation of the rescue parachute in an external container
If your harness does not have a built-in container, you can still use the QUA-
DRO series rescue parachutes with an external front container.
WOODY VALLEY can provide an optional front rescue container with rescue
handle in different versions. We recommend that you carefully follow the
instructions in the manual and connect the bridle on both main carabiners.
The possible use of other manufacturer’s front container depends on size
and therefore you must make sure it is not too small.
If in doubt, seek professional advice.
5.1.4 - Connection of the tandem reserve parachute
The tandem emergency connection requires the sole addition of the V line
for TANDEM. Then connect the V line with the main or exclusive rescue at-
tachment point to the top of each spreader bar (at the main loop). If your V
line has an auxiliary suspender it must be connected to risers B and C of the
glider after passing it through the main carabiners. The tandem emergency
will make the B-C- stall in case the emergency parachute is opened. Care-
fully follow the instructions in your tandem harness manual.
5.1.5 - Specics for paraglider winch launch
For winch towing please pay attention to the harness, paraglider and winch
manufacturers’ instructions. If you use a front container, make sure that
rescue system deployment is possible in any situation.
5.1.6 - Important points
Additionally, the following points must also be strictly followed:
- Only use the original release handle that is delivered with the harness.
Other release handles must not be used as they do not guarantee faultless
operation.
- The container must be of a suitable volume.
- When using an inner container with asymmetric attachment loop, it must
be placed inside the harness container in such a way so that the attach-
ment loop remains as close as possible to the release handle and the rescue
system does not get twisted during deployment.
- When placing the rescue system inside the harness container, it is abso-
lutely necessary to ensure the connection between the release handle and
safety pin is shorter than the connection between the release handle and
inner container.
- Install the release handle in the intended position in such a way so that the
connecting line is not under tension and the safety pin is not pulled out of

QUADRO SERIES - user’s manual
20
EN
the closing loop.
- After each packing, a test deployment must be carried out to ensure the
proper operation of the rescue system! Deployment from the ying position
must be possible without any difculty and according to the manufactu-
rer‘s specications.
- Only insert your rescue parachute in your harness after its back protection
has been installed.
5.1.7 - Compatibility- check
A control of every new combination of rescue system and harness/outer
container has to be carried out by either the producer of the harness or
the rescue system or an authorized person (dealer or ight instructor). The
activation of the rescue system in ight position has to be correct and in
conformity to the construction guidelines.
The check has to be recorded in the documentation of the rescue system.
The throwing movement should be practiced every time the rescue system
is repacked.
Check (regularly):
• connection of the rescue system to your harness
• connection of the harness and deployment handle
Check compatibility of rescue system and harness
In addition to a normal preight check (see manual of the glider/harness or
maybe towing device), check before each take off ensure that the rescue
container is closed correctly and the release handle is correctly positioned.
If the rescue parachute connection V line is removed after every ight (for
example: when you use a frontcontainer), correct bridle attachment must
also be checked.
This manual suits for next models
4
Table of contents
Popular Lighting Equipment manuals by other brands

Elation
Elation Rayzor Q12 Zoom user manual

MIIDEX LIGHTING
MIIDEX LIGHTING VISION-EL 75492 Notice Instructions

thomann
thomann STAIRVILLE LED Matrix Blinder 5x5 MKII user manual

ONNLINE
ONNLINE COW492 instruction manual

Red Arrow Trading
Red Arrow Trading WIL22LEDEMSCF installation instructions

Philips
Philips Bodine Cold-Pak B4CF1 installation instructions