manuals.online logo
Brands
  1. Home
  2. •
  3. Brands
  4. •
  5. Woosh
  6. •
  7. Bicycle Accessories
  8. •
  9. Woosh SWX02 48V Assembly instructions

Woosh SWX02 48V Assembly instructions

1
Sales: 01702 435566 — Support: 01702 684444 — E-mail: [email protected]
Important: For your own safety you must read this man-
ual before attempting to fit any part of the motor kit to
your bike. You must also ensure that you fit the kit in
strict accordance with the instructions in this manual.
SWX02 48V (REAR)
Hub Kit Fing Guide
2
Before you start the installaon of your kit, please read the following:
This kit is intended to be fied by someone who is competent and experienced at fing electric kits to
bikes. If you are not experienced and/or lack the necessary tools to complete any of the proceduresin
this manual, you should seek the advice of a professional who can fit the kit for you. If necessary, call us
on 01702 684444 or email us at support@wooshbikes.co.uk and we will try and put you in touch with
someone in your area that has the necessary experse to properly fit your kit. You will of course need to
pay for the technician to install your kit, these costs are not covered by Woosh Bikes.
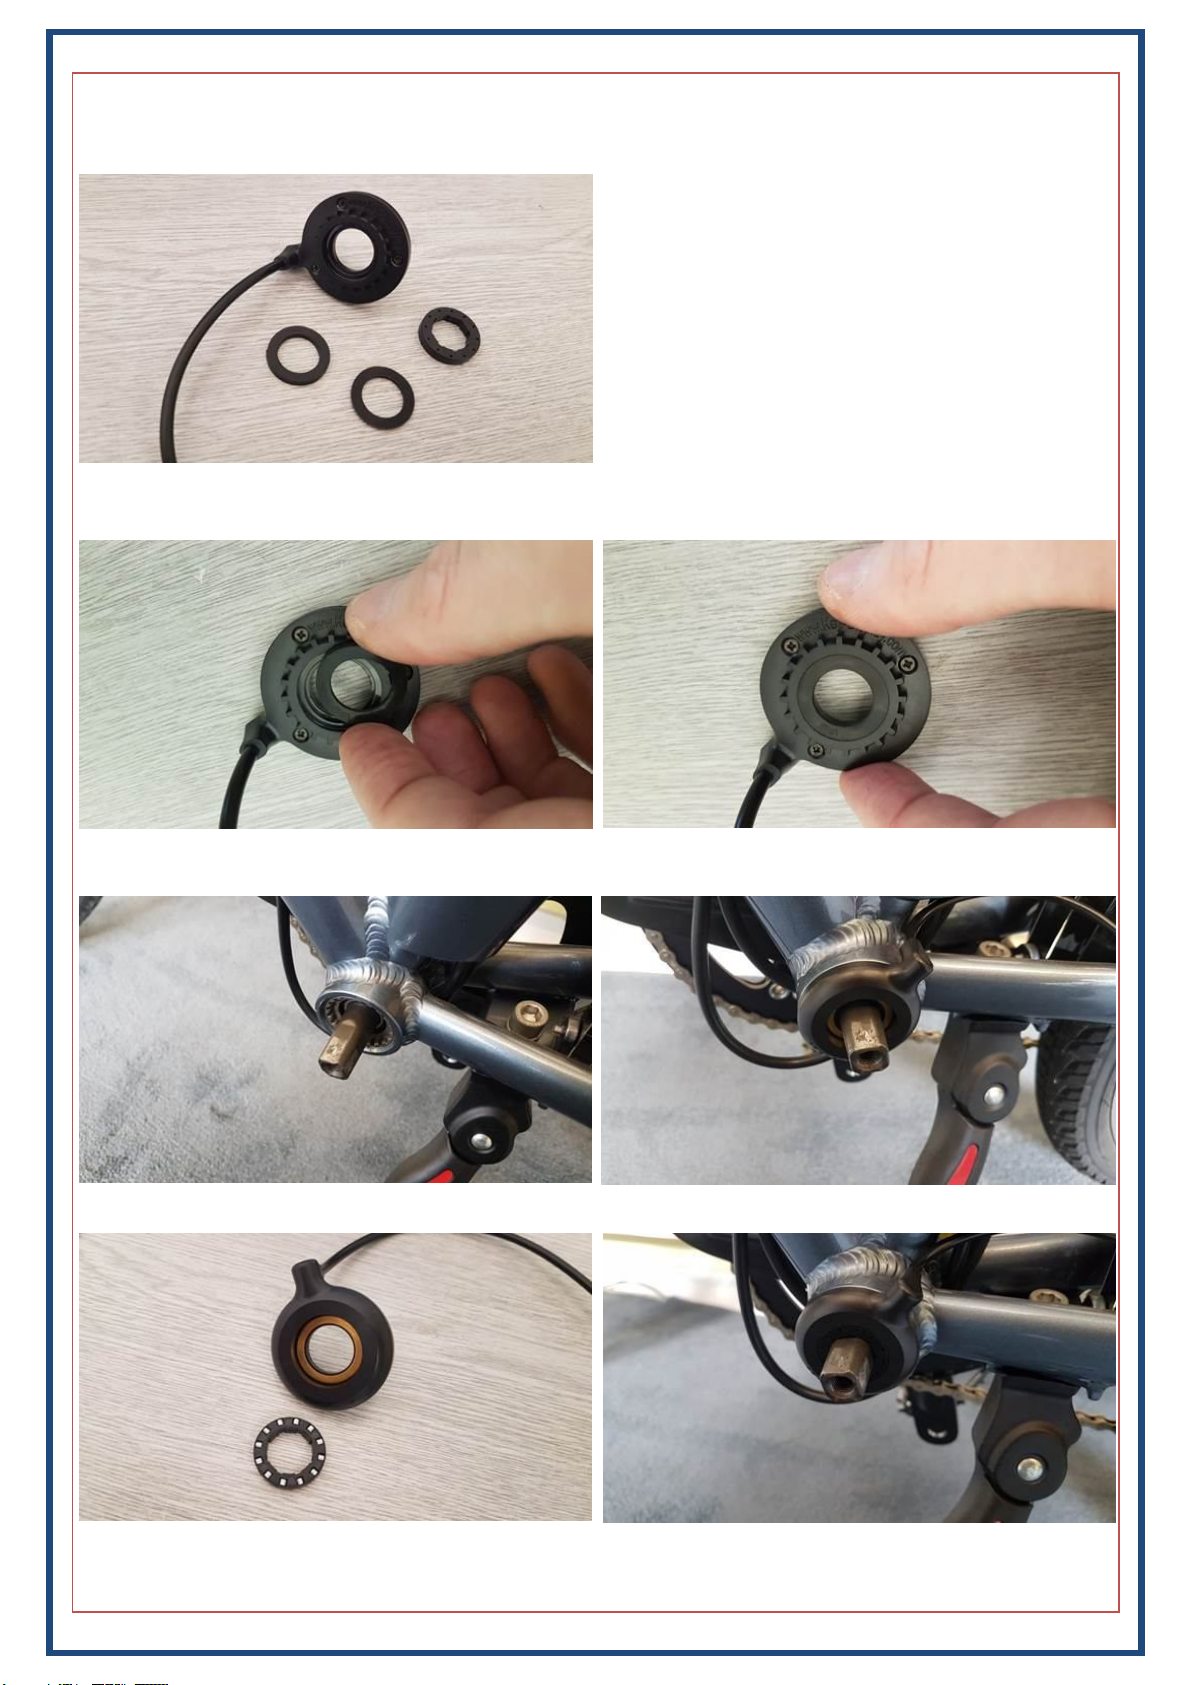
There are several different types of pedelec sensor, we would normally have determined which type is
suitable for your bike before you finalised your order. If we didn’t, please contact us before aempng
to fit your kit.
Warranty Terms:
If your kit is fied by a professional installer, it will be covered by our standard one year warranty, which
means that in the event of a failure, you would first need to have the person that installed your kit con-
firm the issue and likely cause, then you (or the installer) would need to contact us and provide us with
the details of the fault. If the issue cannot be resolved over the phone or via email, then you would need
to return the faulty part to us at your expense. We will then repair or replace the faulty part andsend it
back to you at our expense. If the kit was not fied by a professional and/or the failure that has occurred
is due to poor/incorrect installaon, or the kit has been used improperly, the warranty will be voided.
3
What’s in the Box
Ensure that you have all the parts listed below before going any further, if there are any missing parts,
contact us on 01702 435566.
The motor kit comprises of a motor wheel, a baery cradle with integral controller, a baery, a charger,
modular cable, pedal-assist disc and sensor, a throle, brake levers and an LCD. Ensure that you have all
of these items, a photo of the items is show below so you can easily idenfy each of the parts. Not shown
in the photo below are the baery itself and the motor wheel, and the pedelec sensor (as this differs from
kit to the next), ensure you have the complete kit before you start.
Baery cradle/controller
Modular cable
Thumb throle
Brake levers
KM529 LCD
Note: The speed sensor is internal to the motor on this unit, and so there is no separate sensor/magnet to
be fied.
4
Installaon of the various Pedelec Sensor types
There are three types of sensor kit that can be used, two that fit on the right side of the bike between the
chain-ring and frame, and the other le-side sensor which slots into the end of the boom bracket.
The standard right-side pedelec kit consists of two parts, these are the sensor itself and the PAS disc. You
will need to remove the boom bracket and then slide the sensor ring into place as shown below. With
the sensor in posion, you can refit the boom bracket. With the boom bracket re-installed, slide the
PAS disc over the spindle so that it is as close as possible to the sensor, without actually touching it.
You need to ensure that the disc is the correct way around on the spindle, otherwise you will find that the
motor kicks in when you pedal backwards!The disc should be fied such that the arrows on the disc are
on the le side.
The supplied sensor/disc may differ slightly from the one shown above, but the installaon procedure will
be the same.
A variaon of this same arrangement is shown below, it sll uses a PAS disc much like the above, but uses
a sensorwhich is mountedonto the downtube instead.
Sensor To controller
5
Le-side pedelec sensor
The le side sensor consists of the sensor itself, two rubber washers, and the magnet-ring—see below.
Remove the le crank, and then fit the thinner of the two rubber washers into the rear of the sensor.
Ensure that your boom bracket matches the one shown below, and then slide the sensor into posion.
Fit the plasc ring that incorporates the magnets. The silver magnets should face inwards.
6
Le-side pedelec sensor cont.
Slide the larger rubber washer over the spindle and then re-fit the crank.
7
Pedelec Sensor for Octalink type crank sets:
The diameter of the Octalink axle is greater and so the regular pedelec disc cannot be used. We are how-
ever able to provide a soluon for this type of boom bracket. We supply a modified pedelec disk which
has a larger hole in the centre which can be used, it needs to be secured to the back of your smallest
chain-ring in the case of double or triple rings. The sensor itself is then aached to the base of the seat
tube.
Pedelec disc
With the sensor in place as per the photo above, it now needs to be secured, the way you achieve this may vary depending on
your specific bike. In this example, we’re just using some cable-es.
The sensor is mounted at the base of the seat tube. The sensor is supplied with a single cable-e which is use to secure the
sensor to the seat tube.
The sensor needs to line up with the magnets embedded in the disc, so that it can detect the magnetsas they pass by.
Sensor To controller
Cable-e for
securing to
seat tube.
8
Baery Cradle/Controller
The HL baery/controller kit included with this conversion kit mounts to your down-tube where your
bole holder would normally be. If the bike does not have these fixings, you can fit the supplied riv-nuts
to allow you to mount the baery cradle. Ensure that you mount the cradle high enough up the frame so
that the baery/cradle does not foul on the chain-ring. You will also need to ensure that there is sufficient
clearance at the top end of the baery/base, the baery needs to be slid upwards and towards the front
of the bike a lile when removing it.
Once the base has been secured to the frame, fit the baery in place and double-check that that you have
enough clearance at either end, and adjust the posion of the base if necessary. You should then remove
the baery and connue on with the installaon of the kit. Do NOT connue the installaon with the
baery in place. You should only re-fit the baery when all leads have been correctly terminated/secured
and the kit installaon is complete. If you leave the baery aached, you may accidentally short some-
thing and cause damage to the baery and/or kit components.
Truing your wheel:
The wheel will come with a spoke tool, it will likely be necessary foryou to true your wheel. You should
ensure that the spokes are all sufficiently ght, then adjust the tension of the spokes to ensure the wheel
runs true. It may be necessary to adjust the alignment of the wheel, this is also done by adjustmentof the
spokes. If you’re not sure how to do this, you should ask your local bike shop to do this for you.
9
Motor Wheel
Remove the exisng rear wheel and swap the tyre, tube and freewheel to the new motor wheel. If you
had a cassee previously, you should have ordered a suitable freewheel from us at the same me you or-
dered your kit, we will normally have fied the freewheel to the motor before despatching your kit.
If you have purchased this kit and cannot carry out one or more of the procedures in this manual ordo
not have the necessary tools to complete these procedures, you should seek the advice of a professional
who can fit the kit for you.
You must ensure that the motor cable where it exits the spindle, points downwards towards the ground,
see below for photos showing how the wheel should be fied and the correct orientaon of the cable.
Once the wheel is properly installed, slide the rubber covers in place and secure the motor cable tothe
frame using cable–es. The rubber cover for the side where the cable exits the spindle will need to be slid
along the cable, and it should be fied in such a way that the hole in the rubber cover keeps the motor
cable poinng downwards as much as possible—see below. Also ensure that the metal coil/sheath is all
the way down the cable so that it protects the cable from the edges where the cable exits the motor.
The red arrow on the diagram above shows the usual route for the motor cable, with the quick-release
connector (in the cable) indicated by the solidred box.
10
Handlebar Components:
The thumb-throle, brake levers and LCD need to be mounted to the handlebars. The installaon proce-
dure for these parts may vary a lile from bike to bike, but follow the guide below for a general overview.
The LCD would normally be fied to the le side of the handlebars just to the right of the grip, this way
the buons can be easily reached with your thumb. To fit the thumb-throle, slide the grip off the right
side, loosen the exisng components such as the shier, brake lever etc. then slide the thumb-throle on
and then secure it (and the other components) back in posion.
Depending on the configuraon of the bike, it may be more praccal to mount the throle and display in
slightly different locaons or on opposite sides. The next step is to run the modular cable (for the LCD,
throle and brake cut-outs) from the front of the bike, along the down-tube and back to the controller.
11
Handlebar Components cont.
Youmust ensure that there is enough play in the cables so that they do not get stretched or pulled when
the handlebars are rotated.
The connectors for the throle (yellow), LCD (green) and brake levers (red) are colour coded and should
be mated with the matching colours on the modular cable. There are arrows on each connector which
indicate how to line them up, see photos below.
Ensure that the arrows line up on both sides before pushing the connectors firmly together, be careful
with them and don’t force them or you may bend/damage the pins. Also be sure to mate the cables with
the matching coloured connectors.
If you have too much slack in the cables, you will need to secure them with cable-es as dily as possible.
Ensure that none of the cables are hanging loosely or in a posion where they may get caught on any oth-
er parts whilst the bike is being ridden.
Note: Don’t be alarmed if you see a join in the pedelec cable, this has been modified specifically to suit
your kit and is of course covered by our warranty.
12
Controller Connecons:
Exing from the boom of the baery base/cradle are three cables, these are for the motor wheel, the
pedelec sensor and the modular cable. The modular cable runs up to the handlebars and connects to the
LCD, the thumb-throle and the brake levers. All of the connectors have arrows on them that need to be
correctly aligned before pushing the connectors firmly together.
Modular cable
(to handlebars)
To pedelec sensor
To motor wheel
13
Warning:
The display comes pre-configured and limited to 15mph. Incorrect settings could cause damage to the kit
components and also result in a bike that is not UK road legal. Modifications made to the controller config-
uration will void your warranty if found to be a contributing factor to a failure.
Turning Control Module On/Off
To turn on the control module press and hold the top (Mode) button. Press and hold the same button to
turn off the module and disable all electric features of the bike.
Turning Backlight On/Off
To turn on the display backlight, press and hold the “Up” button. Press and hold the same button to turn it
off.
Varying Pedal Assist Level
To alter the level of assistance provided simply press the Up/Down arrows to cycle through the 5 levels of
assistance. Level 1 offers the least assistance while level 5 offers the greatest assistance.
Speed Display Mode
There are three different modes for the speed display, these are current speed, average speed and maxi-
mum speed. To switch between these modes, press and hold the “Up and Mode” buttons for approx. 1
second to cycle through the modes.
Walking Mode/Start– Aid
The bike also supports a walking mode which is basically a very slow mode allowing you to walk next to
the bike at approx. 6m/h. This is activated by pressing and holding the “Down” button. As soon as the but-
ton is released, the bike will stop. This can be used to start off, if you find it difficult from a stand-still.
Display Mode
To switch between Odo (overall distance travelled) and Trip mode (current trip distance travelled), press
the “Mode” button. To reset the trip computer press and hold both the top and bottom buttons.
LCD—Control Panel
The display has many advanced features and modes, these include back-lit display (for night riding), indi-
cator options for max speed, average speed and current speed and a battery power indicator. It also fea-
tures a walking mode which is used when you want to wheel/push the bike, this is basically a very low
speed mode which is activated by pressing and holding the minus (-) button, this can also be used as a
start-aid.
On/Off/Mode buon
(+) or UP Buon
(-) or Down Buon
Baery Level
Speed
Odometer
Assistance Level
14
Baery care:
Some care is needed to ensure that the baery performs at its best and lasts as long as possible. All
baeries age over me, and the way that they age is that the range you can achieve will gradually de-
crease. Follow the instrucons below to ensure your baery performs as well as possibly for as long as
possible. Charge the baery once or twice per week as needed.
Do NOT charge the baery in extremely cold condions. The baery can be easily removed from the bike
and charged whilst off the bike if it’s more convenient. Allow the baery to warm up to room tempera-
ture before charging.
If the baery is not in regular use i.e. over the winter, you should charge the baery for around 10
minutes ever three to four weeks. When the bike is to be put back into service, fully charge the baery as
normal. Try and keep the baery around two thirds full when not being used.
General baery care:
Do not aempt to open the outer casing of the baery.
Do not aempt to repair the baery.
Do not immerse the baery in water.
Keep the baery away from children.
Do not drop, pierce or otherwise damage the baery.
Ensure the baery is not exposed to temperatures above 55 degrees Celsius or extreme humidity.
Do not use the bike in an environment where temperatures are below -5 orgreater than 55 degrees Cel-
sius.
Lithium baeries do not perform at their best during the winter months, and so the range may vary from
one season to another.
Charging the baery:
Plug the charger into the socket on the right-side of the baery, then plug the other end into the mains
socket and switch it on. While the baery is charging, the LED on the charger will glow RED, when charg-
ing is complete, the LED will go GREEN. If the charger is on but not aached to the baery, the LED will
also be GREEN. If you experience a sudden drop in capacity, run the baery down quite low, then fully
charge it. Once full, leave the charger switched on and connected to the baery for a further two hours.
This will help to balance the cells internally and restore normal operaon.
15
© 2018 Woosh Bikes Limited
Woosh Support:
Our contact details are below.
It can sometimes be useful to see the issue you have, so if possible, email a couple of photos illustrating
the problem and we’ll normally get back to you within an hour or two (on weekdays).
Support staff are not available at the weekends, though if you send an email, it will normally be read and
replied to on the following Monday (except on bank holidays).
Email: kits@wooshbikes.co.uk
Telephone: 01702 684444 (If there is no answer, leave a brief message and we will call you back).
Support staff are available 10am to 5pm Monday to Friday.

Other Woosh Bicycle Accessories manuals

Woosh GSM CD Kit Assembly instructions

Woosh

Woosh GSM CD Kit Assembly instructions

Woosh 36V HL Assembly instructions

Woosh

Woosh 36V HL Assembly instructions

Woosh HL30 Assembly instructions

Woosh

Woosh HL30 Assembly instructions

Woosh Hub Kit Assembly instructions

Woosh

Woosh Hub Kit Assembly instructions

Woosh KM529 User manual

Woosh

Woosh KM529 User manual

Woosh VLCD5 User manual

Woosh

Woosh VLCD5 User manual

Popular Bicycle Accessories manuals by other brands

Magellan CYCLO 315 Series user manual

Magellan

Magellan CYCLO 315 Series user manual

Cateye Velo Wireless + owner's manual

Cateye

Cateye Velo Wireless + owner's manual

Cateye STRADA CADENCE CC-RD200 quick start

Cateye

Cateye STRADA CADENCE CC-RD200 quick start

OKBABY SIRIUS Instructions for use and assembly

OKBABY

OKBABY SIRIUS Instructions for use and assembly

Profile Design AERIA1 EVO manual

Profile Design

Profile Design AERIA1 EVO manual

Contec C-900 manual

Contec

Contec C-900 manual

xLab Torpedo Kompact instruction manual

xLab

xLab Torpedo Kompact instruction manual

foc.us DROPPER POST Information sheet

foc.us

foc.us DROPPER POST Information sheet

eBike P850C manual

eBike

eBike P850C manual

Contec Nara Air Link+ manual

Contec

Contec Nara Air Link+ manual

ARGON18 340A Assembly guide

ARGON18

ARGON18 340A Assembly guide

xLab TORPEDO VERSA 500 instructions

xLab

xLab TORPEDO VERSA 500 instructions

monkey lectric m133s Monkey Light manual

monkey lectric

monkey lectric m133s Monkey Light manual

parktool TNS-4 instructions

parktool

parktool TNS-4 instructions

Masterlock 8195EURDPRO quick start guide

Masterlock

Masterlock 8195EURDPRO quick start guide

parktool PCS-12 instructions

parktool

parktool PCS-12 instructions

SON Edelux II DC user manual

SON

SON Edelux II DC user manual

MAHLE X20 user manual

MAHLE

MAHLE X20 user manual

manuals.online logo
manuals.online logoBrands
  • About & Mission
  • Contact us
  • Privacy Policy
  • Terms and Conditions

Copyright 2025 Manuals.Online. All Rights Reserved.