Worthington Bernzomatic WK5500OX User manual

08/19/16
INSTRUCTION MANUAL
Trigger-Start Torches
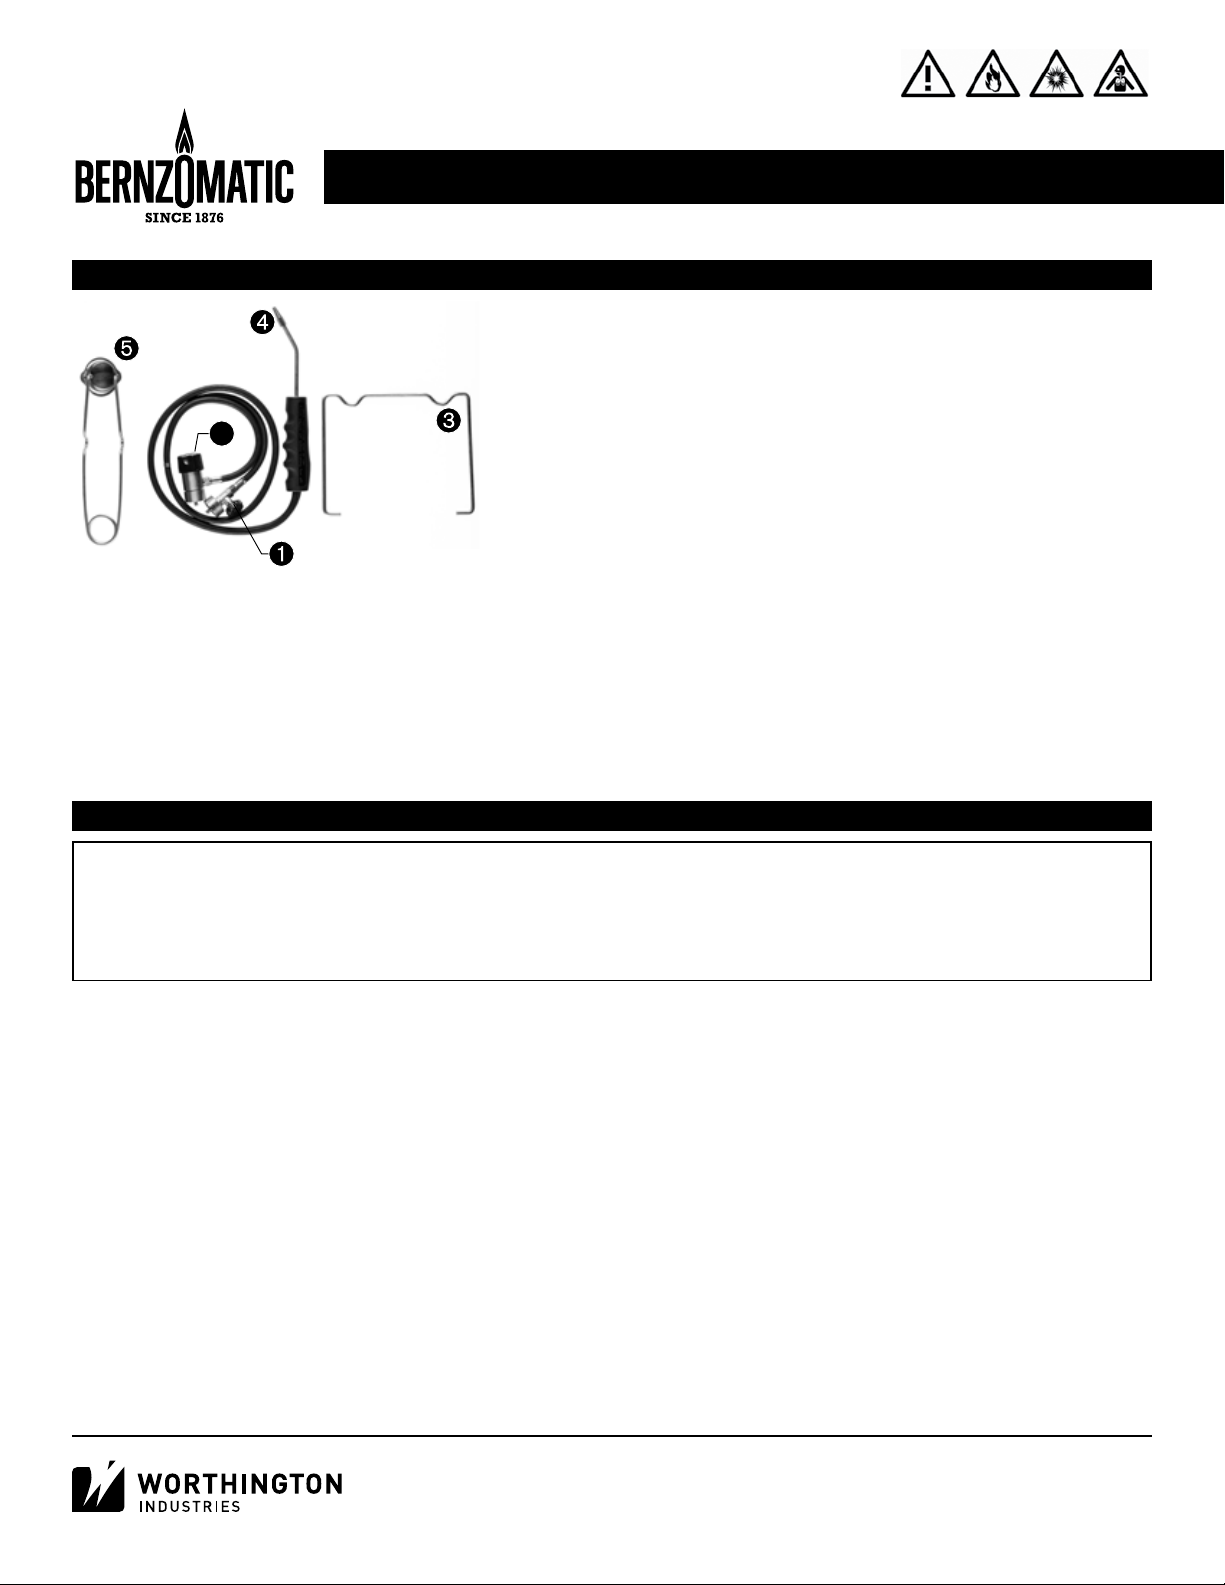
Models: WK5500OX
DANGER
EXTREMELY FLAMMABLE GASES USED WITH TORCH.
FIRE/EXPLOSION HAZARD. CARBON MONOXIDE HAZARD
This oxygen brazing and cutting torch is unlike most hand held torches.
It is designed to be used simultaneously with an oxygen cylinder and a
MAP-Pro™ or propane cylinder. The use of an oxygen cylinder results in
the torch flame burning at much higher temperatures as it would without an
oxygen cylinder. Do not use this torch until you become thoroughly familiar
with its proper use and potential hazards. In particular, you must not attempt
to ignite the torch while oxygen is flowing to the torch. Further, when turning
the torch off ALWAYS TURN OFF THE OXYGEN BEFORE TURNING OFF THE FUEL GAS. Turning off the fuel gas while oxygen is still
flowing could result in a flash back and an explosion.
Read and follow the instructions and warnings in this manual. Familiarize yourself with the torch before lighting and using.
Review instructions and warnings periodically to maintain awareness. Do not try to operate before reading instructions and
without being thoroughly familiar with this torch’s use and potential hazards.
Failure to comply with these instructions and warnings may result in damage to property, serious personal injury, or death.
WARNING
• While the Oxygen-MAP-Pro™Torch is not a commercial oxygen torch, it produces flame temperatures up to 5300°F.
This is much hotter than the flame of a standard propane torch. These extremely high temperatures can cause serious
personal injury or damage to the metal you are working on if not handled carefully and correctly.
• Never point the torch toward the cylinders or let the flame deflect to heat the cylinder in any manner.
• Do not permit grease or oil to be placed on or come in contact with any portion of the torch, hoses or cylinders,
particularly the oxygen cylinder, oxygen connection, oxygen regulator or oxygen hose as oxygen can cause the grease
or oil to burn in an uncontrolled manner.
• Keep torch out of reach of children and anyone who has not read instructions. Do not point torch towards face, other
persons or flammable objects. Never attempt to use torch as a cigarette lighter.
• Disconnect cylinders when not in use.
Materials used in the construction of this device may contain brass (which may contain lead), a chemical known to the
State of California to cause birth defects or other reproductive harm.
Combustion by-products produced when using this device contain chemicals known to the State of California to cause
cancer, birth defects, or other reproductive harm.
ENG DANGER INCENDIE EXPLOSION FUMES
1
1
1
1
1

08/19/16
• Never attempt to modify the torch construction and never use unapproved accessories or fuels.
• Treat the torch as you would any fine tool or instrument. Do not drop, throw, or otherwise abuse.
• Do not use a leaking, damaged or malfunctioning torch.
• Always wear safety glasses, protective gloves and use proper tools to handle hot work.
• Radiant energy can harm your eyes. Wear glasses having an appropriate lens shade number (see 29 CFR 1926.102)
for the torch operation being done; brazing and light cutting (3 or 4), medium cutting and light welding (4 or 5), heavy
cutting and medium/heavy welding (5-8).
• Work only in well-ventilated areas. Avoid the fumes from fluxes, lead-based paint, and all metal heating operations.
Be careful to avoid fumes from cadmium plating and galvanized metal- remove these coatings in the area to be heated
by filing or sanding prior to heating.
• Never use torch to strip lead paint.
• Be careful when using the torch outdoors on sunny or windy days. Bright light makes it difficult to see the torch’s
flame. Wind may carry the torch’s heat back towards you or other areas not intended to be heated. Windy conditions
may also cause sparks to be blown into other areas with combustible materials.
• Heating a surface may cause heat to be conducted to adjoining surfaces that may be combustible or become
pressurized when heated. Always check to make sure no unintended parts or materials are being heated.
• Be aware that the tip of the torch can get extremely hot during use. Take precautions to protect yourself and others
from accidental burns.
• Never use the torch on or near combustibles. Be careful around motor vehicles or any gasoline-fired products and
beware of hidden fuel lines and tanks.
• Always make certain the torch is placed on a level surface when connected to the fuel cylinder to reduce the risk of
accidental tip over. Be sure the torch is not pointed in a direction which could cause nearby objects to ignite when the
torch is set down.
• Be careful not to overheat surrounding materials. Use a heat shield when necessary.
• Never leave the torch unattended when lit.
• Never attempt to repair or heat a gasoline tank, a chemical drum, an aerosol can, a compressed gas container that
held flammable liquid or gas or any other chemical. Heating these is extremely dangerous, especially after they have
been emptied because vapors may still be in the container.
• Always have a fire extinguisher and a bucket of water near the torch and work area.
• This torch consumes oxygen and must only be used in well ventilated areas. Do not use in a confined space.

08/19/16
OPERATIONAL WARNINGS
• Do not operate the torch with a flame that is less than ¼ inch long because it can overheat the mixing tube and cause
flame outage or flashback.
• Do not hold the tip of the torch too close to the work piece. This can cause the flame to go out, cause flashback and
weld the tip shut.
• Do not operate the torch if the section of the mixing tube that is directly in front of the torch handle becomes hot.
Although the section of the mixing tube immediately behind the tip of the torch can get hot, the section of the mixing
tube directly in front of the handle should never get hot. If this occurs, extinguish the torch immediately by turning OFF
the oxygen valve and then the fuel valve. Allow the torch to cool and then check the tip of the torch for blockage. If the
tip is unblocked and clean, relight the torch. If the section of the mixing tube that is directly in front of the torch handle
still becomes hot, discontinue use of the torch and contact Bernzomatic immediately.
• If the flame disappears unexpectedly, immediately turn OFF the oxygen valve and then the fuel valve. Disconnect the
oxygen and fuel valves from their cylinders and re-open the valves to bleed the hoses.
• Place the cylinder stand on a stable and level surface. Improper stand position, such as placing the stand on its side,
could cause accidental tip over leading to liquid fuel entering the hose and causing an excessively long flame. This is
called flare and is very dangerous. It can also cause the flame to go out.
• DO NOT USE THE TORCH IF THE HOSES SWELL DURING OPERATION. THE HOSES MAY RUPTURE UNEXPECTEDLY AND
CAUSE INJURY OR DAMAGE. If the hoses swell, stop using the torch by turning OFF the oxygen valve first and then the
fuel valve. Disconnect the valves from the cylinders and then re-open the valves to bleed the hoses. Replace the torch
assembly before relighting.
• Always use tools, such as tongs or pliers, to handle brazing/welding rods because they could be hot.
• Beware that certain surfaces can reflect and transfer the heat back to the torch handle causing damage or injuries.
• In cold weather the size of the flame will be smaller.
• Always carry the torch by the handle and make sure the valve side of the cylinders is not tipping downward, which
could cause the cylinders to fall out of the stand.

08/19/16
MAINTENANCE AND INSPECTION
HOSE CARE AND INSPECTION
• Hoses should be kept dry at all times and kept free of debris, caustic chemicals or liquids, especially oil, grease and gasoline.
• Do not pinch, twist, puncture or pull the hoses.
• Do not pull the hoses over rough surfaces or sharp edges.
• Do not tug or yank hoses or subject to other undue forces.
• Do not places hoses near heat or in the direction of the flame.
• Prior to use, inspect the hoses to ensure that there are no tears, cuts, frays or any other signs of deterioration or damage.
Do not use the torch if you detect any such conditions.
• Visually make sure that the tip is open and unobstructed. CAUTION: Do not operate with a blocked or deformed tip. Doing
so may damage the oxygen regulation resulting in leaks or permanent damage.
ASSEMBLY
1. Before attaching the hoses to the cylinders, make sure the oxygen and the fuel valves on the hoses are OFF by turning
the knobs clockwise until the knobs stop. Hand tighten only. Do not force.
2. Thread the fuel cylinder clockwise onto the fuel hose valve (1). Hand tighten only. Do not force.
3. Thread the oxygen cylinder counter-clockwise onto the oxygen hose valve (2). Hand tighten only. Do not force.
4. Place the cylinders, while attached to the hoses, into the stand (3). Do not attempt to ignite or use the torch unless the
cylinders are secured in the stand.
5. Place the cylinder stand on a stable and level surface. Improper stand position, such as placing the stand on its side, could
cause accidental tip over leading to liquid fuel entering the hoses and causing excessively long flame or flame outage.

08/19/16
LIGHTING AND OPERATION
LEAK TESTING
Whenever the hose or torch is connected to a cylinder and prior to attempting to ignite torch: check all joints and couplings
to ensure against loose connections. With the fuel valve and oxygen valve closed and without lighting, test the connections
between the fuel valve and fuel cylinder and between the oxygen valve and the oxygen cylinder with soapy water. If bubbles
appear, gas is leaking and torch must be repaired. Never use a flame to check for leaks. Conduct this test in a well-ventilated
and spark-free area where there are no open flames.
• Do not ignite the torch while oxygen is flowing to the torch.
• Point he tip of the torch (4) in a safe direction.
• To light with a spark lighter, (5) open fuel valve (1) slowly just before sparking. Hold spark lighter at a 45 degree angle to
the tip of the torch (4).
• Squeeze spark lighter to create sparks and remove once torch is lit.
Note: It is very difficult to light torch with valve fully open.
• Do not light with cigarette lighter or match.
• If ignition does not occur immediately upon opening the fuel valve, close the valve and wait 5 minutes before attempting
to ignite again. Failure to follow this instruction could result in a build up of flammable gas which if ignited could result in
a fireball that could cause injuries and property damage. Do not open the valve and allow gas to flow through the torch
without attempting to ignite the torch.
• After igniting, the flame will appear soft yellow.Adjust flame to be between 4 and 6 inches long.
• Then, slowly open the oxygen valve (2) until the flame has an inner blue flame about ¼ inch long. The outside flame may
be longer. This is the starting flame.
SHUT OFF AND STORAGE
• TURN OFF THE OXYGEN VALVE (2) BEFORE TURNING OFF THE FUEL GAS VALVE (1). Turning off the fuel gas valve while
oxygen is still flowing could result in a flash back and an explosion.
• When the torch is cool, disconnect the cylinders from the hoses and replace the protective caps on the cylinders.
• Disconnect the oxygen cylinder by holding the oxygen hose valve and turning the oxygen cylinder clockwise.
• Disconnect the fuel valve by holding the fuel hose valve and turning the fuel cylinder counterclockwise.
• Store the torch and cylinders separately and out of reach of children.
• Do not store torch and/or cylinders inside a vehicle.

08/19/16
PARTICULAR APPLICATIONS
SOLDERING/HEAT TREATING FLAME
Begin with the starting flame. Then, slowly increase the flow of the fuel by
adjusting the fuel valve (1) so that the yellow portion of the flame remains
in contact with the tip of the torch. Adjust the fuel valve (1) until the flame is
approximately 7 to 9 inches long. If the yellow flame loses contact with the
tip of the torch, reduce the flow of fuel until the flame is touching the tip of
the torch (4).
WELDING/BRAZING FLAME
From the soldering/heat treating flame, slowly increase the flow of oxygen
by adjusting the oxygen valve (2) until there is an inner blue flame ½ inch
long at the tip of the torch. At this flame setting, a full oxygen cylinder will
last approximately 18-25 minutes.
CUTTING FLAME
From the welding/brazing flame, slowly increase the flow of fuel by
adjusting the fuel valve (1) until the yellow flame is about 5 inches long.
Then slowly increase the flow of oxygen by adjusting the oxygen valve (2)
until the inner blue flame is about 5/16 inches long. The tip of the inner
blue flame is the hottest and should be in contact with the metal to cut.
Once the metal is sufficiently heated, and a molten puddle is present, increase the oxygen flow until the molten metal blows
away from the puddle. Move the torch slowly along the cutting line. If the torch is too far from the metal or moves too quickly,
the metal will cool and you will need to restart the cutting process. At this flame setting, a full oxygen cylinder will last
approximately 8 to 12 minutes.
Note: Cutting will generate flying sparks and hot metal drippings, so cut in an area that is away from flammables. Avoid
metal drippings contacting any part of the torch assembly and/or cylinders.
9 in.
(228.6 mm)
5/16 in.
(7.9 mm)
1/2 in.
(12.7 mm)

08/19/16
TROUBLE SHOOTING
NO FLAME/CANNOT OBTAIN ACCEPTABLE FLAME
1. Turn the oxygen valve (2) OFF and then turn the fuel cylinder (1) OFF. Disconnect the cylinders.
2. Make sure the torch and the tip (4) are completely cool and then move the torch and cylinders to a well-ventilated
area, away from combustibles and flammables.
3. Check the tip of the torch (4) for blockage.
4. Without igniting, connect the oxygen cylinder and turn on the oxygen valve (2) slowly (the fuel cylinder should be
disconnected). Then, hold a piece of paper in front of the tip (4) to see whether it moves. If not, replace the oxygen
cylinder and repeat the above step. This is to see whether gas is flowing to the tip (4).
5. If there is still no movement, the oxygen hose is clogged and/or there is some other problem, the torch assembly
needs to be replaced.
6. If the oxygen cylinder does cause the paper to move, then disconnect the oxygen cylinder and connect the fuel
cylinder. Repeat step 4 with the fuel cylinder. Be sure to only keep the fuel valve (1) on for one second or less.
7. If there is still no movement, the fuel hose is closed and/or there is some other problem, the torch assembly needs to
be replaced.
8. If both the fuel and oxygen lines caused the paper to move, check for leaks by following the instructions for leak testing.
9. If the paper moves and there are no leaks, then attempt to re-light. If you still do not get a flame, replace the torch assembly.
THE BRAZING OR WELDING RODS STICK TO THE METAL AND FAIL TO FLOW PROPERLY
1. Use the correct size flame for your job.
2. Make sure the tip of the blue flame is just touching the piece you are working on. If you move away slightly, the metal
will cool and the rod will not stick.
TORCH WILL NOT WELD
1. Make sure the metal has been cleaned and fluxed.
2. Use the correct size flame for your job.
3. Make sure the tip of the blue flame is just touching the piece you are working on.
4. Try using MAP-Pro™instead of propane for extra heat.
5. If the torch still fails to weld, the work piece may be too big for this torch.
THIS TORCH IS NOT RECOMMENDED FOR INDUSTRIAL OR COMMERCIAL USE.
Check out the collection of welding equipment & soldering tools we offer.
Table of contents