7
1
2
3
4
Operating instructions
Note: Before using the tool, read the instruction book carefully.
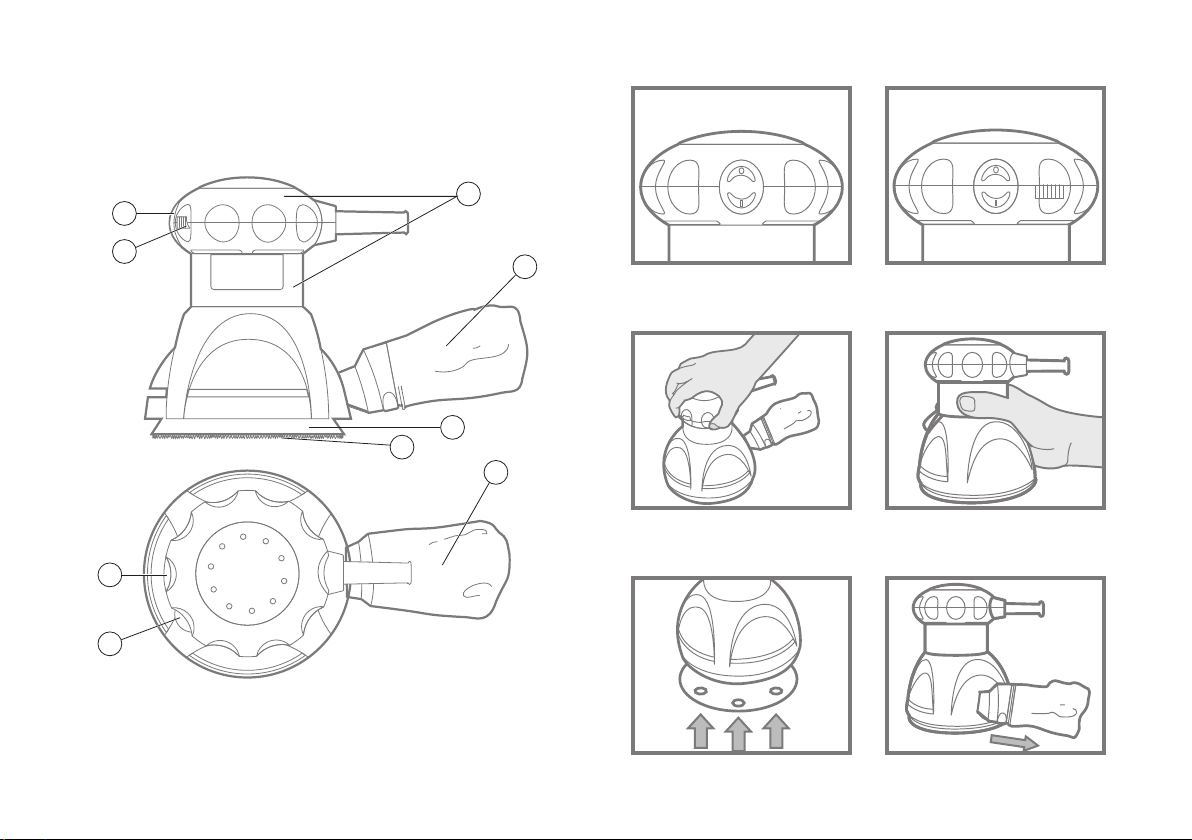
ON/OFF SWITCH
To start your sander, depress the protective cover over the switch at
the position marked ”I”. To stop your sander, depress the protective
cover at the position marked “0” (See A).
VARIABLE SPEED CONTROL AND FUNCTION
The unit is equipped with a variable speed control. This allows you to
adjust the speed in order to achieve different finishes (See B).
HAND GRIP AREA
Your sander is designed to be held either around the main housings
(See D), or by the top of the main housing (See C). When sanding for
long periods at a time, it is recommended you periodically alternate
between the two holding positions.
CHANGING HOOK&LOOP SANDPAPER
The sandpaper and sanding disc are provided with a hook and loop
attachment system to allow quick and easy changing of the sanding
and polishing accessories. Firstly, remove any dust or other objects
from the hook and loop on the sanding disc and sandpaper. As the
sandpaper has dust extraction holes you must align these with the
holes in the sanding disc, otherwise the dust extraction will not
function. To remove the sandpaper, lift one corner of the paper and
pull off from the sanding disc (See E).
DUST BAG
Always operate your sander with the dust bag fitted. For the best
performance always empty the dust bag in time. Open the zip and
empty the dust from the bag. To remove the bag (See F). To refit the
bag, firmly push the mounting bracket into the location on the sander
housing (See G).
ORBITAL SANDING
Guide your sander parallel to the working surface and move it in
circles or in a cross pattern. Do not tilt the tool in order to avoid
deep unwanted sanding marks. The amount of material removed is
determined by the speed of the sanding disc and the grit size used.
The speed of the sanding disc diminishes relative to the pressure
applied to the tool. For faster removal, do not increase pressure on
the tool, but use a coarser grit size.
SELECTING THE RIGHT GRADE OF SANDPAPER
• Different grades of sanding paper can be purchased from good DIY
shops. Available grades are Coarse, Medium and Fine.
• Use coarse grits to sand down rough finishes, medium grit to
smooth the work and fine grit to finish off.
• The higher the grade number, the finer the grit. For rough work start
with a low grade of grit. (e.g. 60 grit) and change to a higher, finer
grade (e.g. 100 or 120 grit) for finishing. If you use a fine grade for
rough surfaces it will soon clog and need changing.
• It is best to make a trial run on a scrap piece of material to
determine the optimum grades of sandpaper for a particular job.
PAD BRAKE
Your sander is equipped with a pad brake that prevents over-speeding
5
6
7
8