Worx WR213E User manual

Installation

MANUAL

3
EN
WARNING: Read all safety warnings and all instructions.
Failure to follow the warnings and instructions may result
in electric shock, fire and/or serious injury.
Carefully read the instructions for the safe operation of the machine.
Save all warnings and instructions for future reference.
1. HOW LANDROID VISION WORKS
In the following section, we would like to help you better understand how Landroid Vision works.
Landroid Vision is equipped with an AI (Artificial intelligence) camera sensor, enabling it to automatically work on its own. Landroid
Vision can identify areas that are lawn covered or not, it knows when it needs to return to its charging base, can sense when is
raining, can stop itself if it senses a problem and turn around when it sees something blocking its path. To prevent an accident,
Landroid Vision will also automatically stop its blade disc from rotating if it is lifted off the ground or any other safety issues occur.
Border management
No boundary wire or antenna installation, no maintenance or signal concern. With Landroid Vision deep learning technology
it knows where the boundary is, automatically mowing the lawn areas via grass and no-grass identification. To ensure its
safety navigation around your lawn area, there are some scenarios that need to be paid special attention to. Please refer to the
“preparation and planning” section.
Cut to edge
The special offset blade gets as close as possible to the border of your lawn, leaving you little or no trimming to do. Landroid
Vision is programmed to mow the edge twice a week on Monday and Friday. If you want to change this pre-set, you can modify it
via your smartphone or by using the control panel in “Work time-Customize Work time” section.
All day cut
With the optional FiatLux, Landroid Vision can work all day even at night and remain friendly to nocturnal animals like hedgehogs.
Otherwise the Landroid Vision can only work during the day.
Obstacle avoidance
Landroid Vision is able to detect objects ahead in real time using its AI camera technology, and an ever growing and extensive
database of images. Non-grass things, such as tree stump, water pipe and balls will be avoided.

4
EN
Easy cleanning
Landroid Vision is IPX 5 waterproofed and can be washed by using a regular garden hose.
Self-leveling cutting deck
Landroid Vision’s ‘Ground Tracer’ automatically adjusts the blade’s height to mirror small undulations on the lawn surface.
Charge itself
When your Landroid Vision needs to recharge its battery, it will stop mowing and follow the border in anti-clockwise direction back
to its charging base. Once charging is completed, Landroid Vision will automatically resume mowing or stay in the charging base
according to its mowing schedule.
Rain sensor & Rain delay
Landroid Vision is 100% weather proof and happy to be outside. But mowing wet grass does not give you the best result.
Landroid Vision is equipped with a rain sensor which detects rain and tells Landroid Vision to stop mowing and go back to
its charging base. Landroid Vision then re-starts mowing when the grass is no longer wet. The default Rain Delay time is 180
minutes. You can change the Rain Delay time setting via the Landroid Vision App.
No more grass clippings to collect
Landroid Vision’s daily mowing produces very short clippings that don’t need to be raked, or collected. These clippings are a per-
fect organic nutrient for your lawn. Frequent mowing boosts the density of grass blades and effectively prevents the propagation of
weeds.

5
EN
Cutting Height
Before starting your Landroid Vision at the first time, make sure your grass is not longer than 9 cm. If it isn’t, use a regular mower
to cut it before operating Landroid Vision. If you want to drastically shorten the height of your grass, it is recommended that you
do so progressively, by adjusting the cutting height in steps.
Security & PIN Protection
To prevent unauthorised people from being able to use it, Landroid Vision is protected by a PIN code that you can easily set up.
Besides, Landroid Vision also supports auto lock function to prevent children or bystanders getting access to the settings.
In more extreme weather
In case of a lightning storm, protect Landroid Vision by unplugging the charging base and making sure Landroid Vision is not
allowed to charge. In the Winter and especially in case of very cold weather and snow, we recommend you to store your Landroid
Vision inside. In some countries we offer a Winter servicing of your Landroid Vision so it’s ready for the Spring growing season.
Contact your dealer or check online for more details.

6
EN
2. WHAT’S IN THE BOX (See Fig. 1)
AWorx Landroid Vision GMagnetic strip pegs
BCharging tower HPower supply
CCharging base plate I20V battery
DSpare blades kits JMagnetic strip in green*
EHex key KManuals
FScrews LRFID
* Only for Landroid Vision
Not all the accessories illustrated or described are included in standard delivery.
3. PREPARATION AND PLANNING
Preparing your Worx Landroid Vision to work is easier if you carefully follow these instructions. In addition to this manual, you can
watch the comprehensive video tutorials on our YouTube channel*.
* This information is provided for your convenience but cannot subsitute the instruction manual and the safety instructions that
need to be read and understood.
Power up
Landroid Vision
Test and get
ready to mow
Patrol your
lawn to plan
installation
Install the RFID
Connect
charging
base to AC
Install the
charging base

7
EN
3.1 PATROL YOUR LAWN TO PLAN INSTALLATION
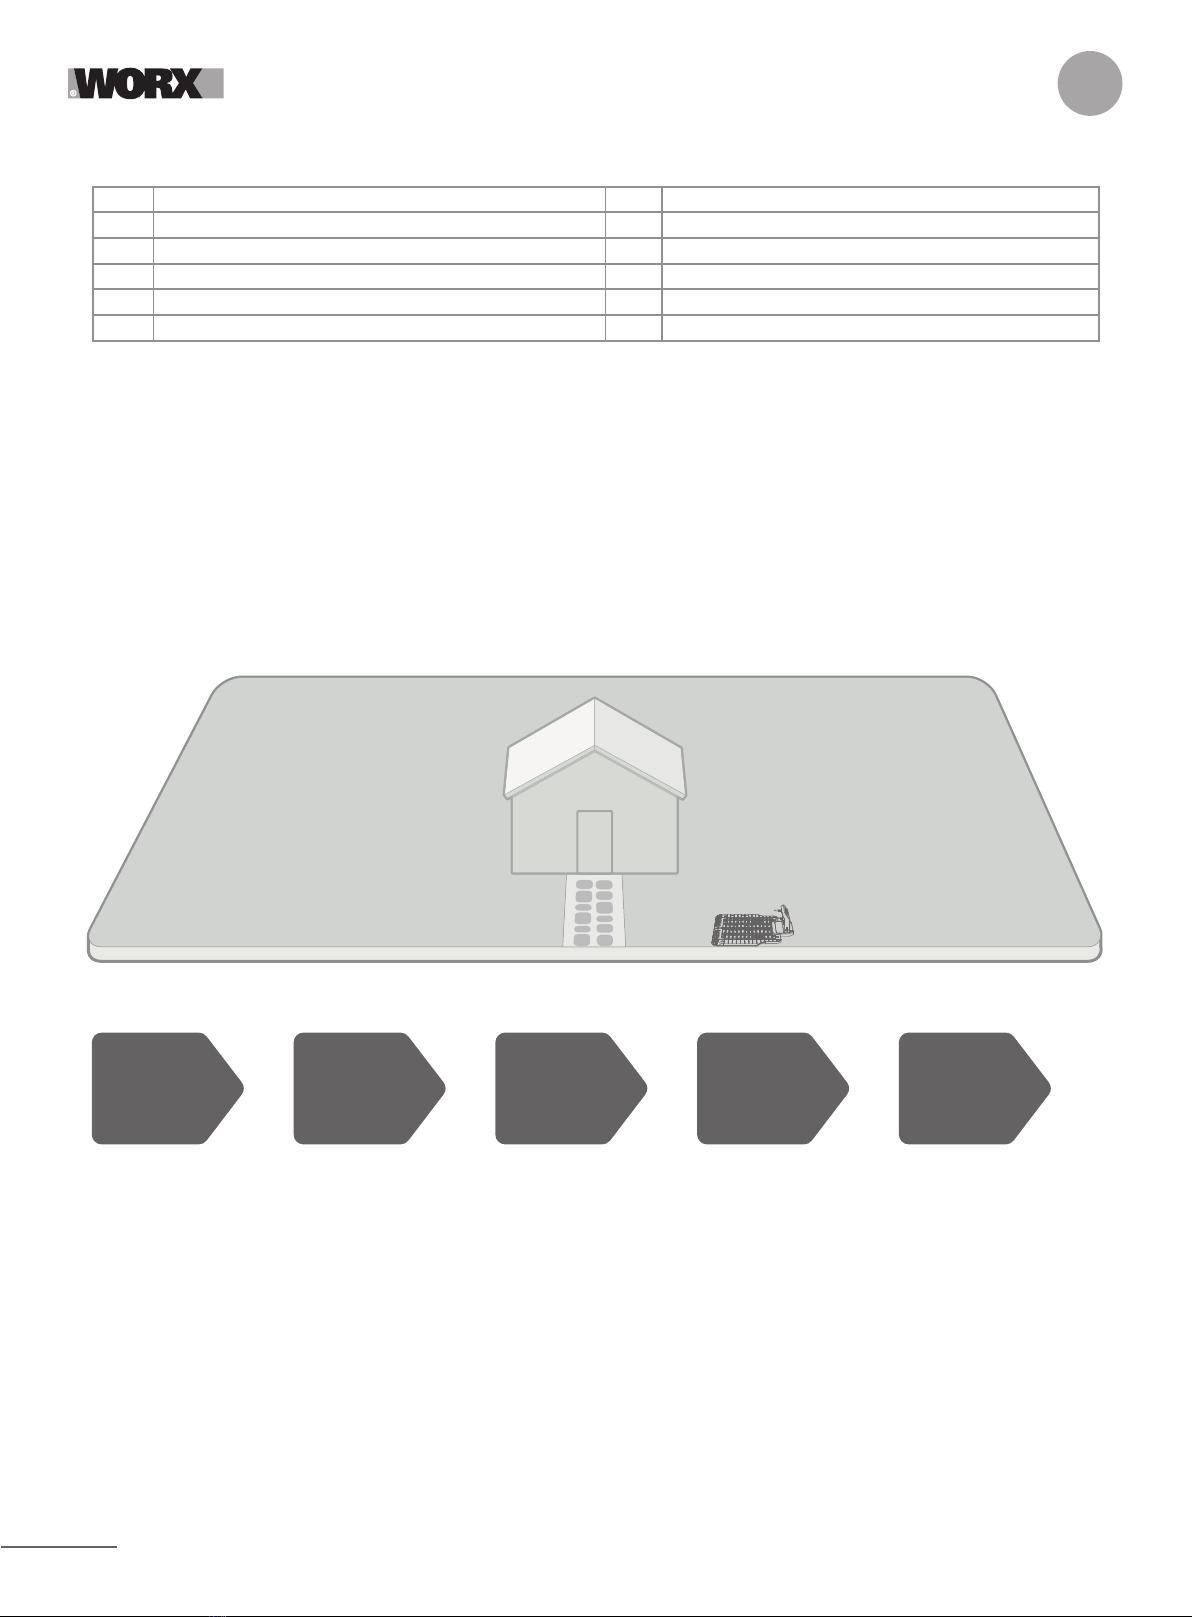
3.1.1 Plan for the charging base (See Fig. 2 - Fig. 4)
The charging base composed of charging base plate and charging tower, is where your Landroid Vision goes to have its battery
recharged. It’s also the parking lot where it rests in between one mowing session and the next.
Locate a proper position for it, bearing in mind:
A. The station needs to sit on flat land to ensure effective docking.
B. It needs 2 m straight driving path in front for Landroid Vision following the edge and entering the charging base.
C. There isn’t a large area of bare ground or sparse grass within the 2 m driving path to enter the charging base.
D. The QR code on the charging tower is clear.
E. It needs to be powered and be no more than 10 m away from an AC mains outlet.
F. If possible, choose a shaded position as batteries and chargers don’t like over-heating.
G. Avoid places close to irrigation sprinklers.
H. Make sure Landroid Vision enter right towards to the charging base and depart in anti-clockwise direction.
3.1.2 Plan for the RFID used for multi-zone
If you have separated lawns, the equipped RFIDs can help Landroid Vision navigate the passage or pathway and cut the se-
parated lawn areas. The Landroid Vision follows the lawn edge and senses all the RFID cards to explore the zones in the first
travel. The mower will follow its working schedule, sense the RFID card and come across to another zone to complete its work
afterwards.
Each Landroid Vision will be equipped with 2 RFIDs. You need to install the RFID in each zone. If you have two separated lawns,
you can refer to Figure 5 to install the RFID. If you have three separated lawns, you can refer to Figure 6 and Figure 7 to install
the RFID.
To make sure the RFID work well, please help check:
A. there are no obstacles or large area of bare grass and the edge is straight within 1.5 m around the RFIDs.
B. there is a clear boundary besides the RFID.
C. the ground under RFID is flat.
D. no wires and strong magnet devices within 30 cm around the RFID to avoid signal interference.
E. make sure the path between each zone is shorter than 6 m and that the height of any steps on the pathway are less than 3 cm.
NOTE: If the RFID’s supplied are not enough for you, you can purchase more from our retail partners and online.
3.1.3 Patrol your lawn
A. Cutting height
It is recommended that the cutting height is lower than 9 cm at the first Landroid Vision do the cut.
B. Piles of things (See Fig. 8 - Fig. 9)
We suggest you to clean up the things such as leaves and wildflowers on the lawn, otherwise Landroid Vision will see them as
obstacles and avoid cutting this area.
C. Steps covered by grass on the boundary (See Fig. 10 - Fig. 11)
If the steps on the lawn boundary are covered with grass and there is also grass underneath the steps, and the height of the steps
is more than 3 cm. It is recommended to install magnetic strips around the edges of the steps or leave a path without grass that is
wider than 5 cm.
D. Protected area (See Fig. 12 - Fig. 13)
If there are flowerbeds, vegetation or other valuable plants in your garden or on the boundary that are connected with or covered
by grass, Landroid Vision may cut these when mowing. It is recommended to surround these areas with the magnetic strip, or set
up a path without grass that is wider than 5 cm.
E. Slope at edge higher than 30% (170) (See Fig. 14 - Fig. 15)
If your lawn edge has a steep slope higher than 30% (17°), Landroid Vision will struggle to navigate the slope. In order to protect
your Landroid Vision, it is recommended to surround the slope area with the magnetic strip or set up a path without grass that is
wider than 5 cm.
F. Tall grass (See Fig. 16 - Fig. 17)
If there is tall grass along the boundary, and the height of the grass is greater than 15 cm. If there are water puddles or holes un-
derneath the tall grass, it is recommended to cut the grass to below 15 cm or install magnetic strips around the tall grass.
G. Adjacent grass (See Fig. 18 - Fig. 19)
If your lawn is connected to your neighbor’s lawn, we recommend that you install magnetic strips or create a 5 cm wide path

8
EN
without grass as a boundary.
NOTE (only for Landroid Vision): Make sure the magnetic strip is installed 32 cm away from the protected area and
border. The starting and ending points of the magnetic strip should be in an arc shape.
H. Narrow passage (See Fig. 20)
Make sure the narrow passage for Landroid Vision to pass is wider than 1 m.
NOW ROLL YOUR SLEEVES UP. WHEN IT’S DONE IT’S DONE!
Now that you have planned the installation in every detail, you are ready to take action. Before starting, you may want to use your
old mower for the last time to clean up your lawn and make the installation easier.
3.2 INSTALL THE CHARGING BASE
Position the charging base
Option A: Position the charging base at the corner of your lawn (See Fig. 21)
To enter the charging base, Landroid Vision needs at least 2 m straight path in front and 5-15 cm away from the boundary of the
lawn.
Option B: Position the charging base on one side of your lawn (See Fig. 22)
To enter the charging base, Landroid Vision needs at least 2 m straight path in front and 5-15 cm away from the boundary of the
lawn. It needs at least 1.5 m behind the charging base to make sure the grass can be cut.
Option C: Position the charging base in the corner outside the lawn (See Fig. 23)
Locate charging base on the extension line and 5-15 cm away from the edge. To enter the charging base, the charging station
should be placed near the edge of the lawn.
Charging base checklist:
A. within reach of AC mains
B. in shade (if possible)
C. no obstacles, and no area of sparse grass within the 2 m straight path to the charging base
D. flat or level location
E. no irrigation sprinklers nearby
Fix the charging base in the selected location
A. Compose the charging base plate, flatten and tighten the conjunction. (See Fig. 24)
B. Insert charging tower into charging base plate. Then fix the charging base to the ground by means of the supplied screws,
using the supplied hex key. (See Fig. 24)
C. If you position the base on hard surface, fix it with plug and screw fixings.
NOTE: It is recommended to assemble the charging base on a flat and hard surface.
3.3 INSTALL THE RFID (See Fig. 25)
A. The distance from the centre of the RFID to the front and rear lawn boundaries needs to be greater than 1.5 m.
B. Make sure the center of the RFID is 50-60 cm away from the lawn edge, fix the RFID with 2 screws.
C. Put another RFID symmetrically in the opposite zone and fix it.
3.4 CONNECT CHARGING BASE TO AC
There are only a few more steps to go:
A. Connect the charging base to the AC mains socket. (See Fig. 26)
B. If everything is fine, the LED will light green.
C. Open the cover of the battery enclosure and insert the PowerShare battery into the slot until it clicks. Then close the cover.
(See Fig. 27)
D. Place Landroid Vision on charge by making sure a deep contact is established with the base. (See Fig. 28) The LED will blink
green; once the battery is fully charged, the LED will turn solid green.
E. Let the battery get charged for a while. Whilst it is charging you may want to take a well-deserved break: get familiar with the
following instructions, and connect Landroid Vision to your Wi-Fi network.

9
EN
4. START THE LANDROID VISION
Get familiar with the control panel
Landroid Vision’s control panel provides the key functions in a minimalistic design.
For advanced functions, the free Landroid Vision App provides further options in a richer interface: your smartphone.
Wed.11/29 09:00PM
STOP
RETURN
Back to proceeding menu
POWER ON/OFF
Turns Landroid Vision on and off
DISABLING DEVICE
Prevents operation of
Landroid Vision
KNOB (Select and Enter)
DISPLAY
HOME
Sends Landroid Vision to its
charging base during operation
and activates charging
START
start mowing
4.1 Start Landroid Vision (See Fig. 29)
A. Position Landroid Vision in the charging base and get it charged.
B. Press and hold down until the display lights up.
C. Enter the default PIN code 0000 by pressing three times. The display will show 0000. Press again to confirm. The
display will show “PIN code OK”.
D. Press the button and then the button to confirm. The Landroid Vision will start mowing the lawn.
E. You can stop the Landroid Vision at any time by pressing the large red button .
F. To send the Landroid Vision to the charging base, press the button and confirm by pressing .
NOTE: For optimal performance of the Landroid Vision, it is recommended to perform “Update the software” during its initial
setup.
4.2 Update the software
It is recommended you to update the software to the latest firmware. It helps Landroid Vision become smarter. Please note that
Landroid Vision should be updated to the latest firmware at the first time.
Over-the-Air (OTA) updates
If your Landroid Vision is connected to your Wi-Fi network, you will be notified that new software is available via the App. Once you
confirm, the update will happen automatically Over-the-Air.
NOTE: Make sure Landroid Vision is charging or the battery capacity has reached 50% prior to starting the firmware update.
4.3 Single zone: Identify the zone (See Fig. 30 - Fig. 31)
During the initial startup, Landroid Vision needs to confirm the working area. If you have a single lawn, please follow the steps
below:
A. Position Landroid Vision in the charging base within the designated working area and ensure it is charged.
B. Start Landroid Vision, and it will exit the charging base to search for the lawn edge.
C. Upon encountering the lawn edge for the first time, Landroid Vision will rotate in place, and a message “Is it your identified

10
EN
zone” will be displayed on the screen.
D. Press to confirm “Yes” and Landroid Vision will start working.
4.4 Multi-zone: Lawn explore (See Fig. 32 - Fig. 33)
If your lawn is multi-zone, Landroid Vision needs to follow the lawn edge in a circle to explore the zone during the initial startup.
Steps to explore zones:
A. Position the Landroid Vision inside the working area, in the charging base and get it charged.
B. Rotate clockwise to access the main menu, select “General settings” and press .
C. Rotate to select “Lawn explore”, press to confirm.
D. Landroid Vision will start from and return to charging base to complete the zone exploration process.
NOTE: Make sure the first time Landroid Vision starts at the charging base and has at least 50% battery.
The App is being prepared for you to fully take advantage of this feature. Please stay tuned for upcoming OTA upda-
tes.

11
EN
5. MACHINE SETTING
Advanced functions via the built-in interface
Despite its minimalistic design, you can set several advanced functions through the built-in control panel.
However, for the best user experience, we recommend you to use the free Landroid Vision App to do this, given its much richer
and intuitive interface.
5.1 Settings (See Fig. 34)
A. To access the main menu, rotate clockwise.
B. Rotate to select the menu items: “General settings” , “Working time” , “Security” , then press to enter.
C. Use the same procedure for the following actions.
5.2 Set date and time (See Fig. 35)
A. Return to “General settings”.
B. Rotate clockwise to select “Set date & time”, then press to enter.
C. Rotate clockwise to select the date, then press to confirm. The selected options (day, month or year) will start flashing.
D. Rotate to select the day, month or year and press quickly to confirm. Use the same method to complete the “Year / Month /
Time”.
5.3 Set work schedule (See Fig. 36)
NOTE: It is possible to set two work schedules per day: “Scheduler #1” and “Scheduler #2”.
A. Return to the main menu and rotate clockwise to select “Working time”, then press to enter.
B. Rotate clockwise to select “Customize work time”, then press to confirm.
C. Rotate clockwise to select the day of the week, then press to confirm.
D. Press to enter settings.
E. Rotate clockwise to activate “Scheduler #1 *”. Press to confirm.
F. Rotate clockwise. Select the start time “Hour/minute” and press to enter. The selected number will start flashing.
G. Rotate to select the time you want the Landroid Vision to start working on that day, and press to confirm. Follow the
same procedure to set the time to stop work.
H. Next, rotate clockwise to select “Border cut” and press to enter settings.
I. Rotate clockwise to choose whether or not to activate “Border cut” and press to confirm.
J. If you want to set a second working time (“Scheduler #2”), follow the same procedure.
K. Press the button and follow the same procedure to set the other days of the week.
* Be continuously updated according to the software version.
** Only shown for WR213E and WR216E
*** For after-sales service only
General settings
Working time
Security
Navigation
Page *
Language
Time format
Date format
Set date & time
Rain start delay
App link
Lawn explore
Blade height adjust**
Diagnose***
Auto Work Time
Customize work time
Change PIN code
Auto-Lock

12
EN
5.4 Working time adjust (See Fig. 37)
You can rapidly adjust the work time of the week. The increment /decrement of time will be evenly allocated to required working
days.
A. Return to main interface.
B. Anticlockwise rotate to activate the working time adjust.
NOTE: The total time is based on the customized work time, and can be adjusted by gradient of 10%.
C. Then rotate to adjust and short press to confirm.
5.5 Adjust the blade height (only for WR213E) (See Fig. 38)
A. Back to home page, clockwise rotate to select General settings and press to confirm.
B. Clockwise rotate to select Blade height adjustment, press to confirm.
C. Press button, the cutting height can be adjusted between 30-60 mm (5 mm every turn ). Clockwise rotate to select
the cutting height you prefer, and then press to confirm.

13
EN
6. CONNECTING LANDROID VISION TO THE INTERNET
Why connect Landroid Vision
Landroid Vision is an IoT (Internet of Things) device. To get full functionality out of your Landroid Vision and keep it always updated
to the latest software, it is recommended to be connected to the internet via your Wi-Fi network. The more Landroid Vision mows
your lawn, it will become smarter when connected to the internet.
BEFORE YOU START
1. Download the App
Label and
QR code
Download the free Landroid Vision App first. Get it from Android or Apple
App stores.
2. Ensure you have:
A. Your WiFi network password/Bluetooth function on your smartphone.
B. Landroid Vision Serial Number: it can be found in the label under the
rear bonnet of the machine.
If you don’t want to type the 20-digit Serial Number, input it by scanning
the QR code with your smartphone’s camera.
3. Check your settings
Wi-Fi connection
A. Landroid Vision works with 2.4GHz/5GHz Wi-Fi signal.
B. Make sure your Landroid Vision is in the same router environment as
your smartphone.
C. Make sure the distance between your Landroid Vision, smartphone
and your router is as close as possible during connection.
Tip: When Landroid Vision moves to an area of your lawn with poor or
no Wi-Fi signal, instructions sent from the App will only be executed when
Landroid Vision returns to an area with good signal.
Bluetooth function
A. Bluetooth function on your smartphone is activated.
B. Make sure your Landroid Vision is within the connectable distance.
7. LANDROID VISION APP
NOT A SIMPLE REMOTE CONTROL
Don’t regard it as a remote control. The App is an integral part of the Worx Landroid Vision advanced ecosystem based on cloud
computing and artificial intelligence.
Thanks to the App’s augmented reality feature, you can measure the exact area of your lawn. It’s as easy as taking a walk along its
border.
You can use the App to upload information on your grass species, soil type and irrigation. These inputs, in combination with
weather data and lawn size, will allow our cloud computing to tailor-make your Landroid Vision’s working schedule to the actual
growth of your grass, everyday.
The App also lets you view statistics on what Landroid Vision has been doing for you.
If you ever need to get your Landroid Vision serviced, you can even open a service ticket by using the App.
The App also notifies you when there’s new software available for Landroid Vision to download automatically over the air.
Once connected, Landroid Vision can access its unique auto scheduling instructions from the cloud and is able to download the
latest software to optimise its performance.
AR01733700


This manual suits for next models
1
Table of contents
Other Worx Lawn Mower manuals

Worx
Worx Landroid M User manual

Worx
Worx Landroid M WG794E Operation instructions

Worx
Worx Landroid User manual

Worx
Worx Landroid User manual

Worx
Worx WG724E Installation manual

Worx
Worx Landroid User manual

Worx
Worx LANDROID M WG754E User manual

Worx
Worx WG776E User manual

Worx
Worx WG784E User manual

Worx
Worx Landroid Specification sheet

Worx
Worx WG788 User manual

Worx
Worx WG779E Installation manual

Worx
Worx Landroid M User manual

Worx
Worx Landroid Series Specification sheet

Worx
Worx WG780 User manual

Worx
Worx LANDROID WA3766 User manual

Worx
Worx Landroid M User manual

Worx
Worx WG717E User manual

Worx
Worx Landroid WR142E User manual

Worx
Worx WG783 User manual