wowvision proVEOS User manual

Installation Guide


Contents
Welcome...............................................................................5
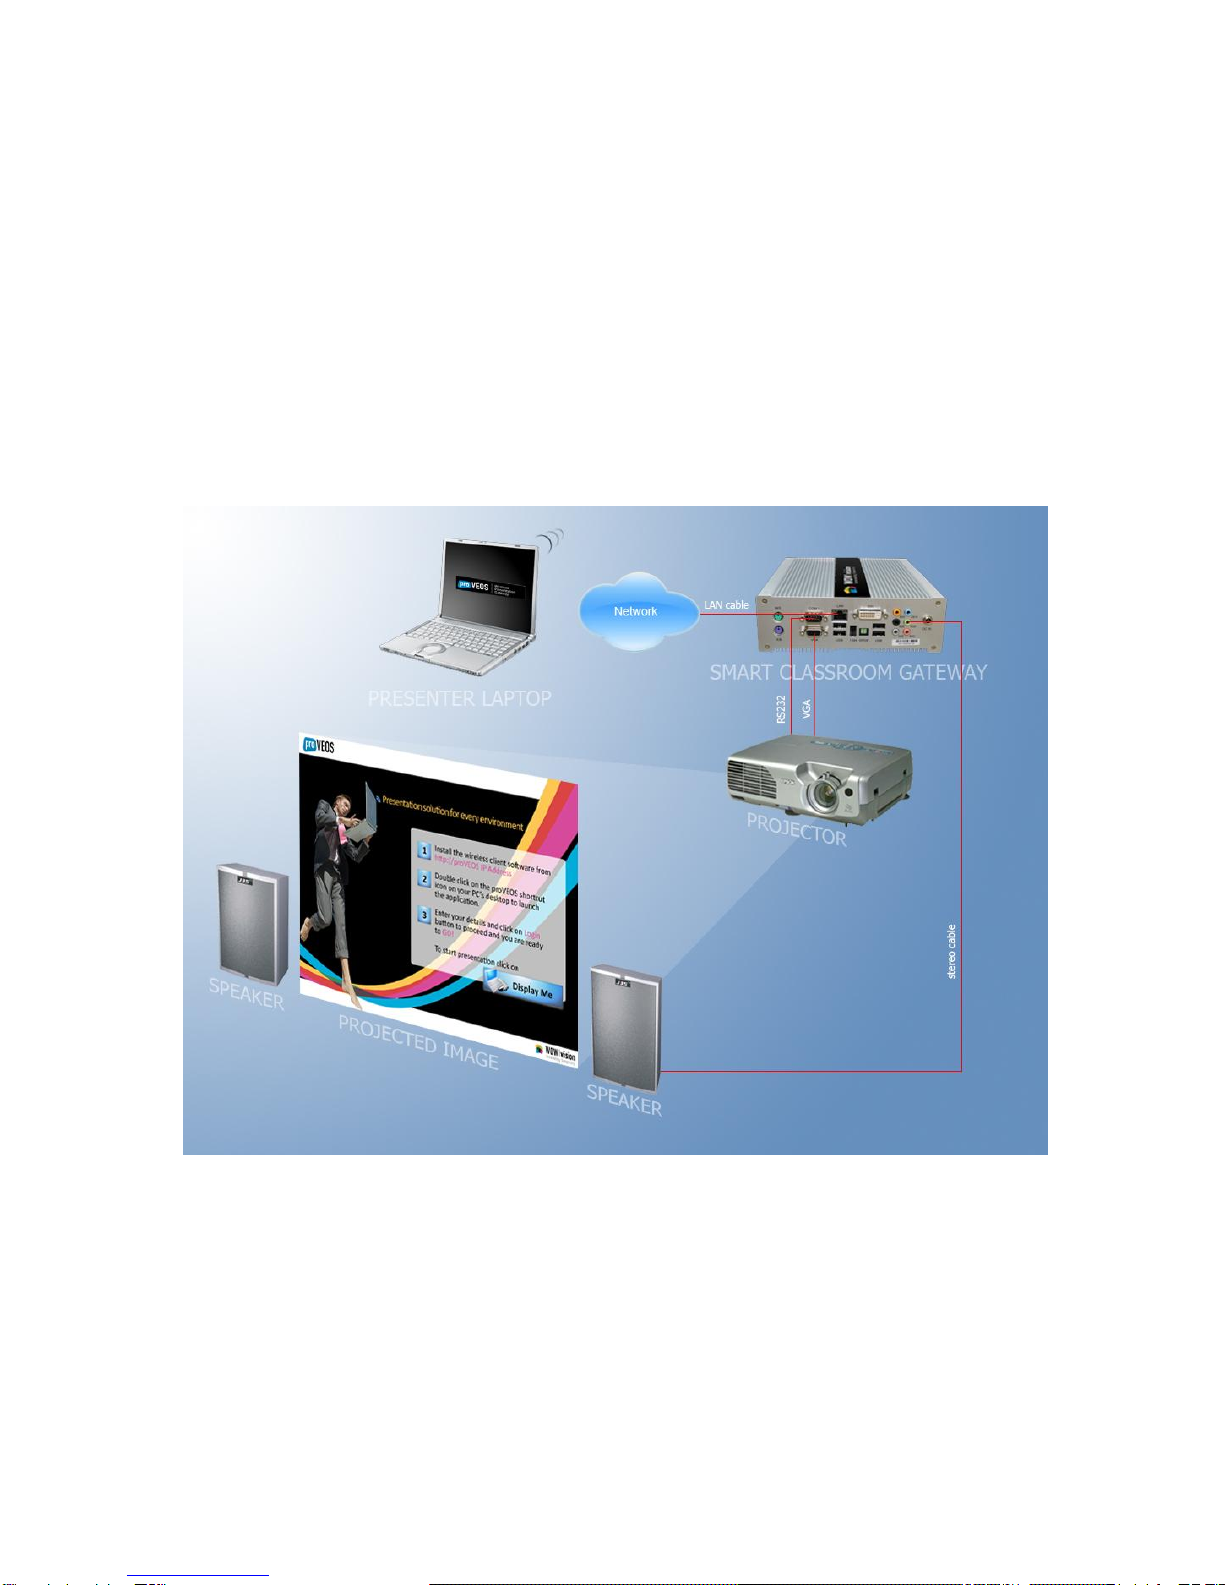
Overview...............................................................................7
Connections..........................................................................................................9
Setting Up the Hardware..................................................... 11
Connecting Up....................................................................................................14
Installing the proVEOS System...........................................17
Booting the proVEOS System CD-ROM.............................................................18
Configuring proVEOS .........................................................21
Step 1: IP Configuration......................................................................................23
Step 2: Date & Time Configuration .....................................................................24
Step 3: Volume Configuration.............................................................................26
Accessing the Control Panel...............................................................................28
Presenting from a Client .....................................................29
Configuring the Firewall......................................................................................30
Installing the proVEOS Client .............................................................................33
Testing the proVEOS Client................................................................................44
Configuring Projectors ........................................................49
Selecting a Projector...........................................................................................50
Adding and Editing Projectors.............................................................................51
Activating proVEOS ............................................................57
Demo Activation..................................................................................................58
Full Activation .....................................................................................................58
Importing an Activation Key ................................................................................61
Troubleshooting ..................................................................63
Projector Has No Image......................................................................................64
Projector Cannot Be Controlled ..........................................................................64
Clients Cannot Connect......................................................................................64
“Display Me” Shows a Blank Screen...................................................................65
Web Admin Cannot Be Accessed.......................................................................65
Login to Web Admin Fails...................................................................................66
proVEOS Client Windows Installer Does Not Appear.........................................66


Welcome

6 proVEOS Installation Guide
Thank you for choosing the proVEOS Wireless Presentation Gateway. proVEOS
is an advanced network-based and wireless presentation solution that provides a
superior experience, multimedia functionality and cost savings.
Send any laptop display to the projector wirelessly without the hassle of
passing around VGA cables and configuring display settings
Participants can interact with one another with the chat and whiteboard
sharing features
Present video and audio files in HD quality
Easily integrate with an existing projector setup
Eliminate costly matrix switches, touch panels, VGA connection boxes and
cables

Overview

8 proVEOS Installation Guide
A proVEOS setup consists of several components:
1. proVEOS Wireless Presentation Gateway
2. Projector
3. Speakers
4. Local area network
5. Presentation laptop with proVEOS client software

proVEOS Installation Guide 9
Connections
The components in a proVEOS setup are connected together during installation
to form the entire system:
The proVEOS client software is installed in a presentation laptop to
capture and send its display to proVEOS
proVEOS is connected to a network via wired (Ethernet) or wireless
(Wi-Fi) networking to receive presentation screens, media files and other
information captured and sent from the proVEOS client software
Video received by proVEOS is sent to the projector via an analog (VGA)
or digital (DVI or HDMI) video cable
Audio from proVEOS is sent to a speaker system via stereo mini-jack
analog audio cables (optional: audio cable is not provided)
proVEOS is also connected to the projector via a RS-232 serial cable so
that proVEOS can interact with the projector and send commands to it, for
example, to turn it on and off


Setting Up the
Hardware

12 proVEOS Installation Guide
In the proVEOS box, you will find these items:
proVEOS Wireless Presentation
Gateway
9-pin RS-232 serial cable
Provides a data communication link
between proVEOS and the projector
to exchange commands
VGA, DVI or HDMI video cables &
converters
Sends the video output by proVEOS
to the projector.
Note: The included cables and
converters may differ depending on
the model of the proVEOS gateway.
AC power adapter
Supplies power to proVEOS

proVEOS Installation Guide 13
AC power cord
Supplies AC power to the AC power
adapter
Wireless antenna
For Wi-Fi-capable models only
Installation discs & manuals
Note: Actual items may differ based on the model you have purchased.

14 proVEOS Installation Guide
Connecting Up
Several connectors are available on the back panel of proVEOS:
Note: The back panel layout on your proVEOS and projector may differ,
depending on the model and configuration.
To install and power on proVEOS:
Connect the AC power cord to the AC power adapter
Connect the AC power cord to outlet power
Connect the AC power adapter’s round DC plug to the matching DC
power connector behind proVEOS
Screw on the wireless antenna, if your unit comes with Wi-Fi functionality
Next, connect proVEOS to the projector:
Using the provided video cables and/or converters (VGA, DVI or HDMI),
connect proVEOS to the VGA/DVI/HDMI input on the projector
Connect the provided RS-232 serial cable between the serial ports of
proVEOS and the projector
Connect the audio equipment:

proVEOS Installation Guide 15
Connect an appropriate audio cable from the green line-out mini-jack to
the speaker system to send the audio from media files played by
proVEOS to the speakers
If you have line-level audio equipment like CD players, VCRs and DVD
players that you wish to hear over the speakers connected to proVEOS,
connect the equipment to the blue line-in mini-jack
If you wish to pass through a microphone to the external speakers,
connect a microphone to the pink microphone input mini-jack
Note: Volume levels need to be configured correctly before sound can be heard
over the speakers. See Step 3: Volume Configuration on page 26 to find out how
to configure the proVEOS mixer.
Lastly, connect to the network to allow clients to connect to proVEOS to make
presentations:
For wired connections, connect an Ethernet cable from the LAN port
behind proVEOS to the network
For wireless connections, ensure that the antenna is attached behind
proVEOS
Note: It is recommended to connect proVEOS to the network only after the
relevant TCP/IP settings described in Step 1: IP Configuration on page 23 have
been made.

16 proVEOS Installation Guide
This diagram below shows a proVEOS (top) and the ports that are connected to
the projector (bottom), power adapter, network and external speakers.
Note: The back panel of your projector may differ.

Installing the
proVEOS
System

18 proVEOS Installation Guide
If your vendor has installed the proVEOS system software, skip this section and
proceed to Configuring proVEOS on page 21.
To install the proVEOS system software, configure proVEOS to boot from the
included proVEOS system software CD-ROM in an external USB optical drive.
Once the system software installer loads up, type proveos and press Enter
to start the installation.
The following hardware should be connected to proVEOS before it is powered up
for installation:
A display capable of at least 1024x768 resolution, connected to the
VGA/DVI port
USB keyboard
USB mouse
Once the display, keyboard and mouse are connected, proVEOS can be
powered on.
Booting the proVEOS System CD-ROM
When proVEOS is starting up, press the key indicated on the screen to enter the
BIOS setup. This is usually the Delete key.

proVEOS Installation Guide 19
From the main menu, search the submenus for a setting that allows configuration
of boot devices. The submenu is usually labeled Advanced BIOS Features.
The boot device setting is usually labeled First Boot Device.
This setting should be changed to the USB CD-ROM drive so that proVEOS can
start from the proVEOS system software CD-ROM and begin installation. This
option is usually labeled USB-CDROM.
Once the setting is made, save the BIOS settings and proVEOS will restart itself.
When it starts up again, proVEOS will boot from the system software CD-ROM
and automatically install the proVEOS system software.
The installation will take approximately 20 minutes.
Note: The BIOS screenshots pictured may be different depending on the
hardware configuration of the proVEOS you have received.
Once the installation completes, proVEOS will automatically restart.

20 proVEOS Installation Guide
After about 30 seconds, the following screen will be displayed on the connected
display:
This screen will be displayed whenever proVEOS has started successfully and is
ready for use.
Troubleshooting Display Problems
If the screen above does not show up after proVEOS is turned on, it is most likely
caused by the display’s inability to support the required 1024 x 768 resolution
output by proVEOS. Some older projectors may only support resolutions up to
800 x 600.
To resolve this, connect proVEOS to another display capable of at least 1024 x
768 resolution.
Other manuals for proVEOS
5
Table of contents
Other wowvision Projector Accessories manuals