Woxcon SCU41-MV User manual

SCU41-MV
4K 4X1 Seamless Switcher with Multi-view
All Rights Reserved
Version: SCU41-MV_2019V1.1
User Manual

4K 4x1 Seamless Switcher with Multi-view
Preface
Read this user manual carefully before using the product. Pictures shown in this
manual are for reference only. Different models and specifications are subject to real
product.
This manual is only for operation instruction, please contact the local distributor for
maintenance assistance. The functions described in this version were updated till
November, 2019. In the constant effort to improve the product, we reserve the right to
make functions or parameters changes without notice or obligation. Please refer to the
dealers for the latest details.
FCC Statement
This equipment generates, uses and can radiate radio frequency energy and, if not
installed and used in accordance with the instructions, may cause harmful interference
to radio communications. It has been tested and found to comply with the limits for a
Class B digital device, pursuant to part 15 of the FCC Rules. These limits are designed
to provide reasonable protection against harmful interference in a commercial
installation.
Operation of this equipment in a residential area is likely to cause interference, in which
case the user at their own expense will be required to take whatever measures may be
necessary to correct the interference.
Any changes or modifications not expressly approved by the manufacture would void
the user’s authority to operate the equipment.

4K 4x1 Seamless Switcher with Multi-view
SAFETY PRECAUTIONS
To ensur e t h e b e s t from the product, p l e a s e r ea d all instr u c t i o n s c ar efully before u s i n g
the device. Save this manual for further reference.
l Unpack the equipment carefully and save the original box and packing material for
possible future shipment.
l Follow basic safety precautions to reduce the risk of fire, electrical shock and injury
to persons.
l Do not dismantle the housing or modify the module. It may result in electrical shock
or burn.
l Using supplies or parts not meeting the specifications of product may cause
damage, deterioration or malfunction.
l Refer all servicing to qualified service personnel.
l To prev e n t f i re or shock hazard, d o n o t e x p o s e the unit to rain, moisture or install
this product near water.
l Do not put any heavy items on the extension cable in case of extrusion.
l Do not remove the housing of the device as opening or removing housing may
expose you to dangerous voltage or other hazards.
l Install the device in a place with fine ventilation to avoid damage caused by
overheat.
l Keep the module away from liquids.
l Spillage into the housing may result in fire, electrical shock, or equipment damage.
If an object or liquid falls or spills on to the housing, unplug the module immediately.
l Do not twist or pull by force ends of the optical cable. It can cause malfunction.
l Do not use liquid or aerosol cleaners to clean this unit. Always unplug the power to
the device before cleaning.
l Unplug the power cord when left unused for a long period of time.
l Information on disposal for scrapped devices: do not burn or mix with general
household waste, and please treat them as normal electrical wastes.

4K 4x1 Seamless Switcher with Multi-view
Table of Contents
Product Introduction .................................................................................................... 1
Features ............................................................................................................. 1
Package List ....................................................................................................... 1
Specification ................................................................................................................ 2
Panel Description ........................................................................................................ 4
Front Panel ......................................................................................................... 4
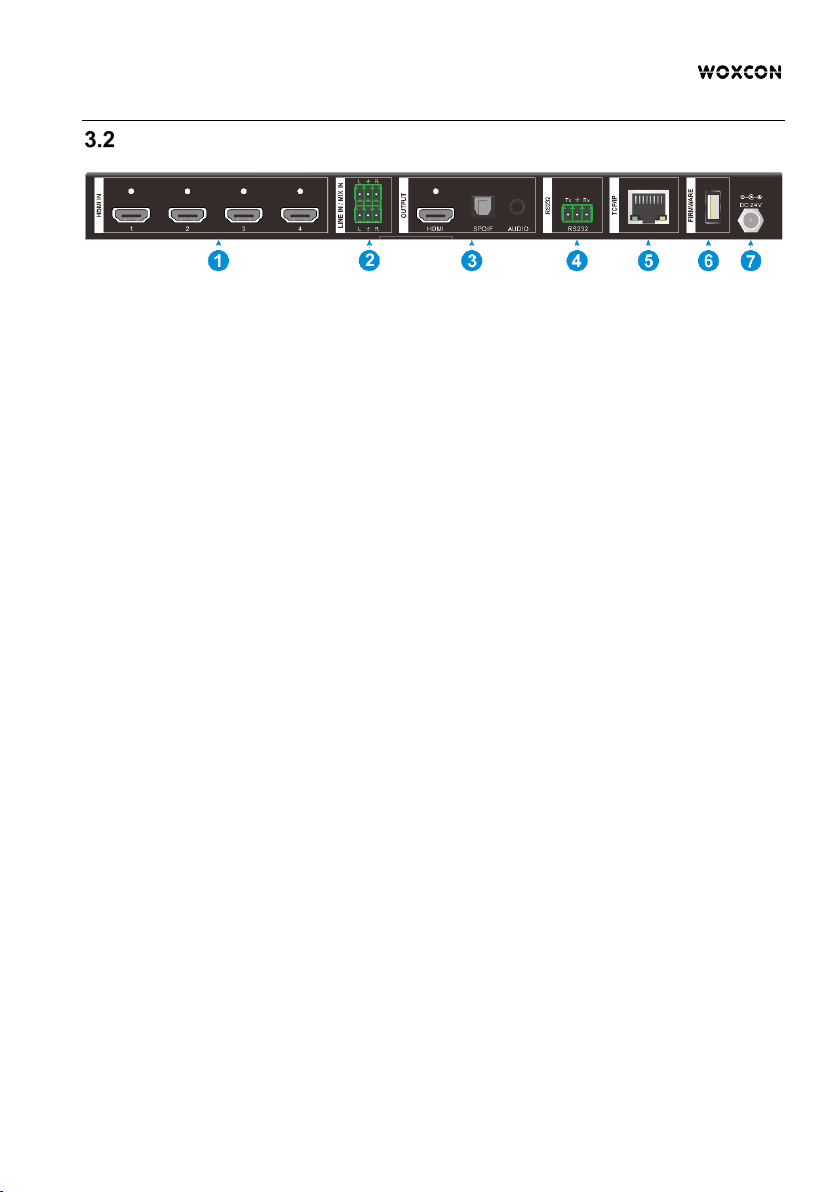
Rear Panel ......................................................................................................... 5
System Connection ..................................................................................................... 6
Usage Precaution ............................................................................................... 6
System Diagram ................................................................................................. 6
Front Panel Control ..................................................................................................... 7
Multi-views Selection .......................................................................................... 7
Video Signal Switching ....................................................................................... 7
Video Switching Status Inquiry ........................................................................... 8
Audio Select ....................................................................................................... 8
Config Button ...................................................................................................... 8
IR Remote .................................................................................................................... 9
GUI Control ................................................................................................................ 10
Multiview Tab .................................................................................................... 11
Audio Tab .......................................................................................................... 13
Resolution Tab .................................................................................................. 14
RS232 Tab ........................................................................................................ 14
CEC Tab ........................................................................................................... 15
EDID Tab .......................................................................................................... 17
Network Tab ..................................................................................................... 18
Tags Ta b ........................................................................................................... 19
Security Tab ...................................................................................................... 20
GUI Update .................................................................................................... 20
RS232 Control ........................................................................................................... 21

4K 4x1 Seamless Switcher with Multi-view
RS232 Control Software ................................................................................... 21
RS232 Command ............................................................................................. 23
8.2.1 System Control ....................................................................................... 23
8.2.2 Signal Switching ..................................................................................... 24
8.2.3 Audio Switching ...................................................................................... 25
8.2.4 Function Setting ..................................................................................... 26
8.2.5 CEC Command ...................................................................................... 32
8.2.6 Special Commands ................................................................................ 37
Firmware Upgrade ..................................................................................................... 39
Panel Drawing ......................................................................................................... 39
Troubleshooting & Maintenance .............................................................................. 40
Customer Service .................................................................................................... 41

4K 4x1 Seamless Switcher with Multi-view
1
Product Introduction
The 4K Multi-view switcher is seamless video scaler designed to enable a true 4K
display. The switcher features four HDMI inputs and one HDMI output which allows you
to display four video sources on one display. It also provides a line input, 1 mix input, 1
SPDIF output and 1 analog output for audio processing.
Control is quick and comprehensive, whether you are using the front panel, the remote
control, RS232 commands, or the fully featured web GUI.
Features
l 4 HDMI inputs, 1 HDMI output.
l Supports 4K@30Hz 4:4:4, HDCP 2.2.
l Seamless switch between 4 input ports.
l Auto Scaler in each source input.
l Supports audio embedding and mixing.
l Supports audio de-embedding.
l Auto-switching at single window.
l Cycles through the windows from A to D by swap button.
l Base on FPGA Technology, layout and size of the windows can be customized.
l Resizes the windows in 3 different sizes.
l 16 pre-defined layouts for multi-view.
l Multiple control methods, including an assignable front panel, IR remote, web GUI
and RS232 port
Package List
l 1x SCU41-MV 4k 4x1 Seamless Switcher.
l 1x IR Remote
l 4x Plastic Cushions
l 2x Mounting Ears
l 4x Mounting Screws
l 2x 3-pin Terminal Block
l 1x RS232 Cable (3-pin terminal block to DB9)
l 1x Power Adapter (24V DC
1.25A)
l 1x User Manual
Note: Please contact your distributor immediately if any damage or defect in the
components is found.

4K 4x1 Seamless Switcher with Multi-view
2
Specification
Video
Video Input
(4) HDMI IN (1~4)
Video Input Connector
(4) Type-A female HDMI
HDMI Input Resolution
Up to 4K@30Hz 4:4:4
Video Output
(1) HDMI
Video Output Connector
(1) Type-A female HDMI
HDMI Output Resolution
Up to 4K@30Hz RGB
HDMI Standard
HDMI 1.4b
HDCP Version
Up to HDCP 2.2
Audio IN
Audio In
(1) LINE IN, (1) MIX IN.
Audio In Connector
(2) 3-pin terminal connectors
Frequency Response
20Hz to 20KHz, ±3dB
Max Input Level
2.0 Vrms ± 0.5 dB. 2 V = 16 dB headroom
above -10 dBV (316 mV) nominal consumer line
level signal.
L-R level deviation
< 0.3 dB, 1 kHz sine at 0 dBFS level (or max level
before clipping)
Input Impedance
> 10kohm
Audio Format
PCM 2CH
SPDIF OUT
SPDIF Out
(1) SPDIF
Audio Out Connector
(1) Toslink
Max Output level
±0.05dBFS
Frequency Response
20 Hz to 20 kHz, ±1dB
THD+N
< 0.05%, 20 Hz – 20 kHz bandwidth, 1 kHz sine at
0 dBFS level (or max level)
Signal-to-Noise Ratio
> 90dB, 20Hz-20 kHz bandwidth
Crosstalk isolation
< -70 dB, 10 kHz sine at 0 dBFS level (or max
level before clipping)
Noise
-90dB
Audio Format
PCM 2CH
AUDIO OUT

4K 4x1 Seamless Switcher with Multi-view
3
Audio Out
(1) AUDIO
Audio Out Connector
(1) 3.5mm mini jack
Frequency Response
20 Hz to 20 kHz, ±1dB
Max Output Level
2.0 Vrms ± 0.5 dB. 2 V = 16 dB headroom above -
10 dBV (316 mV) nominal consumer line level
signal
THD+N
< 0.05%, 20 Hz – 20 kHz bandwidth, 1 kHz sine at
0 dBFS level (or max level)
Signal-to-Noise Ratio
> 80dB, 20Hz-20 kHz bandwidth
Crosstalk Isolation
< -80 dB, 10 kHz sine at 0 dBFS level (or max
level before clipping)
L-R Level Deviation
< 0.05 dB, 1 kHz sine at 0 dBFS level (or max
level before clipping)
Output Load Capability
1k ohm and higher (supports 10x paralleled 10k
ohm loads)
Noise
-80dB
Control
Control port
(1)RS232, (1)TCP/IP
Control Connector
(1) 3-pin terminal connector, (1) RJ45.
General
Operation Temperature
-5℃ ~ +55℃
Storage Temperature
-25℃ ~ +70℃
Relative Humidity
10% ~ 90%
External Power Supply
Input: AC 100~240V, 50/60Hz; Output: 24V DC
1.25A.
Power Consumption
13w(Max)
Dimension (W*H*D)
285mm x 27mm x 172.5mm
Net Weight
1.24kg
Note: The resolution 1080i 60Hz and HDR are not supported

4K 4x1 Seamless Switcher with Multi-view
4
Panel Description
Front Panel
①
POWER LED: The LED illuminates green when it is working, and the LED
illuminates red when it is standby.
②
IR LED: Built-in IR sensor, receive IR signal sent from IR remote.
③
FOUR INPUT LEDS/AUDIO SELECTS: Press the buttons to selected
corresponding HDMI input, its LED illuminates yellow when there is a video signal,
it will illuminates blue when the video signal is chosen as input source.
AUTO LED: Press the button to Auto Switching or Manual Switching exchange
mode, its LED illuminates blue in auto-switching mode, and it will be off when exit
the auto-switching mode.
④
FOUR SELECT/FULL SCREENS: Press the buttons to select corresponding input
source as Full Screen, its LED illuminates blue when it is selected.
⑤
CONFIG: Press SWAP button to select window display screen anti-clockwise
direction. its LED illuminates blue when it is selected. Press the RESIZE button to
readjust the windows size, its LED illuminates blue when it is pressed.
⑥
THREE MULTI-VIEWS: Press the buttons to choose different available Multi-view
modes, its LED illuminates blue when it is selected.

4K 4x1 Seamless Switcher with Multi-view
5
Rear Panel
①
HDMI IN: Four type-A female HDMI input ports to connect HDMI source devices.
②
LINE IN: 3-pin terminal block to connect audio source device like mobile phone or
computer to embed in HDMI audio sources.
MIX IN: 3-pin terminal block to connect audio source device like mobile phone or
computer to mix HDMI audio sources.
③
HDMI OUTPUT: Type-A female HDMI output port to connect display device.
SPDIF OUTPUT: Toslink for a u d i o d e -embedding from HDMI output.
AUDIO OUTPUT: 3.5mm mini jack for audio de-embedding from HDMI output.
④
RS232: 3-pin terminal block to connect the RS232 control device (e.g. PC) or a
third-party device to be controlled by RS232 commands.
⑤
TCP/IP: RJ45 port to connect the control device (e.g. PC) to control the switcher
by GUI.
⑥
FIREWARE: Type-A USB port for firmware upgrade.
⑦
DC 24V: DC connector for power adapter connection.

4K 4x1 Seamless Switcher with Multi-view
6
System Connection
Usage Precaution
l Make sure all components and accessories included before installation.
l System should be installed in a clean environment with proper temperature and
humidity.
l All of the power switches, plugs, sockets, and power cords should be insulated and
safe.
l All devices should be connected before power on.
System Diagram
FIRMWARE
HDMI IN
OUTPUT
HDMI SPDIF AUDIO
LINE IN / MIX IN
RL
RL
Tx Rx
RS2 32 1 2 3 4
RS232
TCP/IP
DC 24V
1
2
3
4
Laptop
Laptop
Laptop
Laptop
Audio Player
Layout
4K TV
HDMI:
Audio:
RS232:
Ethernet:
Laptop
Central Cont rol Sy stem
Amplifier

4K 4x1 Seamless Switcher with Multi-view
7
Front Panel Control
Multi-views Selection
Factory default is four quarter views, and factory default input and output corresponding
relation is input1 -> window A, input2 -> window B, input3 -> window C, input 4->
window D. Press one of the other two multi-view buttons to change layout. And its
multi-view mode and corresponding windows LEDs illuminate blue.
Full Screen mode: Press Windows A~D button to select the corresponding window to
display in full-screen. Meanwhile, the corresponding input source button LED and
window button A LED illuminate blue, other window buttons and previous multi-view
mode button LED goes out.
Video Signal Switching
l In the Multi-view mode
Operation: Inputs# + Windows#
Example: Switch Input 1 to Windows B:
Press INPUT 1(The input 1 LED illuminates blue, the windows A-D LEDs flash.)
Press Windows B (The windows A, C and D LEDs go out, then input 1 and windows B
LED flash three times, last, input 1 LED goes out and windows A-D LEDs illuminate
blue.)
l In the Full Screen mode
1) Manual Switching
Operation: Inputs# + Windows#
Example: Switch Input 2 to Windows A:
Press INPUT 2 (The input 2 LED illuminates blue.) Press Windows A (The input
2 and windows A LEDs illuminate blue).
2) Auto Switching
Press AUTO button to enter auto-switching mode, and the corresponding LED
illuminate blue.
When in the AUTO mode, signal switching complies with the following principles:
1) Four input sources priority: HDMI 1 > HDMI 2 > HDMI 3 > HDMI 4. When input
source and output window are connected, the corresponding LEDs illuminate blue.
2) Once detecting a new input signal, the switcher will switch to this new signal
automatically.

4K 4x1 Seamless Switcher with Multi-view
8
3) The switcher will memorize last input source when power off
4) Manual switching is enabled in the auto switching mode and does not exit it.
5) When full screen mode changes into multi-view mode, the AUTO mode will not exit.
Video Switching Status Inquiry
In the Multi-view mode (Window A, B, C or D LED illuminate blue).
Operation: Windows#
Example: Long press Windows B button for more than 3s (Window A, C and D LEDs
go out, and then corresponding input source LED will illuminate blue). After 3 seconds,
Window A, B, C and D LEDs illuminate blue.
Audio Select
Factory default is HDMI IN1 audio source. In the Multi-view mode, long press any
INPUT buttons for more than 3s to replace all output audios with corresponding input
audio source, meanwhile, the input LED illuminates blue. No operation within 3s, the
input LED will go out.
Long press AUTO button for 3s to replace all output audios with LINE IN audio source.
Config Button
SWAP: Press Swap button to select window display screen anti-clockwise direction,
the SWAP LED lights once when press its button once.
Example: In the Multi-view mode
Example: In the Full Screen mode
RESIZE: Press RESIZE button to readjust the windows size. Please refer the GUI
Multi-view Tab on page 12 for more details.
Example: In the PIP mode

4K 4x1 Seamless Switcher with Multi-view
9
IR Remote
①
INPUTS: Press 1-4 button to select the
input sources. Press AUTO button to
automatically detect the input sources.
②
SELECT/FULL SCREEN: Press A-D
button to display corresponding input as
full-screen mode.
③
CONFIG: Press SWAP button to select
window display screen anti-clockwise
direction. Press the RESIZE button to
adjust the windows size. Press MUTE
button to control the basic function, such
as adjusting volume, pause, play and
switch and so on. Press RES button to
adjust the output resolution.
④
MULTIVIEW: The MULTIVIEW includes
eight buttons, the first four buttons to
choose different multi-views mode, and
USER1-4 button to enter user-defined
multi-views mode via GUI control.
Note: There is no long pressing function on this IR remote, and its button functions are
the same as the front panel buttons.
AUTO
A B C D
RESIZE MUTE RES
INPUTS
CONFIG
1 2 3 4
MULTIVIEW
C
B
D
A
B
AB
A
C D
A B
USER 1 USER 2 USER3 USER 4
Multiview Switcher
1
2
3
4

4K 4x1 Seamless Switcher with Multi-view
10
GUI Control
The switcher can be controlled via TCP/IP. The default IP settings are:
IP Address:
192.168.0.178
Subnet Mask:
255.255.255.0
Type 192.168.0.178 in the internet browser, it will enter the below log-in webpage:
Username: admin
Password: admin
Type the user name and password, and then click Login to enter the section for video
switching.

4K 4x1 Seamless Switcher with Multi-view
11
Multiview Tab
Type the default user name and password, and then click Login to enter the Multiview
Tab shown as b e l o w :
①
Pre-defined
§ Pre-defined:
ü Click the corresponding button (Layout1~16) to select video input view and
mode.
ü Click the Layout2, Layout5~Layout8, Layout9~Layout12 buttons to enable the
Resize function.
ü Press SWAP button to select window display screen anti-clockwise direction.
ü Click Confirm button complete the selection.
Note: Only layout2, layout5~8 and layout9~12, 9 layouts in total, can be resized.

4K 4x1 Seamless Switcher with Multi-view
12
ü Click Setting button to enter Window Select, and select any one of input
sources and corresponding output shown windows.
②
User-defined
ü Click 1, 2, 3, or 4 button to choose User Layout.
ü Select the corresponding input, set the size and position for each window that
you want to display on the layout.
ü Click Save button to present the results above selected.

4K 4x1 Seamless Switcher with Multi-view
13
ü Click OK button to exit the current interface and reselect User-defined if the
Bandwidth limit exceeded.
Audio Tab
ü Click On button to enter Mix mode, Click Off button to exit Mix mode.
ü Click Unmute or Mute button to control Audio Output.
ü Select one audio input among input 1-4 and line audio to set as output audio.

4K 4x1 Seamless Switcher with Multi-view
14
Resolution Tab
ü Click any one of built-in resolutions for the selected input source device, click
Auto button to show the resolution from third-party display device automatically.
ü Click Confirm button when the selection is completed.
RS232 Tab
ü ASCII or HEX command format can be selected.

4K 4x1 Seamless Switcher with Multi-view
15
ü Baud Rate: Supports 2400, 4800, 9600, 19200, 38400, 57600 or 115200.
ü Command Ending: NULL, CR, LF or CR+LF can be chosen.
ü Command: Type the command in this box to control the third-party device
which is connected to the RS232 port of the switcher.
ü Display On: Send the Display ON via RS232 command.
ü Display Off: Send the Display OFF via RS232 command.
CEC Tab
①
Source
ü Click Source button to select HDMI input source, and click Function to enter the
basic control.
Table of contents
Other Woxcon Switch manuals

Woxcon
Woxcon SCU21E-CODEC User manual

Woxcon
Woxcon WUH4ARC-H2 User manual

Woxcon
Woxcon SE-891MV User manual

Woxcon
Woxcon SC51TS User manual

Woxcon
Woxcon SCU41T-TB User manual

Woxcon
Woxcon SCU42 User manual

Woxcon
Woxcon SM62T User manual

Woxcon
Woxcon CE-SS3113 User manual

Woxcon
Woxcon SCU42T-CODEC User manual

Woxcon
Woxcon SCU82TS User manual
Popular Switch manuals by other brands

Halemeier
Halemeier Safetybox ASA400 quick start guide

JVC
JVC KM-H2500 manual

Weidmuller
Weidmuller IE-SW-PL18M Series Hardware installation guide

Cajun
Cajun P220G Configuration and operation guide

socomec
socomec SIRCOVER 100A instruction sheet

Broadcast Tools
Broadcast Tools AES Switcher Sentinel 4 XLR Installation and operation manual