Woxcon SCU41T-TB User manual

SCU41T-TB
4x1 Conference Tabletop Box with Soft Codec
All Rights Reserved
Version: SCU41T-TB_2020V1.0
User Manual

4x1 Conference Tabletop Box with Soft Codec
Table of Contents
1. Product Introduction ................................................................................................................................ 1
1.1 Features ....................................................................................................................................... 1
1.2 Package List ................................................................................................................................. 2
2. Specification ............................................................................................................................................ 3
3. Panel Description .................................................................................................................................... 4
4. System Connection ................................................................................................................................. 5
5. Panel Button Control ............................................................................................................................... 6
5.1 Signal Switching ........................................................................................................................... 6
5.2 Display Control ............................................................................................................................. 6
6. GUI Control ............................................................................................................................................. 7
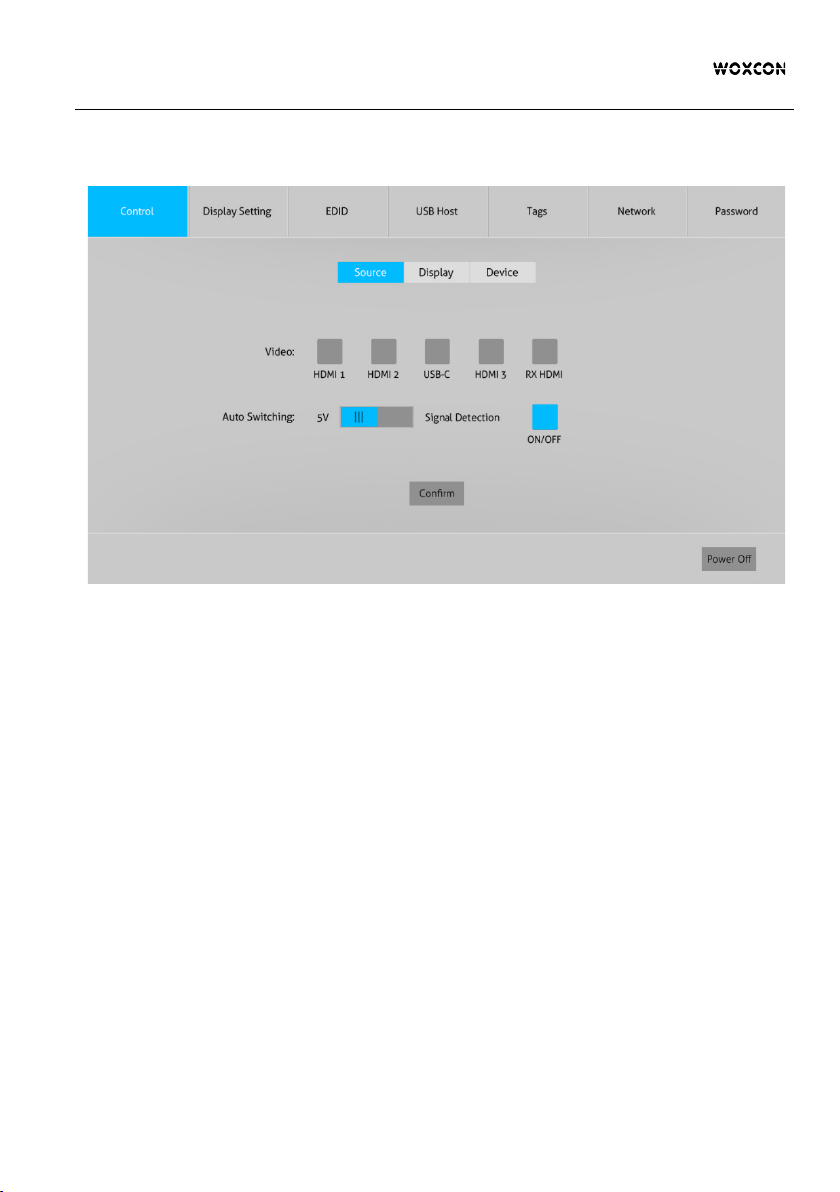
6.1 Control Tab ................................................................................................................................... 8
6.1.1 Signal Switching ............................................................................................................... 8
6.1.2 Display Control ................................................................................................................. 9
6.1.3 Device Control ................................................................................................................ 10
6.2 Display Setting Tab ..................................................................................................................... 11
6.3 EDID Tab .................................................................................................................................... 12
6.4 USB Host Tab ............................................................................................................................. 13
6.5 Tags Ta b ..................................................................................................................................... 15
6.6 Network Tab ............................................................................................................................... 15
6.7 Password Tab ............................................................................................................................. 16
6.8 GUI Upgrade .............................................................................................................................. 16
7. RS232 Control ...................................................................................................................................... 18
7.1 Device Control ............................................................................................................................ 18
7.2 Signal Switching ......................................................................................................................... 20
7.3 Display Control ........................................................................................................................... 21
7.4 Display Setting ........................................................................................................................... 22
7.5 EDID Setting .............................................................................................................................. 24
7.6 USB Control ............................................................................................................................... 26
7.7 Relay Control ............................................................................................................................. 27
8. Firmware Upgrade ................................................................................................................................ 28

4x1 Conference Tabletop Box with Soft Codec
1
1. Product Introduction
The SCU41T-TB 4x1 conference tabletop box is a multi-format switcher with three
HDMI inputs, one USB Type-C input, one HDMI output and one HDBT output. The USB
Type-C port provides charging for source device up to 60w. The box supports HDMI
and USB-C video resolutions up to 4K@60Hz 4:4:4 and multichannel audio. In addition
to passing EDID information from the display, there are multiple built-in EDID settings to
simplify an installation. The kit supports auto switching, auto display device control,
USB 2.0+3.0 signal extension and Ethernet signal extension. All signals of video, audio,
control and USB can be transmitted over a single CATx cable up to 70m. The HDBT
output supports bi-directional 24V PoC, allowing the compatible receiver (e.g. SCU42T-
CODEC-R, sold separately) to draw power from the tabletop box over the CATx cable.
The SCU41T-TB also supports front panel button control, Web GUI, CEC and RS232
control.
1.1 Features
l 4x1 switcher with three HDMI inputs and one USB Type-C input.
l Supports HDMI V2.0, 4K@60Hz 4:4:4, 8bit, HDR 10, HDR 10+ and Dolby Vision.
l Supports auto switching.
l Provides charging via USB-C port up to 60W.
l Provides USB data (USB 3.0/2.0) and 4K video transmission via USB-C port.
l Supports USB 2.0+3.0 signal extension by providing one USB Type-C and two USB
Type-B ports for host PC connection, and four USB Type-A ports for USB devices
connection (e.g. mouse, keyboard, microphone, camera etc.).
l Provides one 5V 2A USB Type-A port to power other device (e.g. mobile phone).
l Supports Ethernet signal extension by providing two ETHERNET ports.
l Supports bi-directional 24V PoC, only one power supply required in system.
l Transmits 4K signal to the distance up to 131 feet (40 meters) and 1080p signal to
the distance up to 230 feet (70 meters) over a single CATx Ethernet cable.
l Supports relay control.
l Supports Web GUI, CEC and RS232 control.
l Smart EDID management and HDCP handling.
l AC power output for charging other devices.
l Auto display control.

4x1 Conference Tabletop Box with Soft Codec
2
1.2 Package List
l 1x SCU41T-TB Conference Tabletop Box Transmitter
l 2x Mounting Screws (Ф10*15*M3)
l 2x Mounting Screws (6.8*12-M5*8)
l 2x Wing Mounting Screws
l 1x RS232 Cable
l 1x AC Power Cord
l 1x User Manual
Note: Please contact your distributor immediately if any damage or defect in the
components is found.

4x1 Conference Tabletop Box with Soft Codec
3
2. Specification
Input & Output
Video Input
(3) HDMI, (1) USB-C
Video Input Connector
(3) Type-A female HDMI, (1) USB 3.0 Type-C
HDMI Input Resolution
Up to 4K@60Hz 4:4:4 8bit, HDR 10, HDR 10+, Dolby Vision.
USB-C Input Resolution
Up to 4K@60Hz 4:4:4
Video Output
(1) HDMI, (1) HDBT
Video Output Connector
(1) Type-A female HDMI, (1) RJ45
HDMI Output Resolution
Up to 4K@60Hz 4:4:4 8bit, HDR 10, HDR 10+, Dolby Vision.
Supports 4K to 1080p video down-scaling.
HDBT Output Resolution
Up to 4K@60Hz 4:2:0 (Only compression)
HDMI Standard
2.0
HDCP Standard
2.2
HDMI Audio Format
Supports Dolby Atmos, Dolby TrueHD, Dolby Digital Plus, Dolby
Digital, DTS-X, DTS-HD Master Audio, DTS 5.1, 2-8Ch PCM 32-
192kHz 16-24 bits.
Control
Control
(2) 9x7mm Buttons, (2) ETHERNET, (1) TCP/IP, (2) PC/HOST 1/2,
(4) DEVICE, (1) RS232, (1) FIRMWARE
Control Connector
(3) RJ45, (2) USB Type-B, (4) USB 3.0 Type-A, (1) 3-pin terminal
block, (1) Micro-USB
Power
(1) CHARGING (USB 2.0 Type-A) , (1) AC Output, (1) AC Input
General
CEC Control
Supported
HPD
Supported
USB-C Charging
Up to 60W
USB-A (DEVICE) Charging
5V 1A
USB-A Charging
5V 2A
AC Input
100 to 240VAC, 50/60Hz
AC Output
100 to 240VAC, 50/60Hz
Transmission Distance
1080p@60Hz ≤ 70 meters (230ft), 4K@60Hz ≤ 40 meters (131ft)
Power Consumption
27W (Except USB-C Charging)
Operation Temperature
-5 to +55℃ (+23° to +131°F)
Storage Temperature
-25 to +70℃ (-13° to +158°F)
Relative Humidity
10% to 90%, Non-condensing
Dimension (W*H*D)
228mm x 304.5mm x 141mm
Net Weight
3.2kg

4x1 Conference Tabletop Box with Soft Codec
4
3. Panel Description
① INPUT SELECTION:
l Press the button repeatedly to cycle through the video inputs, and the
corresponding input LED HDMI 1, HDMI 2, USB-C, HDMI 3 or RX HDMI will
illuminate green. The RX HDMI source refers to the device which is connected
to the HDMI input port of the receiver.
l Hold and press the button at least three seconds to enter/exit auto switching
mode.
② DISPLAY CONTROL: Display ON/OFF composite button. Press the button to
simultaneously send CEC and RS232 commands to turn on/off display device. The
corresponding LED ON/OFF will illuminate green. Note that the ON and OFF
RS232 commands should be set by users.
③ HDMI IN 1: Connects to HDMI source device (e.g. laptop.).
④ HDMI IN 2: Connects to HDMI source device (e.g. laptop.).
⑤ USB-C IN: Connects to USB-C source device (e.g. MacBook)., and then its LED
will illuminate green.
⑥ HDMI IN 3: Connects to HDMI source device (e.g. PC).
⑦ HDMI OUT: Connects to HDMI display device.
⑧ RS232: Connects to control device (e.g. PC) to control the unit, or connects to the
display device which needs to be controlled by RS232 commands.
⑨ FIRMWARE: Micro USB port for firmware upgrade.
⑩ ETHERNET: Two RJ45 ports for network signal extension. One port connects to
network, the other will gain network signal. Note that the network signal can not be
extended to receiver by HDBT output.
DEVICETCP/IP
CONTROL
LINK
HDCP
HDMI OUT HDMI IN 3 RS232
FIRMWARE
Tx Rx
AC100V-240V
ETHERNET DEVICE CHARGING
HDMI IN 1 HDMI IN 2 USB-C IN
ON OFF
INPUT
HDMI 1 HDMI 2 USB-C HDMI 3 RX HDMI
1
4
357896
2
10 11 12 13 16 17
14 15 12
11
10

4x1 Conference Tabletop Box with Soft Codec
5
⑪ PC/HOST 1&2: Two USB Type-B ports for HOST PCs connection. The HOST PC
can be controlled by the USB devices (e.g. mouse, keyboard, etc.) which are
connected to USB Type-A ports (DEVICE).
⑫ DEVICE: Four USB Type-A ports for USB device connection (e.g. mouse,
keyboard, etc.). These USB devices are used to control HOST PC 1/2, or USB-C
device. These four USB Type-A ports also provide 5V 1A power.
⑬ CHARGING: Provides 5V 2A power for the other peripheral device (e.g. mobile
phone).
⑭ AC OUTPUT: Provides AC output for the other peripheral device.
⑮ AC INPUT: Power input port for power cord connection.
⑯ HDBT OUT: Connects to the HDBT IN port of far-end receiver. The HDBT output
signal is same as the HDMI output’s.
⑰ TCP/IP CONTROL: Connects to control device (e.g. PC) to control the unit via
GUI.
4. System Connection

4x1 Conference Tabletop Box with Soft Codec
6
5. Panel Button Control
5.1 Signal Switching
Press INPUT button to manually select input source, the corresponding LED of HDMI 1,
HDMI 2, USB-C, HDMI 3 or RX HDMI will illuminate green. When the LED of RX HDMI
turns green, the RX HDMI source is switched to the HDMI output port of the receiver,
and the source input of tabletop box is switched to HDMI 3 input, then the LED of HDMI
3 also lights green. Note that the HDMI 3 input can be switched to another source input
by GUI Control tab, and the switching status of RX HDMI would not be changed.
Press and hold INPUT button at least three seconds to enable or disable auto switching
mode, and the button will light up.
In auto switching mode, the unit will switch source input according to the following
rules:
l The default detection method of input source signal is 5V, and it also supports
TMDS.
l The unit will switch to the first available active input with the priority is HDMI 1>
HDMI 2 > USB-C > HDMI 3.
l New input: The unit will automatically select the new input once detecting a new
input.
l Reboot: If power is restored to the unit, it will automatically reconnect the input
before shutdown.
l Source removed: When an active source is removed, the unit will switch to the first
active input with the priority is HDMI 1> HDMI 2 > USB-C > HDMI 3.
l In auto switching mode, the input source also can be switched by press the INPUT
button, but the unit will not exit auto mode.
l Press and hold the INPUT button at least three seconds again can exit AUTO
mode, but the active input source will not be changed.
l The HDMI output and HDBT output come from the same signal source.
5.2 Display Control
Press DISPLAY button to turn on/off the display device by simultaneously sending CEC
and RS232 commands, and then the corresponding LED ON/OFF will illuminate green.
The ON/OFF RS232 command can be saved into the control button by GUI Display
Setting tab, or sending command “#SET_ON_param1_param2:xxxx” /
“#SET_OF_param1_param2_param3: xxxx” on RS232 control software. For more
details, refer to 6.2 Display Setting Tab or 7.4 Display Setting.

4x1 Conference Tabletop Box with Soft Codec
7
6. GUI Control
The unit can be controlled via TCP/IP. The default IP settings are:
IP Address:
192.168.0.178
Subnet Mask:
255.255.255.0
Type 192.168.0.178 in the internet browser, it will enter the below log-in webpage:
Username: admin
Password: admin
Type the user name and password, and then click Login to enter the section for video
switching.

4x1 Conference Tabletop Box with Soft Codec
8
6.1 Control Tab
6.1.1 Signal Switching
l Video: Click button “HDMI 1”, “HDMI 2”, “USB-C”, “HDMI 3” or “RX HDMI” to select
the corresponding input source.
l Auto Switching:
ü Select 5V or TMDS signal detection mode.
ü Click button “ON/OFF” to enable or disable auto switching mode.
l Power Off: Click the button to let the unit to enter standby mode, click the button
again to wake up.

4x1 Conference Tabletop Box with Soft Codec
9
6.1.2 Display Control
l Auto Display Control: Enable or disable the auto display control mode. In auto
display control mode, the unit will automatically perform the following operations.
ü System On:
When the unit detects source signal input (5V or TMDS), or receives “Wake Up”
command, it will automatically perform the following operation steps:
1) Send “Display On” CEC command to the display device.
2) Send “Display On -> Delay Time (default: 10S) -> Display Input Select” RS232
commands to the display device.
3) Execute Relay 1 control of receiver.
ü System Off:
When the unit detects no signal source input and the No Signal Timeout (default:
0S) is up; detects no activities or RS232 communication and No Activity Timeout
(default: 0min) is up; or receives “Power Off” command, it will automatically perform
the following operation steps:
1) Send “Display Off” CEC command to the display device.
2) Send “Display Off” RS232 command to the display device. This command is
sent once by default, or it can be sent twice by setting.
3) Execute Relay 2 control of receiver.
4) Only after executing “System Off” program, the “System On” can be triggered.

4x1 Conference Tabletop Box with Soft Codec
10
Note: The “Display On”, “Display Off” and “Display Input Select” RS232 commands;
the Delay Time, No Signal Timeout and No Activity Timeout can be set by GUI
Display Setting tab or RS232 command. For more details, please refer to 6.2
Display Setting Tab or 7.4 Display Setting.
l Display: Click “On” or “Off” to turn on or off the display device by simultaneously
sending CEC and RS232 commands.
l RS232 Command: Enter RS232 commands to be sent to control the display device
as needed, and then click “Send”. The RS232 commands may be found in the user
manual of display device.
l Latching or Momentary relay control mode for Relay 1 and Relay 2:
ü Click “LATCHING” to manually control the relay device (e.g. projector screen),
and then click the button again to stop the process. For example, click
“LATCHING”, the projector screen starts to be rolled up or dropped down, and
then click “LATCHING” again to stop the process.
ü Automatically control the relay device (e.g. projector screen). For example, after
setting the auto stop time (0~30s), click “Momentary”, the projector screen starts
to be rolled up or dropped down until the auto stop time is up.
6.1.3 Device Control
l Factory Default: Click the button to restore to factory default.
l HDCP Out: Select HDCP Passive or Active mode.

4x1 Conference Tabletop Box with Soft Codec
11
ü Passive: Automatically follows the input source’s HDCP content.
ü Active: Automatically output HDCP 1.4 content, and if the input source has no
HDCP content, the output also has no HDCP content.
6.2 Display Setting Tab
l Baud Rate: Set the baud rate for display device. It supports 2400, 4800, 9600,
19200, 38400, 57600 and 115200.
l Command Ending: NULL, CR, LF or CR+LF can be selected.
l Select “Hex” to enter hexadecimal string.
l Display On: Enter the “Display On” RS232 command to be saved, and then click
“Save”. The command is usually used to turn on the display device. When pressing
the “DISPLAY ON” button on front panel, the command will be automatically sent to
the display device.
l Display Off: Enter the “Display Off” RS232 command to be saved, and then click
“Save”. The command is usually used to turn off the display device. When pressing
the “DISPLAY OFF” button on front panel, the command will be automatically sent
to the display device. When “2x” is checked, the “Display Off” command is sent
twice.
l Display Off x2 Delay: Set the interval time for “Display Off” command to be sent
twice.

4x1 Conference Tabletop Box with Soft Codec
12
l Input Delay: Set the sending interval time between the “Display On” and “Display
Input Select” commands.
l Display Input Select: Enter the “Display Input Select” RS232 command to be saved,
and then click “Save”. The command is usually used to select input source for the
display device.
l No Activity Timeout: The system will enter standby mode, and the display device will
be automatically shut down when no any activity is detected within the setup time.
l No Signal Timeout: The system will enter standby mode, and the display device will
be automatically shut down when no source signal is detected within the setup time.
6.3 EDID Tab
l Click “HDMI 1”, “HDMI 2”, “USB-C”, “HDMI 3” or “RX HDMI” to select the source
device, and then select the desired built-in EDID for the selected source device.
l User-defined 1/2: There are two user-defined EDID can be set by the following
steps:
ü Step 1: Prepare the EDID file (.bin) on the control PC.
ü Step 2: Select the “User-defined 1” or “User-defined 2”.
ü Step 3: Select the EDID file (.bin) according the tooltip.
ü Step 4: Click “Apply” to upload the user-defined EDID.

4x1 Conference Tabletop Box with Soft Codec
13
6.4 USB Host Tab
The system provides USB HOST PC 1, PC 2 or USB-C to be selected, and it provides
USB Type-A ports for connecting USB devices (e.g. mouse, keyboard, etc.) used to
control the selected USB HOST. The USB HOST can be switched in this tab.
l Auto Switch: Enable or disable auto switching mode of USB HOST. In auto
switching mode, the unit will switch USB HOST according to the following rules:
ü When all USB HOSTs are connected in system, the switching priority is PC 1>
PC 2 > USB-C.
ü When an active USB HOST is removed, the unit will switch to the first detected
HOST with the priority is PC 1> PC 2 > USB-C.
l Manual: Manually select the USB HOST (PC 1, PC 2 or USB-C).
l Follow Video: Set the USB HOST (PC 1 or PC 2) to follow the video source signal
switching.
ü HDMI 1: Set PC 1 or PC 2 to follow HDMI IN 1 source switching.
ü HDMI 2: Set PC 1 or PC 2 to follow HDMI IN 2 source switching.
ü HDMI 3: Set PC 1 or PC 2 to follow HDMI IN 3 source switching.
For example: If select PC 2 to follow the HDMI IN 1 source switching, when the
HDMI IN 1 is switched as source input, all USB devices (e.g. mouse, keyboard) in
system are used to control the PC 2.

4x1 Conference Tabletop Box with Soft Codec
14

4x1 Conference Tabletop Box with Soft Codec
15
6.5 Tags Tab
l Modify the input source tags.
6.6 Network Tab
l Set Static IP or Dynamic Host Configuration Protocol (DHCP).
l Modify the static IP Address, Subnet Mask, and Gateway.

4x1 Conference Tabletop Box with Soft Codec
16
6.7 Password Tab
l Reset the login username and password.
6.8 GUI Upgrade
Please visit at http://192.168.0.178:100 for GUI online upgrade.
Type the username and password (the same as the GUI log-in setting, modified
password will be available only after rebooting) to login the configuration interface. After
that, click Administration in the source menu, and then click Upload Firmware, select
the desired update file and press Apply, it will start upgrading then.

4x1 Conference Tabletop Box with Soft Codec
17

4x1 Conference Tabletop Box with Soft Codec
18
7. RS232 Control
The unit provides RS232 port for control device (e.g. PC) connection. After setting all
needed input and output devices according to the system connection diagram, please
install the RS232 control software (e.g. docklight) into the control PC to send RS232
command.
After installing the RS232 control software, please set the parameters of COM number,
bound rate, data bit, stop bit and the parity bit correctly, and then you are able to send
command in command sending area.
When controlling the unit, the serial port settings for all RS232 commands is:
Baud rate: 9600 Data bit: 8 Stop bit: 1 Parity bit: none
Note: The unit can be controlled by sending the following RS232 commands, and the
command ending is “<CR><LF>”.
7.1 Device Control
Command
Function
Command Example and
Feedback
#GET_FIRMWARE_VERSION
Get firmware version.
@V1.0.0
#FACTORY_RESET
Restore to factory default.
@FACTORY_RESET
#REBOOT
System reboot.
@REBOOT
#GET_STATUS
Get device status.
@V1.0.0
@AV H1
@AUTO_SWITCH 1
@OUTPUT_HDCP
PASSIVE
@H1_EDID_MODE 0
@C_EDID_MODE 0
@H2_EDID_MODE 0
@SIGNAL_DET_MODE
5V
@KEYPAD_LOCK 0
@USB_SWITCH_MODE 2
@USB_CH PC1
@RS232_BAUD 4
#SET_POWER param1
Enter or exit standby mode.
param1 = 0, 1
0 - Standby mode.
1 - Normal working mode.
#SET_POWER 0
#SET_POWER 1
@POWER 0
@POWER 1
Table of contents
Other Woxcon Switch manuals

Woxcon
Woxcon WUH4ARC-H2 User manual

Woxcon
Woxcon SCU42 User manual

Woxcon
Woxcon SCU41-BYOD User manual

Woxcon
Woxcon SCU61E User manual

Woxcon
Woxcon SC51TS User manual

Woxcon
Woxcon SCU82TS User manual

Woxcon
Woxcon SCU41E User manual

Woxcon
Woxcon SCU21E-CODEC User manual

Woxcon
Woxcon SM62T User manual

Woxcon
Woxcon SCU41-MV User manual
Popular Switch manuals by other brands

AirCycler
AirCycler SmartExhaust Installation & user guide

CTS
CTS FOS-3110 Series user guide

H3C
H3C S6800 Series MCE Command Reference

Ametek
Ametek Magnetrol Thermatel TD1 Installation and operating manual

Dahua Technology
Dahua Technology DH-PFS4210-8GT-150 user manual

Moxa Technologies
Moxa Technologies ToughNet TN-4500A Series Quick installation guide