wtw pHotoFlex pH User manual

QUICK START GUIDE
ba75977e03 10/2017
pHotoFlex®pH
LED FILTER PHOTOMETER WITH INTEGRATED pH FUNCTION

ba75977e03 10/2017
pHotoFlex®pH
Copyright ©2017 Xylem Analytics Germany GmbH
Printed in Germany.

pHotoFlex®pH Contents
3
ba75977e03 10/2017
Contents
Safety . . . . . . . . . . . . . . . . . . . . . . . . . . . . . . . . . . . . . . . . . . . . . . . 4
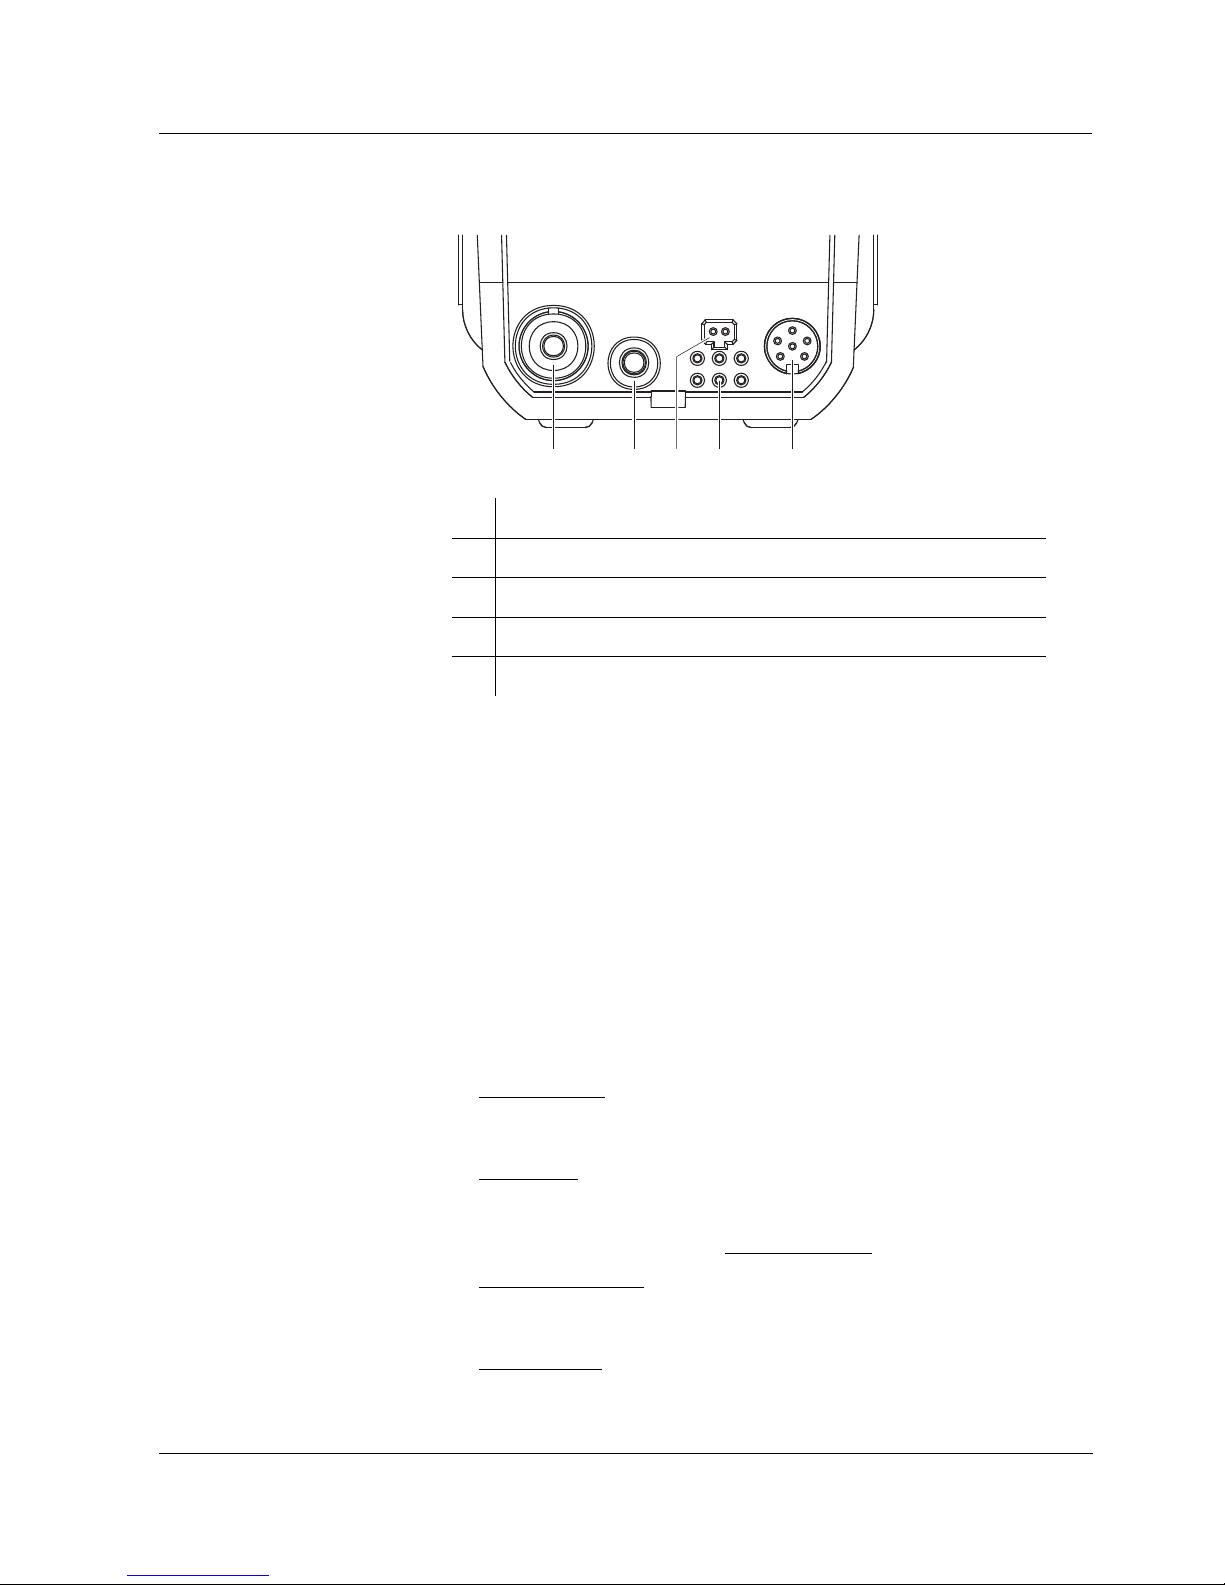
Display and socket field . . . . . . . . . . . . . . . . . . . . . . . . . . . . . . . . 4
Power supply . . . . . . . . . . . . . . . . . . . . . . . . . . . . . . . . . . . . . . . . . 5
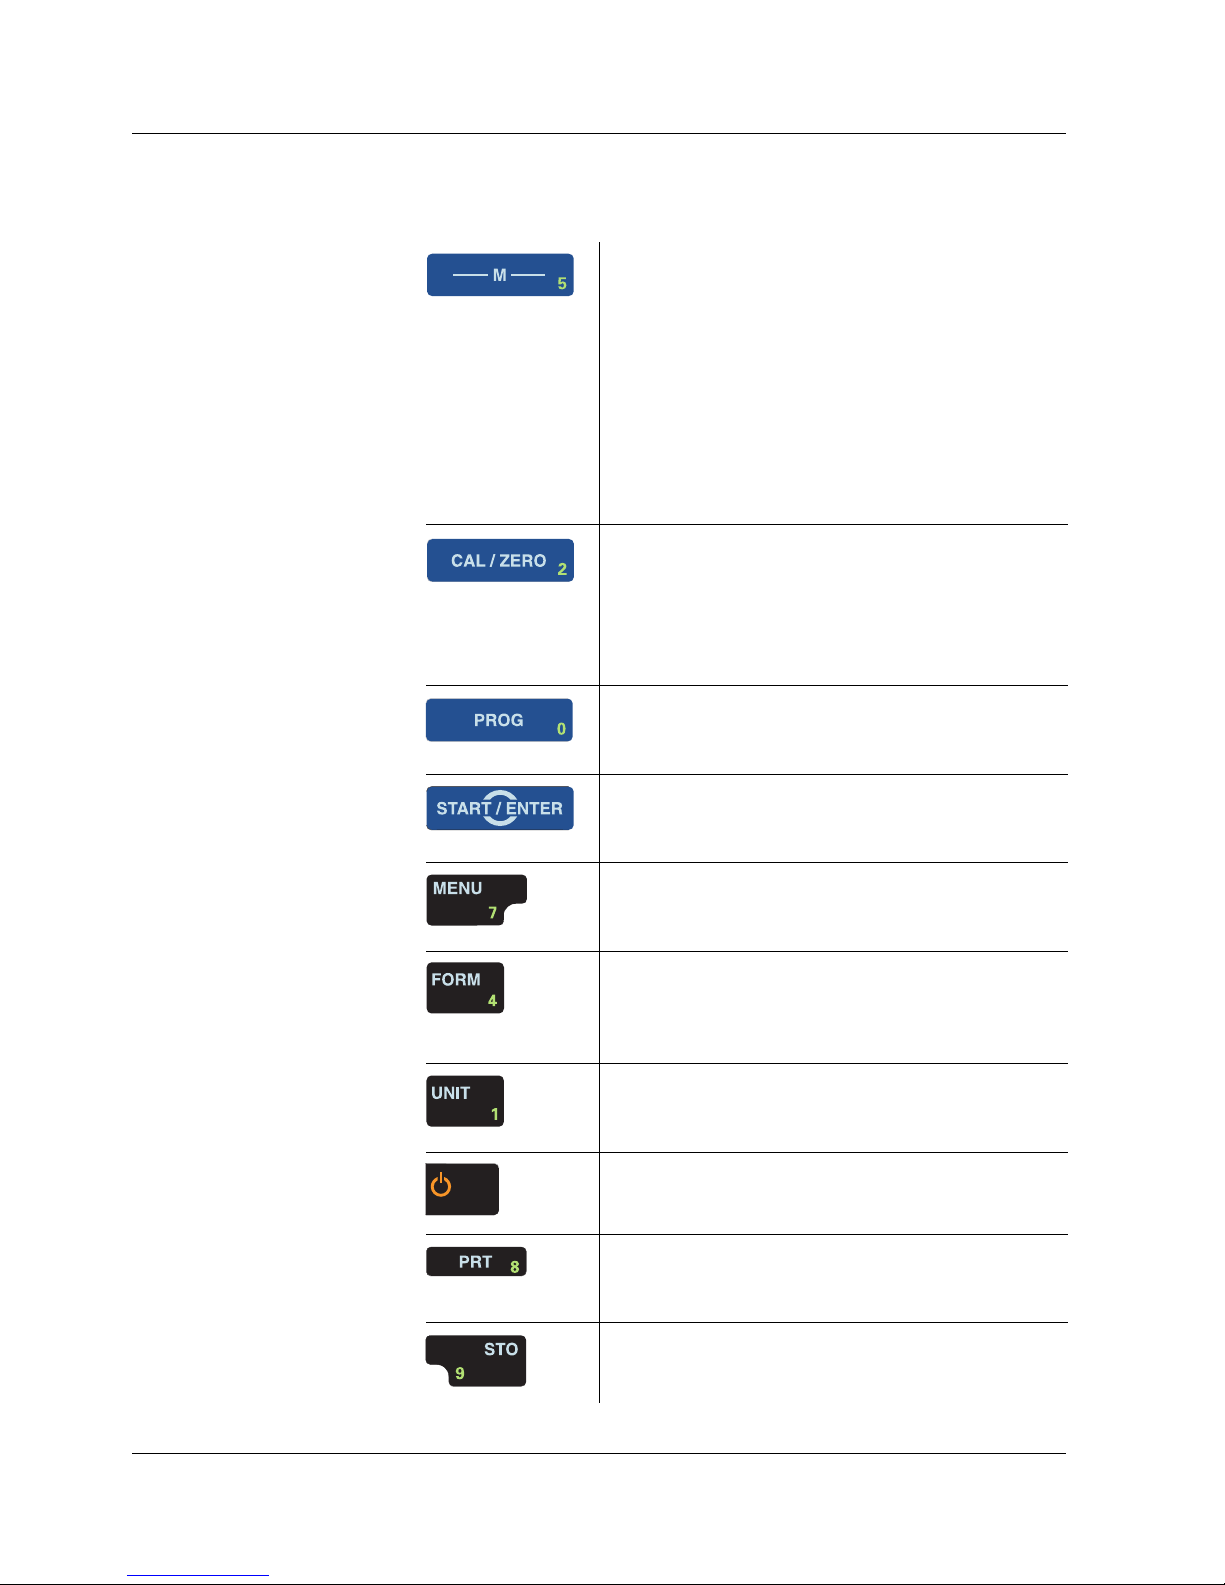
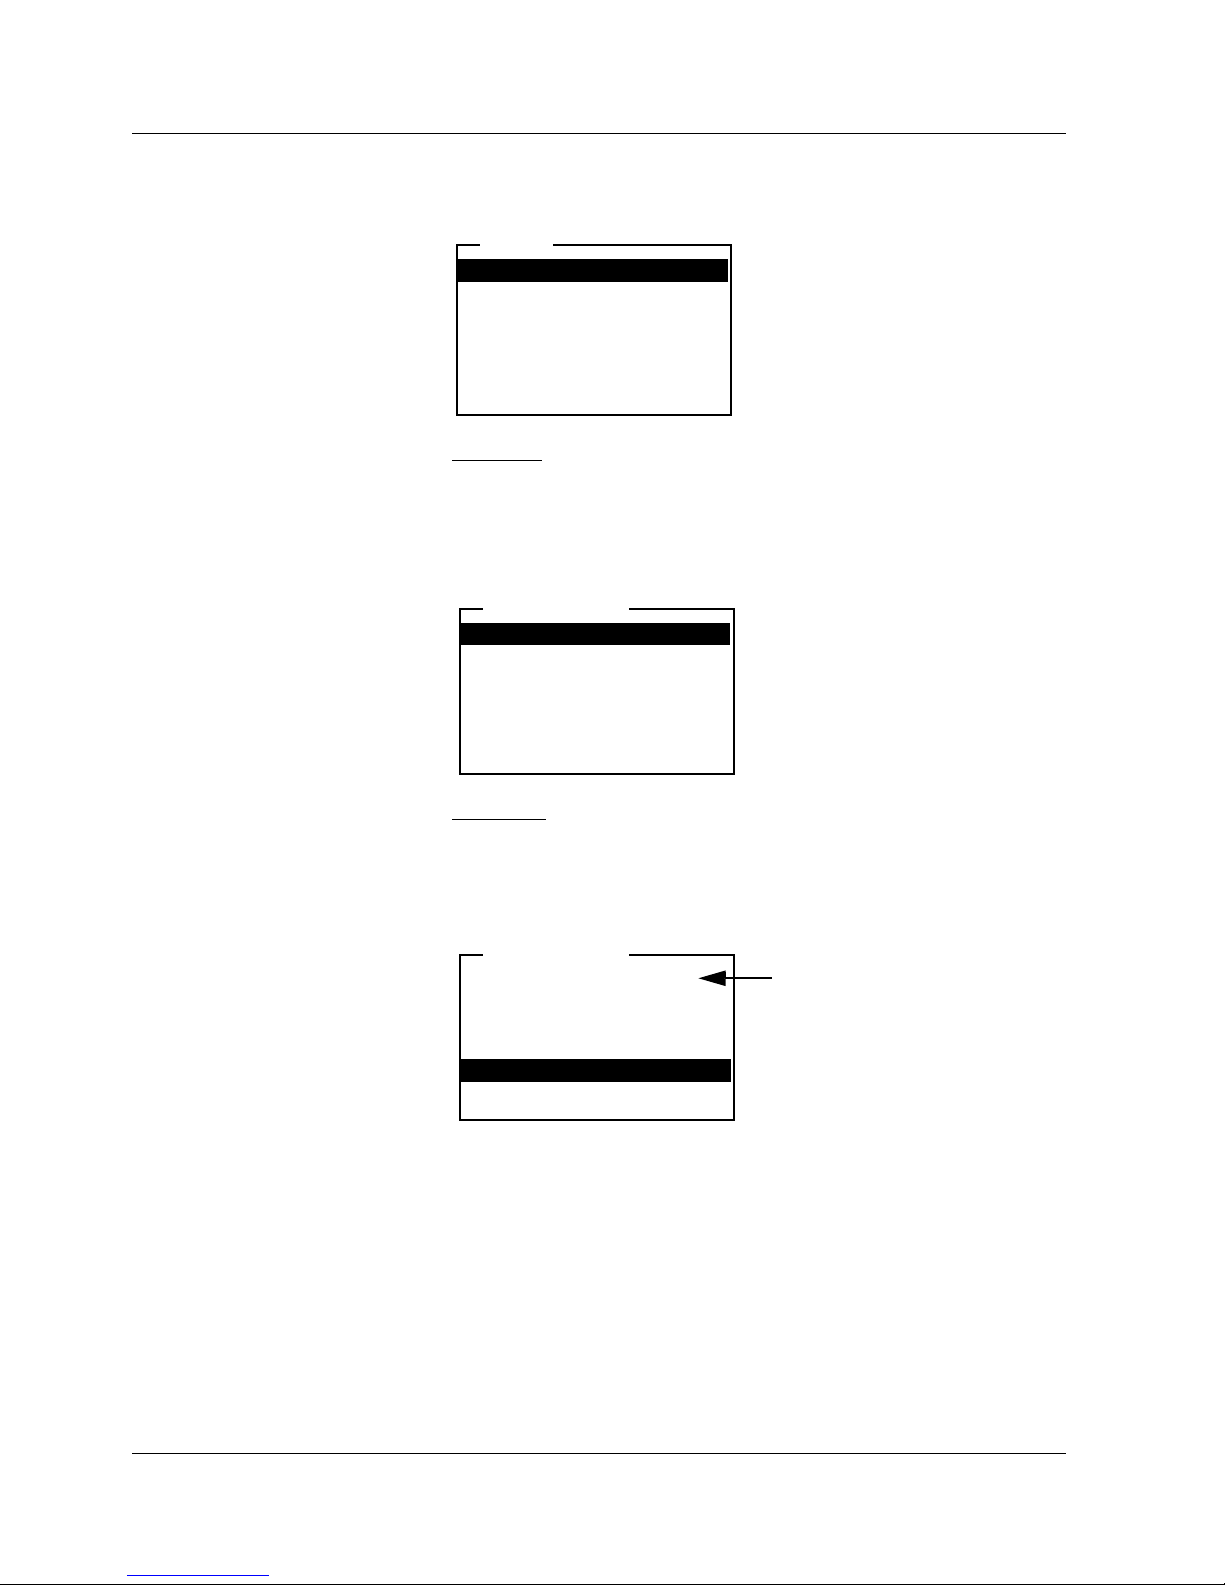
General operating principles . . . . . . . . . . . . . . . . . . . . . . . . . . . . 5
Initial commissioning . . . . . . . . . . . . . . . . . . . . . . . . . . . . . . . . . . 9
Operation . . . . . . . . . . . . . . . . . . . . . . . . . . . . . . . . . . . . . . . . . . . . 9
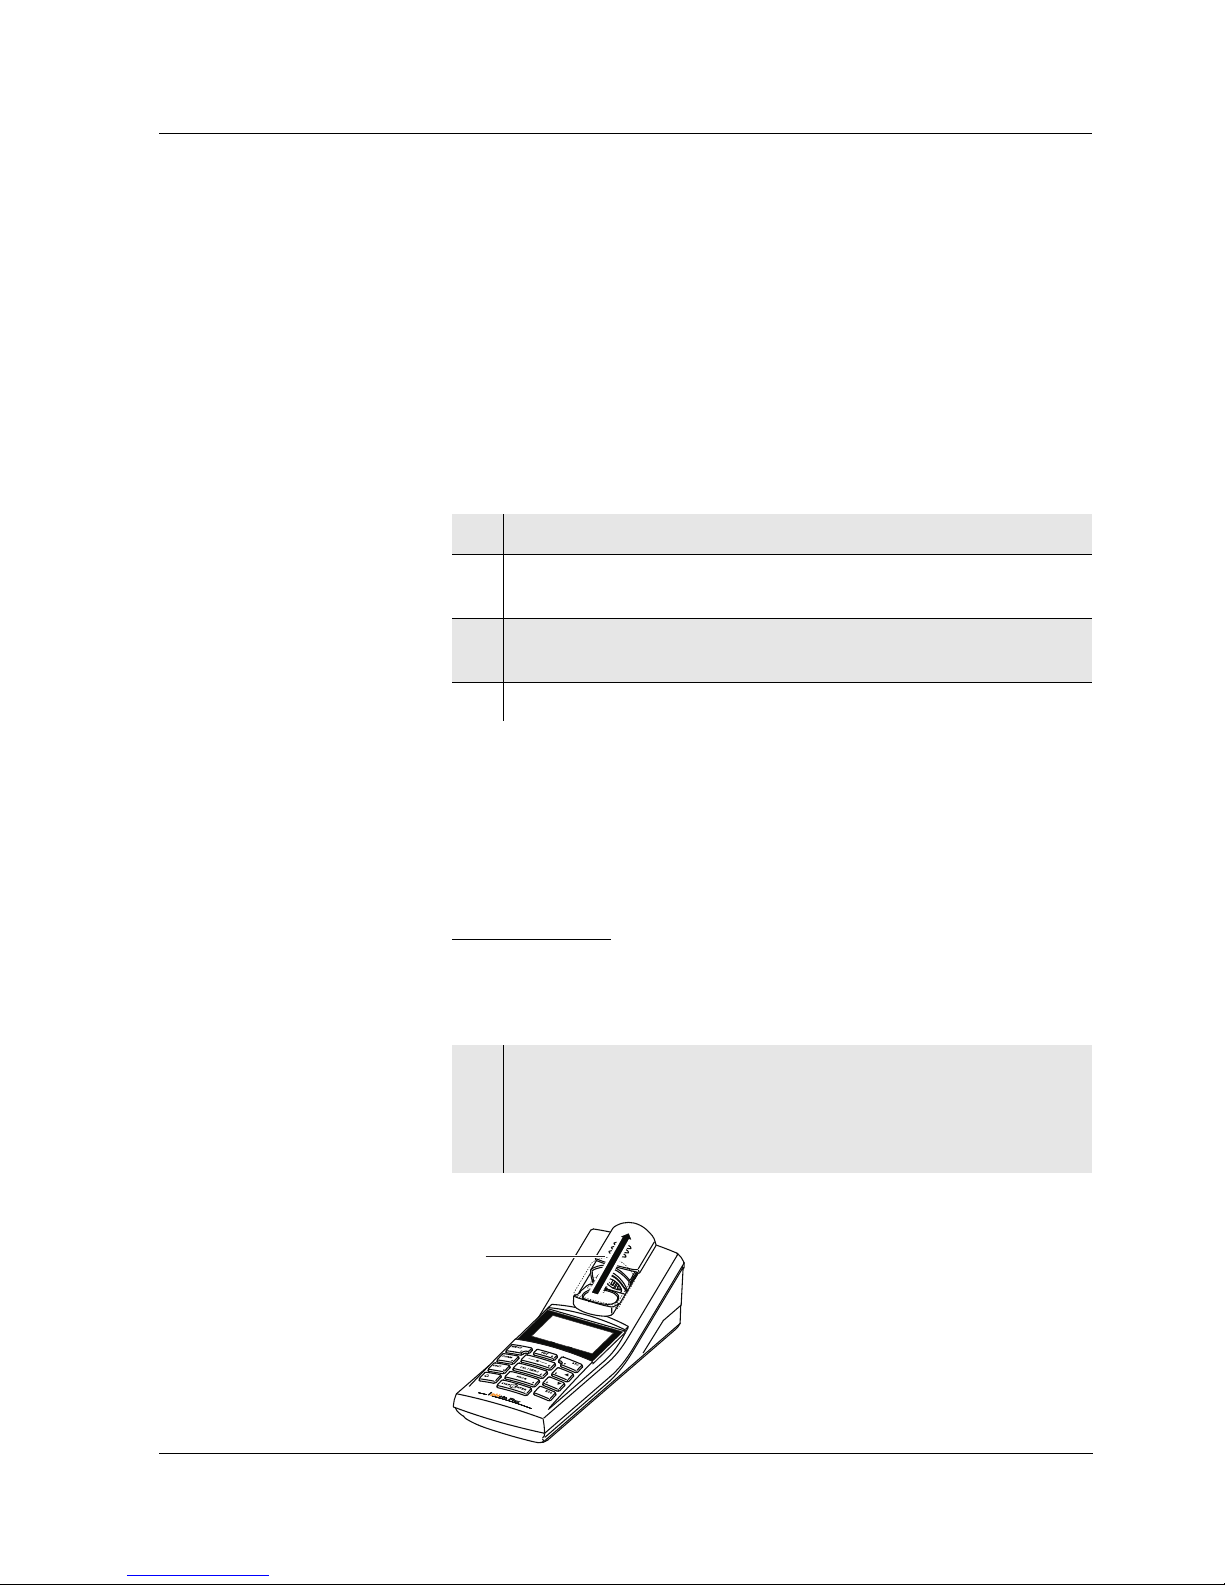
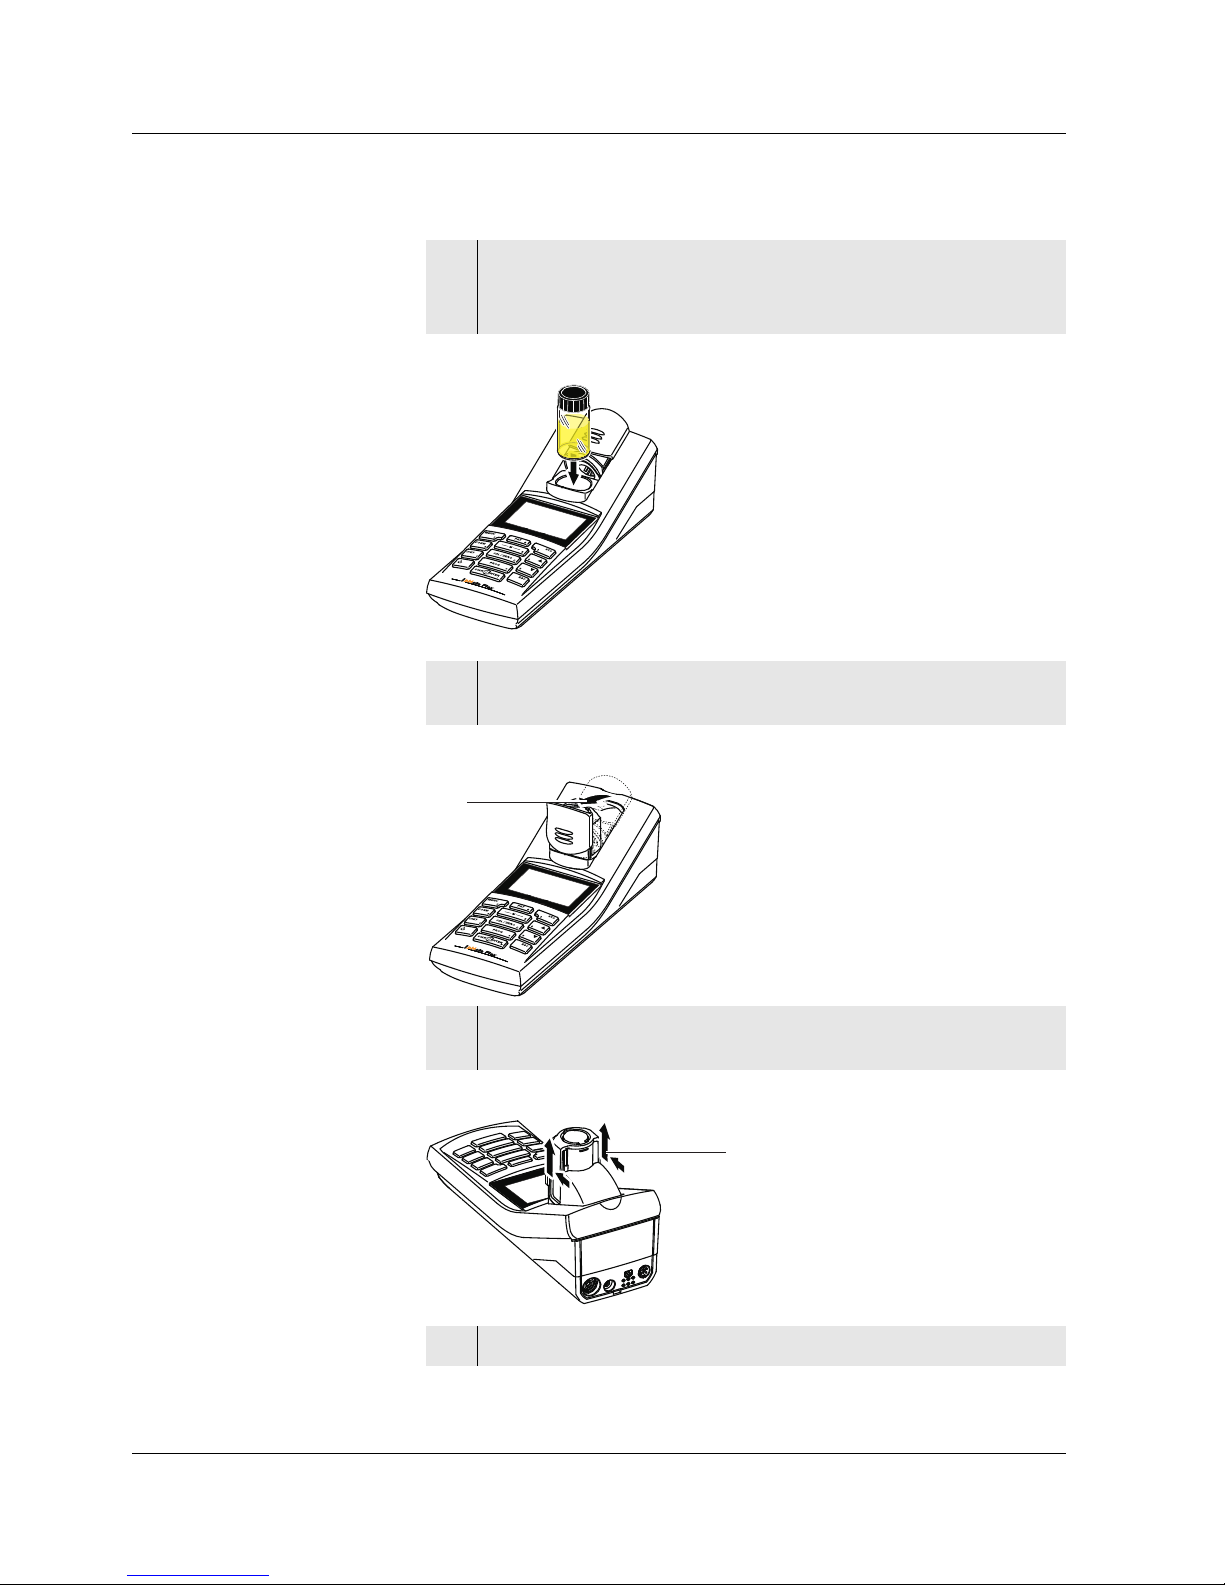
Inserting a cell . . . . . . . . . . . . . . . . . . . . . . . . . . . . . . . . . . . . . . . . . . . 9
Photometry . . . . . . . . . . . . . . . . . . . . . . . . . . . . . . . . . . . . . . . . . . . . 12
pH value / ORP voltage . . . . . . . . . . . . . . . . . . . . . . . . . . . . . . . . . . 14
Maintenance, cleaning. . . . . . . . . . . . . . . . . . . . . . . . . . . . . . . . . 16
What to do if... . . . . . . . . . . . . . . . . . . . . . . . . . . . . . . . . . . . . . . . 18
General errors . . . . . . . . . . . . . . . . . . . . . . . . . . . . . . . . . . . . . . . . . . 18
Photometry . . . . . . . . . . . . . . . . . . . . . . . . . . . . . . . . . . . . . . . . . . . . 18
pH value / ORP voltage . . . . . . . . . . . . . . . . . . . . . . . . . . . . . . . . . . 19
Technical data . . . . . . . . . . . . . . . . . . . . . . . . . . . . . . . . . . . . . . . 21
General data . . . . . . . . . . . . . . . . . . . . . . . . . . . . . . . . . . . . . . . . . . . 21
Photometry . . . . . . . . . . . . . . . . . . . . . . . . . . . . . . . . . . . . . . . . . . . . 23
pH value / ORP voltage . . . . . . . . . . . . . . . . . . . . . . . . . . . . . . . . . . 24
Part of the process of consequently improving our products is the continuous
further development of the range of photometric tests offered and the meter
firmware. All current data for the pHotoFlex®pH can be found on the Internet
under www.WTW.com:
Firmware
Method data
Analysis specifications
Operating manual
You can easily transfer new firmware to your instrument with the aid of the
AK 540/B cable and a PC. More detailed information can be found in the
detailed operating manual on the CD-ROM provided.

Safety pHotoFlex®pH
4ba75977e03 10/2017
Safety
Target group The meter was developed for work in the field and in the laboratory.
We assume that, as a result of their professional training and
experience, the operators will know the necessary safety precautions
to take when handling the chemicals of photometric test sets.
The personnel responsible for the commissioning, operation and
maintenance must have the necessary qualifications for this work. If the
personnel do not have the required skills they have to be instructed.
Furthermore, it must be ensured that the personnel read and
completely understand the present operating manual.
Safety instructions Important safety instructions are highlighted in this operating manual.
They are indicated by the warning symbol (triangle) in the left column.
The signal word (e.g. "Caution") indicates the level of danger:
CAUTION
indicates a possibly dangerous situation that can lead to slight
(reversible) injury if the safety instruction is not followed.
NOTE
indicates a possibly dangerous situation where goods might be
damaged if the actions mentioned are not taken.
Safe operation
CAUTION
Danger of eye damage by visible and invisible LED radiation. In
the cell shaft there are light emitting diodes (LED) of the 1M class.
Do not look at the radiation using optical instruments. With
normal, authorized use there is no hazard.
Display and socket field
Display The graphic display shows all information of the current measurement
in the measured value display. The illumination enables to read the
display even in the darkness.
Measuring mode \ measured
parameter
Measured value (with unit)
Program and citation form
Diameter of the cell and
measuring range
Status line with date and time
Photometry \ Concentration
1.29
mg/l
2: A5/25 MC NH4
-N
16 mm 0.20 - 8.00 mg/l
01.02.05 15:12

pHotoFlex®pH Power supply
5
ba75977e03 10/2017
Socket field
Identifying the
connectors
Power supply
You can operate the meter either with batteries, rechargeable battery
or a power pack.
The LoBat display indicator appears when the batteries or
rechargeable battery is nearly discharged.
General operating principles
This section contains basic information on the operation of the
pHotoFlex®pH.
Operating modes Measurement
The display indicates measurement data in the measured value
display
Calibration
The display indicates a calibration process with calibration
information,
or a process to carry out a zero adjustment
Data transmission
The meter transmits measuring datasets or calibration records to the
serial interface
Configuration
The display indicates a menu with further menus, settings and
functions
12345
1pH electrode
2pH temperature sensor
3Power pack (9 V DC, see page 22)
4Contacts for operation on the LabStation
5RS232 serial interface

General operating principles pHotoFlex®pH
6ba75977e03 10/2017
Keypad Select the measuring mode
<M> (long keystroke):
–Photometry
–pH & ORP
Select the measured parameter within a
measuring mode
<M> (short keystroke):
–pH & ORP: pH, ORP
–Photometry:
Concentration, Absorbance, % Transmission
Start calibration (measuring mode pH & ORP)
Start zero adjustment or blank value
measurement via the Photometry \ Adjustment
menu
(measuring mode, Photometry)
<CAL/ZERO>
In the Photometry measuring mode: Select a
program for concentration measurement
<PROG>
Open menus / confirm entries /
start measurement
<START/ENTER>
Call up the Configuration menu
(all settings are made here)
<MENU>
In the Photometry measuring mode, measured
parameter, Concentration
:
switch over between available citation forms
<FORM>
In the Photometry measuring mode, measured
parameter, Concentration
:
Switch over between available units <UNIT>
Switch the meter on/off
<ON/OFF>
Output display contents to RS232 interface
(e.g. print)
<PRT>
Open the Store menu: <STO>
Quick storing: 2 x <STO>
.
PRT

pHotoFlex®pH General operating principles
7
ba75977e03 10/2017
Keys with an additional number printed on are assigned doubly.
This enables to directly enter numbers in special menus. Thus, you
can, for example, conveniently enter the date and time via the number
keys.
Measured value display In the measured value display, you can
select a measuring mode with <M> (long pressure)
select a measured parameter in the active measuring mode (e. g.
pH <−> mV) with <M> (short pressure)
open the menu with <MENU>
switch to the higher Start menu with <ESC>.
Menus and dialogs The menus for settings and dialogs in procedures contain further
submenus. The selection is made with the <><>keys.
The current selection is highlighted as white text on a black
background.
Menus
The name of the menu is displayed at the upper edge of the frame.
Menus are opened by confirming with <START/ENTER>. Example:
Settings
Settings are indicated by a colon. The current setting is displayed on
the right-hand side. With <START/ENTER>, the selection of the
possible settings is opened. Subsequently, the setting can be
changed with <><>and<START/ENTER>.
Example:
Highlight menu items or selection /
set values
<>, <>
Switch to the next higher menu level /
cancel input
<ESC>
Photometry
pH & ORP
System
Info
Configuration

General operating principles pHotoFlex®pH
8ba75977e03 10/2017
Functions
Functions are designated by the name of the function. They are
immediately carried out by confirming with <START/ENTER>.
Example: display the Calibration record function
(in the pH & ORP / Calibration menu).
Messages
Information or operating instructions are indicated by the isymbol.
They cannot be selected.
Example:
Language:English
Beep:Off
Illumination:On
Contrast:48 %
Temperature unit:°C
Switchoff time:30 min
System
Calibration record
Cal. type: AutoCal
TEC
Calibration interval:007 d
Unit for slope:mV/pH
i2.00 4.01 7.00 10.01
pH & ORP
iBuffer recognition TEC
iImmerse sensor in buffer 1
Set temperature:25 °C
Continue
pH & ORP
The iindicates
info texts, e.g.
messages, notes or
instructions

pHotoFlex®pH Operation
9
ba75977e03 10/2017
Initial commissioning
Switching on the meter Press the <ON/OFF> key.
For a few seconds, the Start menu appears with a selection of the
measuring modes. The measuring mode last selected is highlighted.
After a few seconds, the meter automatically switches to the measuring
mode and measured parameter used last.
Setting the language The English language is set on delivery. Set a different language as
follows:
Setting the date and
time
The date and time are set in the menu,
Configuration / System / Continue ... / Date/time.
Operation
Inserting a cell
To be able to insert cells in the pHotoFlex®pH, the cell shaft has to be
prepared to take in a cell.
1Open the Configuration menu with the <MENU> key.
2 Open the Configuration / System / Language menu with the
<><>and <START/ENTER> keys.
3Select the required language with the <><>keys and
confirm with <START/ENTER>.
4 Quit the menu with the <M> key.
1Push the dust cover (1) upward.
The cell shaft for 28 mm cells is open.
Insert a 28 mm cell (see below)
Insert a 16 mm cell (see page 10)
1

Operation pHotoFlex®pH
10 ba75977e03 10/2017
Inserting a 28 mm cell
Inserting a 16 mm cell
2Insert the cell so that it is positioned on the bottom of the cell
shaft.
The cell is ready to be measured.
1Put the fold-out cell shaft (2) in an upright position until it locks
into place.
2Pull up the height adapter (3).
The cell shaft is extended.
3Open the external light cover (4) of the cell shaft.
2
3

pHotoFlex®pH Operation
11
ba75977e03 10/2017
4Insert the 16 mm cell (marking points forward) so that it is
positioned on the bottom of the cell shaft.
5 Close the external light cover (4).
The cell is ready to be measured.
4

Operation pHotoFlex®pH
12 ba75977e03 10/2017
Photometry
Measuring the
concentration
From the second concentration measurement, the data of the program
last used is automatically displayed here.
With <><>you can quickly switch between the ten programs last
used.
If a program number is selected that requires a measured blank value,
the menu automatically guides to the blank value measurement.
1Press the <M> key (long pressure) repeatedly until the
Photometry measuring mode is selected.
2 Press the <M> key (short pressure) repeatedly until the
measured parameter, Concentration is selected.
3Open the Program number display with <PROG>,
enter the required program number with the number keys and
confirm with <START/ENTER>.
or (from the second concentration measurement):
Select a program out of the last ten programs with <><>.
The program data is displayed.
4Insert the cell (see page 9).
Photometry \ Concentration
iSelect program
with <PROG>
01.02.05 15:12
Photometry \ Concentration
iSelect program
with <PROG>
or with
?
?
1: A5/25 MC NH4-N
16 mm 0.20 - 6.51 mg/l
01.02.05 15:12
First concentration measurement
with the pHotoFlex®pH
Second and all further
concentration measurements
Photometry \ Concentration
iInsert sample
iStart measurement
with <START>
1: A5/25 MC NH4-N
16 mm 0.20 - 6.51 mg/l
01.02.04 15:12

pHotoFlex®pH Operation
13
ba75977e03 10/2017
Blank value
(reagent blank value)
A blank value is required for every concentration measurement.
For some programs (methods) for concentration measurement, the
blank values are already stored in the meter. For all other programs, the
blank value has to be determined separately before the first
measurement.
You will find more information on blank values in the photometry
analysis manual. A table with the programs and required blank values
can be found in the analysis specifications.
Zero adjustment The zero adjustment, i. e. measuring and storing the absorbance of a
cell filled with water, is necessary after the meter is switched on.
Additionally, we recommend to carry out a zero adjustment if the
ambient temperature has changed.
Only perform the zero adjustment against distilled water in an optically
perfect cell. The zero adjustment must be performed separately for
each cell type.
Zero adjustment / blank
value measurement
5 Start the measurement with <START/ENTER>.
Measurement is started. The result is displayed.
Photometry \ Concentration
[BV]
0.74 mg/l
1: A5/25 MC NH4-N
16 mm 0.20 - 6.51 mg/l
01.02.04 15:12
A blank value measured by
the user is used
1Press the <M> key (long pressure) repeatedly until the
Photometry measuring mode is selected.
2 Press the <M> key (short pressure) repeatedly until the
measured parameter, Concentration is selected.
3Press the <CAL/ZERO> key.
The menu for adjustment measurements opens up.
Zero adjust.
Measure blank value
Delete blank value
Photometry \ Adjustment

Operation pHotoFlex®pH
14 ba75977e03 10/2017
pH value / ORP voltage
Measuring the pH value
4Using <><>and <START/ENTER>, select and start the
Zero adjust. or Measure blank value function.
The menu-guided blank value measurement or zero
adjustment starts.
Follow the instructions on the display.
1Connect a suitable pH or ORP electrode to the pHotoFlex®pH.
2 Press the <M> key (long pressure) repeatedly until the pH &
ORP measuring mode is selected.
1Immerse the pH electrode in the test sample.
2Press the <M> key (short pressure) repeatedly until the
measured parameter, pH is selected.
pH & ORP
\
pH
6.94
25.0 °C
[AR]
01.02.04 15:12

pHotoFlex®pH Operation
15
ba75977e03 10/2017
Measuring the ORP
Calibration
Calibrate
at regular intervals
after connecting another electrode
when the sensor symbol flashes:
– after the calibration interval has expired
– after voltage interruption (e.g. empty batteries, empty
rechargeable battery)
1Submerse the ORP electrode in the sample.
2Press the <M> key (short pressure) repeatedly until the
measured parameter, pH is selected.
pH & ORP
\
ORP
157mV
25.0 °C
[AR]
01.02.04 15:12
1Press the <M> key (long pressure) repeatedly until the pH
measuring mode is selected.
2 Press the <CAL/ZERO> key.
The menu-guided calibration begins.
Follow the instructions on the display.

Operation pHotoFlex®pH
16 ba75977e03 10/2017
Maintenance, cleaning
Maintenance The meter is almost maintenance-free.
The only maintenance task is replacing the batteries or rechargeable
battery.
NOTE
Make sure the poles of the batteries are the right way round. The ±
signs on the batteries must correspond to the ± signs in the battery
compartment.
Dispose of used batteries according to the local regulations of your
country.
End users within the European Union are obligated to return used bat-
teries (even ecologically compatible ones) to a collection point set up
for recycling purposes.
Batteries are marked with the crossed-out waste container symbol.
Therefore, they may not be disposed with the domestic waste.
Cleaning Occasionally wipe the outside of the meter with a damp, lint-free cloth.
Disinfect the housing with isopropanol as required.
NOTE
The housing components are made out of synthetic materials
1Open the battery compartment:
– Unscrew the two screws (1) on the underside of the meter,
– Remove the lid of the battery compartment (2).
2 If necessary, take four old batteries out of the battery
compartment.
3Insert four batteries (3) in the battery compartment.
4 Close the battery compartment and fix it with the screws.
1
2

pHotoFlex®pH Operation
17
ba75977e03 10/2017
(polyurethane, ABS and PMMA). Thus, avoid contact with acetone and
similar detergents that contain solvents. Remove any splashes
immediately.
Cleaning the cell shaft If liquid is in the cell shaft (e.g. due to a spilled cell), clean the cell shaft
as follows:
CAUTION
Cells can contain poisonous or corrosive substances. If the
content is released follow the danger warnings on the cell. If
necessary, take corresponding protective measures (protective
goggles, protective gloves etc.).
Cleaning the cells Cells have to be clean, dry, and free of fingerprints and scratches.
Therefore, clean them regularly:
Scratches in the glass change the optical characteristics of the cell and
falsify the measured value. For this reason, never use scratched cells!
1Switch the pHotoFlex®pH off and pull out the power plug.
2 Rinse the cell shaft with distilled water.
1Clean the cells inside and out with hydrochloric acid or
laboratory soap.
2 Rinse out several times with distilled water.
3Let them dry in the air.
4 Only hold the cells by the top or by the light protection cap so
that the optical path is not impaired.
5Before measuring, clean the cell with the enclosed cleaning
cloth.

Operation pHotoFlex®pH
18 ba75977e03 10/2017
What to do if...
General errors
Display, LoBat
Instrument does not
react
to keystroke
RS232 interface does
not react
Error message,
Error
0, 8, 16, 16384
Photometry
Measuring range
undercut or exceeded
Cause Remedy
– The batteries or rechargeable
battery are largely depleted
– Insert new batteries
– Charge the rechargeable
battery
Cause Remedy
– Software error
– Operating condition undefined
or EMC load unallowed
– Processor reset:
Press the <START/ENTER>
and <PRT> key
simultaneously.
Cause Remedy
– Software error
– Operating condition undefined
or EMC load unallowed
– Processor reset:
Press the <START/ENTER>
and <PRT> key
simultaneously.
Cause Remedy
– Instrument error – Repeat measurement
– Meter defective,
send meter for repair and
quote the error number
Cause Remedy
– Program not suitable – Select program with suitable
measuring range
– Dilute the sample

pHotoFlex®pH Operation
19
ba75977e03 10/2017
Obviously incorrect
measured values
pH value / ORP voltage
Measuring range
exceeded or undercut
Measured value display
----
(calibration error)
Cause Remedy
– Measurement disturbed by
external light
– Close the external light cover.
– Cell not correctly inserted – Insert the cell so that it is
positioned on the bottom of
the cell shaft.
– Cell contaminated – Clean the cell
– Cell shaft contaminated – Clean the cell shaft
– Dilution set incorrectly – Set the dilution
– Selected program unsuitable – Select other program
– Zero measurement incorrect – Perform zero measurement
– Blank value incorrect – Remeasure the blank value
Cause Remedy
Electrode:
– Air bubble in front of the
junction
– Remove air bubble
– Air in the junction – Extract air or
moisten junction
– Gel electrolyte dried out – Replace electrode
Test sample:
– The pH value lies outside the
measuring range
– not possible
Cause Remedy
Electrode:
– Junction contaminated – Clean junction
– Membrane contaminated – Clean membrane
– Moisture in the plug – Dry plug

Operation pHotoFlex®pH
20 ba75977e03 10/2017
No stable measured
value
Obviously incorrect
measured values
– Not enough electrolyte – Top up electrolyte
– Electrode obsolete – Replace electrode
– Electrode broken – Replace electrode
– Socket damp – Dry socket
Calibration procedure:
– Incorrect solution temperature
(without temperature sensor)
– Set up correct temperature
– Incorrect buffer solutions – Select buffer solutions
suitable for the calibration
procedure
– Buffer solutions too old – Use only once.
Note the shelf life
Cause Remedy
Cause Remedy
pH electrode:
– Junction contaminated – Clean junction
– Membrane contaminated – Clean membrane
Test sample:
– pH value not stable – Measure with air excluded if
necessary
– Temperature not stable – Temper if necessary
Electrode + test sample:
– Conductivity too low
(e.g. in ultrapure water)
– Use suitable electrode
– Temperature too high – Use suitable electrode
– Organic liquids – Use suitable electrode
Cause Remedy
pH electrode:
– Not connected – Connect electrode
Other manuals for pHotoFlex pH
1
Table of contents
Other wtw Measuring Instrument manuals

wtw
wtw TresCon NOx-N User manual

wtw
wtw pH 3310 User manual

wtw
wtw pH 1970i User manual

wtw
wtw TetraCon 325 User manual

wtw
wtw VWR MU 6100 H User manual

wtw
wtw SensoLyt MPP-A Pt Series User manual

wtw
wtw DIQ/S 182-XT-4 User manual

wtw
wtw Oxi 330i User manual

wtw
wtw LF 330/SET Manual

wtw
wtw LabStation LS Flex/430 User manual