Wurkkos TS10 User manual

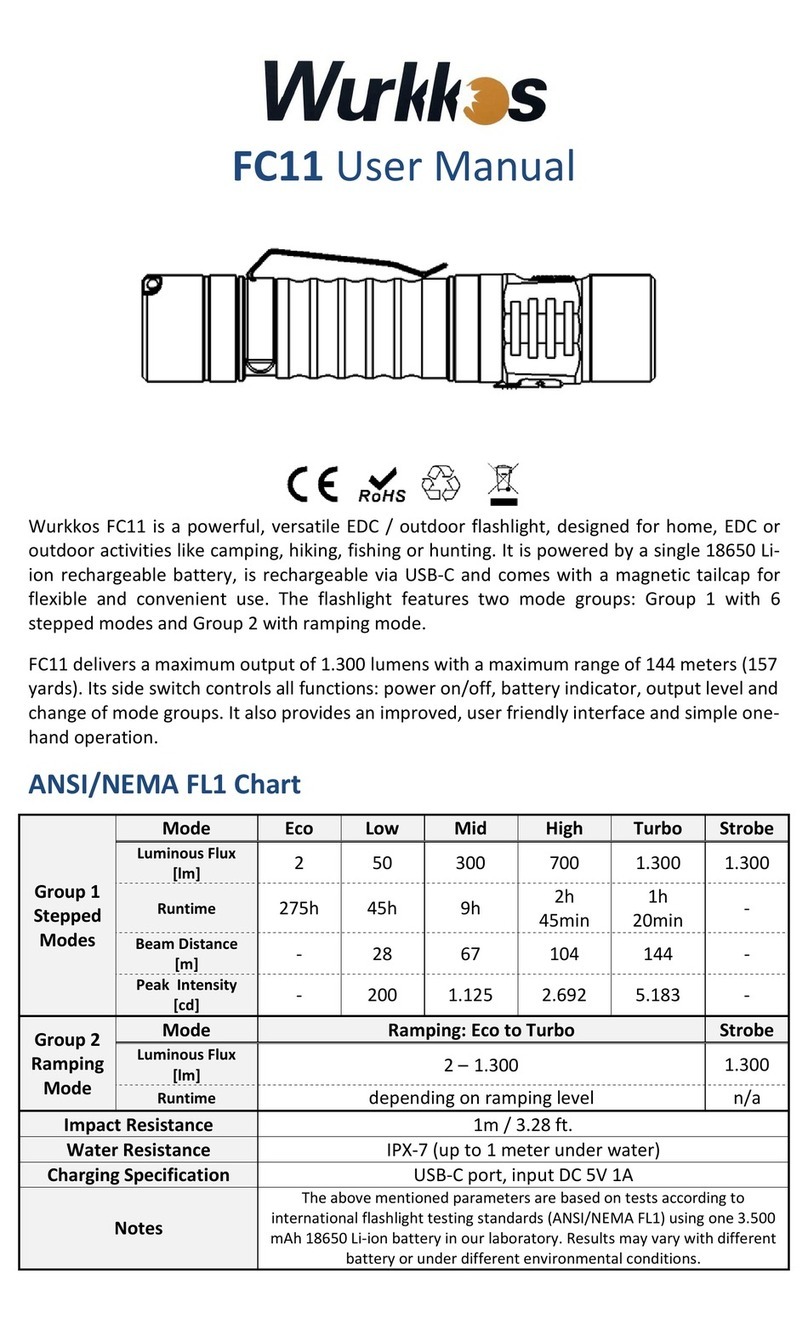
The
TS10
is
a
powerful
Mini
EDC
flashlight.
It
uses
3
pieces
main
LEDs
and
3
peices
single
color
Aux
LEDs
to
provide
.with
Anduril
2.
and
powered
by
one
145
battery
It
will
be
your
reliable
partner
for
every
day
use
and
with
fun.
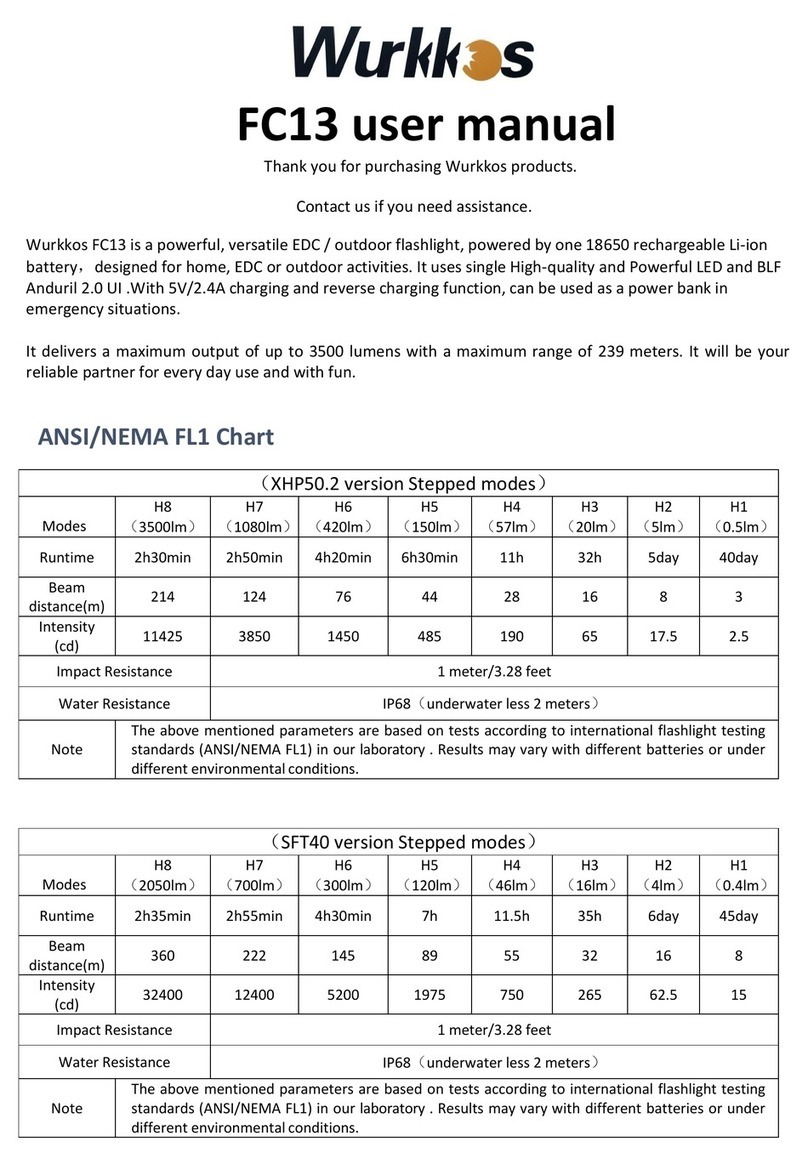
ANSI/NEMA
FL1
Chart
(Advance
UI)
Modes
H8
(uooim)
H7
(9 1m)
H6
(58 1m)
H5
(3 1m)
H4
(13 1m)
H3
(5 1m)
H2
(1 fm)
Hl
(llm)
Runtime
lhl4mln
1.5h
1.5h
1.5h
2h43min 6h43min
Beam
distan e(m)
13 1
8
55
4
25
12
4.5
Intensity
( d)
415
2525
1675
8
4
16
45
5
Impa t
Resistan e
1
meter/3.28
feet
Water
Resistan e
IPX8
Note
The
above
mentioned
parameters
are
based
on
tests
according
to
international
flashlight
testing
standards
(ANSI/NEMA
FL1)
in
our
laboratory
.
Results
may
vary
with
different
batteries
or
under
different
environmental
conditions.
Spe ifi ations
Emitter:
3
pieces
0
CRI
CSP
LEDs
and
3
pieces
single
color
aux
LEDs
Battery
options:
lx
14500
Li-Ion
battery
Operating
voltage:
3.0V
-
4.2V
(14500
battery)
Dimension:
71.5
mm
(length)
x
21mm
(head
diameter)
Weight:
32
+
1
grams
(without
battery)
AndurilZ
User
Interface
flashlight
body:
Aerospace
grade
6061
grade
aluminum
alloy,
CNC
manufactured
to
hard-anodized
to
military
grade
specification
type
III,
anti-abrasive
finish
to
get
solid
built
body,
anti-crash
geometry
and
better
heat
exchange.
Automatic
Stepdown:
Turbo
mode
steps
down
to
High
mode
automatically
to
prevent
overheating.
Electronic
reverse
polarity
protection
from
improper
battery
installation
Advanced
Temperature
Regulation
(ATR)
technology:
As
the
temperature
rises,
TS10
is
programmed
to
automatically
step
down
and
step
up
the
brightness
to
prevent
overheating.
Jittery
Type
Dimension
&
Quantity
Nominal
Voltage
Compatibility
techargeable
lithium-ion
battery
14500x1
3.7
V
Yes
techargeable
NiMH
battery
AAx
1
1.2
V
NO
disposable
alkaline
battery
AAxl
1.5
V
NO
_________
Battery
Spe ifi ation

Operation
Instru tions
Quick
Start
After
putting
a
battery
in
the
light
and
tightening
the
parts
together,
the
light
should
quickly
blink
once
to
confirm
it
has
power
and
is
now
operational.
After
that,
basic
usage
is
simple:
Click
to
turn
the
light
on
or
another
click
to
turn
It
off.
-
Hold
the
button
to
change
brightness.
Release
and
hold
again
to
change
brightness
the
other
way.
That
Is
all
the
user
needs
to
know
for
basic
use,
but
there
are
many
more
modes
and
features
available
for
people
who
want
more.
Before
reading
the
rest
of
this
manual,
it
is
recommended
that
users
look
at
the
Anduril
UI
diagram(s),
which
should
be
provided
along
with
the
flashlight.
Button
presses
Button
presses
are
abbreviated
using
a
simple
notation:
-
1
C:
One
dick.
Press
and
then
quickly
release
the
button.
-
1H:
Hold.
Press
the
button,
but
keep
holding
it.
-
2C:
Two
clicks.
Press
and
release
quickly,
twice.
-
2H:
Click,
hold.
Click
two
times,
but
hold
the
second
press.
-
3C:
Three
clicks.
Press
and
release
quickly,
three
times.
-
3H:
Click,
click,
hold.
Click
three
times,
but
hold
the
final
press.
The
same
pattern
is
used
with
higher
numbers
too.
For
example,
10
C
means
ten
clicks...
and
10H
means
ten
clicks
but
hold
the
final
press.
Simple
UI
Diagram
Not
everything
is
covered
in
the
diagram,
please
read
the
text.
Andúril
Simple
UI

Simple
UI
By
default,
the
light
uses
a
simple
UI.
This
Is
useful
If
you
lend
the
light
to
someone
else,
or
if
you
just
don't
want
to
bother
with
any
crazy
disco
modes.
Simple
UI
has
all
the
basic
functions
needed
to
work
as
a
flashlight,
but
the
minimum
and
maximum
brightness
are
limited
to
make
It
safer,
and
any
complex
or
advanced
functions
are
blocked.
Functions
available
In
Simple
UI
Include:
■
IC:
On
/off
•
1H:
Ramp
up
(or
down,
if
button
was
released
less
than
a
second
ago)
-
2H:
If
light
is
on
:
ramp
down
If
light
is
off:
momentary
high
mode
-
2C:
Double
click
to
go
to
/
from
highest
safe
level
-
4C:
Lockout
mode.
Some
other
modes
and
functions
are
available
too.
When
the
light
is
off,
these
are
the
options:
-
3C:
Battery
check
mode,
(displays
voltage
once,
then
turns
off)
-
4C:
Lockout
mode.
-
10H:
Switch
to
Advanced
UI.
-
15C
or
more:
Version
check.
In
Lockout
mode
with
Simple
UI,
there
are
a
few
functions:
-
1H:
Momentary
moon
-
2H:
Momentary
low
-
4C:
Unlock
and
turn
on
-
4H:
Unlock
and
turn
on
at
low
level
-
5C:
Unlock
and
turn
on
at
high
level
To
change
between
Simple
UI
and
Advanced
UI,
turn
the
light
off
and
then
do
one
of
these:
In
Simple
UI:
-
10H:
Go
to
Advanced
UI.
In
Advanced
UI:
-
IOC:
Go
to
Simple
UI.
-
10H:
Configure
Simple
UI.
If
you
get
lost,
or
if
you
want
to
auto-callbrate
the
temperature
sensor,
do
a
Factory
Reset.
The
process
for
this
is:
*
Loosen
body
tube
-
Hold
button
-
Tighten
body
tube
*
Keep
holding
button
for
about
4$
The
light
should
flicker
while
getting
brighter,
then
briefly
burst
to
full
power.
Hold
until
it
reaches
full
power
to
do
a
reset,
or
let
go
of
the
button
early
to
abort.
Advanced
UI
Advanced
UI
has
all
the
advanced
functions
which
are
fun
to
play
with
but
also
hard
to
learn.
Please
refer
the
UI
diagram
below.
Pteawfk
Ui
for
pdf
flit
sovou
can
readv
easily.
We
can
abo
sand
video
Mt*
to
show
how
to
play
with
AndurilZ

Factory
Defaults
Anduril
2C/2H
Simple
UI
Check
10H
10H
Sunset
Mode
Mode
Check
13H
Strobe
Modes
SOS
Mode
Momentary
Moonlight
Momentary
Lockout
Momentary
Lockout
Liçhtning
Storm
Turns
off
the
light
automatically
Keep
holding
to
add
Smin
increments
of
runtime
to
the
sunset
timer.
(
\
2
Release
711
(or
IO
’
m
Smpie
UI)
after
triple
flash
►
Set
number
of
steps*
CUk
n
trrws
for
the
number
of
steps
1.
feteasc
10*
after
single
Hash
►
Disable
manual
memory
Cbck
any
value
to
dfsaeae
menus*
memory
Action#:
1H:
bnghter/f
aster
(except
Mghtning
Storm)
2H:
0*mmer/sSower
(escape
üghtrwig
Storm)
SC
go
to
Momentary
Mode
/
Strobe
2.
Reteaie
(or
10M
m
Smçle
UI)
after
double
flash
b
Set
Ceiling
Level
Ckck
n
teres
for
th<
nth
highest
level
of
ISO
Brightness
of
AUX/
Button
Lt
Ds
in
Standby
Off
•
Low
•
Hgh
•
Bl*nk.ng
Momentary
Low
2.
Release
TH
after
double
flash
►
Set
Stepdown
Temperature
Limit
Qck
ft
tmes
for
ft
♦
)0*C
Color
of
AUX/Button
LEDs
In
Lockout
Red
•
Yehow
-
Green
-
Cyan
...
2.
Release
1CH
after
double
Hash
►
Configure
manual
memory
timer
Cbck
n
tmes
for
n
minutes
(0
ticks
■
tmer
off)
Toggle
Smooth
/
Stepped
Ramp
Toggle
Smooth
/
Stepped
Ramp
Color
Of
AUX/
Button
LEDs
in
Standby
Red
-
Yellow
•
Green
•
Cyan
...
Auto-Lock
n
dicks
•
n
minutes
until
locked
automatically
Automate
last
ramped
brightness
Manual:
user's
saved
bngheness
Hytnd:
remember
Ust-ramped
brightness
for
nmnutes
1.
ReWaw
7K
after
single
flash
►
Set
Current
Temperature
Ock
n
times
for
n
':
Set
Candle
Runtime
1
bbnk
•
5
m*n
runtime
OFF
OFF
Voltage
Calibration
Actions
IC:
Click
1H:
Hold
2C:
Click,
Click
2H:
Click,
Hold
3C:
Click,
Click,
Click
Default
UI:
Simple
UI
Default
Ceiling
Simple
UI:
ISO/ISO
Default
Ceiling
Advanced
UI:
120/150

Safety
Instru tions
❖
Operating
the
flashlight
for
a
long
time
in
Turbo
or
High
mode
will
warm
it
up
This
is
normal.
❖
When
installing
the
battery,
make
sure
the
anode
(>)
side
always
faces
towards
the
head/LEDs.
❖
Unscrew
the
tailcap
half
a
turn
to
avoid
unwanted
activation
during
transport
It
also
prevents
the
battery
from
draining
while
the
flashlight
is
in
standby
❖
Avoid
hitting
or
dropping
the
flashlight
Troubleshooting
and
Maintenan e
❖
Disassembling
the
sealed
head
an
damage
the
flashlight
and
voids
the
warranty.
❖
Wurkkos
Ltd.
re ommends
using
high-quality
brand
batteries.
Damage
by
battery
leakage
voids
the
warranty.
❖
Remove
the
battery
if
the
flashlight
will
not
be
used
for
an
extended
period
of
time.
To
prevent
self-dis
barge
or
a idental
a tivation
during
storage
or
transportation,
uns rew
the
tail ap
by
haff
a
turn
or
remove
the
battery.
❖
Every
6
months
threads
should
be
wiped
with
a
lean
loth
followed
by
a
thin
layer
of
sili one
grease.
❖
To
maintain
a
proper
level
of
waterproofness,
repla e
worn-out
o-rings
with
an
approved
spare.
❖
Troubleshooting:
Clean
battery
onta ts
regularly
as
dirty
onta ts
may
impair
the
performan e
of
thç
flashlight
If
you
experien e
problems
(fli ker,
shine
intermittently
or
failure
turn
on)
the
following
root
auses
and
solutions
should
be
tried:
Reason
A:
The
battery
needs
a
repla ement.
Solution:
Repla e
the
battery
with
an
approved
type
of
a
fully
harged
battery.
Reason
B:
Threads,
PCB
board
onta t
or
other
onta ts
are
dirty.
Solutions:
Please
dean
the
onta t
points
with
a
otton
swab
soaked
in
rubbing
al ohol.
Reason
C:
The
flashlight
will
not
turn
on
upon
first
use.
Solution:
Please
do
not
forget
to
remove
the
insulation
sti ker
from
the
battery
on
first
use.
If
the
above
methods
do
not
work
please
refer
to
the
warranty
poli y
before
onta ting
your
authorized
distributor.
Table of contents
Other Wurkkos Flashlight manuals