manuals.online logo
Brands
  1. Home
  2. •
  3. Brands
  4. •
  5. Xaoc Devices
  6. •
  7. Recording Equipment
  8. •
  9. Xaoc Devices Tirana User manual

Xaoc Devices Tirana User manual

Other Xaoc Devices Recording Equipment manuals

Xaoc Devices Poczdam 1989 Leibniz Device Komutator User manual

Xaoc Devices

Xaoc Devices Poczdam 1989 Leibniz Device Komutator User manual

Xaoc Devices KOSZALIN User manual

Xaoc Devices

Xaoc Devices KOSZALIN User manual

Xaoc Devices OSTANKINO User manual

Xaoc Devices

Xaoc Devices OSTANKINO User manual

Xaoc Devices PRAGA User manual

Xaoc Devices

Xaoc Devices PRAGA User manual

Xaoc Devices Moskwa II User manual

Xaoc Devices

Xaoc Devices Moskwa II User manual

Xaoc Devices KAMIENIEC User manual

Xaoc Devices

Xaoc Devices KAMIENIEC User manual

Xaoc Devices DREZNO User manual

Xaoc Devices

Xaoc Devices DREZNO User manual

Xaoc Devices ZADAR User manual

Xaoc Devices

Xaoc Devices ZADAR User manual

Xaoc Devices SARAJEWO User manual

Xaoc Devices

Xaoc Devices SARAJEWO User manual

Popular Recording Equipment manuals by other brands

ThermoFisher Scientific Dionex DRS 600 Installation checklist

ThermoFisher Scientific

ThermoFisher Scientific Dionex DRS 600 Installation checklist

Shure ANIUSB-Matrix user guide

Shure

Shure ANIUSB-Matrix user guide

Nady Audio HE-1 user guide

Nady Audio

Nady Audio HE-1 user guide

AUDAC APM 01 User manual & installation guide

AUDAC

AUDAC APM 01 User manual & installation guide

Teac GF-350 owner's manual

Teac

Teac GF-350 owner's manual

Fractal Audio MFC-101 MARK III owner's manual

Fractal Audio

Fractal Audio MFC-101 MARK III owner's manual

bmcm USB-OI16 manual

bmcm

bmcm USB-OI16 manual

HHB BurnIT CDR-830 Service manual

HHB

HHB BurnIT CDR-830 Service manual

GE VersaMax IC200CPUE05 manual

GE

GE VersaMax IC200CPUE05 manual

IntesisBox MH-RC-MBS-1 user manual

IntesisBox

IntesisBox MH-RC-MBS-1 user manual

Attero Tech unD4l user manual

Attero Tech

Attero Tech unD4l user manual

Sennheiser UI 765 instruction manual

Sennheiser

Sennheiser UI 765 instruction manual

Sony RCD-W1 Operating Instructions  (primary... Service manual

Sony

Sony RCD-W1 Operating Instructions (primary... Service manual

Roland Planet-P  MKS-10 owner's manual

Roland

Roland Planet-P MKS-10 owner's manual

Roland BOSS GT-PRO Turbostart

Roland

Roland BOSS GT-PRO Turbostart

8x8 Inc Valcom V-2001A manual

8x8 Inc

8x8 Inc Valcom V-2001A manual

Waves SUB Align user guide

Waves

Waves SUB Align user guide

Mitsubishi Electric MAC-334IF-E installation manual

Mitsubishi Electric

Mitsubishi Electric MAC-334IF-E installation manual

manuals.online logo
manuals.online logoBrands
  • About & Mission
  • Contact us
  • Privacy Policy
  • Terms and Conditions

Copyright 2025 Manuals.Online. All Rights Reserved.

OPERATOR’S MANUAL 60/1.2
UTILITY MICRO SEQUENCER
MODEL OF 1960
SALUT
Thank you for purchasing the
Xaoc Devices product. The
Tirana module comes in handy
as a classic step sequencer,
modulation source, voltage
bank, arpeggiator etc., serv-
ing as the utility module for
supporting other sequencers,
but it also shines on its own
terms. Due to smart features
to be described in this manual,
Tirana provides a number of
very interesting possibilities,
and turns out to be surpris-
ingly powerful module, while
preserving the ease of use
and minimal real estate in
the system. It is only 6hp, and
therefore a perfect solution for
compact and portable modular
setups, but can empower just
any system to a great extent.
THE MODULE EXPLAINED
GETTING STARTED
Clear 6hp space in your
eurorack cabinet and turn
the power off. Ensure that the
jumper on the in header re-
mains in place (for single unit
operation; for multiplied setups
read the instructions further
down in the manual). Now plug
in the ribbon cable to the bus
board, observing the red stripe
orientation. Tirana has been
secured against reversed power
connection but it is always a
good habit to pay attention to
this. Mount the screws and turn
your system back on.
CONTROLS & OPERATION
In order to operate, an external
clock needs to be fed to the
clock input 3– usually the
pulse from a LFO or any clock
generator of choice. Steps will
now be played subsequently in
a loop. Adjust the desired pitch
by turning knobs 1. Generated
pitch and trigger voltages are
available at cv out 8and trig-
ger 7sockets.
Each step may now be removed
from the sequence (muted) by
pressing the corresponding
button 2. Please note that
only the trigger output is being
muted; the pitch voltage is
available as usual.
The sequence direction can be
changed by feeding a trigger
impulse into the direct.input
4. To reset the sequence, a
trigger needs to be fed into the
reset input 6.
The sequence can be also
transposed (offset) by provid-
ing control voltage into the
transp.input jack 5.
PANEL
CONTROLS
UNIPOLAR VOLTAGE BIPOLAR VOLTAGE
2
1
3
54
6
87
1
STEP
2
STEP
4
STEP
3
STEP
•TIRANA•
1960 UTILITY MICRO SEQUENCER
CV OUT
TRANSP.
TRIGGER
DIRECT.
RESET
CLOCK
+10VOV
0V
+5V–5V
CHAINING UP UNITS
STEP REPEAT
Each step can be repeated
up to 4 times (resulting in up
to 16 steps in the sequence).
To set a desired number of
repeats for a given step, hold its
mute button down for approx.
2 seconds until the menu mode
is conrmed by all buttons
dimmed for a moment. Then,
push the button no. 2 for one
repetition (2 note events), but-
ton no. 3 for double repetition
(3 events) or button no. 4 for
triple repetition of the given step
(4 events). To reset the desired
step to generate just one note,
push button no. 1.
SETTING THE POLARITY
Tirana ships set to unipolar
0 to 10 V mode (as most users
will probably want to use it as
a melody generator). Still, the
module makes a great modula-
tion source when set to bipolar
-5 to +5V operation. To adjust
the desired mode, simply set
the jumper on the back of the
module.
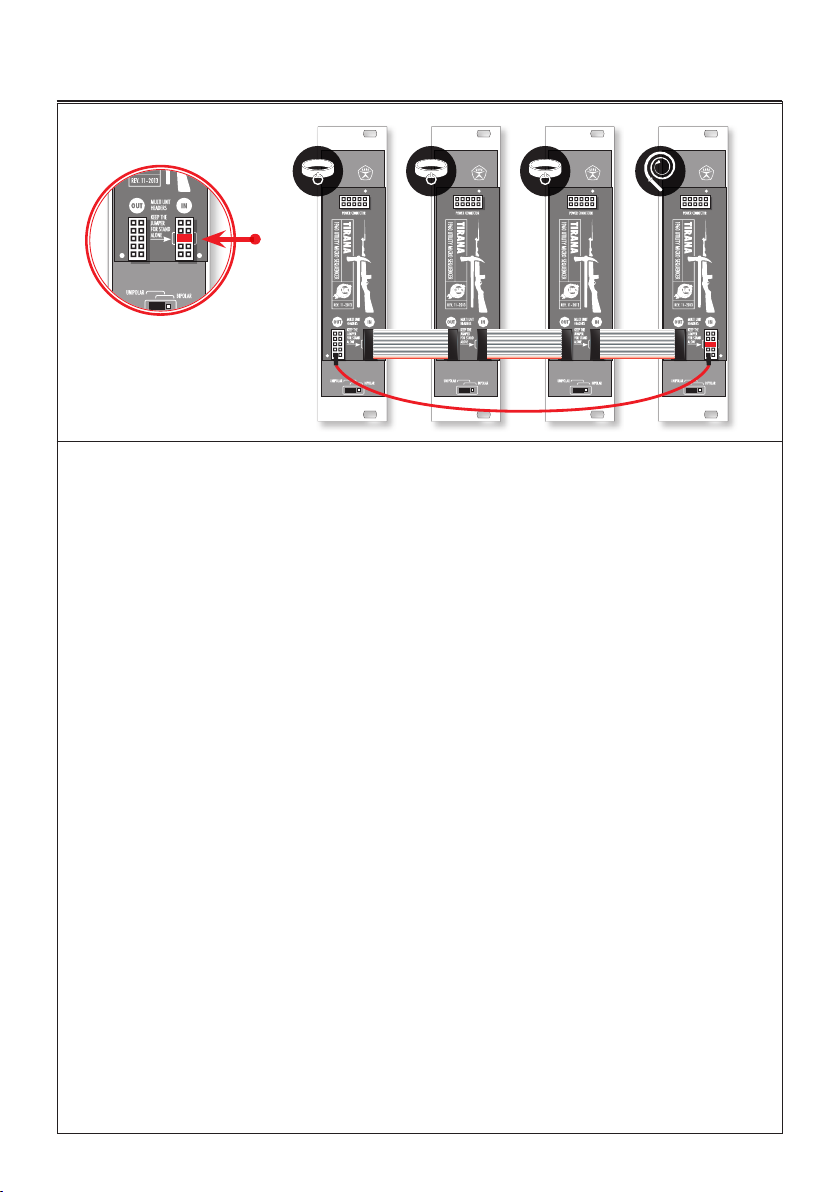
MULTIPLE TIRANA SETUPS
You can easily chain up a
number of Tirana units together
to open up a lot of interesting
possibilities.
Every Tirana ships with one
10-pin ribbon cable and a loop
wire. Attach them exactly as
shown on the picture! First,
every slave unit requires jump-
ers to be removed (these are
required for single-unit opera-
tion). Then, every ribbon should
connect the out header of the
master unit with the in header
of slave unit. The rst unit in a
chain should only have the out
header occupied.
The single wire cable needs to
connect the lowest left pin of the
in header on the master unit,
and the same lowest left pin of
the out header on the last slave
unit in a chain.
Please double check that if it is
mounted correctly and put the
whole set in your cabinet. Don’t
forget about powering every
single Tirana unit.
SUGGESTED PATCHES
• Build a 8, 12, 16, 32 (and lon-
ger) – step sequencer subsystem
using multiple Tiranas. The rst
unit in a linked chain acts as the
master, and this is where all the
patch cables should be fed. The
mutes and repetitions work for
each slave unit independently.
• Use one Tirana to transpose
the other one (unlinked) for
a pseudo arpeggio effect. Use
different divisions of the same
clock and step repeat function.
• Let one Tirana trigger the re-
set or direction change function
of another unit (unlinked).
• Use a couple of unlinked Ti-
ranas for complex sequencing:
feed them different clocks, com-
bine their trigger outputs with
Xaoc Bytom and CV outputs
with Xaoc Warna mixer.
• Make the trigger output a
source of complex clock for
another Tirana.
• Tirana comes in handy as an
utility clock divider. Feed a clock
and adjust the same repeat
setting on every step. Division is
available at the trigger output.
master
slave
slave
slave
Remove the jumper from
every module but master!
Then, attach supplied cables
exactly as shown on the
picture.
PRODUCT FEATURES
TECHNICAL DETAILS
• 4 steps of pitch and trigger impulse
generation
• step repetition (up to 4 note events
per step)
• unipolar and bipolar voltages
• mutable trigger (per step)
• playback direction change via CV
• sequence trasposition via CV
• sequence reset via CV
• backward power protection
• expandability via chaining up more
Tirana units together
• eurorack standard synthesizer
module, fully Doepfer compatible
• 6 hp wide
• +12/-12V powered
• current draw: 30 mA
APPROVED
BY THE PEOPLE’S COunCiL
FOR MUTUAL ECONOMIC AID
WARRANTY INFORMATION•xaOC dEviCES warranTS THiS PrOduCT TO BE frEE frOm anY COnSTruCTiOn dEfECTS fOr OnE
YEar frOm THE daTE Of PurCHaSE. during THaT PEriOd anY maLfunCTiOning uniTS wiLL BE rEPairEd, SErviCEd and CaLiBraTEd
wiTH0uT CuSTOmEr COvEring THE aPPrOPriaTE TranSiT fEES•warranTY dOES nOT COvEr anY PrOBLEmS rESuLTing frOm THE inCOr-
rECT inSTaLLaTiOn Or vOLTagE SuPPLiEd, aBuSivE TrEaTmEnT Or anY OTHEr OBviOuS uSEr-infLiCTEd fauLT•wE arE STiLL HaPPY TO
HELP afTEr THE warranTY PEriOd, HOwEvEr wE rESErvE THE rigHT TO CHargE fOr LaBOr, rEPLaCEmEnT ParTS and TranSiT•in CaSE
Of anY PrOBLEm PLEaSE COnTaCT uS immEdiaTELY: [email protected]•XAOC SALUTES•muff wiggLErS COmmuniTY, Our
awESOmE diSTriBuTOrS, nOrdvargr, B.SmiTH, j.LindgrEn, B. van dEr waL, mOduLarnE.infO & COmradES wOrLdwidE•aLL rigHTS
rESErvEd © 2014 xaOC dEviCES•manufaCTurEr rESErvES THE rigHT TO CHangE SPECifiCaTiOnS aT anY TimE•madE in EurOPE
VISIT XAOCDEVICES.COM fOr uPdaTES, manuaLS, TuTOriaLS and ParaPHrEnaLia
WORKING
CLASS
ELECTRONICS