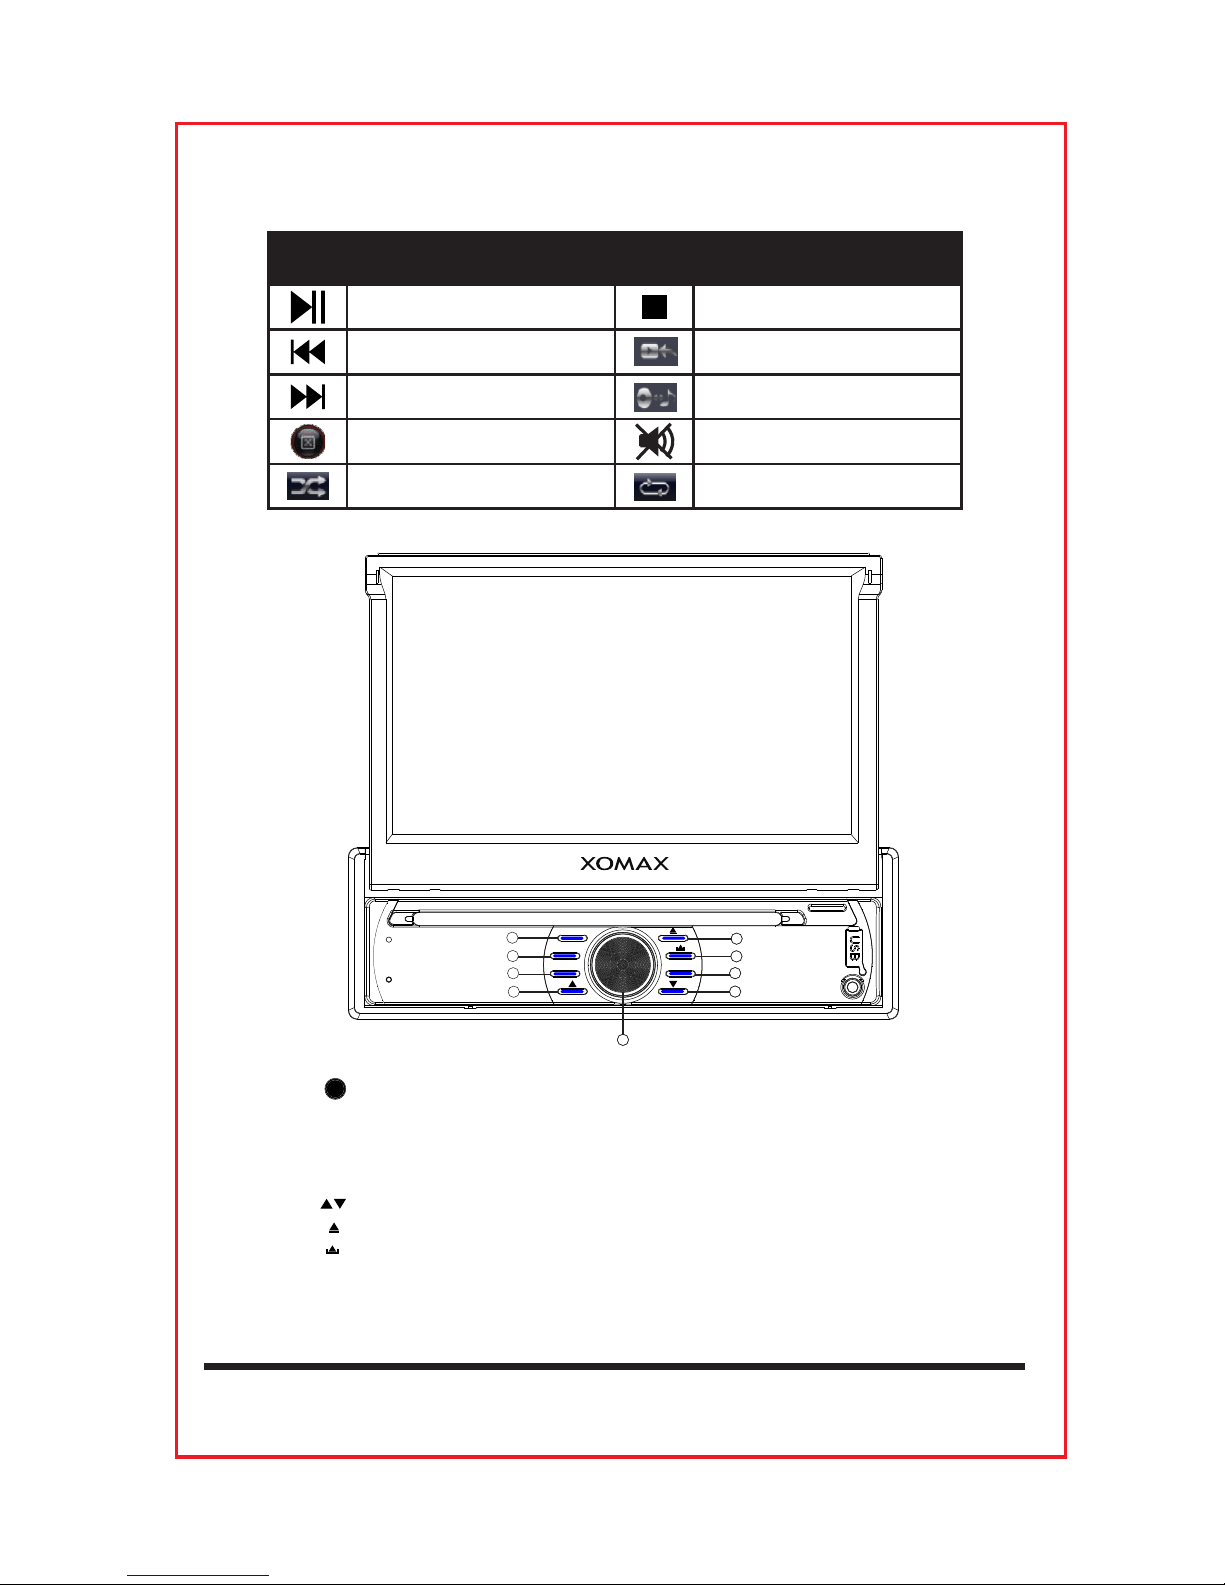
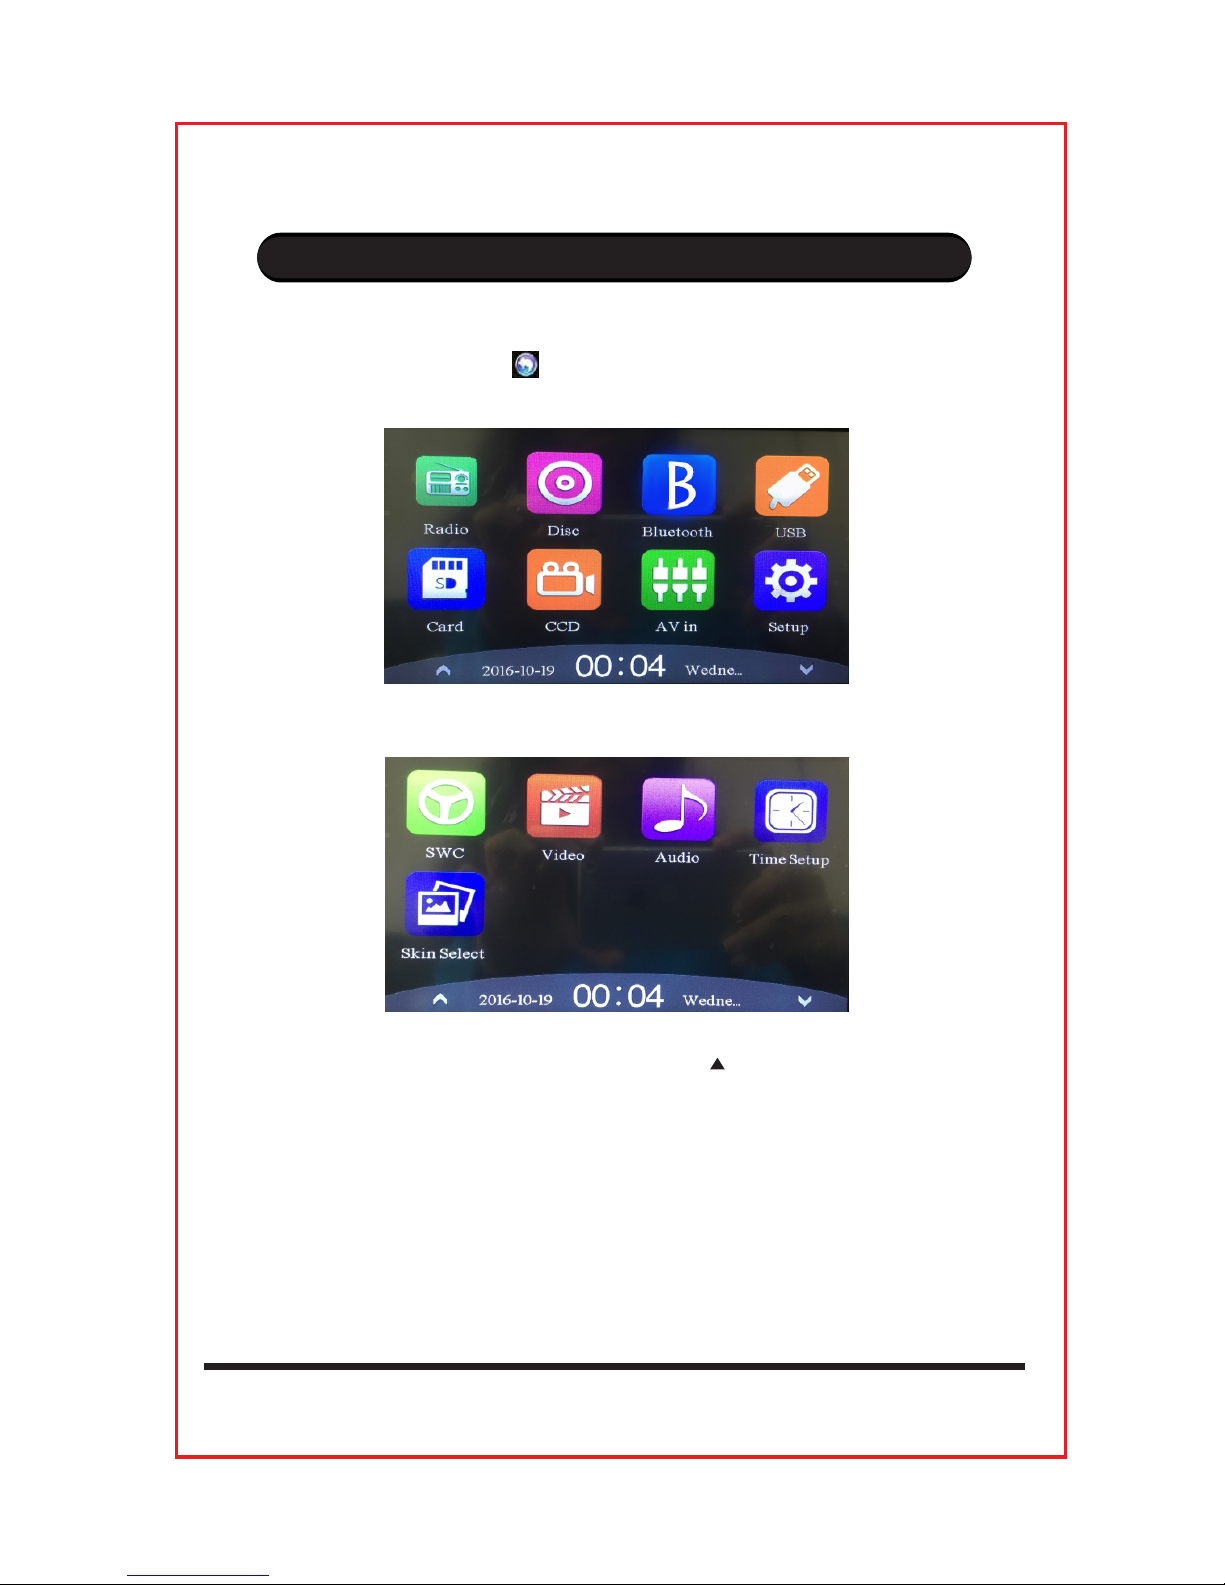
Xomax XM-DTSB931 User manual

USER MANUAL
Before operating the unit, please read this manual
Throughly and retain it for future reference
7' indash car DVD player'
DVD
MODE
BAND
MENU
SD

1. Summarizes the basic functions............................................... 2
2. Precautions............................................................................2
3. Wiring diagram.. .4
4. Specifications.. .5
5. Common icon and panel function instruction......... ..6
6. Multimedia play introduction. ..7
7. Main menu.... .8
7.1 Radio.... .....9
7.2 Bluetooth .11
7.3 AUX.. ..10
7.4 USB/SD player.. .11
7.5 DVD... 12
7.6 Setup.. .12
7.6.1 Systerm. ..12
7.6.2 Video..... .13
7.6.3 Audio................................................................................13
7.6.4 Clock................................................................................13
7.7 Wheel……………........……………………….........................….14
7.8 Wallpaper……………………………………................................14
7.9. Touch screen calibration……………………………………………..15
8.Simple Troubleshooting Guide………………….............................16
.....................................................................
......................................................................
...................
..................................................
.........................................................................
...........................................................................
.............................................................................
..................................................................................
....................................................................
..................................................................................
................................................................................
.........................................................................
..........................................................................
CONTENTS
1

Summarizes the basic functions
This product uses high-definition digital touch screen, fine bright image, coupled with
high-quality audio processing chip, has reached the perfect touching visual effects.
Efficient platform multimedia system,and plug-in USB/SD player functions.Intelligent steering
wheel control function, the product and the perfect combination of the original car,
the operation step, is your ideal choice!
To avoid accidents, please read the following precautions before the
installation and operation of the head unit.
About Security
1、 Please observe local traffic rules and regulations.
2、 Don’t watch or operate the head unit while driving.
3、 Make sure to stop your car before you watch or operate the head unit.
About Installation
1、 This machine should be installed by the qualified technical or service personnel.
2、 If you install the head unit by yourself, you should follow the user manual.
If the car is parked under sunlight, do not turn on the head unit until it is cool.
Before turning on the machine, make sure the interior temperature is within (+60℃)to (-10℃).
Avoid using this machine in a magnetic environment( GPS,Bluetooth will be affected).
In the rainy or very humid areas, there might be moisture condensation inside the head unit.
Under this condition, the head unit will fail working properly. You should wait until the
moisture has evaporated dehumidifier or before use.
Precautions
2

In order to maintain the high quality audio and video,
do not splash juice or other liquids on the head unit or CD-ROM.
Before switching off the ignition, turn off the head unit,
otherwise it will cause consumption to car's battery.
Make sure the disc entrance is cleaned. If the disc and then disc entrance are dusted,
please clean it with soft towel. Otherwise it will bring the dust into the unit and cause
unusual of the head unit. If happened, please call for professional to clean the unit.
Use the product for a long time will affect its service life. In order to extend the
product service life, please choose the moderate volume.
Please don't rebuild the model privately. If rebuilding, it is likely to cause an accident.
The lens might be damaged if drive on the bump road or play
the non-standard or hardly damaged disc.
This unit can play the following disc
12 cm
12 cm
12 cm
12 cm
Sound only
Sound and Video
Sound and Video
Sound and Video
DVD
VCD
Mp4
CD
Content Size
Disc
1、 This unit is compatible with DVD、VCD. 0/1, 1/2,0/3 editions、DVCD、
CD-R、CD-RW、MPEG3 Disc.
2、 The head unit will automatically identify DVD, VCD,CD or MP4.
When display< No equipment>, it means the disc is not compatible
with the head unit. Please select other functions. About specific
opearation please find other connected instruction.
3

1.This machine uses voltage is DC 12V, negative ground system,
pre-installation required to confirm whether your car's electrical system of this type.
2.This unit with automatic antenna subwoofer separately powered.
3.It must be connected with the wire of wiring diagram, if connected incorrectly,
it may cause malfunction or damage to the vehicles electrical system.
4.The speaker leads (-) must be connected to the speaker terminal (-),
do not receive the body or interconnected to each speaker.
5.Do not block vents or heat sink,so as to avoid overheating and damage to the machine.
Note. The left and right bracket screw can not exceed 8MM, otherwise it will damage
the machine components.
Wiring diagram
4

Specifications
FM receiver
FM receiver..................................................................................87.5-108.0 MHZ
Noise sensitivity ≥37dB
DVD Audio part
Noise sensitivity ≥60dB
Frequency range 100HZ-20KHZ
Channel separation ≥36dB(Double channel)
Stereo channel separation ≥36dB(Double channel)
T.H.D U (1 KHZ) 3%
Total
Voltage 13.8V DC
Output power 4CHXW
Real power 4CHXW
Speaker impedance 4-8Ω
Dimensions 177(Length)X178(Width)X50(Height)mm
...........................................................................
..........................................................................
.........................................................................
.....................................................................
...........................................................
..........................................................................
......................................................................................
..............................................................................
.................................................................................
.....................................................................
.................................
AM receiver
Frequency range 530-1710 MHZ
Noise sensitivity ≥37dB
.........................................................................
.........................................................................
5

Common icon and panel function instruction
Play/Pause Stop
Previous track Return
Next track
Folder switch
Black screen Mute
Random Repeat
1. :Press it to turn on the unit,when it is power on ,press it for mute.
Hold it to turn off the head unit,rotate it to adjust the volume.
2.MODE button: press it for mode switch
3.BAND button: press it for radio band switch from FM1/FM2/FM3.
4.DVD button:press it to enter DVD mode
5. :When the screen is opened,press it to adjust the screen angle to upward or downward.
6. :Press it to reject and take away the disc.
7. :After the unit start working,press it to open or close the screen.
8.MENU button:Press it to return to the main menu interface.
6
DVD
MODE
BAND
MENU
SD
2
3
4
555
66
11
77
88

Play
1.Enjoy the disc: Insert the disc into head unit (with logo upside), it will play automatically.
2.Other mode: When there is a disc inside the head unit( Warning: never insert the second disc),
press mode to switch to DVD player , it will play the program of disc、SD、USB etc. accordingly.
Reject
Press to reject the disc and take away the disc within 10 seconds. If you do not take the
disc in time, the head unit will intake the disc.
Section switch/ Fast forward/Fast backward
Radio mode: Press it for manual search next stations; hold it for auto search next last stations
Play mode: Press it for next track, hold it for fast forward x8.
Radio mode: Press it for manual search last stations; hold it for auto search last stations
Play mode: Press it for last track, hold it for fast backward by fast backward×8.
MP3 select tracks player
1.Select tracks method 1:
In selecting tracks from the list in MP3 mode, Press for next song for last song.
2.Select tracks method 2:
In MP3 mode directly touch the song of the list you choose on the screen
when it is playing,also you can use the Remote Control with (0-9) button or 10+ button
to select the track.
USB/SD play
When you plug into the USB/SD to the head unit, the system will search all the content of the
USB/SD and start to play automatically.
,
Multimedia play introduction
7

MAIN MENU
Main Menu:Click on the panel, It will enter the main menu.
Main Interface
(for touch screen functionality)
8

Hold it and the radio will start with the current frequency to search and storage
the stations automatically.Memorize the strong signal firstly,then the weak signal.
Click it again to stop searching.
PTY: Press it to choose the station on RDS mode.
TA/AF: Press it for TA on, press again for TA off.(Auto scan RDS stations)
Hold it for AF on, hold again for AF OFF.(RDS function on)
Press< or >can manual up or down searching different stations.
Press or can automatic up or down searching different stations.
Click to stereo on/off.
:Press it for mute.
Click it and the to switch between FM1/FM2/FM3.
FM interface
Click on the menu to enter radio mode,as shown
7.1 Radio
9

Click on the main menu to enter the Bluetooth interface as below:
Handsfree phone call mode:
1. When it’s Bluetooth mode, search the Bluetooth name on your phone.Connect
Bluetooth of your phone with the unit(For some phones, it needs to enter the
code 0000 or 1234 for paring Bluetooth). When Bluetooth connected, when there is a call,
the unit will turn to the Bluetooth interface for hand free answer. Click to answer the call.
When the call is finished, it will turn to the prevsious interface automatically.
1 . Make phone call.
3 .
button:
2 . button:Delete the phone number.
button: Incoming call
4 .
8 . Click it to enter Bluetooth music mode.
9 . button :Press it to mute
When it is on Bluetooth music mode,
click it to for previous and next tracks.
10. When it is on Bluetooth music mode,
click it for play/pause function.
11. button:Show the Bluetooth connect record
button: Outgoing call
5 . button: Missed call
6 . button: Down load the phone record
7 . Contact list: Click the name list on the left or enter the name on the right
form to search to make a phone call.
button:
button:
button:
7.2 Bluetooth
10

Press for last track,hold it for fast backward.
Play /Stop.
Press for next track,hold it for fast forward.
Turn to the .
video catalogue for title select
Press to the menu.
Have the same function with the DVD mode backward.
Last image
Play /Stop
Press for next image.
Image massage
Stop/play
Repeat
Random
Rotate
Magnify
Repeat.
Random.
File select
EQ on/off
Song on/ off
Press for last track,hold it for fast backward.
Play/Stop
Press for next track,hold it for fast forward.
File select
EQ choise
Return
Song
Image play.
Video play.
7.4 USB/SD Player
Click the menu enter SD/USB play mode.
7.3 AUX
Click on the menu to enter AUX mode
11

7.5 DVD
Click the menu enter DVD mode, turn the volume knob, as show:
Current track/ total, press for track select.
Current title/ total. press for title select.
Turn to the next page menu, press for track select.
Press for last track,hold it for fast backward.
Play / Stop
Press for next track,hold it for fast forward.
When playing DVD,turn to the DVD catalogue for track ot title select.
Next page
Repeat.
Random.
System set up.
Radio Area select .
Audio adjust.
Time set up.
Other set up.
Car logo set up.
Skin select.
Version.
Default.
Factory set up.
Disc set up .
Video set up .
Click the menu
enter mode, as shown.
7.6 Set up 7.6.1 Systerm setup
Press it for record playing.
Adjust the video image size.
Press it for audio select.
Subtitle on/off
Press it for audio select Turn to the first page menu.
12

Click HOUR then press or could adjust the correct hours.
Click MIN then press or could adjust the correct minutes.
Click 24H then press or could set the hour limited with 24 hours or 12 hours.
Click could up or down drag to adjust the correct years.
Click could up or down drag to adjust the correct months.
Click could up or down drag to adjust the correct dates.
Video adjust
7.6.2 Video
7.6.4 Clock
In image setting interface,click +or - to adjust the suitable Bright ness、Contrast and Hue
Press Standard、Colorful、Soft into the relevant image status.
、
Saturation、Sharpness
7.6.3 Audio
Voice setting interface
13

Please follow the equipment prompt to complete the steering control setting:
press and hold the steering wheel buttons,choose the function you want
for this button on the unit display.
Click it to select the wallpaper you want.
Click as shown:
7.7 Wheel
7.8 Wallpaper Setting
14

The calibration is finished.
Click the center of “+”when it move to the 4 corners.The display will show as
When the touch screen is abnormal,reset the head unit.Turn on the head unit.
Hold the button “MOD”on the control panel,it will show as following.
Cancelar
7.9 Touch screen calibration
15

Simple Troubleshooting Guide
Power off
Fail in keying
Fail in getting stations
Bad station receiving effect
SD/USB no reading
Bad ESP effect
Fail to input disc
"STEREO"flashing
Noise,image jumping,
no color
Remote unavailable
Problem Cause and resolve
1.Check the power fuse is burn out or not,change it.
2.Fail in connection of DC wires,connect them again.
Program disorder,press reset button or turn off the
power to restart.
Check if the antenna has been input,or it is not
connected correctly,if it is,please input the
antenna or connect it correctly.
1.Antenna length may not be set up right,check if it
reach out completely or is broken down,if it broke
down,please change it for new one.
2.Or the radio signal is too weak.
3.Antenna is not grounding rightly,please confirm
if it connects the ground wire rightly.
1.There is dust on lens,please find professionals
to clean the lens.
2.Lens is aged,please change it.
Loader is with disc.
1.Turning the radio frequency accurately.
2.Radio signal is too weak.(Please press
ST button to turn off stereo.)
1.Disc is damaged or blurry.
2.Color system setup is not correct,set the color
system for "PAL" or"NTSC"according to the
connected TV condition.
1.The battery of remote control has no power,
change the battery.
2.The remote control window can't receive signal,
made the remote control aim at model's remote
receiver window.
1.Not connected correctly.
2.Belongs to unsupported card,only
supports 2G card at present.
16
Table of contents
Other Xomax Car Receiver manuals

Xomax
Xomax XM-2D6904 User manual

Xomax
Xomax XM-VN745 User manual

Xomax
Xomax XM-2VA718 User manual

Xomax
Xomax XM-DTSBN915 Service manual

Xomax
Xomax XM-RSU247BT User manual

Xomax
Xomax XM-VRSU311BT User manual

Xomax
Xomax XM-CDB623 User manual

Xomax
Xomax XM-CDB617 User manual

Xomax
Xomax XM-RSU256BT User manual

Xomax
Xomax XM-2DTSBN6214 User manual

Xomax
Xomax XM-RSU221BT User manual

Xomax
Xomax XM-RSU262BT User manual

Xomax
Xomax XM-RD263 User manual

Xomax
Xomax XM-DA755 User manual

Xomax
Xomax XM-RD263 User manual

Xomax
Xomax XM-R268 User manual

Xomax
Xomax XM-RSU228 User manual

Xomax
Xomax XM-RSU249BT-R User manual

Xomax
Xomax XM-RSU259BT User manual

Xomax
Xomax XM-2R422 User manual