Xomax XM-02Z User manual

1
User manual
XM-02Z
Thank you for purchasing one of our XOMAX products! We appreciate your
condence. Enjoy your brand new multimedia unit!
Please read the following manual carefully before you install and use the unit.
Please save this manual in case you will need to clarify further possible ques-
tions regarding installation and usage of our product.
We are constantly trying to keep our online-library of user's manuals for our
products up-to-date. In case you miss some information or if something should
be unclear, please visit our homepage www.xomax.de/download for a current
version of user's manual or contact our customer service.
i
Manual's version 1.0
Last update 20.11.2017
We appreciate our environment, so to keep it safe and clean, we
do not print our manuals on paper but provide our products with
manuals in digital version created in *.pdf format.
You can nd and download them anytime on our homepage
www.xomax.de, view them on your mobile devices and print
them for yourself if needed.
Please note: Any alternations and changes of technical data or/and design
due to technical update of some models need no advertisement.
XOMAX

2
EN
Thema:
List of contents
List of contents
Safety instructions and precau-
tions 3
Handling by stop only ...................... 3
Installation .................................... 3
Regular loudness ............................ 3
Repair of the unit............................ 3
Power supply ................................. 3
Replacement of fuses ...................... 3
Overheating ................................... 3
Regular temperature ....................... 3
Cleaning of the unit ........................ 4
Usage of the touchscreen ................ 4
Moisture ........................................ 4
The risk of injuries .......................... 4
Handling the CDs and DVDs ............. 4
Installation 5
Startup operations 7
Usage of the remote control ............. 7
Replacement of the battery .............. 7
Unit on/off ..................................... 8
Insert a microSD card ..................... 8
Insert a USB ash drive ................... 8
Remote control 9
Menu setup 10
Common solutions 20
Regulation 22
Recycling of an old unit ..................22
Recycling of the battery ..................22

3
EN
Thema:
Safety instructions and precautions
Safety instructions and
precautions
!
Handling by stop only
To avoid any accidents please don't
handle the unit while you driving. Please
stop and park the vehicle at safety
place and handle the unit casually.
!
Installation
Please read the following manual
carefully before you install the unit. We
recommend you to let the technician
install the unit in your vehicle.
!
Regular loudness
Please set the loudness of the unit to
the appropriate level so you were still
able to hear exterior noises especially
trafc warning signals. Furthermore the
higher loudness level can damage your
hearing organs.
!
Repair of the unit
Do not open the unit. Do not try to
repair the unit by yourself due to any
emerging technical problems. While
opening the unit by yourself exists the
danger to be electrocuted.
Do not use the unit any further since
you detect any kind of technical
problems.
Leave all the repair operations to
professional technicians.
Due to awed warranty seal the
warranty becomes invalid.
!
Power supply
Use the unit connected only to 12 Volt
on-board power supply. The minus (-)
should be connected with the ground
(GND) (negative).
Due to the wrong conguration exists
the danger of re. In case of doubt
please consult with professional techni-
cians.
!
Replacement of fuses
While replacing the fuse please make
sure that the new fuse has the same
properties as the old one, especially the
amperage.
!
Overheating
Do not occlude the vent holes to avoid
the heat generation and accumulation
in the unit. Otherwise exists the danger
of re.
!
Regular temperature
Please make sure that the temperature
inside of the vehicle amounts to not
more than +40 C.
If it's too cold or too hot inside of the
vehicle, do not turn the unit on until
the inside temperature of the cabin
descends.
!

4
EN
Thema:
Safety instructions and precautions
!
Cleaning of the unit
Please keep the unit clean and remove
the dust from it regularly. Please use for
that a soft and dry cleaning rag.
Major soilings can be removed carefully
with the wet cleaning rag. Do not use
any chemical or alcohol-containing
detergents to avoid the damage of the
unit's varnish.
!
Usage of the touchscreen
Do not press the touchscreen too hard
– it may lead to image distortions, unit
malfunctions and touchscreen damages.
Do not use any sharp articles to use
the touchscreen. Please handle the
touchscreen with your nger or with the
appropriate stylus.
!
Moisture
To avoid the danger of re or the
electric shock do not put the unit in to
the moist environment (e.g. adverse
weather conditions, inappropriate wet
cleaning etc.)
!
The risk of injuries
Do not open the cabinet or modify
the unit. The active laser components
used with this product comply with the
provisions of Laser Class 1.
!
Handling the CDs and DVDs
Remove transport securing
screws (if available)
Before using the optical drive, be
sure to remove the two transport
locking screws marked with colored
stripes (top of the radio).
!

5
EN
Thema:
Installation
Installation
WARNING!
Please read these advices carefully
before installation procedure.
The damages caused by an inappropriate
installation are not covered by warranty.
To avoid the risk of losing the warranty
please let a specialist accomplish the
installation of the unit.
»To avoid a short circuit please
disconnect the vehicle battery before
the installation. To do it properly please
read the manual of the vehicle.
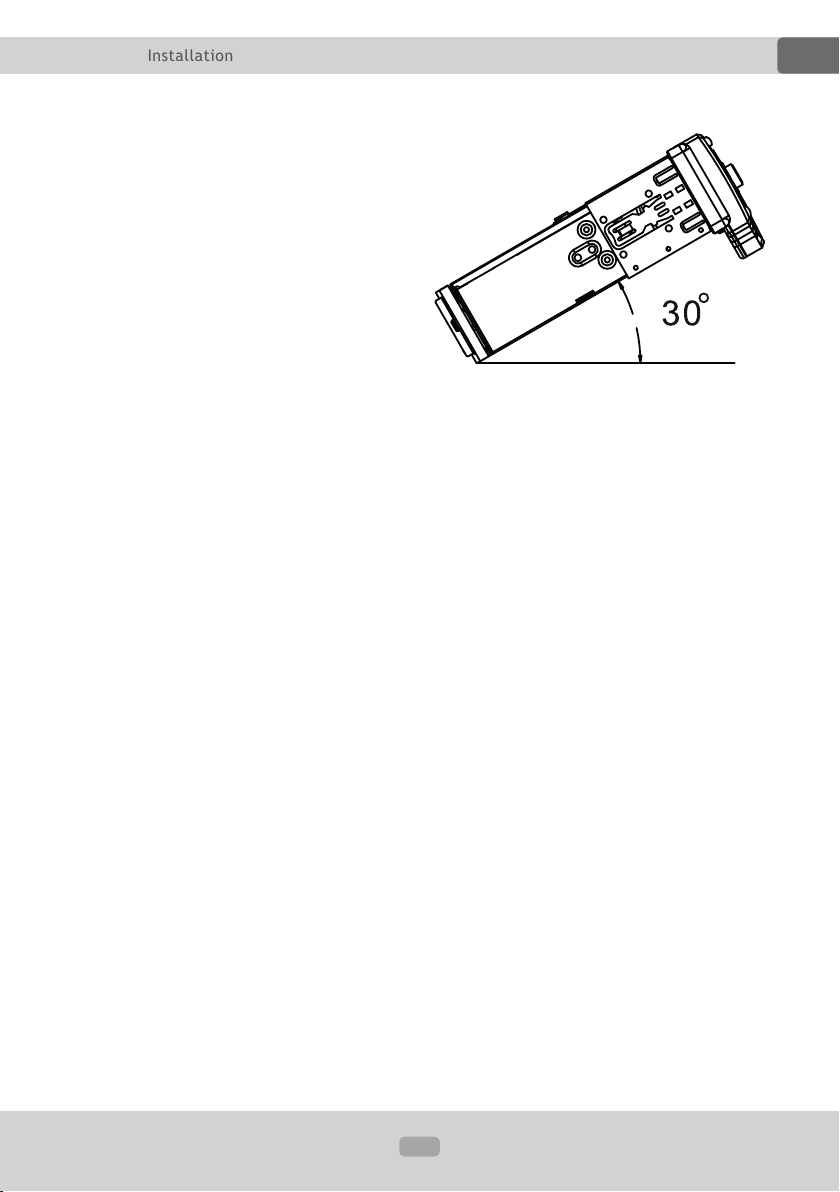
»Please be aware that this unit has an
2DIN standart size. Make sure that your
vehicle is equipped with an installation
cell of required size.
»As may be the case you will need a
suitable faceplate, adapter or other
accessories. These could be provided
from your local specialist supplier.
»The connection cables may not be
cutted or short-circuited. Otherwise the
warranty becomes invalid.
»Before the installation please make
sure that the vehicle has the 12 Volt
on-board power supply.
»The minus (-) should be connected
We recommend you to let a
professional technician install the
unit in your vehicle.
!
!
with the ground (GND) (negative).
»Please tag the polarity of the avai-
lable speakers before you disconnect
the vehicle battery.
»A proper grounding of the unit's
housing requires a clean ground
connection. Thus the grounding area
should be rust-, stain- and dust-free.
»Please ground the cable separately
from other heavy current devices such
as an amplier etc.
»Please ensure that the coloured
cables are connected according to the
wiring diagram. The wrong wiring may
lead to malfunctions or even damages
of the electric elements of the vehicle.
»Please note that the connection
cables of this unit and of the other
devices may have the same purpose
but the different colour. For this reason
while connecting this unit with the
other devices please ensure that both
of the cables in each case have the
same purpose. To congure everything
correctly please refer to the manuals of
the both devices.
»Please ensure that the negative
speaker cable is in each case plugged
into the negative speaker socket of the
ISO interface. Do not ever connect the
negative speaker cables with the vehicle
body.
»This unit is designed and construed
for connection with 4 speakers. Do not
combine this unit with devices that are
designed and construed for connection
with 2 speakers.

6
EN
Thema:
Installation
»The speakers should feature the
impedance of 4-8 Ohm and a sufcient
wattage.
»Please ensure that the speakers you
are connecting with the unit are intact.
Damaged speakers can impair the unit.
»To avoid a short circuit please isolate
all cable junctions and endings of the
unused cables with the electrical tape.
»All the cables should be layed and
xated tidy and properly. The cables
should not contact any movable or hot
objects.
»If the vehicle doesn't have an "ACC"
ignition position, please connect the
red cable with the ignition switch.
Otherwise the unit does not turn off
automatically, causing the discharging
of the vehicle battery.
»To avoid a rogue and hazardous
short circuit do not lay the yellow cable
through the engine bay in order to
connect it with the vehicle battery.
»Do not ever connect speaker cables
among one another. In case you do not
want to connect all the 4 speakers with
the unit please isolate the endings of
unused cables with the electrical tape
to prevent a short circuit.
»Do not ever connect the negative
speaker cables with the vehicle body.
»To ensure a awless performance of
the unit the intergration angle should
amount to +/- 30°.

7
EN
Thema:
Startup operations
2. Remove the old battery and insert
the new one (CR-2025 Lithium).
3. Insert the battery compartment back
into the remote control till it clicks into
place.
Startup operations
Usage of the remote control
Before the rst usage please remove
the isolation plate.
Aim the remote control at the IR
receiver on the front operating panel.
The IR receiver should not be blocked.
As soon as the remote control does
not work proper the battery should be
replaced.
Do not expose the remote control to
direct sunlight or air heater.
Replacement of the battery
The remote control is operated by
CR-2025 Lithium battery.
As soon as the remote control does
not work proper the battery should be
replaced.
Replacement instructions:
1. Remove the battery compartment:
push it to the left rst, then pull it out.
!

8
EN
Thema:
Startup operations
Unit on/off
Press the ? button to turn the unit
on.
If the unit is already on, keep the ?
button pressed for a couple of seconds
to turn it down.
Insert a microSD card
Insert a micro SD card into the slot with
the label side up and the pin side down.
Make sure that the card is intact and
dirt-free.
Insert a USB flash drive
Insert an USB ash drive proper into a
USB plug.
Do not insert any heavy or big USB
ash drives in order not to hit it
accidently - it could cause damages of
the USB plug or USB ash drive.
Micro SD cards and USB ash
drives should have following le-
system format: exFat or Fat32. Other
types will not be supported.
i

9
EN
Thema:
Remote control
Remote control

10
EN
Thema:
Menu setup
Menu setup

11
EN
Thema:
Menu setup

12
EN
Thema:
Menu setup

13
EN
Thema:
Menu setup

14
EN
Thema:
Menu setup

15
EN
Thema:
Menu setup

16
EN
Thema:
Menu setup

17
EN
Thema:
Menu setup

18
EN
Thema:
Menu setup

19
EN
Thema:
Menu setup

20
EN
Thema:
Common solutions
The describtion of the
problem
The cause and the solution
The remote control is
without function.
Solution 1:
Please ensure that the battery lm is removed. By
delivery the battery is protected by a lm which should
be removed before usage.
Solution 2:
The battery could be empty. Please replace it if required.
Solution 3:
Please make sure that the infrared receiver (labelled with
IR) on the control panel is not blocked.
Note:
You can test the functionality of the remote control as
follows: please hold the IR transmitter towards a camera
(e.g. a cell phone camera) and press any button on the
remote control. If the remote control is operative you can
see the infrared signal on the display of the used camera
device.
The unit does not turn
on.
This problem is in most cases caused due to a wrong
connection of the ISO cable.
Please review the pin assignments of the ISO cable and
ISO plug. Pay attention to the proper connection of the
ignition- and steady plus and correct the discrepancy if
required.
Note:
Though the design of ISO plug is standardized, it's pin
assigment is not and may vary. Thus in case of mismatch
of connections due to different pin assignments a simple
plug'n'play connection may lead to grievous errors.
Common solutions
The following advices are generally valid and refer to diverse car radios models with
the similar characteristics. Please note that some articles may refer not to your
model exactly and contain the describtion of features and functions that your model
does not support.
Table of contents
Other Xomax Car Video System manuals

Xomax
Xomax XM-VRSU713BT User manual

Xomax
Xomax XM-DTSB928 V2 User manual

Xomax
Xomax XM-RSU255BT V2 User manual

Xomax
Xomax xm-dtsb925 User manual

Xomax
Xomax XM-R271 User manual

Xomax
Xomax XM-RSU248BT-B User manual

Xomax
Xomax XM-RSU253BT User manual

Xomax
Xomax XM-2DTSBN6222 User manual

Xomax
Xomax XM-2VRSU734BT User manual

Xomax
Xomax XM-VRSU4309BT User manual

Xomax
Xomax XM-2RSU420 User manual

Xomax
Xomax XM-D749 User manual

Xomax
Xomax XM-VRSU414BT User manual

Xomax
Xomax XM-DTS8300 User manual

Xomax
Xomax XM-DTSBN932 User manual

Xomax
Xomax XM-DTSB928 User manual

Xomax
Xomax XM-VRSU411 User manual

Xomax
Xomax XM-VRSU727BT User manual

Xomax
Xomax XM-DTSBN929 User manual

Xomax
Xomax XM-DTSB914 Installation instructions