manuals.online logo
Brands
  1. Home
  2. •
  3. Brands
  4. •
  5. Phonocar
  6. •
  7. Car Video System
  8. •
  9. Phonocar VM 156 User manual

Phonocar VM 156 User manual

08/2020
FR
DE
EN
IT
ES
Manuale istruzioni
Instructions manual
Notice de montage et d’emploi
Gebrauchsanweisungen
Manual de instrucciones
VM156
MONITOR MULTIMEDIALE 12.5” TFT HD 4K FULL CAPACITIVE TOUCH SCREEN
per POGGIATESTA con SUPPORTO REGOLABILE
12.5” TFT HD 4K MULTIMEDIA MONITOR FULL CAPACITIVE TOUCH SCREEN
for HEADREST with ADJUSTABLE SUPPORT
ECRAN MULTIMEDIA 12,5” TFT HD 4K CAPACITIF
et TACTILE POUR APPUI-TETE avec SUPPORT REGLABLE
12,5” TFT HD 4K VOLL KAPAZITIVER TOUCHSCREEN-MULTIMEDIAMONITOR
FÜR KOPFSTÜTZE mit VERSTELLBAREM STÄNDER
MONITOR MULTIMEDIA 12,5” 4K TFT HD con PANTALLA TÁCTIL CAPACITIVA
para REPOSACABEZAS con SOPORTE AJUSTABLE
Android 9.0Android 9.0
2
IT - Per l’installazione rivolgersi al personale tecnico qualificato. • Usare solo con impianto elettrico a 12V DC con
negativo a massa. • Scollegare il terminale negativo della batteria del veicolo quando si effettuano le connessioni
dell’apparecchio. • Quando si sostituisce il fusibile, utilizzarne uno con lo stesso valore di amperaggio. • Non aprire
l’unità e non tentare di ripararla, consultare il proprio rivenditore o personale tecnico qualificato. • Accendere
l’apparecchio solo quando la temperatura dell’abitacolo è nella norma. • Non collegare alcun cavo in luoghi dove
potrebbe ostacolare il funzionamento dei dispositivi di sicurezza dell’auto.
EN - Installation to be carried out by trained technical personnel • Make sure you have 12V DC, with negative-pole
to mass • First disconnect negative-pole of the car-battery, then effect car-radio connections • When replacing fuse,
always use fuse with same Ampere-value • Never open the unit, nor try to repair yourself. Always ask your Retailer
or authorized technical staff • When switching-on, make sure that temperate inside passenger-compartment is at a
normal level • When placing the cables, keep away from all car security-devices.
FR - Se servir du personnel technique qualifié pour l’installation. • Utiliser uniquement dans des installations élec-
triques à 12V DC avec négatif à masse. • Débrancher le terminal négatif de la batterie lorsqu’on fait les connexions
de l’appareil. • Quand on remplace un fusible, se servir d’un autre ayant le même ampérage. • Ne pas ouvrir l’appa-
reil pour essayer de le réparer, contacter votre revendeur ou un personnel technique qualifié • Allumer l’appareil
seulement lorsque la température interne du véhicule est dans la norme • Ne brancher aucun câble dans des
endroits pouvant causer les obstacles au fonctionnement des dispositifs de sécurité du véhicule.
DE - Die Installation muss durch technische Fachkräfte vorgenommen werden • Nur bei 12V DC verwenden, mit
Negativ-Pol zur Masse • Erst den Negativ-Pol der Auto-Batterie abtrennen, dann die Radio-Anschlüsse herstellen •
Beim Auswechseln, immer Sicherungen derselben Ampere-Stärke verwenden • Nie versuchen, das Gerät zu öffnen
oder eigenhändig zu reparieren. Immer den Händler bzw. technische Fachkräfte zu Rate ziehen • Gerät nur dann
einschalten, wenn die Temperatur im Wagen-Innenraum auf normalem Niveau ist 
• Kabel fernhalten von allen Sicherheits-Geräten des Wagens.
ES - Para la instalación, contactar exclusivamente con empresas especializadas y personal técnicamente cualifi-
cado. • Usar solo en vehículos con alimentación de 12V DC y negativo a masa. • Desconectar el terminal negativo
de la batería del vehículo cuando se efectúen las conexiones del aparato.• Cuando se sustituya el fusible, utilizar
exclusivamente fusibles con el mismo amperaje. • No abrir la unidad y no intentar repararla, consultar al reven-
dedor o personal técnico cualificado. • Encender el aparato solo cuando la temperatura del habitáculo se haya
normalizado. • No conectar ningún cable en lugares que puedan obstaculizar el funcionamiento de los dispositivos
de seguridad del coche.
Avvertenze • Warning • Avertissements • Warnungen • Advertencias
3
Installazione • Installation • Installation • Installation • Instalación
IT - Inserire le boccole adeguate nelle aste del poggia-
testa facendo attenzione ai diametri.
FR - Insérer les bagues adéquates dans les guides
correspondantes en faisant attention aux diamètres
des tiges de l’appuie-tête.
ES - Introducir los casquillos adecuados en la res-
pectiva guía teniendo cuidado a los diámetros de las
varillas del reposa cabeza.
DE - Metall-Ringe auf die entsprechenden Schienen
setzen und dabei auf den Rohr-Durchmesser der Kopf-
stütze achten.
EN - Introduce metal rings into the related guides,
in due consideration of the diameter of the head-
rest-bars.
180°
180°
14 mm
12 mm
12,5 mm
10 mm
15 mm
15 mm
10 mm
12,5 mm
12 mm
14 mm
Diametro asta.
Bar-Diameter.
Diamètre tige.
Rohr-Durchmesser.
Diámetro varilla.
4
Funzioni • Functions • Fonctions • Funktionen • Funciones
10
11
13 12
Collegamenti • Connections • Connexions • Anschlüsse • Conexions
GIALLO / YELLOW
GIALLO / YELLOW
+12 V
ROSSO / RED
BIANCO / WHITE
ACC
A/V IN
NERO / BLACK
ROSSO / RED
GND
9
1 2 3 4 5 6 7
8
5
Funzioni • Functions • Fonctions • Funktionen • Funciones
1) Volume –
2) Funzione precedente
3) Schermata home
4) Applicazioni
5) Volume +
6) Visualizza nascondi barra degli strumenti
7) Screenshot
8) Accensione / Spegnimento *
9) Uscita cuffie jack 3,5”
10)Slot micro-SD Card
11)Porta USB
12) Reset
13)Porta HDMI, ingresso
* Premere per 3 secondi per “Accensione / Spegnimen-
to”. Premere brevemente per oscurare il monitor.
1) Volume –
2) Function before
3) Initial Page
4) Applications
5) Volume +
6) Show/Hide toolbar
7) Screenshot
8) On/Off *
9) Headphone output jack 3,5”
10)Micro-SD Card slot
11)USB port
12)Reset
13)HDMI port, input
* Press for 3 seconds to “On / Off”.
Short press to darken the monitor.
1) Lautstärke -
2) Funktion davor
3) Anfangs-Bild
4) Applikationen
5) Lautstärke +
6) Symbol-leiste anzeigen/verbergen
7) Screenshot
8) EIN / AUS*
9) Kopfhörerausgang 3,5 “
10)Micro SD-Öffnung
11)USB-Öffnung
12)Reset
13)HDMI-Öffnung, eingang
*Drücken Sie für 3 Sekunden auf “On / Off”.
Kurz drücken, um den Bildschirm zu verdunkeln.
1) Volumen -
2) Función precedente
3) Pantalla de inicio
4) Aplicaciones
5) Volumen +
6) Visualiza/Esconde barra de herramienta
7) Screenshot
8) Encendido / Apagado*
9) Salida auriculares jack 3,5”
10)Ranura micro SD Card
11)Puerto USB
12) Reset
13)Puerto entrada HDMI
*Pulse por 3 segundos a “On / Off”.
Pulse breve para atenuar el monitor.
1) Volume –
2) Fonction précédente
3) Page d’accueil
4) Applications
5) Volume +
6) Afficher/Cacher la barre d’outils
7) Screenshot
8) Allumage / Extinction*
9) Sortie casque 3,5 “
10)Slot Carte micro-SD
11)Port USB
12)Reset
13)Port entrée HDMI
*Appuyez pendant 3 secondes pour “On / Off”.
Appui court pour assombrir l’écran.
IT EN
DE
ES
FR
6
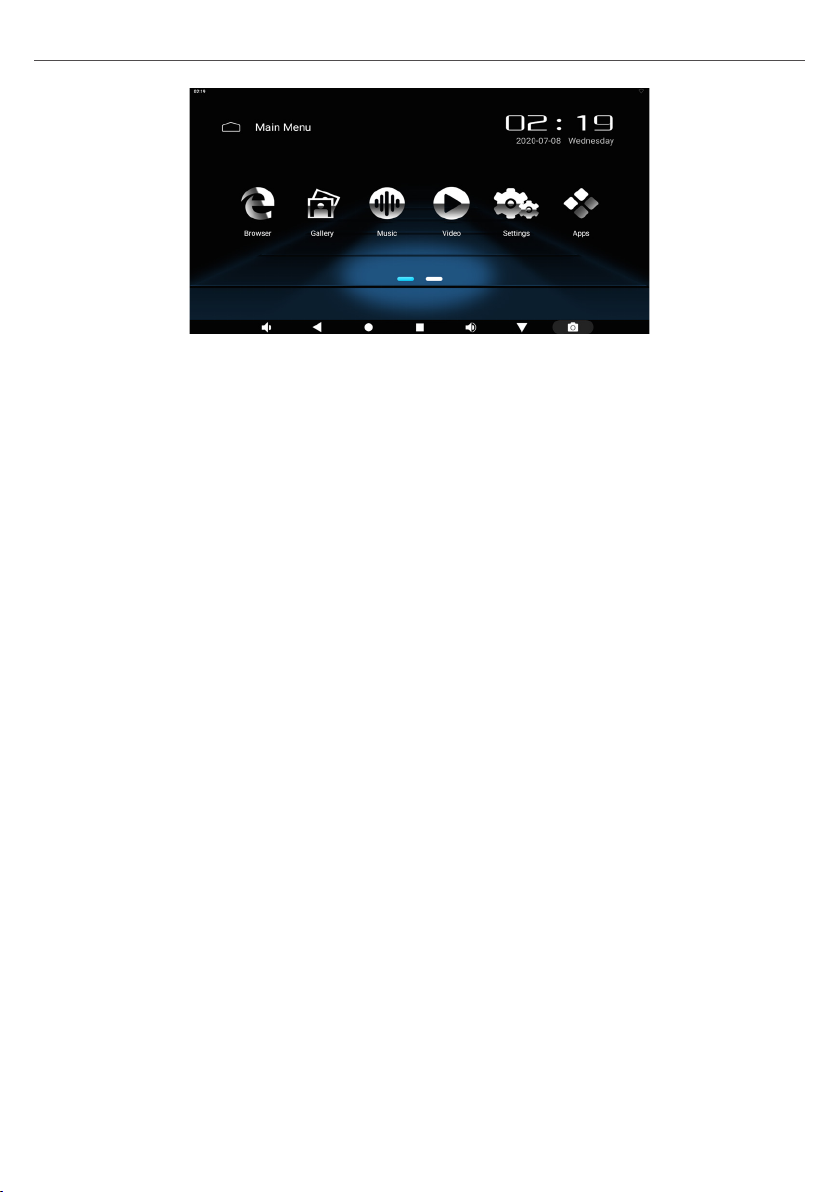
IT - Dopo l’accensione apparirà in automatico il menù,
SELEZIONARE:
BROWSER: Premere l’icona per accedere a internet.
GALLERY: Premere per accedere alle immagini presen-
ti sul dispositivo e / o sulle sorgenti esterne.
MUSIC: Premere l’icona per accedere al menù di sele-
zione della musica presente sul dispositivo e / o sulle
sorgenti esterne.
VIDEO: Premere l’icona per accedere al menù di
selezione dei video presenti sul dispositivo e / o sulle
sorgenti esterne.
SETTINGS: Premere per accedere al menù impostazio-
ni del dispositivo.
APPS: Premere per accedere alle applicazioni del
dispositivo.
FR - Après l’allumage, le menu apparait automatique-
ment.
SÉLECTIONNER:
NAVIGATEUR: Appuyez sur l’icône pour accéder à
Internet.
GALERIE: Appuyez pour accéder aux images sur
l’appareil et / ou aux sources externes.
MUSIQUE: Appuyez sur l’icône pour accéder au menu
de sélection de musique sur l’appareil et / ou les
sources externes.
ES - Después del encendido aparecerá de forma
automática el menú.
SELECCIONAR:
NAVEGADOR: Presione el icono para acceder a Inter-
net.
GALERÍA: Presione para acceder a las imágenes en el
dispositivo y / o fuentes externas.
MÚSICA: presione el icono para acceder al menú de
selección de música en el dispositivo y / o fuentes
externas.
VIDEO: Presione el ícono para acceder al menú de
selección de vídeos en el dispositivo y / o fuentes
externas.
SETTINGS para acceder al menú de ajustes.
APPS para acceder al menú aplicaciones instaladas.
DE - Nach dem Einschalten erscheint automatisch das
Menü, WAHL-Möglichkeiten:
BROWSER: Drücken Sie das Symbol, um auf das Inter-
net zuzugreifen.
GALERIE: Drücken Sie diese Taste, um auf die Bilder
auf dem Gerät und / oder externen Quellen zuzu-
greifen.
MUSIK: Drücken Sie das Symbol, um auf das Musik-
auswahlmenü des Geräts und / oder externer Quellen
zuzugreifen.
VIDEO: Drücken Sie auf das Symbol, um auf das Menü
zur Auswahl der Videos auf dem Gerät und / oder ex-
ternen Quellen zuzugreifen.
SETTINGS Einstell-Menü betreten.
APPS Menü der installierten Apps betreten.
EN - After switch-on, Menu will appear automatically.
SELECT:
BROWSER: Press the icon to access the internet.
GALLERY: Press to access the images on the device
and / or external sources.
MUSIC: Press the icon to access the music selection
menu on the device and / or external sources.
VIDEO: Press the icon to access the menu for selecting
the videos on the device and / or external sources
connected to it.
SETTINGS to enter the Settings-Menu.
APPS to enter Menu showing the installed Apps.
Menù • Menu • Menu • Menü • Menú
VIDEO: Appuyez sur l’icône pour accéder au menu de
sélection des vidéos sur l’appareil et / ou des sources
externes.
SETTINGS: pour accéder au menu des réglages.
APPS: pour accéder au menu des applications instal-
lées.
7
IT - Dal menu principale premere l’icona “SET-
TINGS” per accedere alle impostazioni generali.
SYSTEM INFORMATION: Mostra le informazioni
software.
ANDROID SETTING: Accede al menu impostazioni
Android.
SCENE SETTING: Modifica l’interfaccia grafica del
menu applicazioni.
FACTORY SETTINGS: Accede al menù personalizza-
zione logo e tema si sfondo. Digitare la password:
000000
FR - Dans le menu principal, appuyez sur l’icône
«PARAMÈTRES» pour accéder aux réglages généraux.
INFO sur le SYSTÈME : Affiche les informations du
logiciel.
ANDROID: Accède au menu des paramètres Android.
RÉGLAGE DU SCENE : Modifie l’interface graphique du
menu d’application.
FACTORY SETTINGS: Accède au menu pour personna-
liser le logo et le thème d’arrière-plan. Entrer le mot
de passe: 000000
ES - En el menú principal pulsar el icono
“SETTINGS” para acceder a los ajustes generales.
SYSTEM INFO: Muestra la información del software.
ANDROID SETTING: Accede al menú de ajustes de
Android.
SCENE SETTING: Modifica la interfaz gráfica del menú
aplicaciones.
FACTORY SETTINGS: Accede al menú para personalizar
el logotipo y el tema del fondo.
Introduzca la contraseña: 000000
DE - Drücken Sie im Hauptmenü auf das Symbol
«EINSTELLUNGEN», um die allgemeinen Einstellungen
aufzurufen.
SYSTEMINFO: Zeigt Softwareinformationen an.
ANDROID-EINSTELLUNG: Ruft das Android-Einstel-
lungsmenü auf.
SCENE-EINSTELLUNG: Ändert das grafische Interface
des Anwendungsmenüs.
FACTORY SETTINGS: Ruft das Menü zur Anpassung
von Logo und Hintergrundthema auf. Geben Sie das
Passwort ein: 000000
EN - From the main menu, press the «SETTINGS»
icon to enter the general settings.
SYSTEM INFO: Displays software information.
ANDROID SETTING: Enters the Android settings menu.
SCENE SETTING: Changes the graphical interface of
the application menu.
FACTORY SETTINGS: Access the menu for customizing
logo and background theme.
Enter the password: 000000
Menù impostazioni • Setting menu • Menu Paramètres • Menü Einstellungen •
Menú Configuración
8
Menù impostazioni • Setting menu • Menu Paramètres • Menü Einstellungen •
Menú Configuración
Premere il tasto ANDROID SETTINGS e
successivamente ENTER ANDOID per accedere al
menù impostazioni Android.
Regola impostazioni: Wi-Fi - Bluetooth - Audio e
notifiche - Display - Screenshot.
Utilizzo dati: Mostra grafico della memoria utilizzata
da ogni applicazione in KB.
Press the key ANDROID SETTINGS and than ENTER
ANDOID to access the Android settings menu.
Choose Settings: Wi-Fi - Bluetooth - Audio -
Display - Screenshot.
Memory Use: Graphical picture of KB-memory-
requirement for every single application.
Appuyez sur la touche ANDROID SETTINGS et ENTER
ANDOID pour accéder au menu des paramètres
Android.
Réglages: Wi fi - Bluetooth - Audio - Display -
Screenshot.
Utilisation des données: Vision graphique de la
mémoire utilisée par chaque application en KB.
Pulsar la tecla ANDROID SETTINGS y ENTER ANDOID al
para acceder menú de ajustes de Android.
Ajustes configuraciones: Wi-Fi - Bluetooth - Audio -
Display - Screenshot.
Utilización de datos: Muestra el grafico de la memoria
en KB utilizada por cada aplicación.
Drücken Sie die Taste ANDROID SETTINGS und ENTER
ANDOID, um das Android-Einstellungsmenü aufzu-
rufen.
Einstell-Möglichkeiten: Wi-Fi - Bluetooth - Audio -
Display - Screenshot.
Speicher-Benutzung: graphische Aufzeichnung des
Speicher-Aufwands in KB, pro Applikation.
IT EN
FR
ES
DE
9
Soluzione con Router • Solution with Router • Solution avec Router
Möglichkeit mit Router • Solución con Router
Soluzioni per l’utilizzo • Application-Possibilities • Solutions pour l’utilisation
Anwendungs-Möglichkeiten • Soluciones para la utilización
IT - ATTENZIONE
• Dal TOUCHSCREEN non è possibile gestire altri dispo-
sitivi connessi via WI-FI o BLUETOOTH.
• Tramite l’applicazione GOOGLE PLAY è possibile
scaricare e utilizzare le appliazioni compatibili sul
dispositivo.
IT
Tramite router WI-FI tutti gli apparati possono condivi-
dere audio e video e collegarsi ad internet.
EN
With the WI-FI-Router, all Devices can share Audio/
Video and connect to Internet.
FR
Moyennant un router WIFI , tous les appareils peuvent
se partager les fichiers audio et vidéo et
se connecter à internet.
DE
Durch den WI-FI-Router können sämtliche Geräte
gleichzeitig teilnehmen an Audios und Videos, und
sich an Internet anschließen.
ES
Mediante Router WI-FI todos los dispositivos pueden
compartir audio y video y conectarse a internet.
EN - ATTENTION
• From the TOUCHSCREEN, you cannot handle other
devices connected through WI-FI or BLUETOOTH.
• With the help of GOOGLE PLAY, you can download
and use compatible apps onto your Device.
FR - ATTENTION
• A partir de l’écran tactile: il est impossible gérer les
autres dispositifs connectés via WIFI ou BLUETOOTH.
• A travers l’application GOOGLE PLAY, vous pouvez
télécharger et utiliser sur le dispositif les applications
compatibles.
DE - WICHTIG
• Auf dem TOUCHSCREEN lassen sich keine weiteren
Geräte handhaben, die durch WIFI oder BLUETOOTH
angeschlossen sind.
• Durch GOOGLE PLAY können alle kompatiblen Apps
auf das Gerät geladen und verwendet werden.
ES - ATENCIÓN
• Desde la PANTALLA TACTIL no es posible gestionar
otros dispositivos mediante WI-FI o BLUETOOTH.
• Mediante la aplicación GOOGLE PLAY es posible
descargar y utilizar las aplicaciones compatibles en el
dispositivo.
Smartphone/Tablet
Router WI-FI
Phonocar VM315 VM156
10
Soluzione senza Router • Solution without Router • Solution sans Router
Möglichkeit ohne Router • Solución sin Router
ES
Mediante BLUETOOTH:
• Conectado a una fuente A2DP trasmite solo Audio.
• Conectado a un Smartphone permite solo la navega-
ción internet.
• No tiene la función de manos libres y no es posible
acceder a las funciones del Smartphone mediante el
VM156.
Mediante USB - SD card:
• Es posible reproducir archivos de audio y video
grabados en el soporte.
IT
Tramite BLUETOOTH:
• Collegato a una sorgente A2DP trasmette solo Audio.
• Collegato ad uno smartphone permette solo la navi-
gazione internet.
• Non ha la funzione vivavoce e non è possibile acce-
dere alle funzioni dello smartphone tramite VM156.
Tramite USB - SD card:
• E’ possibile riprodurre i file audio e video memorizzati
sul supporto.
FR
A travers BLUETOOTH:
• Branché à une source A2DP transmet seulement en
audio
• Connecté à un Smartphone permet uniquement la
navigation sur Internet
• Il n’y a pas la fonction mains-libres et il est impossible
accéder aux fonctions du smartphone à travers le
VM156.
A travers USB - CARTE SD:
• Les fichiers audio et vidéo mémorisés peuvent être
reproduits.
DE
Durch BLUETOOTH:
• An einer A2DP-Quelle angeschlossen, gibt es nur
Audio-Übermittlung.
• An einem Smartphone angeschlossen, gibt es nur die
Internet-Nutzung.
• Keine Freisprech-Funktion und auch kein Zugang zu
den Smartphone-Funktionen durch VM156.
Durch USB - SD card:
• Wiedergabe der jeweils eingespeicherten Audio- und
Video-Dateien.
EN
Through BLUETOOTH:
• Connected to an A2DP-source, you will only get
Audio-transmission.
• Connected to a smartphone, you will only have
Internet-navigation.
• No hands-free-function and no possibility of making
use of the smartphone-functions through the VM154.
Through USB - SD card:
• Possibility of reproducing Audio and Video-files
memorized on the support.
Smartphone/Tablet
Autoradio con A2DP
Car radio with A2DP
VM156
HOT SPOT
WI-FI
Phonocar VM406
Cuffie Bluetooth (es. Phonocar VM406)
Bluetooth headphons (e.g. Phonocar VM406)
Casques Bluetooth (par ex. Phonocar VM406)
Bluetooth-Kopfhörer (z.B. Phonocar VM406)
Auriculares Bluetooth (ej. Phonocar VM406)
BLUETOOTH
11
VM156
Soluzione base • Basic Solution • Solution base • Grundsätzliche Anwendungsmöglichkeit •
Solución de base
Autoradio con A2DP
Car radio with A2DP
Phonocar VM406
Cuffie Bluetooth (es. Phonocar VM406)
Bluetooth headphons (e.g. Phonocar VM406)
Casques Bluetooth (par ex. Phonocar VM406)
Bluetooth-Kopfhörer (z.B. Phonocar VM406)
Auriculares Bluetooth (ej. Phonocar VM406)
BLUETOOTH
IT
La riproduzione Audio/Video da USB o SD verrà
suddivisa: audio sull’impianto HI-FI e video sul monitor
del VM156.
EN
Audio/Video-reproduction from USB or SD will be
splitted: Audio from the HIFI-installation.
Video from the Monitor (VM156)
FR
La reproduction Audio/Vidéo de USB ou SD sera par-
tagée: audio sur l’installation HI-FI et Vidéo sur l’écran
(VM156).
DE
Die Audio/Video-Wiedergabe von USB oder SD wird
aufgeteilt: Audio von der HI-FI-Anlage.
Video auf dem Monitor (VM156) .
ES
La reproducción Audio/Video desde USB o SD será
subdividida: audio en el equipo HI-FI y video en el
monitor (VM156).
Caratteristiche tecniche • Technical specications • Caracteristiques techniques •
Technische Eigenschaften • Características Técnicas
EN
• Capacitve monitor touch-screen 12,5” 4K
• Aspect ratio TFT LED, DIGITAL TOUCH 16:9
• System PAL/NTSC Auto switch
• Operating System ANDROID 9
• Bluetooth functions for all devices.
• RAM DDR 2 GB
• Internal memory 32 GB
• Speakers built-in 2
• Adjustement brightness
• 1 Port USB 64 GB
• 1 Slot Micro-SD Card 32 GB
• Earphone output Bluetooth or Jack 3,5
• 1 A/V RCA input
• 1 A/V HDMI input
• Multi-language menu built-in
• WI-FI aerial built-in
• Power 12 V-1,5A
• Tilt screen 35°
• Dimensions 295X190X10 mm
• Compatible:
AUDIO: MP3/WMA/AAC
VIDEO: MPEG/AVI/MP4
IMAGES: BMP/JPG/GIF
IT
• Monitor touch-screen capacitivo 12,5” 4K
• Formato TFT LED, DIGITAL TOUCH 16:9
• Sistema PAL/NTSC Auto switch
• Sistema Operativo ANDROID 9
• Funzione Bluetooth per tutti i dispositivi.
• Memoria RAM DDR 2 GB
• Memoria interna 32 GB
• Altoparlanti integrati 2
• Regolazioni luminosità
• 1 Porta USB 64 GB
• 1 Slot Micro-SD Card 32 GB
• Uscita cuffie Bluetooth o Jack 3,5
• 1 Ingresso A/V RCA
• 1 Ingresso A/V HDMI
• Menù multilingue integrato
• Antenna WI-FI integrato
• Alimentazione 12 V-1,5A
• Inclinazione schermo 35°
• Dimensioni 295X190X10 mm
• Compatibilità:
AUDIO: MP3/WMA/AAC
VIDEO: MPEG/AVI/MP4
FOTO: BMP/JPG/GIF
Via F.lli Cervi, 167/C - 42124 Reggio Emilia (Italy) - Tel. ++39 0522 941621 • www.phonocar.com - e-mail:info@phonocar.it
Il prodotto non deve essere smaltito con i riuti domestici. Per ulteriori informazioni consultare il sito www.phonocar.it
This Product must NOT be treated as a domestic waste. For further information, please read homepage www.phonocar.it

Other manuals for VM 156

1

Other Phonocar Car Video System manuals

Phonocar VM150 User manual

Phonocar

Phonocar VM150 User manual

Phonocar VM009 User manual

Phonocar

Phonocar VM009 User manual

Phonocar Mirror Link VM 249 User manual

Phonocar

Phonocar Mirror Link VM 249 User manual

Phonocar 1/401 User manual

Phonocar

Phonocar 1/401 User manual

Phonocar VM012 User manual

Phonocar

Phonocar VM012 User manual

Phonocar VM002 User manual

Phonocar

Phonocar VM002 User manual

Phonocar VM153 User manual

Phonocar

Phonocar VM153 User manual

Phonocar VM090 User manual

Phonocar

Phonocar VM090 User manual

Phonocar VM 076 User manual

Phonocar

Phonocar VM 076 User manual

Phonocar VM 155 User manual

Phonocar

Phonocar VM 155 User manual

Phonocar VM109 User manual

Phonocar

Phonocar VM109 User manual

Phonocar VM 095 User manual

Phonocar

Phonocar VM 095 User manual

Phonocar VM086 User manual

Phonocar

Phonocar VM086 User manual

Phonocar VM172 Installation guide

Phonocar

Phonocar VM172 Installation guide

Phonocar VM 156 User manual

Phonocar

Phonocar VM 156 User manual

Phonocar VM192 User manual

Phonocar

Phonocar VM192 User manual

Phonocar VM 007 User manual

Phonocar

Phonocar VM 007 User manual

Phonocar VM081 User manual

Phonocar

Phonocar VM081 User manual

Phonocar VM045 User manual

Phonocar

Phonocar VM045 User manual

Phonocar 05962 User manual

Phonocar

Phonocar 05962 User manual

Popular Car Video System manuals by other brands

Sound Storm DD875MI user manual

Sound Storm

Sound Storm DD875MI user manual

PowerAcoustik PTID-4333NR owner's manual

PowerAcoustik

PowerAcoustik PTID-4333NR owner's manual

Panasonic CQ-VD6505W operating instructions

Panasonic

Panasonic CQ-VD6505W operating instructions

Kenwood DDX749WBT instruction manual

Kenwood

Kenwood DDX749WBT instruction manual

Speedsignal B-3540006 installation guide

Speedsignal

Speedsignal B-3540006 installation guide

Gazer CM70 Series user manual

Gazer

Gazer CM70 Series user manual

Tokai LAR-5722B user manual

Tokai

Tokai LAR-5722B user manual

Seat Media System Plus owner's manual

Seat

Seat Media System Plus owner's manual

Boss Audio Systems BV56HR user manual

Boss Audio Systems

Boss Audio Systems BV56HR user manual

Audiovox VOH641A Operation manual

Audiovox

Audiovox VOH641A Operation manual

Trevi MDV 6380 DAB instruction manual

Trevi

Trevi MDV 6380 DAB instruction manual

Farenheit T-7000MHR owner's manual

Farenheit

Farenheit T-7000MHR owner's manual

Bosch PSARCCA100 Handbook

Bosch

Bosch PSARCCA100 Handbook

Taffio HL Series manual

Taffio

Taffio HL Series manual

ASA Electronics K-9 installation instructions

ASA Electronics

ASA Electronics K-9 installation instructions

Blitz BZDIN7 user guide

Blitz

Blitz BZDIN7 user guide

Pyle PLRD125 instruction manual

Pyle

Pyle PLRD125 instruction manual

JVC KW-AV71BT Installation & connection manual

JVC

JVC KW-AV71BT Installation & connection manual

manuals.online logo
manuals.online logoBrands
  • About & Mission
  • Contact us
  • Privacy Policy
  • Terms and Conditions

Copyright 2025 Manuals.Online. All Rights Reserved.