XP DEUS II User manual

XP has now enhanced the capabilities of the highly versatile , the is its ultimate
accessory to expand your detecting possibilities and has now set new standards in the world of “2 Box”
deep seeking detectors.
The not only surpasses the competition with its advanced simultaneous multiple
frequency platform (FMF®), but it also delivers unmatched performance and stability through its unique
ability to limit ground effects.
Whether you’re a construction professional, archaeologist, industrial worker, or a passionate individual
seeking a reliable and robust tool to locate deep and large targets, the XTREM HUNTER will be your
ultimate companion for uncovering targets such as, large relics and various underground objects including
tanks and metal pipes.
Performance:
• Fast Multi Frequency (FMF®) technology, ensuring unparalleled performance with minimal ground
noise.
• Reach extreme depths of up to 5 meters (16 feet), uncovering the deepest targets
Discrimination capability:
• Thanks to the advanced FMF multiple frequency platform, iron discrimination has reached new levels
in the world of twin box machines. In addition to its natural insensitivity to small targets like nails, the
XTREM HUNTER now offers the ability to discriminate some moderate-sized ferrous objects.
Wireless Convenience:
• Enjoy seamless compatibility with the DEUS II wireless ecosystem, including the remote control,
headphones and standard coil.
• Easily switch to the DEUS II standard wireless coils in seconds to precisely pinpoint your target.
• Pair the XTREM HUNTER as a new coil, and instantly the remote control presents you with unique
menus and real-time visual platform.
Ergonomic - Effortless Portability:
• Designed for single-person use, it ensures effortless detecting.
• Weighing just 2.9 kg (6.4 lb), it guarantees prolonged endurance.
• Store it in the included XP case or consider the optional unique XP backpack 280 for added
convenience.
• Adjust the handle and support to achieve personalized comfort.
Weather-Ready:
• Its waterproof construction can withstand rain and challenging conditions.
Built to Last:
• Backed by a full 5-year warranty (part and labor), the XTREM HUNTER will provide you with reliable
performance for years to come.
eXPlore like never before!
Please refer to the online manual for the latest improvements. Certain functions may have
changed since this manual was printed.
ACCESSORY USER MANUAL
Reaching new standards in the world of
deep seeking metal detectors.

2
COMPARISON
LIST OF PARTS
Box contents
1 S-TELESCOPIC Stem.
1 Remote Controller (depending on version).
1 set of wireless headphones (depending
on version).
1 USB-C charging cable.
2 knurled screws - Ø 5mm - lenght 30mm.
1
2
3
6
10
7
11
8
9
1
12
4 knurled screws - Ø 5mm - lenght 16mm.
1 knurled screw - Ø 4mm - lenght 12mm.
1 Weather proof XP case.
1 carrying strap.
2 parts of the XTREM HUNTER stem structure.
1 front coil with wireless TX and battery.
1 back coil with cable.
Conventional detectors VS XTREM HUNTER
Conventional detectors are capable of detecting small targets
as well as large metal masses at significant depths. However,
they are affected by small targets near the surface or by ground
effects. For example, a nearby nail can mask the signal coming
from a deep large mass.
Moreover, even on relatively clean ground, it is difficult to distin-
guish between a small surface target and a larger target at depth,
as both generate a similar signal level. It becomes challenging to
focus on deep buried masses without spending time searching
through numerous small surface targets.
The , with its coil geometry and distribution of
the electromagnetic field, is highly insensitive to small surface
targets, which are naturally invisible to it. It has the capability to
penetrate the top layers of the ground to easily detect through
them. Additionally, its improved ground effect suppression
reduces false signals caused by movement and oscillations dur-
ing walking, resulting in a significant performance enhancement
compared to previous generations of detectors of this type.
7
9
10
2 3
4
5
6
8
11
x2
x4
x1
12
4
5

3
Step by step installation
ASSEMBLY
I - Back coil installation.
II - Main structure locking (and unlocking).
III - Main structure screwing.
IV - Back coil to front coil connection.
V - Front coil screwing.
VI - Telescopic stem installation.
Mounting of the strap
2
2
2
2
2
16mm
5mm
12mm
30mm
5mm
4mm
VIV
IV
III
II
I
1
1
1
1
1
16mm
5mm
High position Low position
Attachment point
depending on the
size of the user.

4
BEGINNING
1. Ensure that your DEUS II remote control is up to date with Version 2.0 or higher. You can find the ver-
sion on the screen when starting it.
2. Pair your XTREM HUNTER with your DEUS II remote control as a new coil (Option > Pairing > Coil >
enter its serial number). The remote will then present you with a new dedicated interface.
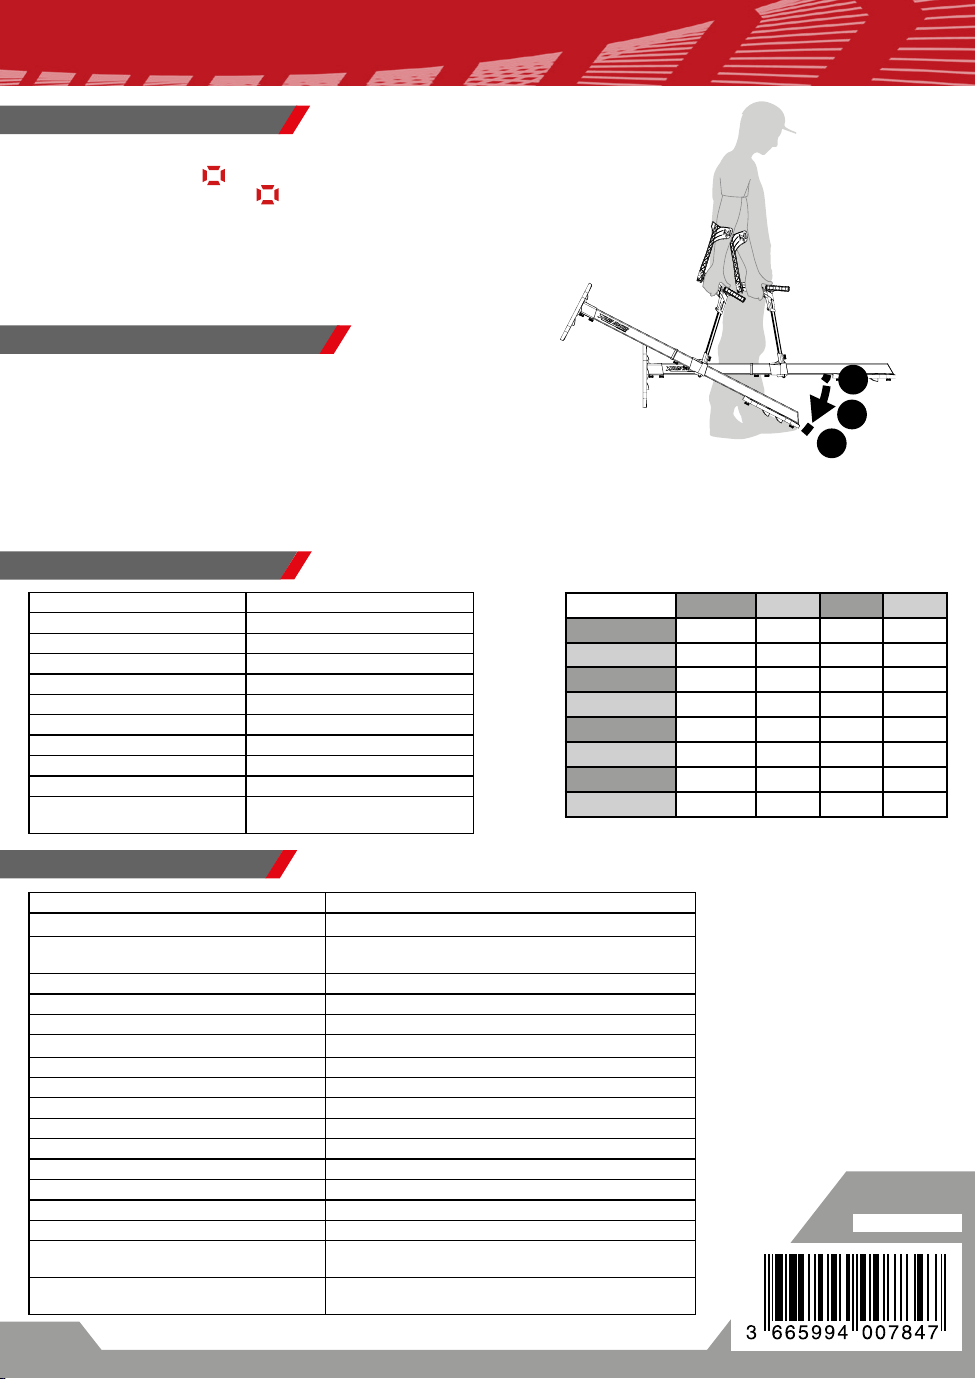
3. Adjust the handle to keep your XTREM HUNTER at a sufficient distance from the ground to avoid
excessive sensitivity to surface targets.
4. Maintain a safe distance from industrial areas, residential houses, or power lines.
5. Make sure you are not carrying / wearing anything metallic, such as shoes, smartphones, belt buckles
or keys. Most hiking gear has a wire metallic frame that interferes with the XTREM HUNTER. Only use
sports shoes or rubber boots (check with your pinpointer that they are not reinforced with wire mesh).
6. Perform a noise cancel to find the quietest frequency band. Long press the top right key. It will automat-
ically scan between the 14 channels. If you encounter difficult conditions or noise:
• Reduce the Sensitivity setting to 60-70 (MENU > SENS).
• Reduce the Audio Response setting to 1 (MENU > AUDIO RESP).
• Keep the coil elevated from the ground by adjusting the handle to a lower level. Or hold the bar with
your hand to keep it at a higher distance from the soil.
7. Press to retune your XTREM HUNTER, and then start walking. Regularly re-tune it to readjust the
audio threshold according to your conditions.
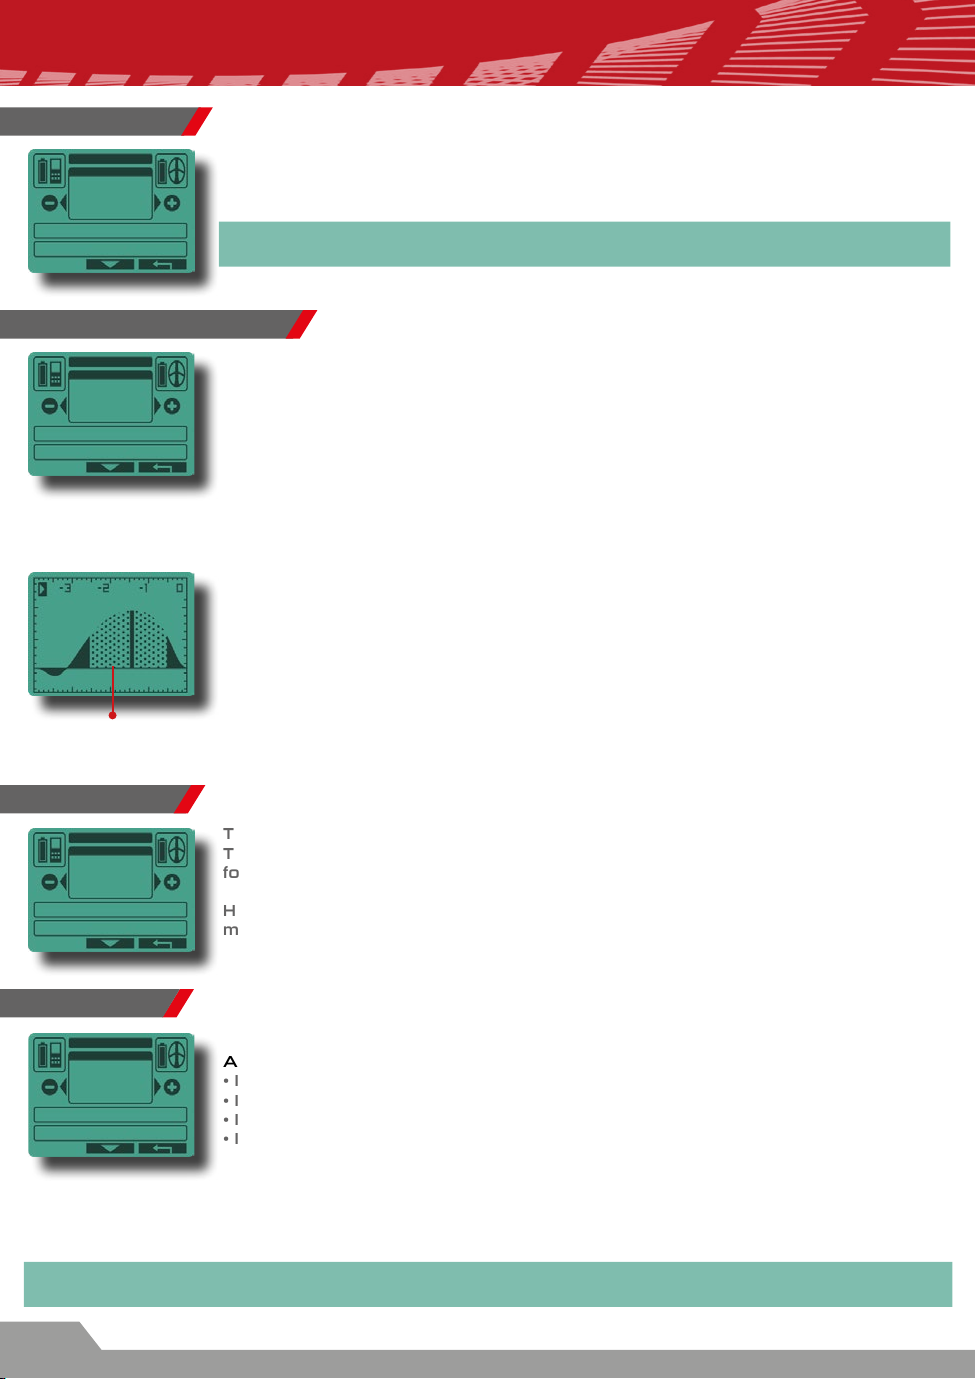
8. Look at your screen to have an idea of the target’s size and depth. The horizontal scale is calibrated
every second of recording, the screen displays the last 4 seconds of detection. Targets located closer
to the surface will produce a double signal, while deeper ones will generate a single signal.
9. To confirm a target, first, adjust the Auto Tune to OFF and retune the XTREM HUNTER. Then, slowly
move the detector around the target to pinpoint its exact location.
You can also increase the reactivity setting to speed up the target locating process.
Alternatively, you have the option to switch to your standard DEUS II coils to confirm targets at moder-
ate distances. To do this, navigate to OPTION > PAIRING > COIL and select the desired coil from your
coil list. The Relic program will be a good program choice for this purpose.
10. Always use headphones with the XTREM HUNTER, as it has a wide audio dynamic range. It is often
difficult to hear the faintest signals using the built-in speaker.
10 Key points to start
How to test your XTREM HUNTER
• If you don’t have buried target samples, test the XTREM HUNTER’s response by placing large
target samples of different sizes (25cm/10” to >1m/3’) on the ground. Then, raise your detector to
1.5 meters/5’ with your arm and pass over the targets.
• Do not pass any target above the XTREM HUNTER as it only accurately detects objects on its bottom
side (ground side). If you move a target on the top for your test, it will not detect it and the threshold
will move in the wrong direction!
• Do not place your Xtrem Hunter on its side at a 90° angle during tests, as it may become more
susceptible to electromagnetic interference. It operates optimally when in a horizontal position.

5
Play / Pause indicator.
The main interface
continuously displays
the signal of the last
4 seconds. You can
freeze it by pressing
the Play / Pause key.
Play / Pause Retune the Threshold
Long press:
Ground Balance
Change Program
Access to G.B
Long press: shortcut
FREQ SCAN
(Noise cancel)
Access to MENU
Long press : Marks your location on
the Go Terrain smartphone app.
Access to OPTION
Signal strength.
It can help you estimate
the target’s depth.
Signal Duration.
It can help you estimate
the target’s size.
30 cm / 12 “ deep
Signal example (Ø 30 cm / 12 inches Target)
INTERFACE
Most sensitive point
A shallow target usually has a double lobe
signal interspersed with a negative one.
More deeply buried, the same target will
have a strong first lobe but the second one
will be less marked.
At more than 1 meter / 3 feet, the target will
have a clear signal but quite faint.
60 cm / 24 “ deep
120 cm / 48 “ deep
When you pair the with your DEUS II, it automatically switches to a dedicated interface
with settings optimized for the detection of large, deep targets.

6
Reactivity
The Reactivity is a key parameter for adjusting the depth capability of the machine.
At a low level of Reactivity:
• It achieves optimal depth performance.
• It cancels out electromagnetic interference (EMI) and small targets.
• It slows down the machine’s response speed and increases the length of the signal.
• It reduces noise caused by shaking effects and coil movement, especially when
using a low ground effect adjustment (<85).
SENSITIVITY
MENU
90
Determines the device’s sensitivity level from 0 to 99.
The most commonly used sensitivity levels range from 70 to 90. Reduce the level
in trashy areas or close to power lines, fences, radio-relay stations, etc.
Do not test your device indoors as there is considerable electromagnetic and metal
interference in urban environments (EMI).
Sensitivity
The IAR discrimination method (Iron Amplitude Rejection) allows rejection of
ferrous items according to their distance from the coils.
OFF = no rejection 3 = Shallow Ferrous rejection 5 = Shallow and deeper Ferrous
rejection.
The XTREM HUNTER naturally ignores small ferrous objects such as nails,
bottle caps, etc. For moderately sized ferrous objects like anchors, hammers,
IAR Discrimination
horseshoes, you can discriminate them using the DISCRI IAR setting, which will result in a low-pitched tone.
The background Iron Rejection processing operates in motion mode, which means you need to be in
This feature is used to set the amplitude of the background sound threshold (HUM).
The Threshold can be increased to mask low sound variations and can act as a
form of sensitivity by drowning out the noise in the threshold hum.
However, it’s important to note that faint signals and deep targets may also be
masked by the threshold, so it should be used in moderation.
Threshold
DISCRI IAR
THRESHOLD
DISCRI IAR
MENU
1
THRESHOLD
REACTIVITY
Ferrous signal example
with Discri IAR: ON
MENU
motion to receive the low-toned response from ferrous targets. If you stop on a
target, the Iron Rejection will not be effective, and the audio will produce a mid-tone
response, indicating a non-ferrous target.
The graphical target display will show ferrous (of moderate size) in shades of gray.
Be cautious if the ground is filled with ferrous objects Iron Rejection may mask
larger and deeper targets. In such highly contaminated areas, it is recommended
to raise the XTREM HUNTER from the ground using the handle’s height adjustment
feature or by directly holding the aluminum frame to further distance it from the
ground. This will maintain excellent performance and significantly improves stability.
THRESHOLD
MENU
2
REACTIVITY
AUTO TUNE
REACTIVITY
MENU
1
AUTO TUNE
FREQ. SHIFT
At a high level of Reactivity:
• It helps to pinpoint the target’s position more precisely due to the faster response speed.
• It produces shorter audio signals.
• It enhances target differentiation in environments with a lot of trash and clutter.
• Do not change this setting frequently if you want to accurately gauge the target on the LCD graphic indicator.
• The lower you set the Reactivity, the slower your walking pace should be.

7
Frequency Shift (EMI Noise cancel): Auto Scan/Manual shift
Always start your session by performing an automatic noise cancel SCAN to find
the most stable channel in terms of electromagnetic interference (EMI).
Shortcut : from the main screen, long press the top right button.
The XTREM HUNTER is a highly sensitive device, so it is recommended to use it far
away from power lines or electrical environments. If you encounter excessive EMI
noise:
• Reduce the Sensitivity.
• Reduce the Reactivity.
• Reduce the Audio Response.
By increasing the Audio Response, you will affect the sound curve and amplify
deep targets, but it will make also the machine more jittery. It is an important setting
of your XTREM HUNTER to control the response to the ground, so adjust it accord-
ing to your local conditions and experience.
Lowering the Audio Response to 1 reduces ground noise and provides a more
stable threshold.
Audio Response
MENU / GROUND
Auto Tune
AUTO TUNE
MENU
1
FREQ. SHIFT
AUDIO RESP.
The XTREM HUNTER operates by default in non-motion with manual threshold
adjustment by briefly pressing .
The AUTOTUNE function allows for automatic threshold tracking to avoid manual
adjustment. The Threshold adjustment speed can be set across 3 levels to accom-
modate different threshold drift rates.
Keep in mind that when Autotune is active, if you hold the detector steady on a
target the signal will disappear after a few seconds depending your Autotune
adjustment. Therefore, it is necessary to keep the detector in motion.
In the same manner, if you are searching for very large targets at significant depths, a fast Autotune
setting may partially or totally adjust to the target and attenuate its signal, which can limit the perception
of the target’s position and shape. This can make it challenging also to track long metal pipes or conduits.
Remember that you can temporarily switch Autotune OFF to precisely locate a target in pure non-motion
mode at any time.
FREQ. SHIFT
MENU
3
AUDIO RESP.
SENSITIVITY
SCAN
AUDIO RESP.
MENU
2
SENSITIVITY
DISCRI IAR
Ground
GRAB
G.B.
87
Until now, detectors of this type have encountered problems with false signals
caused by inevitable height variations during walking. This always required signifi-
cantly lowering the Sensitivity to overcome these issues. Thanks to the FMF® tech-
nology, this phenomenon is reduced, resulting in a significant increase in perfor-
mance in various soil conditions.
Adjusting the ground effects settings is therefore less necessary, and the factory
default 87 level will work better in most cases.
In certain special magnetic ground conditions, you may experiment with a lower
ground balance adjustment manually or by grabbing.
If you encounter very difficult ground or high trash condition, always remember:
1. To elevate the XTREM HUNTER from the ground using its adjustable handle or by directly holding the
aluminum frame to further distance it from the ground. This will maintain excellent performance and
significantly improves stability.
2. Reduce Sensitivity to 60-75 and Audio Response to 1.

8
Prg 1 Prg 2 Prg 3
Sensitivity 0 to 99 85
Discri IAR OFF to 5 OFF
Threshold 0 to 20 0
Reactivity 1 to 3 1
Auto Tune OFF to 3 OFF
Freq. Shift 1 to 14 -
Audio Resp. 1 to 3 2
Ground 59 to 95 87
Technology Simultaneous Fast Multiple Frequency (FMF®)
Detecting Type Non-Motion with adjustable Autotune
Wireless Headphones optional WS6 (rainproof) - WSAII (rainproof) - WSAII XL
(IP 68-1m)
Case included - rain and shock proof
Battery type Li-ion 18650 x1 - 11 Watts/hour - 45g
Battery life > 10 hours
Charging time ~ 4 hours
Operating T° 0 to + 40°C
Max ambient T° during charging 0 to + 40°C
Charging Cable USB type C
Lenght assembled 1.20 m (3.94 ft)
Weight (Xtrem Hunter + remote) 2.9 kg (6.4 lb)
Weight (Xtrem Hunter in its XP case) 5.8 kg (12,8 lb)
Weight (XP Case) 2.7 kg (6 lb)
XP case size 725 x 480 x 170 mm (28’ x 18,9’x 6,7’)
XP Backpack 280 Optional
Warranty Five years parts and labour. Batteries and
connectors, two-year warranty
Patents US 7940049 B2 - EP 1990658 B1 and pat-
ents pending
Sensitivity 99 levels
Discrimination IAR on 5 levels
Threshold 20 levels
Reactivity 3 levels
Auto Tune 3 levels
Frequency Shift 14 bands Manu/Auto
Audio Response 3 levels
Ground balance Grab or Manual
Equalizer 4 Bands configurable
Programs 1 factory program + 2 users
Display Recording 4 seconds with a
Play/Pause option
Features/Settings
General Features
GROUND / ADVICE / SPECIFICATIONS
2
3
1
Ground Grabbing
When using the XTREM HUNTER, follow these steps:
1. Press and hold for 2 seconds.
2. Without releasing the key, Tilt the front of the coil
towards the ground to listen for the ground hum.
3. Release the key, you can see the acquired ground
value if ground is mineralized enough.
After a few attempts, if the ground is not quieter, manu-
ally return to the default ground value of 87.
For maximum depth...
On clean and non-mineralized ground:
• Perform a Frequency Scan.
• Reduce the Reactivity setting.
• If you are searching for deep non-ferrous targets,
adjust the Ground Balance to 70 and set the Reac-
tivity to 1 to minimize coil movements.
• Increase the Sensitivity.
• Increase the Audio Response or use headphones
for better target detection.
CA0HBC
GB
Other manuals for DEUS II
2
This manual suits for next models
4
Table of contents
Other XP Metal Detector manuals
Popular Metal Detector manuals by other brands

Clarke
Clarke MD1000 Operation and maintenance instructions

Titan
Titan 1000 XD owner's manual

Velleman
Velleman C.Scope CS770 operating manual

Detech
Detech SSP-5100 G instruction manual

Makro Detektor
Makro Detektor JEOHUNTER 3D Dual System user guide

DetectorPro
DetectorPro Headhunter Pirate Owner's instruction manual