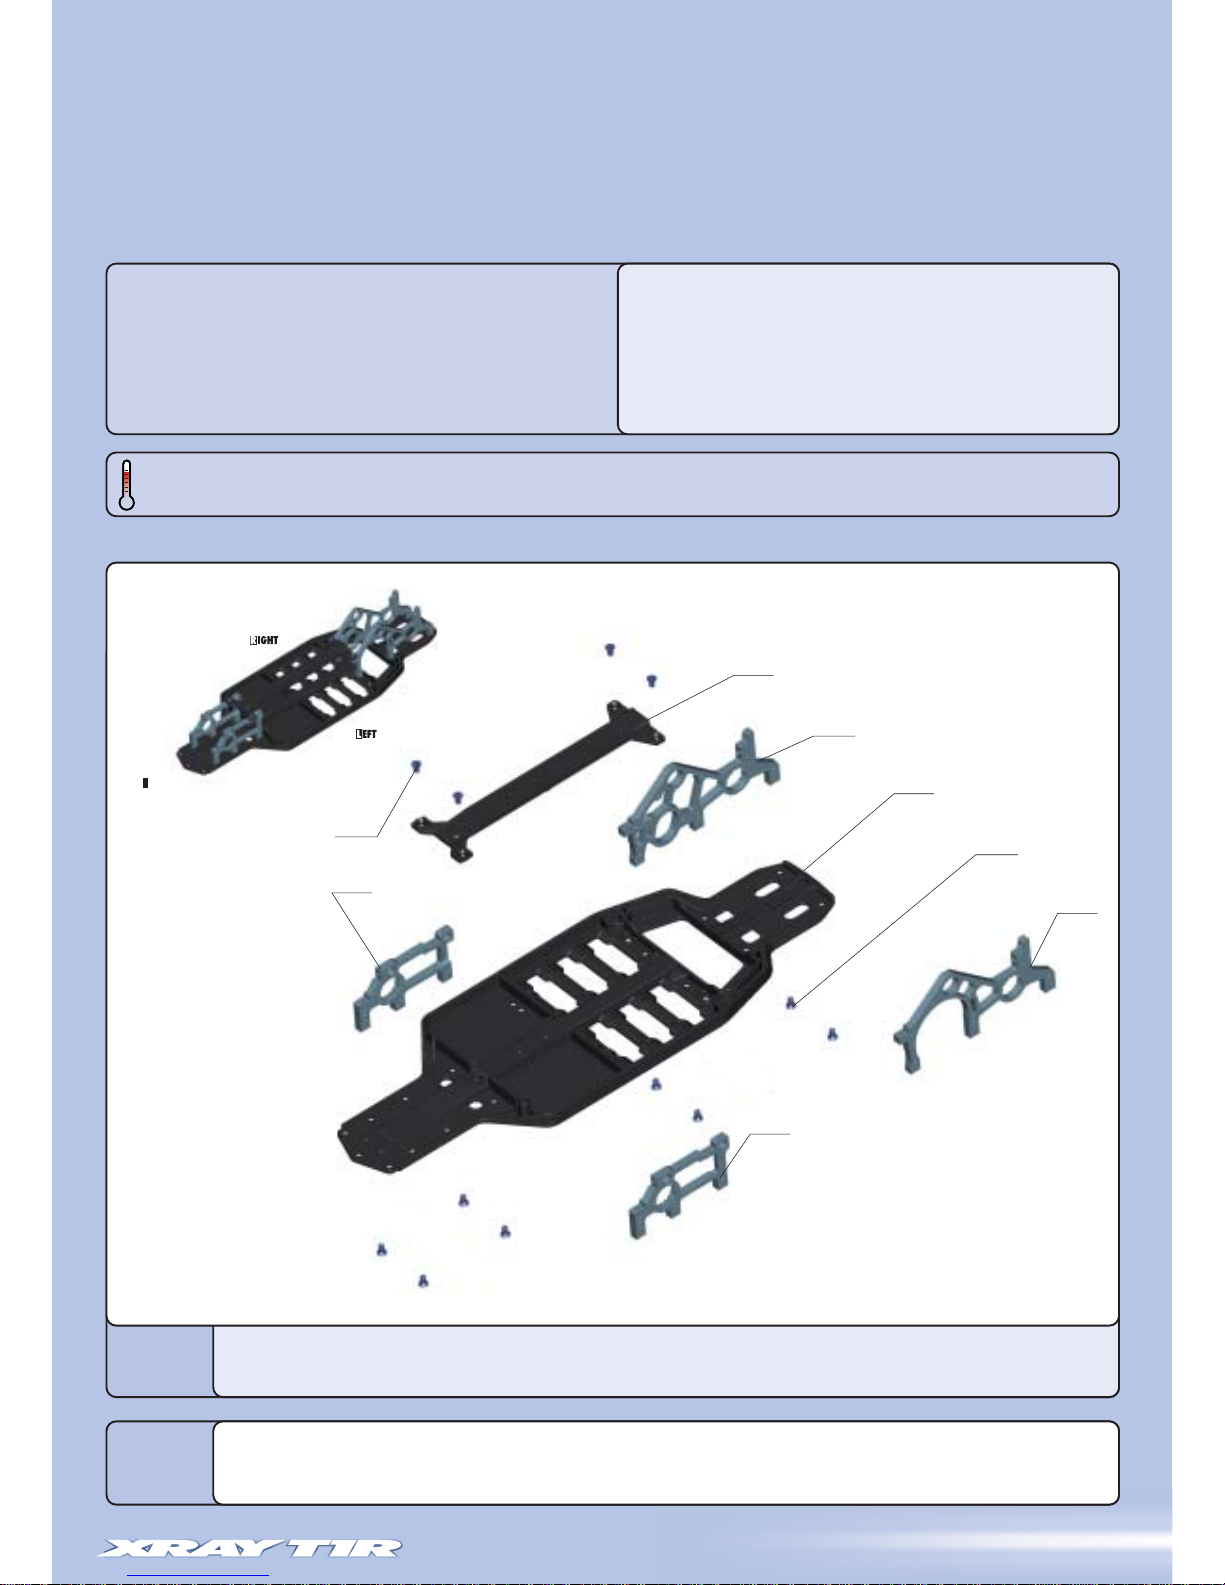
1
The XRAY T1R Raycer is arguably the most affordable advanced
1/10-scale on-road electric touring car ever made for racing, and
is based on the extremely successful XRAY T1 concept. We have
used the results of thousands of hours of racing and testing on
both of asphalt and carpet tracks to offer you the best car in
terms of quality, performance, and price. The XRAY T1R was
created by blending highest-quality materials and excellent
design. The result? A very affordable, durable, high-performance
racecar that is extremely easy to assemble and drive. The XRAY
T1R has the racing pedigree of the XRAY T1 family and can be
used for very high competition racing, but is also well suited for
novice drivers who choose the XRAY T1R as their entrance into the
R/C hobby.
The XRAY T1R features simplified suspension components to
maximize ease of assembly and setup while offering the highest
possible performance at every kind of track. Even with the
standard setup, the XRAY T1R gives a very stable, predictable
driving experience. For more advanced racing and setup, we
have produced a special Set-Up Book to help you understand the
operation of your car and tune it for maximum performance.
Setting up and tuning the XRAY T1R is extremely easy thanks to
the smart design of all parts.
We have made every effort to make these instructions and Set-Up
Book as easy to understand as possible. However, if you have any
difficulties, problems, or questions, please do not hesitate to
contact the XRAY support team at support@teamxray.com. Also,
please visit our web site at www.teamxray.com to find the latest
updates, setup information, option parts, and many other
goodies. We pride ourselves on taking excellent care of our
customers.
CONGRATULATIONS
IInnlliinneewwiitthhoouurrppoolliiccyyooffccoonnttiinnuuoouusspprroodduuccttddeevveellooppmmeenntt,,tthheeeexxaaccttssppeecciiffiiccaattiioonnssoofftthheekkiittmmaayyvvaarryy..IInntthheeuunnlliikkeellyyeevveenntt
ooffaannyypprroobblleemmsswwiitthhyyoouurrnneewwkkiitt,,yyoouusshhoouullddccoonnttaacctttthheemmooddeellsshhooppwweerreeyyoouuppuurrcchhaasseeddiitt,,qquuoottiinnggtthheeppaarrttnnuummbbeerr..WWee
rreesseerrvveeaallllrriigghhttssttoocchhaannggeeaannyyssppeecciiffiiccaattiioonnwwiitthhoouuttpprriioorrnnoottiiccee..AAllllrriigghhttssrreesseerrvveedd..
R/C & BUILDING TIPS
• Read and fully understand the instruction manual before
building.
• Always keep this instruction manual ready at hand for quick
reference, even after completing the assembly.
• Clear a work area for assembling the kit.
• Work on a light-colored towel so any dropped parts are easy
to find.
• Only open bags of parts for the assembly section you are
building; do not open parts bags before required.
• Make sure all screws are tight, and check them periodically.
Make sure the chassis screws do not protrude below the
chassis.
• For best performance, it is very important to ensure the free
movement of all parts.
• Tap or pre-thread plastic parts when threading screws.
• Self-tapping screws cut threads into the parts when tightened.
Do not use excessive force when tightening self-tapping screws,
or you may strip out the thread in the plastic. We recommend
you stop tightening a screw when you feel some resistance.
Please support your local hobby shop, and ask them for any
advice. We at XRAY Model Racing Cars support all local hobby
dealers. Therefore we ask you, when possible, to purchase XRAY
products at your hobby dealer and give them your support as we
do. If you have difficulty finding XRAY products, please check out
www.teamxray.com to get advice, or contact us via e-mail at
support@teamxray.com, or contact the XRAY distributor in your
country.
ADDITIONAL ITEMS REQUIRED:
TOOLS REQUIRED:
Cutting Pliers, Needlenose Pliers, Snap Ring Pliers, Allen Wrenches (1.5 mm, 2.0 mm, 2.5 mm, and 3.0 mm), Hobby Knife, Caster Clip Removal Tool, Turnbuckle
Wrench, Shock Assembly Tool, Vernier Calipers (digital recommended), Soldering Iron and Solder. For ease of assembly, we strongly recommend using high-quality
HUDY tools. For more information, see www.hudy.net.
Radio system (transmitter and receiver), steering servo, speed controller, motor,
battery pack (6-cell), pinion gear, battery charger, 1/10-scale bodyshell (190 mm), tires,
inserts, double-sided tape, CA glue, bearing oil.
Receiver Steering Servo Speed Controller
6-cell Battery Pack
(3+3 saddlepack)
Pinion Gear
Tire Inserts Tires
190mm Bodyshell
Electric Motor