REAR
Please note that there is an assortment of optional tuning parts are additionally included in the M18 PRO kit. This includes set of pinion gears, 42T spur gear and adjustable toe-in linkages.
Please check the instruction manual for tuning tips for how and why you might want to use these included option parts. Look for additional genuine XRAY option and tuning parts.
An assortment of optional tuning parts is included in the M18 PRO kit; this includes a set of pinion gears, 36T/42T spur gears, and adjustable toe linkages. Please check the instruction
manual for tuning tips of how and when to use these option parts. We recommend always using genuine XRAY options and tuning parts.
We recommend performing the following procedures and tips after every raceday (or even during a raceday, depending on requirements)for cleaning critical exposed bearings
on your M18. Cleaning your hub bearings takes the greatest priority; gearbox bearings should not require as frequent maintenance.
WARNING: Do not allow motor cleaner to come in contact with your skin. Wear gloves, and use handling tools during the cleaning process to minimize your exposure.
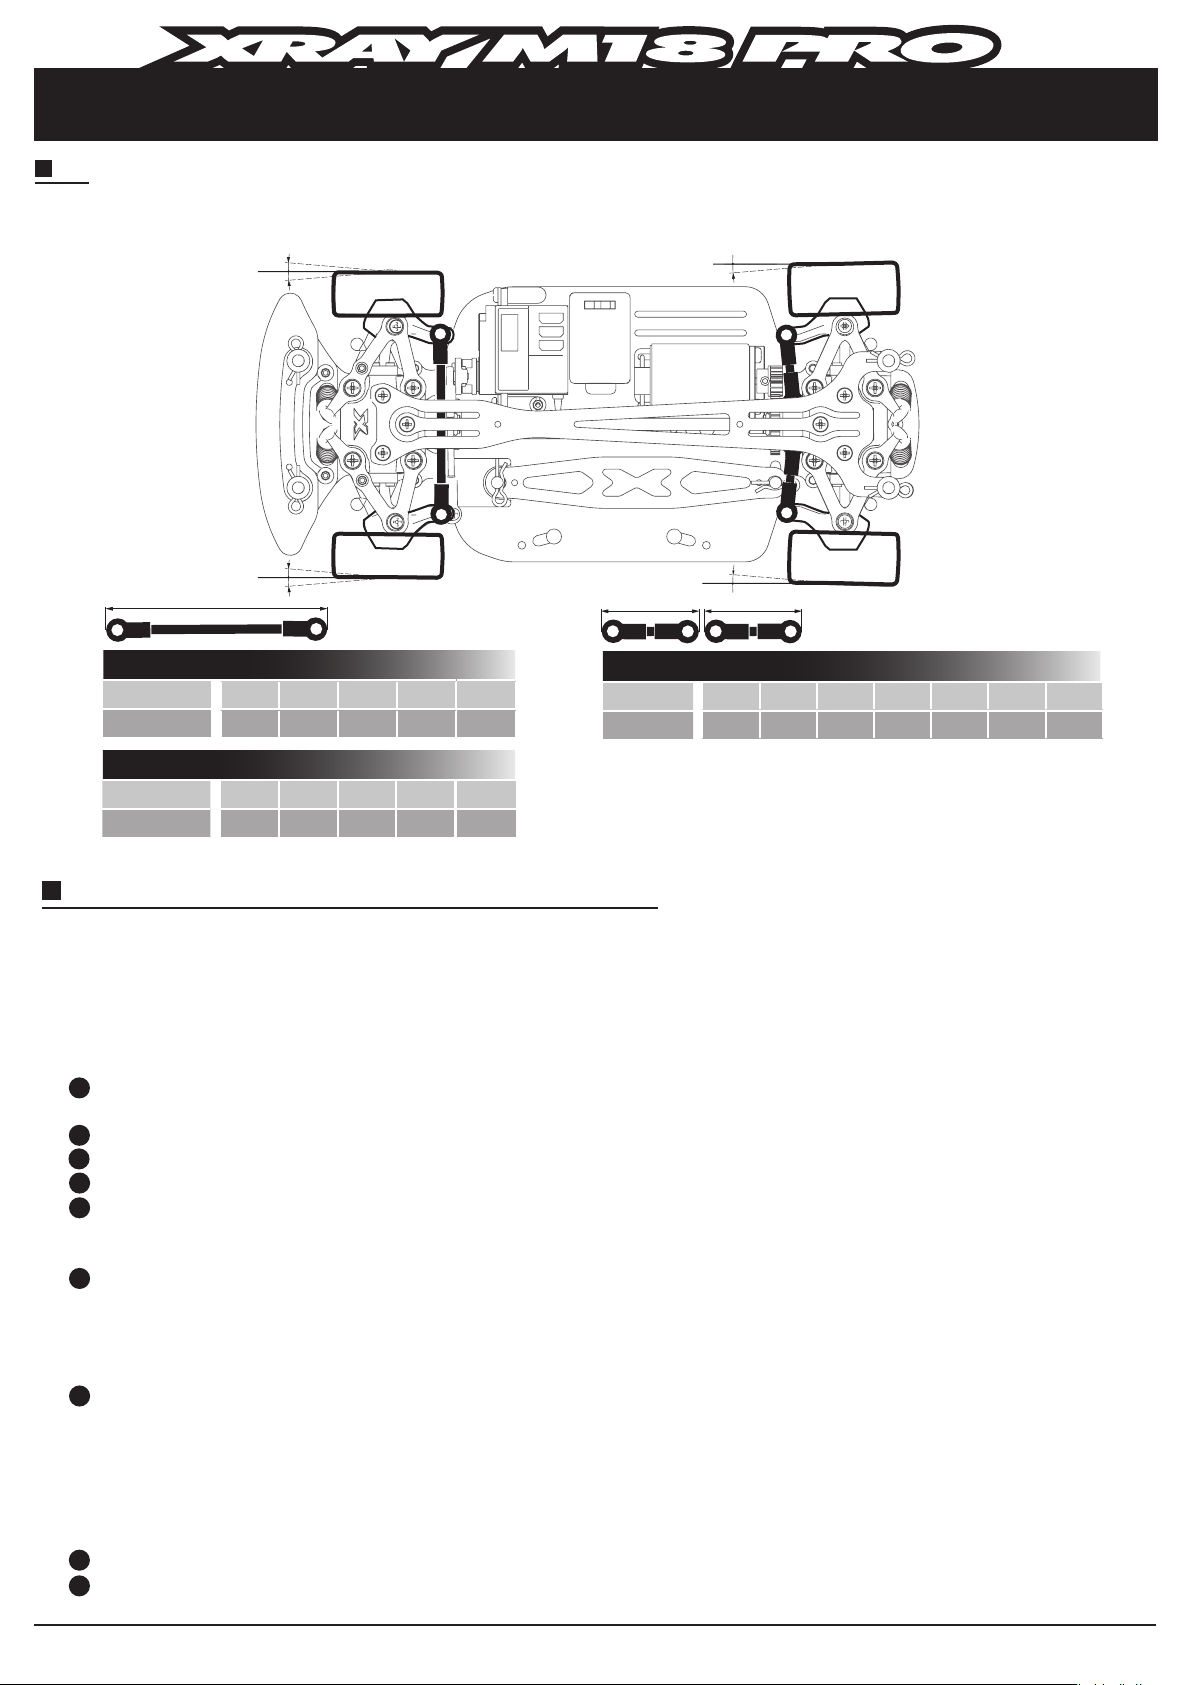
TOE
TOE-OUT
TOE-IN TOE-IN
TECH TIP: BALL-BEARING MAINTENANCE AND CLEANING
PART 1: BALL-BEARING CLEANING
PART 2: MAINTENANCE ON CARPET
If you run your M18 on carpet, especially one that leaves debris and loose fibers on the car, we strongly suggest the procedures following are done at least once during a raceday.
Otherwise, you risk wounded fibers becoming lodged in the bearings and drivetrain which may result in ball-bearing lockout or even failure.
Take off rims and driveshafts to inspect the hub bearings for any wound-up carpet fibers or debris. Remove if necessary before reassembling.
Remove all wound fibers from the drivetrain and clean all parts. Use compressed air, tweezers, brush, etc...
If you have any questions, please do not hesitate to contact XRAY at info@teamxray.com or visit our website at www.teamxray.com for news and updates.
1
2
1
2
3
4
5
6
7
Spray the bearing on both sides with motor cleaner. Make sure you use a motor cleaner that does not leave a residue after it dries. Otherwise this may cause drag and wear
inside the bearings.
Spin the bearing while it is still wet to dislodge any particles with the cleaner
Spray the bearing on both sides again
Blow both sides of the bearing dry with compressed air to make sure particles come out. Pat dry with clean towel/rag before handling.
Hold the inner part of the bearing with left thumb/forefinger and spin it to make sure it spins free without any peculiar vibrations or sounds. The XRAY bearings should spin
freely for more than 5 seconds and come to a smooth stop. New bearings can spin upwards of 10 seconds. If one stops a little suddenly after spinning freely for a few
seconds, repeat the cleaning process to make sure that all particles have been removed. Then spin test again.
If steps 1-5 do not work after repeated attempts, try the following:
-Soak and if possible shake/vibrate the bearing in a sealed jar of cleaner.
-Carefully remove the retaining "C" clip that holds the bearings shields with a hobby blade tip; this will allow direct access to the ball race.
-Remove the bearing shields.
-Spray out the bearing with motor cleaner, dry, then reassemble.
Place one drop of bearing oil into each side of the bearing. When you spin test the bearing after you have re-oiled, it will not spin as freely. This is normal and once you
have mounted the bearings in the car again, the drivetrain will still spin freely.
FRONT
+
--
+
-
-
FRONT TOE-OUT (+)
DEGREES
+2.0° +1.5° +1.0° +0.5°
LENGTH
65.18mm 65.51mm 65.84mm 66.17mm
0.0°
66.5mm
-2.5°
FRONT TOE-IN (-)
DEGREES
- 0.5° - 1.0° - 1.5° - 2.0°
LENGTH
REAR TOE-IN (-)
DEGREES 0.0° -0.5° -1.0° -1.5° -2.0° -2.5°
LENGTH
-3.0°
29.8mm 29.64mm 29.47mm 29.3mm 29.14mm 28.97mm 28.81mm
66.83mm 67.17mm 67.5mm 67.83mm 68.17mm


