manuals.online logo
Brands
  1. Home
  2. •
  3. Brands
  4. •
  5. Xsential
  6. •
  7. Water Filtration System
  8. •
  9. Xsential AX5-TW User manual

Xsential AX5-TW User manual

A
AX
X5
5-
-T
TW
W
U
UN
ND
DE
ER
R
C
CO
OU
UN
NT
TE
ER
R
S
SY
YS
ST
TE
EM
M
I
IN
NS
ST
TA
AL
LL
LA
AT
TI
IO
ON
N
G
GU
UI
ID
DE
E
1.0 AX5-TW UNDER COUNTER SYSTEM
Read through all the instructions carefully before proceeding with the installation. Be sure to follow any special plumbing codes
in your area. With proper installation and maintenance your AX5-TW under counter system will produce good quality, great
tasting drinking water for years to come. You can also contact your local dealer if you are having problems installing it.
Diagram 1 illustrates the plumbing connections that are needed to install the system.
CAUTION: DO NOT USE WITH WATER THAT IS MICROBIOLOGICALLY UNSAFE OR WITH WATER OF UNKNOWN QUALITY WITHOUT
ADEQUATE DISINFECTION BEFORE OR AFTER THE SYSTEM. SYSTEM CERTIFIED FOR CYST REDUCTION MAY BE USED ON DISINFECTED WATER
THAT MAY CONTAIN FILTERABLE CYSTS. PLEASE HAVE THE SYSTEM SERVICED REGULARY EVERY 6 MONTHS.
2.0 SYSTEM COMPONENTS
The Xsential AX5-TW UNDER COUNTER includes the following
components:
1. A bracket with twin AX5-TW under counter filter
2. Pressure reduction valve
3. Classic design ceramic faucet
4. 4 meter tube
5. A ball valve
6. ½” brass adapter
Diagram 1
3.0 INSTALLATION OF SINK-TOP FAUCET
The Faucet should be positioned to ensure a free flow pattern into the sink. It must also be in a location that allows ready access to the mounting hardware from
under the sink.
CAUTION: EXTREME CARE MUST BE TAKEN IN DRILLING THE HOLE FOR THE SINK-TOP FAUCET. THE SURFACE MATERIAL FOR MOST SINKS IS
EXTREMELY HARD AND BRITTLE AND CAN BE EASILY CHIPPED OR CRACKED. THIS UNIT’S MANUFACTURER/RESELLER ACCEPTS NO
RESPONSIBILITY FOR SINK TOP DAMAGE RESULTING FROM THIS INSTALLATION. SAFETY GLASSES MUST BE WORN WHEN OPERATING THE
DRILL.
1. Using the 6.4mm drill bit, drill a hole through the base metal. Operate the drill slowly and carefully, especially when the drill is about to penetrate the
metal. If necessary use a drop or two of oil in the hole. Go slowly otherwise damage to the sink may result.
2. Repeat step 1 using the 12mm drill bit.
3. Mount the faucet in the hole and using an adjustable wrench to hold the faucet, tighten
4.0 MOUNTING THE AX5-TW UNDER COUNTER
1. Mark screw locations at the desired positions. Use the two holes at the back of the Xsential AX5-TW UNDER COUNTER mounting bracket for marker
guides.
2. Screw the wood screws supplied with unit into marked positions.
3. Leave screw heads out a little.
4. Hang AX5-TW UNDER COUNTER system onto screws.
5.0 INSTALLATION OF COLD WATER SUPPLY CONNECTOR
TURN OFF THE MAIN COLD WATER SUPPLY BEFORE YOU START
The water supply connector that comes with the unit is made up of three parts; ½” pipe connector, a brass ball valve and pressure reduction valve. See Diagram 1
for connection details. Please contact your local plumber if you are having problems installing the cold water inlet.
WARNING: INADVERTENTLY CONNECTING THE UNIT TO HOT WATER WILL DESTROY THE MODULE AND VOID THE WARRANTY. THE FEEDING
WATER TEMPERATURE CANNOT EXCEED 40OC.
6.0 CONNECTING UP AX5-TW
Check the labeling detail on AX5-TW system before connecting up the system.
1. Connect the WATER IN tubing to brass ball valve, which is attached to the ½” pipe adapter. With the other end of the tubing, connect it to the pressure
valve followed by the first stage of the AX5-TW system. The first stage of the AX5-TW system is marked with “IN” from the left hand side of the system.
2. Connect the outlet “OUT” from the AX5-TW to the sink top faucet.
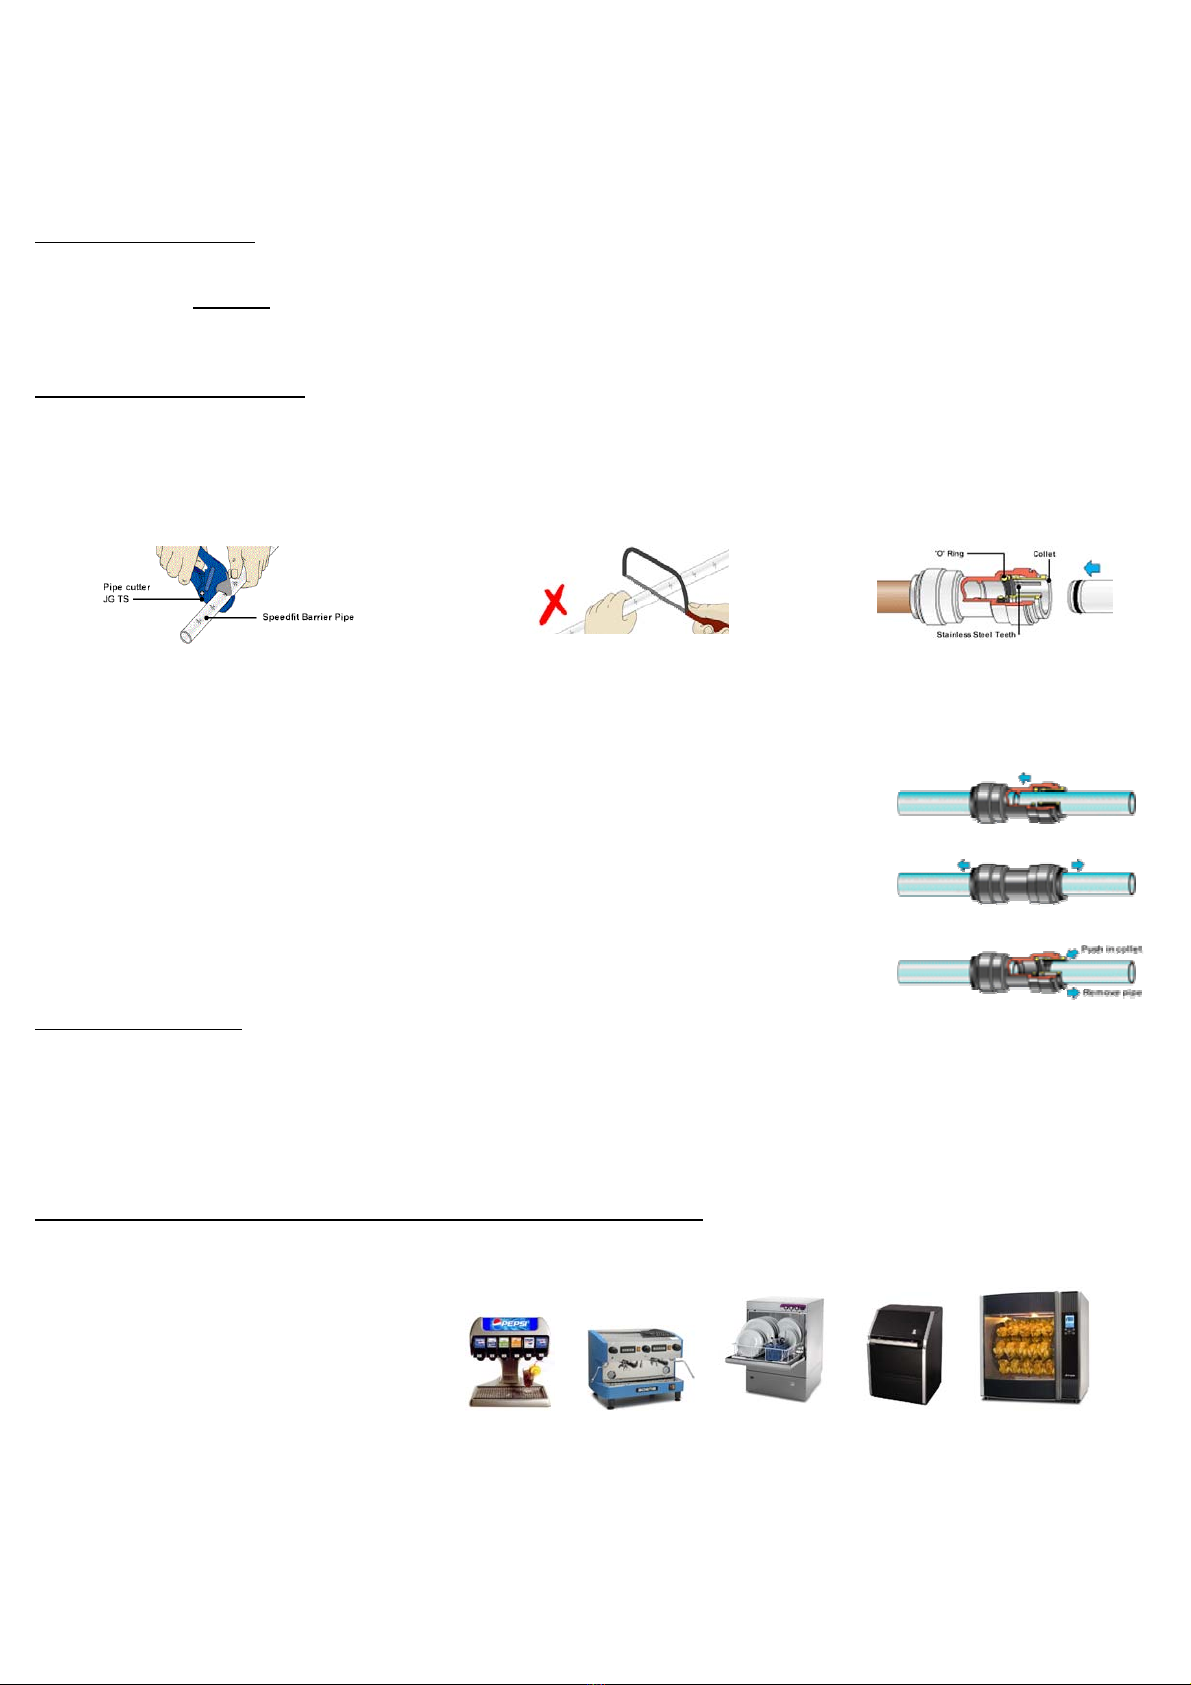
6.1 QUICK INSERT PUSH IN FITTING
Tube connection has never been easier than with Xsential quick connect fittings.
NOTE: Fittings and tube should be kept clean, bagged and undamaged before use.
Step 1 - Prepare the connection:
Cut the tube square ensuring it is free of score marks. We recommend the use of one of the tube cutter for a perfect cut. For soft or thin walled plastic tube we
recommend the use of a tube insert.
Do NOT use a hacksaw
NOTE: To avoid damage to the 'O' Ring, make sure
burrs and sharp edges are removed from the cut end of
the tube.
Do not insert fingers into the fitting as the
stainless steel teeth may cause injury.
With the fitting clean and undamaged and the tube cut square, you are now ready to make the connection.
Step 2 - Assemble the connection:
Push the tube into the fitting, until the tube stops. The collet (gripper) has stainless steel teeth which holds the tube
firmly in position whilst the 'O' Ring provides a permanent leak proof seal.
Pull on the tube to check it is secure. It is good practice to test the system prior to leaving site and/or before use. It is
recommended (and good practice dictates) that you remember to pressure test the completed installation before use.
Disconnecting standard push-in fittings:
Ensure system is depressurized before removing fittings. Push the collet in against the tube (center of the fitting). With
the collet held in this position the tube can be removed. The fitting can then be re-used.
7.0 START UP PROCEDURE
1. With everything connected, turn on the ball valve.
2. Open faucet.
3. Check for leaks. (If anything is leaking shut off water, repair, then start with step 1 again).
4. Within a few seconds the water will start to run.
5. Let the water run for 10 minutes. This flushes out any carbon fines.
6. The system is now ready to be used.
7. Check for leaks daily in the first week and periodically thereafter.
8.0 OTHER WATER APPLIANCE PROTECTION RANGE OF XSENTIAL WATER FILTRATION
There are many appliances that require water of good quality. These appliances include combi-steamer ovens, coffee machines, ice makers, hot water urns, post
mixers, dishwashers and other water feed appliances. A good quality water filtration system will help;
•Reduce sediment, rust and sand particles
•Reduce unpleasant taste and odour
•Prevent corrosion
•Reduce chlorine
•Prevent scale build up
Contact Xsential on 1300 366 295 or visit www.xsential.com.au for details of other products
Xsential Pty Ltd
78 Daly Street Belmont Western Australia 6104
Ph: 1300 366 295
www.xsential.com.au

Other Xsential Water Filtration System manuals

Xsential QuadRO Manual

Xsential

Xsential QuadRO Manual

Xsential XSGH-200F User manual

Xsential

Xsential XSGH-200F User manual

Xsential AX5-TS User manual

Xsential

Xsential AX5-TS User manual

Xsential FRONTIER XBB20-FT300 User manual

Xsential

Xsential FRONTIER XBB20-FT300 User manual

Popular Water Filtration System manuals by other brands

JRC NSVA352 manual

JRC

JRC NSVA352 manual

Antunes VZN-500 Series owner's manual

Antunes

Antunes VZN-500 Series owner's manual

PET Ecoflo ST-500 owner's manual

PET

PET Ecoflo ST-500 owner's manual

Clean Water Systems 7500 Series Installation & start?up guide

Clean Water Systems

Clean Water Systems 7500 Series Installation & start?up guide

GCTek AquaBead instructions

GCTek

GCTek AquaBead instructions

Du Pont WFQTR13000 Series installation instructions

Du Pont

Du Pont WFQTR13000 Series installation instructions

Zip HydroTap G4 installation instructions

Zip

Zip HydroTap G4 installation instructions

TLV DC3A instruction manual

TLV

TLV DC3A instruction manual

Swim & Fun 1927 user manual

Swim & Fun

Swim & Fun 1927 user manual

Pentair FULLFLOXF F Series Installation and user guide

Pentair

Pentair FULLFLOXF F Series Installation and user guide

Aquasana Rhino Well 1 Water with UV owner's manual

Aquasana

Aquasana Rhino Well 1 Water with UV owner's manual

Sullair OWS-88 User & service manual

Sullair

Sullair OWS-88 User & service manual

Pentair Pool Products TR 40 Installation & user guide

Pentair Pool Products

Pentair Pool Products TR 40 Installation & user guide

Pentair OMNIFILTER OT32 installation instructions

Pentair

Pentair OMNIFILTER OT32 installation instructions

Daikin EKAFV100F Series installation manual

Daikin

Daikin EKAFV100F Series installation manual

Zodiac TRi Series Instructions for installation and use

Zodiac

Zodiac TRi Series Instructions for installation and use

Cintroclear UF 400 installation instructions

Cintroclear

Cintroclear UF 400 installation instructions

Clean Water Living Water VORTEXer user guide

Clean Water

Clean Water Living Water VORTEXer user guide

manuals.online logo
manuals.online logoBrands
  • About & Mission
  • Contact us
  • Privacy Policy
  • Terms and Conditions

Copyright 2025 Manuals.Online. All Rights Reserved.