XtendLan IP SENSOR ESZ-162 User manual

ESZ-162
USER MANUAL

Warning:Anychangestothisequipmentwithoutpermissionmaycausedamagestoyourequipment!This
equipment has been authenticated byFCC and CE, it can be preventedfrom theinfluenceof harmful
electronicjammingin normal business use condition.
IMPORTANT NOTICE
1. IP SENSOR ESZ-162 is only designed for splash-proof shell. Wehave no responsibilityfor the
possible damagecausedbybadlyworkingenvironment
2. PleaseusetheDC adapterprovidedbythedealer,we haveno responsibilityforthepossibledamage
causedbyusing other adapter
3. Do not use IP SENSOR ESZ-162 in strongshaking condition.
4. Please contact the dealer if IP SENSOR ESZ-162 worksimproperly.
Copyright©2006 XtendLan. All rights reserved.No part of this publication maybe reproduced, storedin
a retrieval system, or transmitted in anyform or by any means, electronic, mechanical, photocopying,
recording or otherwise, without the prior written consent of XtendLan
All other products mentioned in this document are trademarks of their respective manufactures.

-3-
Table of Content
1. INTRODUCTION................................................................................................................4
FEATURES .........................................................................................................................
ESZ-162 FUNCTION DESCRIBE
................................................................................................
2.SPECIFICATION...............................................................................................................6
PACKAGECONTENTS.........................................................................................................
MINIMUMSYSTEMREQUIREMENTS ....................................................................................
3.INTERFACE DESCRIPTION ..........................................................................................7
4.HARDWARE & SOFTWARE INSTALLATION............................................................8
HARDWAREINSTALLATION..................................................................................................
SOFTWAREINSTALLATION..................................................................................................
5. INITIAL SETTING...............................................................................................................9
INITIALSETTINGTHROUGHETHERNET ................................................................................
READMESSAGEFROMRS232 SERIAL-PORT.......................................................................
6. CONTROL AND SETTING THROUTHTHE INTERNET EXPLORE...................... 10
STATEREPORT..................................................................................................................
SETTINGTHEIP ADDRESS…………………… ………………………………………………
SETTINGTHEDDNS..........................................................................................................
SETTINGTHEE-MAIL.......................................................................................................…
SETTING THE PASSWORD………………………………………………… …………… …..
NETWORK AKE UP FUNCTION.………………………… ……………………………………
SNMPSETTINGS……………………………………… ……………………………….. ….
MONITORINGSETTING……………………… …………… ………… ……… …… ……..
EXTERNALVOLTAGELEVELMONITORING…………… ……………… ……… …… ……..
ONLINEFIRMWAREUPDATE………………………………… …………………………. …
7. CONTROL AND SETTING THROUTH HTTP COMMAND..................................... 20

-4-
1. introduction
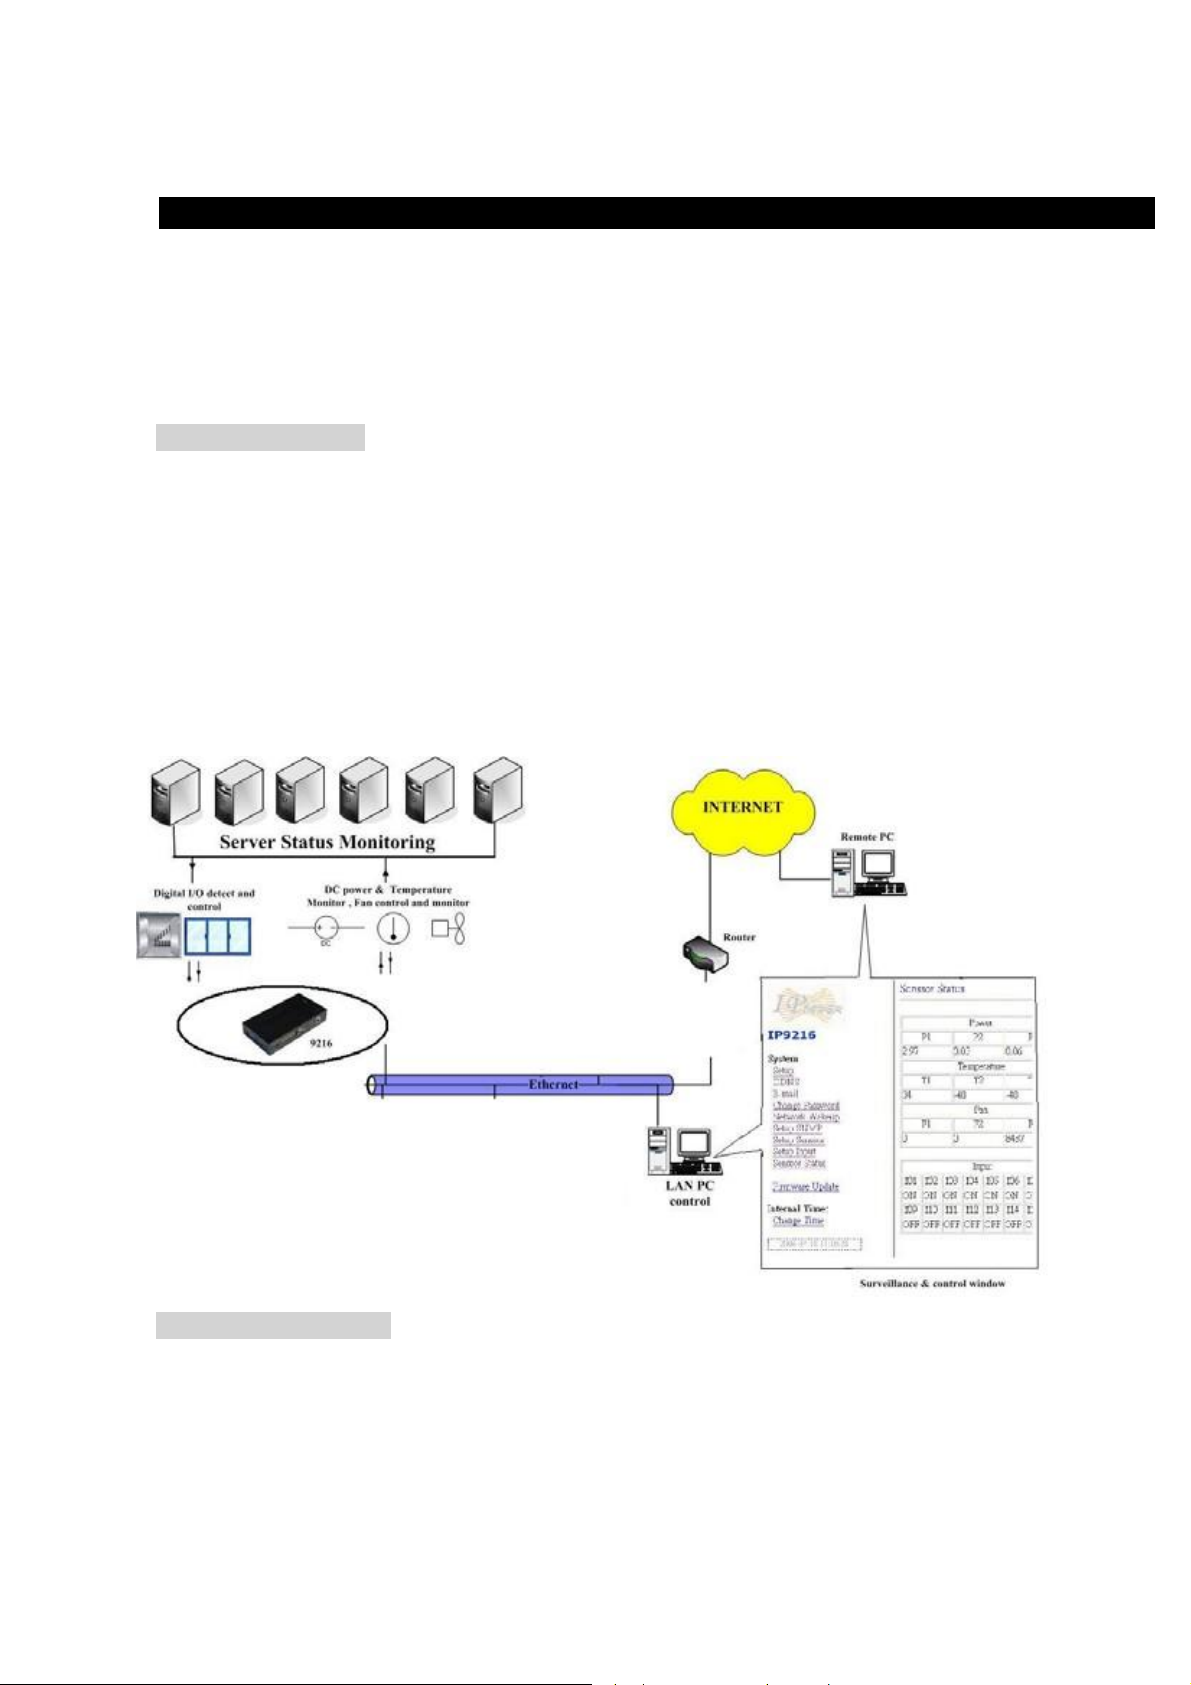
IP SENSOR ESZ-162 is a web sensor with build-in web server which can be easy used in the industry
supervise filed. With the remote net control technology, user can get the IO state of remote equipments,
monitoring the voltage, temperature or working state of power supply directly in remote. User can start the
fan and when the fan is not working properlyit willmakean alarm automatically.
Usercando thisin anycomputer connectedto the internet or localarea network, no needforanyspecial
program or computer.This designis easyto use, is fit for the office/industryautomation or housesecurity
manage.Otherwisethe populardeveloptoolVB/VCis providedforusertomodifytheapplicationsaccordingto
your own needs.
Feature
1. Builtin web server, can be used through the Ethernet network or Internet network withoutcomputer.
2. Supported 10/100M Ethernet and TCP/IP UDP,ICMP, DHCP, HTTP protocol.
3. Builtin network browser interface, you can remote receive or triggerthesignalof drycontactoperatethe
switch and check thestate. Support multi platform and server application,such as InternetExplore,
Netscape,Mozilla(Linux).
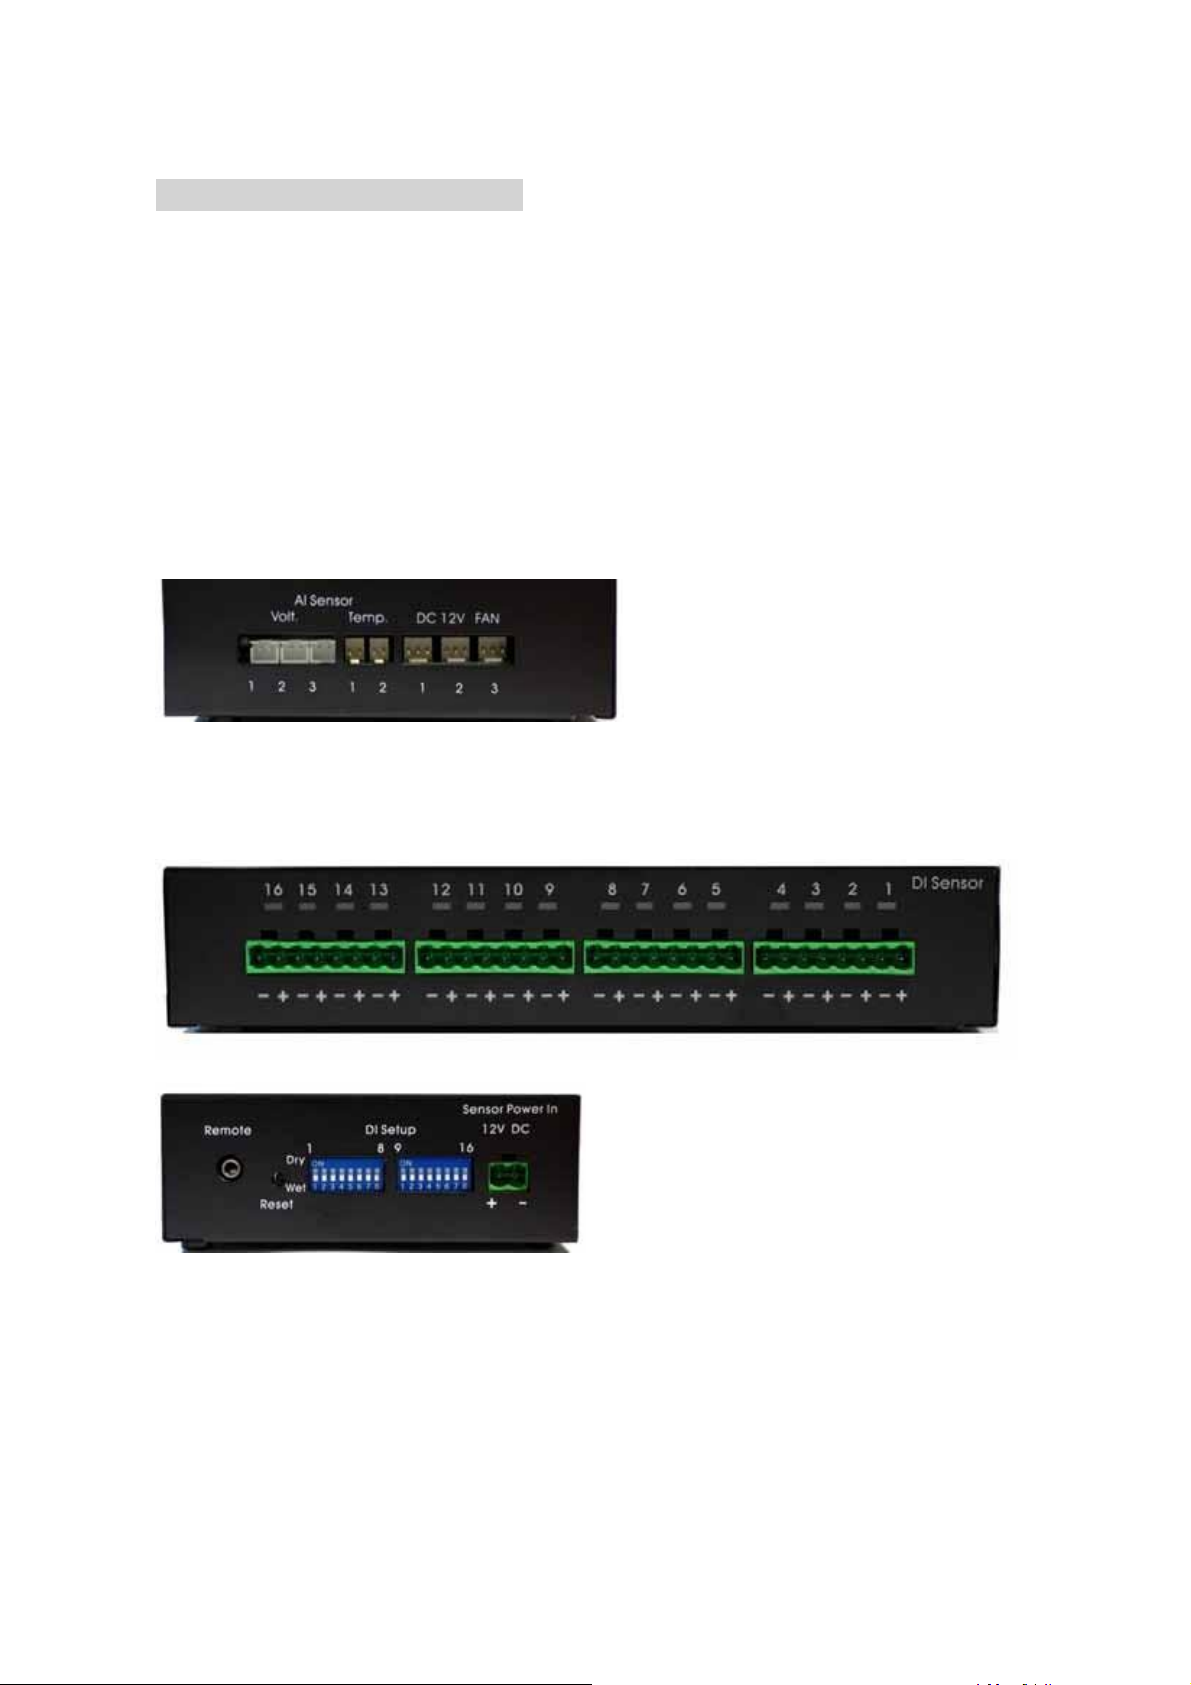
4. 16 route input digitalsignals monitoring, 8 input signals can be setto drycontactor wet contact.
5. 3 routeDC voltagemonitoring, ESZ-162 will alarm if voltage is outof presetnormal range.
6. Controlthestartupandturnoff of 3routefan,monitoringtheoperationof eachfan,ESZ-162willalarm if rotate
speedis lower than the presetlower limit.
7. 2 route temperature monitoring, ESZ-162 will alarm if temperatureis higher than the preset normal range.
8. Supported HTTP, SMTP,SNMP,INTERNET-fixedIP,DDNS, DHCP,LAN–virtualIP
9. Security passwords identify. Easilyinstalled andcanbe updated online.
10.Supported serial portcommunication, indicate all kinds of real time stateof ESZ-
162. 11.Supportedhttp command.
12.Built in Watch Dog.
13.LEDdisplay indicates the status.
14.Develop tool SDK (VB/ VC) is provided.It can be modified to meet theuser’s specialneed.
15.Safely designed for high voltage resistance and protection for leakage of electrical currency, using
nonflammablematerial
16.Polarityprotective—no damage to yourequipmentif you reverse the polarity in installation.
17.It canbe usedseparatedor associated with other series products of XtendLan.

-5-
ESZ-162function describetions
1. Voltagemonitoringof ESZ-162
ESZ-162canmonitor3standardvoltageof 12V,5V,3V.Whenthese3 under monitoringvoltagearebeyondof
the predetermined upper limit or lower limit,the buzzer will make an alarm as enable .
2. Temperaturemonitoringof ESZ-162
ESZ-162can monitor 2 route temperaturesignals.The monitoring temperature can be predeterminedbyuser.
T1 is the temperaturesensorfor ESZ-162 circuitboard,canindicatethe owntemperature of ESZ-162.T2 and
T3is outlet temperature sensors,the temperature will displayto -48 degree if the sensor has not been
connected.When anyof the 3 sensor’s temperatureis beyondof thepredeterminedupperlimit,the buzzer
willmakean alarm (if thisalarm functionis notforbiddenbyuser).Onlywhenthetemperatureis lower than
theupperlimitagain,the alarm will stop.
3. Fanmonitoringof ESZ-162
ESZ-162canmonitoring3 route fan ( DC fan,12V/0.5A),if the workingfan’s rotate speed is lower than the
preset value, the buzzer will make an alarm(if this alarm functionis not forbidden byuser)
4. 16 route inputsignals monitoring
ESZ-162canmonitor 16 route inputsignals; user canget the voltage lever of eachroute signal. There are 8 dry
contacts(DI01–DI08),DI09–DI16canbesetto drycontactor wetcontact.Whenaportis settodrycontact,
ESZ-162 willsupplyDC 5V to contact,monitoring if there is an externalswitch on or switchoffmovement.
5. Monitoringthrough RS232 serial-port
User can monitor the working state in each portof ESZ-162 throughthe RS232serial-port.
6. E-mailreport
When ESZ-162starts up or the presetalarm event happens, ESZ-162 can automaticallysend e-mail
reportto the mailbox preset by user.
7. Settingthe passwordand IP
Usercansetthe password and IP addressof ESZ-162, supporting control multiple ESZ-162s in one local
network.

-6-
8. Settingthe buzzer
User can turn off the buzzer in setup webpage, then buzzer will not alarm . User can turn off the alarm in one
monitoring item, so when this monitoring item reach the alarm level , ESZ-162 will not alarm. When one or
multiple monitoring item trigger the alarm, you can cancel the alarm by pressing the alarm reset button, but
whenthese
monitoring item reach the alarm level again, the buzzer will make an alarm again.
9. LED display
ESZ-162candisplay its workingstate through thedigital LED, for example:
Displayfrom left to right :
IP , 192 , 168 , 100 , 99 , 80 , P1 , 3.00, P2, 0.03, P3 , 2.00 , T1, 29 , T2 , -48 , T3, -48, F1, 3824,
F2, 3633, F3, 0 .
* IP : means following willdisplay the IP address of ESZ-162. IF following displays 192, 168, 10, 100 : 50
(in 5 times),it meansthe IP addressof ESZ-162is 192.168.10.100: 50.
* V1 V2 V3 : means following willdisplaythe voltage valuesof 3 routemonitoringvoltage.
* T1T2 T3: means following will displaythe temperature valuesof 3 route monitoringtemperature(in degree
centigrade, C)
* F1 F2 F3: meansfollowing will displaythe rotatespeed of 3 routemonitoringfan.
2.Specification
ESZ-162E package contents
One setof ESZ-162
One1A,110~220V power adapter
2 temperaturesensors
3 voltage sensor wires
Minimum System Requirements
■
Intel Pentium III 300MHzor above/compatible AMD CPU
■
WINDOWS operating system (IE5.0+SPI) & LINUX
■
Minimum 64MBRAM
■
VGA Card:supported direct draw
Network card with RJ45 port & Ethernet HUB or Switcher
■
Internet network (Ethernet, ADSL or other ways, depends on whether you need far end control ability or
not)

-7-
3. Interface Description
Interfaceof ESZ-162 is as thefigureshows:
Description of each port:
1. RJ45Ethernet port 2. RS232 serialport
3. LED board 4. DC 12V input
5 Portof Fan3 6. Portof Fan2
7. Portof Fan1
9. Portof temperaturesensor2 8. Portof temperaturesensor 3
10. Portof voltage sensor 3
11. Portof voltagesensor 2 12. Portof voltagesensor1
13. DI1 ~ 4 port 14. DI 5 ~ 8 port
15. DI 9 ~D 12 port 16. DI 13 ~ 16 port
17. DI for 12V : Internal debug purpose.
18& 19 : . SW 1 & SW2 - Setting the type of DI9-DI16contact to dryor wetcontact.When SW2 is on, the
respondingcontactis wet contact;when SW2 is off,the respondingcontactis drycontact.
SW1 is responding to DI9, SW2 is responding to DI16 (each contact needs the setting
of SW1 and SW2 at the same time)
For Example :
A. Set DI 9 & 13 as drycontact :1 –ON , 5 –ON , 1- ON , 5 –ON .
B. Set DI 10 & 14 as wet contact :2 –OFF , 6 –OFF, 2- OFF , 5 –OFF .
20. Alarm reset button: when alarming, press this button to turn off the alarm of buzzer.
(Keeppressing for10secondswillsettheIPaddressandpasswordof ESZ-162 backtofactorydefault)
21. Internal debug purpose.

-8-
4. Hardware & Software installation
Before you star to useIP SENSORESZ-162,pleasefollowthe steps below
■
Check the package to make sure the contents is complete.
■
prepareone Ethernet HUBor Router
■
Check the voltage of thepower supplyto makesureit is AC 110-240 volt
Hardwareinstallation
1 Connectthe ESZ-162to HUB throughnetwork wire.
2 Connectthe HUB or Routerto theinternet (MaythroughADSL/XDSLmodem).
3 Connectthe power adapter to the ESZ-162.
4 Connect the power adapters of under controlelectricequipmentto corresponding
outport of ESZ-162.
* ESZ-162 HUB XDSL or * ESZ-162 HUB / ROUTER XDSL
Turnon your computer and the power adapter of IP SENSOR ESZ-162.
Software installation
HavingconnectedthepowersupplyandnetworkwirewithRJ45porttotheESZ-162,pleaseinstallthe
softwareas thefollowsteps:
1. Start yourcomputer,puttheinstalldiscin theCDROM,andthenfindthefilenamedipedit.exe inthe
installdisc.
2. Copythefileto desktopor any directory you want save to.
Start the initial setting process following the construction in nextsection.

-9-
5. Initial Settings
Initial setting through the Ethernet
1. Double click the Edit.exe :
2. All the IPs in thesame subnet of the Ethernet
willbe found and be displayin the window bythe
software.
The default name of IP SENSORESZ-162 is IP
TERMINAL.
The default IP address of ESZ-162 is fixed at
192.168.100.100.
3. Click the equipment‘s name that you want to edit in the left of the window; it will turnfuscous,the
equipment’s nameandIPaddresswilldisplayinthewindows,youcanrename(usenumbersand letters).After
that,click the update button and the new setting will be work in 20 seconds.
4. Doubleclickthenameoftheequipmentyouwanttocontrol,theIE browserwindowwillopenandconnected
tothisequipmentin thatEthernetautomatically. Youalsocantype theIPaddressof the ESZ-162intheIE
browser to open the web pageof ESZ-162.Wesuggestyouto updatethe IE to version6.0withSP1 or
higher if yourIE notices you thesecuritylevel is too low to openthat webpage.
NOTICE:
1. IP Sensor ESZ-162 defaultsettingisfixedIP address:192.168.100.100.TheIP addressof your
computer shouldin thesamesubnetwiththatof IP SensorESZ-162,so thatyoucanopenthe
controlwebpage.In
the figureabove,theIP addressof ESZ-162 is 192.168.100.168. You can make sure theIP address of
your computer first, thenuse the ipedit.exe to modifytheIPaddressof ESZ-162.after that,
your computer can connect to theESZ-162.
2. IF user can not enter the control web page, please set theIP address of IP Sensor ESZ-162 and
your computer in the same subnet. User canobtain thecomputer’s IP address,subnetmask,and
default gateway through the following method.
start run typein “cmd” then open the MS –DOS window, now typein “ipconfig”

-10-
The last number of the IP address(default is 100) canbe any number between1~254, but cannotbe thesame
withthatof thecomputer’s. If youwantto useit at home,you can enter theweb page bytyping in the IP, theIE,
or using ipedit.exeprogram.
*Same subnet : means the firstthreepartsof the IP addressmustbe the same, such as XXX.XXX.X.abc. For
example,192.168.1.100 and 192.168.1.123 are in the samesubnet.
4. The default username and password of IP Sensor ESZ-162
are: Username: admin
Password: 12345678
If forget password and can not log in webpage, please press Reset for 10 second , after few second
then restart power . Then the IP address and password will be back to default value
Read message from RS232 serial port
Usercanreadthe system state of ESZ-162 in PC through theRS232serial port in ESZ-162.
First,connectthe ESZ-162 serial portto PC serial port and make sure theconnection is correct.
Then,click the start menuin your PC,program---accessories---communicate---super terminal,setting as
the figurebelow shows:
* Bits per second ;19200
* Data bits : 8
* Parity:None
* Stopbits: 1
* Flowcontrol : NONE
Then you can read message of ESZ-162from RS232serialport.

-11-
6. Control andsettings through the Internet Explore
TypethenewIPaddressofIPSensorESZ-162in theaddressfieldandyoucanentertheloginwebpage.Input
the defaultusername admin and password 12345678, or the passwordsetby you own, click the OK and
then you can enter theWebControlpage.
State report of ESZ-162
You can enter the state reportwebpageafter you enter the user nameand password. Or you canclick the
“SENSOR” buttonon the left of the webpageto enter the statereport webpage.

-12-
1. Power (Voltage) monitoring
Thefirstcolumnon therightside of the webpageis voltagemonitoring((Maximum current for P1 is 4V ,
for P2 is 5.8V,for P3 is 15.5V), displaying the real timevalue of 3 DC voltages. User canset the value in
setupsensorsub-webpage.User cansettheupperlimitand lower limitof thevoltageor turn on/ off the alarm.
2. Temperaturemonitoring
in the temperature monitoring column on the right side of the webpage, it displays 3 sets of real time
temperature value( 2 sets of external temperature monitoring, 1 set of circuit board temperature monitoring).
Usercansettheupperlimitwhenmakean alarmand the lowerlimitwhenalarmstop,or turnon /offthealarm.
3. Fanmonitoring
in thefanmonitoringcolumnon therightsideof the webpage,it displays 3 sets of realtime rotatespeed.User
can setthe lower limit of rotate speed whenmake an alarm or turn on/ off the alarm.
4. external digital voltage levelmonitoring
It is used to monitor the voltage in 16 route digital input port. is high level or low level. DI 9—16 can be set to
DRY or WETcontact.
IP settings of ESZ-162
TheIPsettingsofESZ-162canbemodifiedthroughXtendLanNetworkAssistantormodifyit inthewebpage.
Click thesetup optionon the leftof the webpage; you can enter the IP setting webpageas thefigurebelow
shows:
Please fillin the new IP address,subnetmask,defaultgatewayetc.
Notice:when finish setting, you need to click submit button to confirm your settings.
1. IP address
Fill the newIP address youplan to useforESZ-162 in the IP Address column.ThenewIP addressof ESZ-162
mustbe in the same subnet with the PC, so the PC can control ESZ-162. for example, if the IP address
of your PC is 192.168.10.110, subnet mask is 255.255.255.0, the IP address of ESZ-162 should be set to
192.168.10.XXX (XXX is from 1-255, and the IP address has not been occupied by other PC or equipments
in the same subnet) .
2. DefaultGateway
if you local network is connect to the internet through router address mapping or gateway and you want to
controlthe ESZ-162 through internet, you should fill the correctgatewayaddress in the Default Gateway
column.

-13-
3. DNS Server
In order to make ESZ-162 can sent state report E-mail through the Internet, you need to fill the correct DNS
IP address in DNScolumn. Pleasereferto your ISP for DNSIP address.
4. DHCP
If your local network has a DHCP Server, you can choose to use DHCP server to gain IP address
automatically. But the IP address of ESZ-162 will change after every start, it is not good for the use of
some advanced functions.
5. Buzzersetting
There is a buzzer on the circuit board of ESZ-162, the buzzer will alarm when the monitoring item is
abnormal. If you don’t like its alarm, you can disable the buzzer in the BEEPER column or choose enable
to turn on the buzzer.
6. cookie
you can select the web server to use cookie method or cookie + base64 method. We suggest user to use
cookie + base64method.
DDNS Setting
DDNS Server Settings: when your network connects to the Internet through ADSL, the IP address you gain is
dynamic assigned by your ISP. So the visitor maybe can not visit the ESZ-162 in local network because don’t
know its IP address. We use DDNS method to solve this problem. Let’s explain that using the DDNS
service provided by www.dyndns.com:
First,we applya domain name in www.dyndns.comforESZ-162,setthe domainpassword and select propel
DNS server (for example, dnsdojo.net) for domain name resolve. Then input the Domain Name Server
(host name), user name, password etc in the DDNS webpage of ESZ-162. after that, every time ESZ-162
start or user select to submit, ESZ-162 will send a message package including its current IP address, domain
name to www.dyndns.com, then the DNS server you choose will link the domain name of ESZ-162 to its
current IP address. So , the visitor can visit the ESZ-162 webpage by input the domain name of ESZ-162 in
the addresscolumnin browser.
Notice: when finish setting, click SAVE button to confirm it. And click UPDATE NOW button to send
DDNS message package to DDNS Server immediately.

-14-
1. DDNSIP
Pleasefill in the IP address of DDNS Server and port number.
2. Domain
Pleasefill in your total domainname in Your Domaincolumn.
3. DDNSuser
Pleasefill in the DDNS domain name you applied here.
4. DDNSpassword
Pleasefill in the DDNS password here which you set in applying domainprocess in DDNSServer.
5. EnableDDNS
Youcanselect trueto enable DDNS functionor selectfalseto disenable it.
6. Proxyserversetting
Sometimes the message package can not send to DDNS directly, you can transmit DDNS message package
through proxy server. You can use the proxy server by selecting TRUE in Proxy enable column. You can find
the usable IP address and port of proxy server in some BBS, or you can use some proxy server searching
softwareto search for usable IP address and portof proxyserver.
7. PROXYIP
Pleasefill in the IP address of proxyserver here.
8. PROXYPORT
Pleasefill in the proxyport here.
E –MAIL settings
ESZ-162 can send E-mail to user to report its working state, such as starting or abnormal monitoring object,
and also can report its InternetIP addressthroughE-mail.
Notice: when finish E-mail settings, click SAVE button to confirm the settings, click SEND button will
send a E-mail immediately.

-15-
1. set theoutgoing mail server (SMTP)
2. set theincoming mail server (POP3)
3. set theusernameof mailbox
4. set thepassword of mailbox
5. set thesender name of the mailbox
6. set the mailbox to receive the incoming E-mail
Change the password
Click the change password button on the left of the webpage will let user to change the password of ESZ-162.
The defaultpassword is admin.
Network wake up function
User can use the network wake up function of ESZ-162 to wake up the PC than in the same subnet with
ESZ-162. Click the network wakeup button on the left of the webpage to enter the Network Wake Up Setup
webpage.Fill in the MACcolumnwiththeMACaddressof the PC youwantto wakeup andclick sendbutton,
ESZ-162 will send a network wake up message package. Click the save button, ESZ-162 will save the MAC
address for futureuse.

-16-
NOTICE:userneedto enablethe‘network wake’ and‘PCI wakeup’ optionin BIOS settingsof the PC you want
to wake up. Wealsosuggest user to select ‘former statues’ in ‘power on (manage) after power failure’ option in
BIOSsettingsof the PC,otherwisethenetwork wakeup function will not work if thepowerof the PC havebeen
turned off or thePC have been turned off abnormally.
SNMP settings
ESZ-162 can sent SNMP data packages to SNMP server appointed by user, reporting the working state of
ESZ-162in these SNMP data packages for the user to manage it directly.
Click the SNMP setup option on the left of the webpage to enter the SNMP setup webpage. Fill the IP address
of SNMP server in the TRAP IP column, select enable in Enable trap option and then click submit button to
confirm these SNMPsettings.
NOTICE: if ESZ-162 can not detect the SNMP in the corresponding IP address and gain the MAC
address of SNMP server, the SNMP data package will not be send out. Now the user can not use the
head off tool to debug SNMP.
SNMP command format : ESZ-162 support SNMP V1 and V2 , user can use snmp program to get the
status of each port in ESZ-162.

-17-

-18-
Monitoring settings
Click the setupsensor button on the leftof thewebpageto enter themonitoring settingswebpage.Usercanset
the values of monitoring voltage, temperature and rotate speed etc. the up limit and lower limit of alarm is
calculated according to the percentage of set value. For example, if you monitoring voltage is 3.3V, the up limit
is 20%, the lower limit is 10%, then the up limit alarm voltage is 3.3V+3.3*20%=3.96V, the lower limit alarm
voltageis 3.3V-3.3*10%=2.97V.
1. voltage monitoring
ESZ-162canmonitor3 routeDC voltages.ThehighestallowedmonitoringDC voltageof P1 is 4V,P2 is 5.8V,
and P3 is 15.5V. User can set the monitoring voltage, up limit and lower limitin thisrange.If input voltage is
higher thantheuplimitorlowerthanthelowerlimit,ESZ-162willsendSNMPalarmdatapackage.If the
beeperis enable, thebeeper willalarm. If the monitoring voltagebacks to the normalrangeor user press the
resetbuttonon the rightof ESZ-162,thealarm will stop. If any other monitor itemstrigger the alarm,the
beeper will alarm again. Notice: if the input voltage exceeds theallowedhighest value, it maycausedamage
to your hardware.
2. Temperaturemonitoring
ESZ-162 can monitor 3 route temperature sensors. T1 is the temperature sensor on the circuit board of ESZ-
162. T2 and T3 are external temperature sensors. User can set the standard temperature of each
sensor, if environment temperature of sensor is high than the preset up limit, ESZ-162 will send SNMP data
package. If the beeper is enable, the beeper will alarm. If the monitoring temperature backs to the normal
range or user press the resetbuttonon the right of ESZ-162,the alarm will stop.
Notice: if the sensors are not connected, the temperature displayin the webpage will be
–48 °C.
3. Fanmonitoring
ESZ-162canconnect to F1,F2andF3 DC 12V fans,andmonitor thererotatespeeds. If the rotatespeed of
fanis lowerthan the alarm lowerlimit,ESZ-162 willsendSNMPalarm data package.If thebeeper is enable,
the beeper

-19-
willalarm.If the monitoringrotatespeedof fanbacks to the normalrange or user press the resetbuttonon the
rightof ESZ-162, the alarm will stop.
external voltage level monitoring
ESZ-162 has 16 IO ports which can be used in monitoring external voltage level. Among them, DI1-DI8 are
wet contacts, can detect the input voltage level is high or low. SW1 and SW2 together control the type
setting of DI9-DI16. When SW is set to ON, the corresponding contact is wet contact, detecting the input
voltage level. When SW is set to OFF, the corresponding contact is dry contact, detecting the circuit between
corresponding IO port is turn on or turn off. SW1 is corresponding to DI9 and SW2 is corresponding to DI16.
(The setting of each contact needs the twoswitches, SW1 and SW2,to work together)
If DI is wet contact, it can be set to alarm at high voltage level (alarm option set to OFF), alarm at low voltage
level(alarm optionset to ON) or not alarm (alarm set to disable) 3 states.
If DI is drycontact,it can be set to alarm at circuitturnon (alarm option set to OFF),alarm at circuit turn off low
(alarm optionset to ON) or not alarm (alarm set to disable) 3 states.
Firmwareupdate
User can gain more function forIP Power 9258 throughfirmware update.
Click the firmware update on therightsideof the page, it willpop up the following window
Click update button, it will popup the following window

-20-
Click the Brower button to find the correspondingupdatefile(you candownloadit from our website or ask it
from the dealer),thenclick Updatebutton to startupdatefirmware.Whentheupdateis finished, youmust wait
one minutebefore you restart theIP SensorESZ-162.
7. Controlandsettingthrouth HTTPCommand
User can read the value of ESZ-162 from HTTPcommand ,the format of http commandas follow :
http://username:password@xxx.xxx.xxx.xxx/Set.cmd?cmd=xxxxxx
the Definition of each part in command ;
username:ESZ-162 username,factorydefault value is
admin. password:ESZ-162 password , factorydefault
valueis admin.
XXX.XXX.XXX.XXX : IP address of ESZ-162
Set.cmd?cmd=xxxxxxxx as commandformatas ESZ-162.
Commandas follow:
Command Description
GetInput16 : read status of DI
GetVolt : read statusof voltage
GetTemp : readstatus of temperature
GetFan : readstatusof fan
example:
ESZ-162IP address is 192.168.100.99
type following command
http://admin:12345678@192.168.100.99/Set.cmd?cmd=GetInput16
you will get the following result:
Input:I1:1,I2:1,I3:1,I4:1,I5:1,I6:1,I7:1,I8:1,I9:0,I10:0,I11:0,I12:0,I13:0,I14:0,I15:0,I16:0,
1 means high voltage 0 means low voltage
so Input1~8 is high voltage and Input 9~16 low voltage.
Table of contents
Other XtendLan Accessories manuals
Popular Accessories manuals by other brands

Sandberg
Sandberg 24000 quick start guide

IntelliSense
IntelliSense DT-700 DUAL TEC installation instructions

SCENTED INTERIORS BY DESIGN
SCENTED INTERIORS BY DESIGN MINI 150 user guide

INIM Electronics
INIM Electronics Air2-MC200 Installation and programming manual

Steren
Steren COM-563 instruction manual

HQ-Powerkites
HQ-Powerkites Montana 6 manual