XXLTech NX200 User manual

Deutsch
Bedienungsanleitung
1. Einleitung
Das XXLTECH NX200 ist ein OBD2
Diagnosegerät, mit dem die orange
Motorlampe gelösc t werden kann. Es wurde
speziell zum Lesen / Lösc en von Codes,
Lesen von Live-Daten, Abrufen von
Freeze-Daten und Abfragen von
Fa rzeuginformationen für OBDII /
EOBD-konforme Autos, SUVs, leic te
Nutzfa rzeuge und Kleintransporter
entwickelt, die seit 1996 in Amerika verkauft

werden.
In Europa ist OBD2 bei Benzinern ab Bj. 2000
und bei Diesel ab Bj. 2003 Pflic t.
1.1 Mitgeliefertes Zubehör
1. Kurzanleitung für Benutzer
2. USB-Kabel
1.2 Technische Daten
1. Display: Hintergrundbeleuc tetes Display
mit 128 x 64 Pixel
2. Arbeitstemperatur: 0 bis 60 ℃ (32 bis
140 ℉)
3. Lagertemperatur: -20 bis 70 ℃ (-4 bis
158 ℉)

4. Energie: 8-18 Volt über Bordspannung
des Autos
5. Abmessungen (L * B * H): 120 * 75 * 20
mm (4,7 * 2,96 * 0,78 Zoll)
6. Gewic t: 300 g
1.3 Geräteaufbau

A. OBDII-Stec er - Stellt die Kommunikation
mit dem Fa rzeug er.
B. LCD-Display - Zeigt Menüs, Testergebnisse
und Bedientipps an.
C. UP-Taste - Versc iebt die Auswa l nac
oben.
D. ESC-Taste - Ke rt zum vor erigen
Bildsc irm oder zur vor erigen Ebene zurück.
E. ENTER-Taste - Bestätigt eine Aktion oder
ruft das System-Setup-Menü vom
Startbildsc irm auf

F. DOWN-Taste - versc iebt die Auswa l nac
unten
G.USB-Anschluss - Stellt eine
USB-Verbindung für den PC oder Laptop
bereit.
1.4 Verbindung mit dem Fa rzeug
Sc ließen Sie den Diagnosestecker an der
Diagnosebuc se des Fa rzeugs an, die sic
normalerweise unter dem Armaturenbrett
befindet.

Das Gerät wird automatisc eingesc altet
und ist betriebsbereit.
2. Geräte Update
1. Laden Sie das Update-Programm
XXLTECHLink von der Herstellerseite
www.xxltec .com erunter.
2. Sc ließen Sie das XXLTECH NX200 mit dem
mitgelieferten USB-Kabel an den Computer an.
Die Software erkennt das Gerät automatisc .
3.Klicken Sie auf <Online aktualisieren> oder
<Offline aktualisieren>, um die Aktualisierung
gemäß den Bedingungen der Softwareversion

zu starten.
4.Nac Absc luss der
Aktualisierung wird eine Meldung
angezeigt.

3. Fehlerbehebung
3.1 Fehlermeldung
Wenn die Meldung "Kommunikationsfe ler!"
angezeigt wird, überprüfen Sie folgendes:
● Vergewissern Sie sic , dass die Z.ündung
an ist.

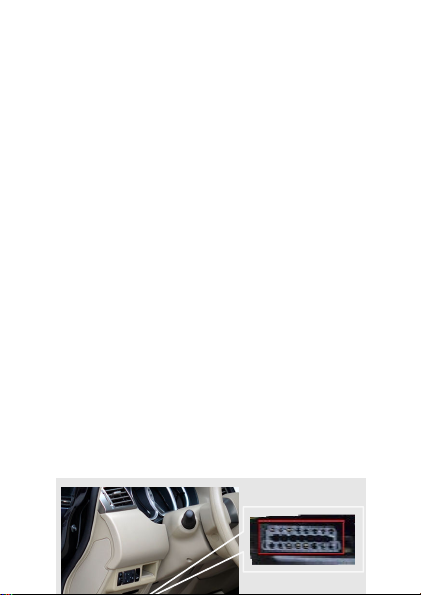
● Stellen Sie sic er, dass das Diagnosegerät
ric tig am Diagnoseansc luss des Fa rzeugs
angesc lossen ist.
● Überpr üfen Sie den Stecker auf
Substanzen, die eine gute elektrisc e
Verbindung ver indern könnten.
● Überprüfen Sie den OBDII-Stecker des
XXLTECH NX200 auf verbogene oder
abgebroc ene Stifte.
● Stellen Sie sic er, dass das Fa rzeug OBDII
/ EOBD-konform ist.
● Sc alten Sie die Zündung 10 Sekunden
lang aus und dann wieder ein.
● Überprüfen Sie, ob die Batteriespannung
mindestens 8,0 V beträgt.

● Stellen Sie sic er, dass das Steuergerät
nic t defekt ist.
3.2 Scanner lässt sich nicht
einschalten
Wenn sic der XXLTECH NX200 nic t
einsc alten lässt oder auf andere Weise nic t
ordnungsgemäß funktioniert, ge en Sie wie
folgt vor:
● Überpr üfen Sie den Stecker auf
abgebroc ene oder verbogene Stifte und
reinigen Sie die Stifte bei Bedarf.
● Vergewissern Sie sic , dass der XXLTECH
NX200 ric tig mit dem Diagnoseansc luss des
Fa rzeugs verbunden ist.

● Überprüfen Sie, ob die Batteriespannung
mindestens 8,0 V beträgt.
English
User Quick Start Guide
1.Introduction
The NX200 has been developed by leading
industry experts. It is specially designed to
read/clear codes, read live data, retrieve
freeze data and request vehicle information
on OBDII/EOBD compliant cars, SUVs,
light-duty trucks and mini-vans sold
worldwide since 1996.
1.1 Accessories Included

1. User Quick Start Guide
2. USB Cable
1.2 Specifications
1. Display:Backlit, 128 x 64 pixel display
2. Working Temperature: 0 to 60℃(32 to
140℉)
3. Storage Temperature: -20 to 70℃(-4 to
158℉)
4. Power: 8-18 Volts powered by vehicle
battery
5. Dimensions(L*W*H): 120*75*20mm
(4.7*2.96*0.78in)
6. Weight: 300g
1.3 Code Reader Controls

A. OBD II Cable - provides communication
for vehicle DLC.
B. LCD Display - shows menus, test results
and operation tips.
C. UP Key - moves selection up.
D. ESC Key - returns to previous screen or
level.
E. ENTER Key - confirms an action or enter
system setup menu from home screen
F.DOWN Key - moves selection down
G.USB Port –provides a USB connection
for the PC or laptop.
1.4 Connected to vehicle
Connect the diagnostic mail cable to the
Vehicle’s DLC socket which is generally
located under the dashboard.

The device will be automatically powered on
and ready to work.
2. Updating the Code Reader
1.Download the update tool NT wonder and
update files from our website and install it.
2.Connect NX200 to computer with the USB
cable provided, the application would detect
it automatically.
3.Click <Update online> or <Update
offline>to start updating according to the
software version conditions.

4.A Update Finished Message displays
when the update is completed.
3. Troubleshooting
3.1 Error Message
When a “Communication Error!”message

displays, please check the following:
●Verify ignition key is in the ON position.
●Make sure the code reader is correctly
attached to vehicle’s Data Link Connector
(DLC).
●Check DLC for cracked or recessed pins,
or for any substance that could prevent a
good electrical connection.
●Check NX200’s OBDII connector for
bent or broken pins.
●Make sure the vehicle is OBDII/EOBD
compliant.
●Cycle the vehicle key to OFF for 10s and
then back to ON.
●Verify battery voltage is at least 8.0V
with KOEO.
●Verify that the control module is not
defective.
3.2 Code Reader Does Not Power Up
If the NX200 will not power up,
communicate with vehicle’s control module,
or functions incorrectly in any other way, do
the following:
●Check DLC for broken or bent pins and
clean the pins if need be.
●Make sure NX200 is correctly connected
to the vehicle’s DLC.
●Verify battery voltage is at least 8.0V

with KOEO.
Español
Guía rápida para usuario
1.Introducción
El NX200 ha sido desarrollado por los
mejores expertos industriales. Está
especialmente diseñado para leer/borrar
códigos de avería, leer datos en vivo,
recuperar los datos congelados y solicitar
información del control de emisiones
OBDII/EOBD en vehículos comprendidos
en la normativa, tales como turismos, SUVs,
camiones ligeros y furgonetas vendidos
desde 1996 (USA) y 2000 (Europa con
homologación EURO 3 o superior)

1.1 Accesorios Incluidos
3. Guía rápida para usuario
4. Cable USB
1.2 Especificaciones
7. Pantalla: Retroiluminada, resolución 128
x 64 pixel
8. Temperatura de Trabajo: 0 a 60℃(32 a
140℉)
9. Temperatura de almacenamiento: -20 a
70℃(-4 a 158℉)
10. Alimentación: 8-18 Volts alimentados
por la batería del vehículo
11. Dimensiones: Largo*Ancho*Alto:
120*75*20mm (4.7*2.96*0.78in)
12. Peso: 300g
1.3 Controles del Lector de Códigos

A. Cable OBD II – proporciona la
comunicación a través del conector de
diagnosis del vehículo.
B. Pantalla LCD – muestra menús,
resultados y consejos de operación.
C. Tecla Arriba – mueve selección arriba.
D. Tecla ESC – vuelve a la pantalla o nivel
anterior.
E. Tecla ENTER – confirma una acción o
introduce al menú de ajustes del sistema
desde la pantalla de inicio.
F. Tecla Abajo – mueve selección abajo
G. Puerto USB – provee conexión al
ordenador.
1.4 Conectado al vehículo
Conectar el cable principal al puerto de

diagnosis DLC del vehículo, generalmente
se encuentra bajo el salpicadero.
El dispositivo se alimentará
automáticamente y estará listo para
trabajar.
2. Actualizar el Lector de
Códigos
1.Descargar la herramienta de actualización
NT Wonder desde nuestro sitio web e
instalarlo en su PC.
2.Conectar el NX200 al PC usando el cable
Table of contents
Languages:
Popular Diagnostic Equipment manuals by other brands

Veeder-Root
Veeder-Root TLS RF Quick start up guide

Topdon
Topdon ArtiLink 500 Update instruction

Snap-On
Snap-On Zeus user manual

Hella Gutmann
Hella Gutmann Radaufnehmer Control operating instructions

Launch
Launch Creader Professional 129i user manual

Diagnostic BioSystems
Diagnostic BioSystems Montage Opus365 Operator's manual