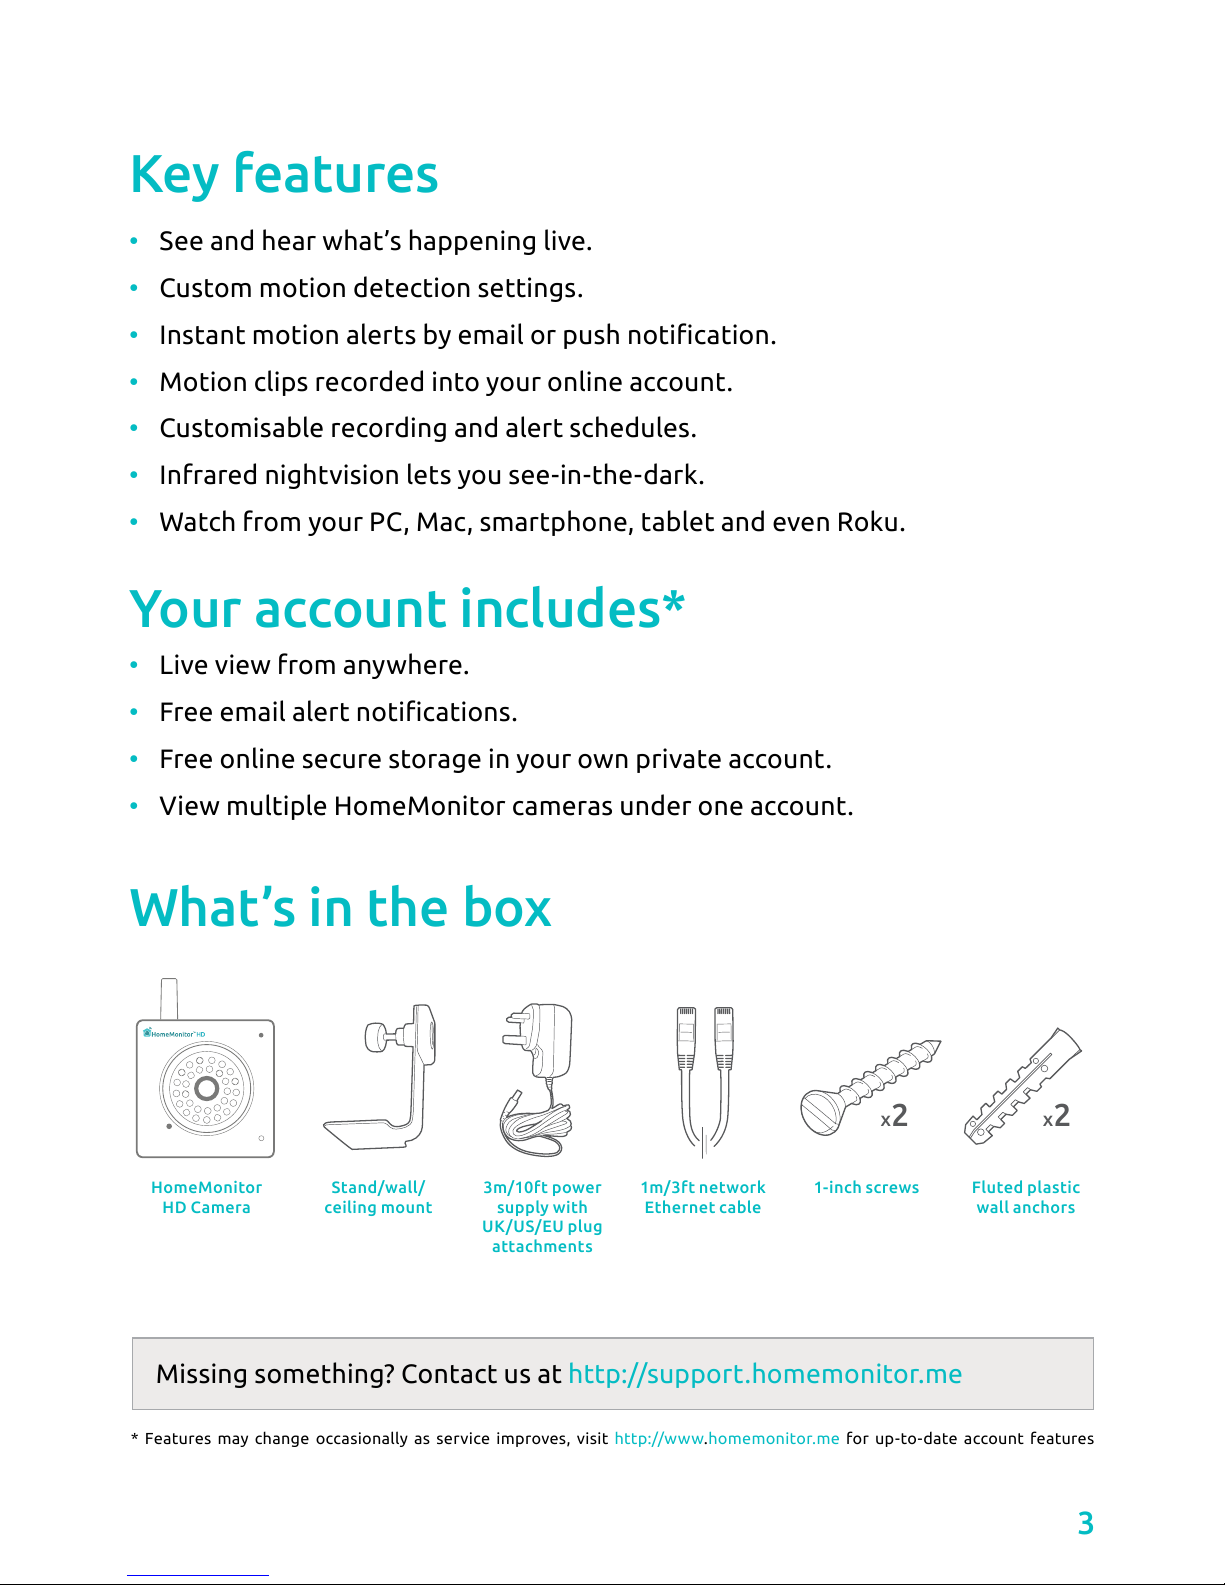
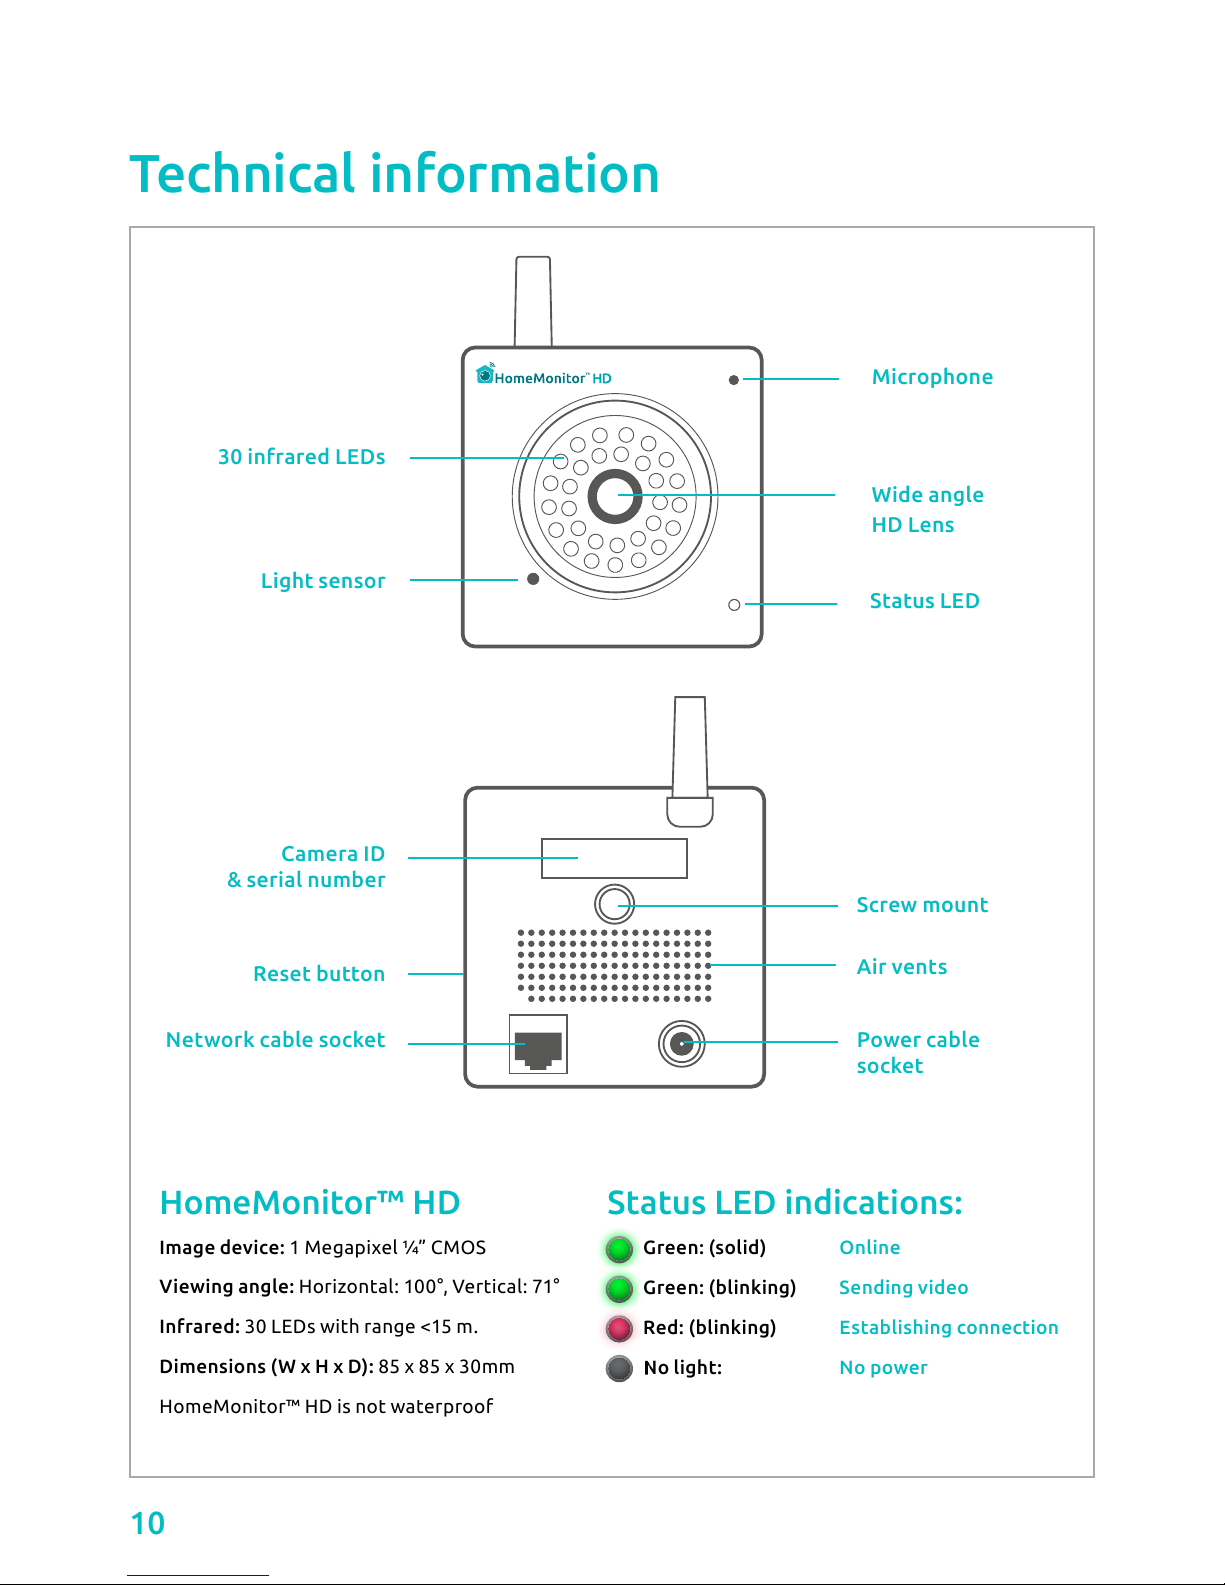
Y-cam HomeMonitor HD User manual

Quick Start Guide
HomeMonitor HD
Your unique camera ID is:
Sign up at http://www.homemonitor.me

2
Welcome to Y-cam HomeMonitor™
Combining professional wireless internet cameras and
a secure online account, HomeMonitor™ allows you to
tap in to your home life from anywhere.
Watch live or see recorded events, from an internet-
enabled computer or smartphone, keeps you in touch
with what matters most.
HomeMonitor™ is super simple to set up and use, just connect a camera,
Never miss another important moment! HomeMonitor™ detects motion
and can send alerts to keep you updated, whilst simultaneously recording and
storing clips in to your secure online account so you can view or download later.

3
x2x2
HomeMonitor
HD Camera
Stand/wall/
ceiling mount
3m/10ft power
supply with
UK/US/EU plug
attachments
1m/3ft network
Ethernet cable
1-inch screws Fluted plastic
wall anchors
Key features
See and hear what’s happening live.
Custom motion detection settings.
Motion clips recorded into your online account.
Customisable recording and alert schedules.
Infrared nightvision lets you see-in-the-dark.
Watch from your PC, Mac, smartphone, tablet and even Roku.
Your account includes*
Live view from anywhere.
Free online secure storage in your own private account.
View multiple HomeMonitor cameras under one account.
What’s in the box
* Features may change occasionally as service improves, visit http://www.homemonitor.me for up-to-date account features
Missing something? Contact us at http://support.homemonitor.me

4
43
1 2
Installing your HomeMonitor™ HD
Decide how you want to connect your HomeMonitor™ HD
router with a network cable.
Use your HomeMonitor™ with Wi-Fi
Connect HomeMonitor™ to your router
and power with provided power supply
and network cable. This is required for
Wi-Fi setup.
Mount HomeMonitor™ securely in
position when prompted and connect
power supply provided.
Visit http://www. homemonitor.me and
choose Create Account. Follow online steps
for connecting your HomeMonitor™ to Wi-Fi.
Follow online steps to complete your
account setup.

5
43
1 2
Using your HomeMonitor™ with network cable
Mount HomeMonitor™ securely in position. Connect HomeMonitor™ to your router
and power. You may need an additional
network cable if you wish to position your
HomeMonitor™ far away from your router.
Visit http://www.homemonitor.me
and choose Create Account.
Follow online steps to complete your
account setup.
Having issues? Our tech support specialists are on hand to help - visit http://support.homemonitor.me

6
!
?
When do I want to have a motion recorded?
Do I want an email sent to me when a motion recording
is triggered?
What kind of scenarios do I want to trigger a motion recording?
Questions you may want to consider:
Getting the best from your
HomeMonitor™
to your individual requirements. Once you have completed
the set up process it is advisable to test it so you are
When you have considered these questions make sure:
The HomeMonitor™ is securely positioned facing what you want to see.
The motion detection setup matches your needs.
The schedule for the HomeMonitor™ is set to match your schedule.

7
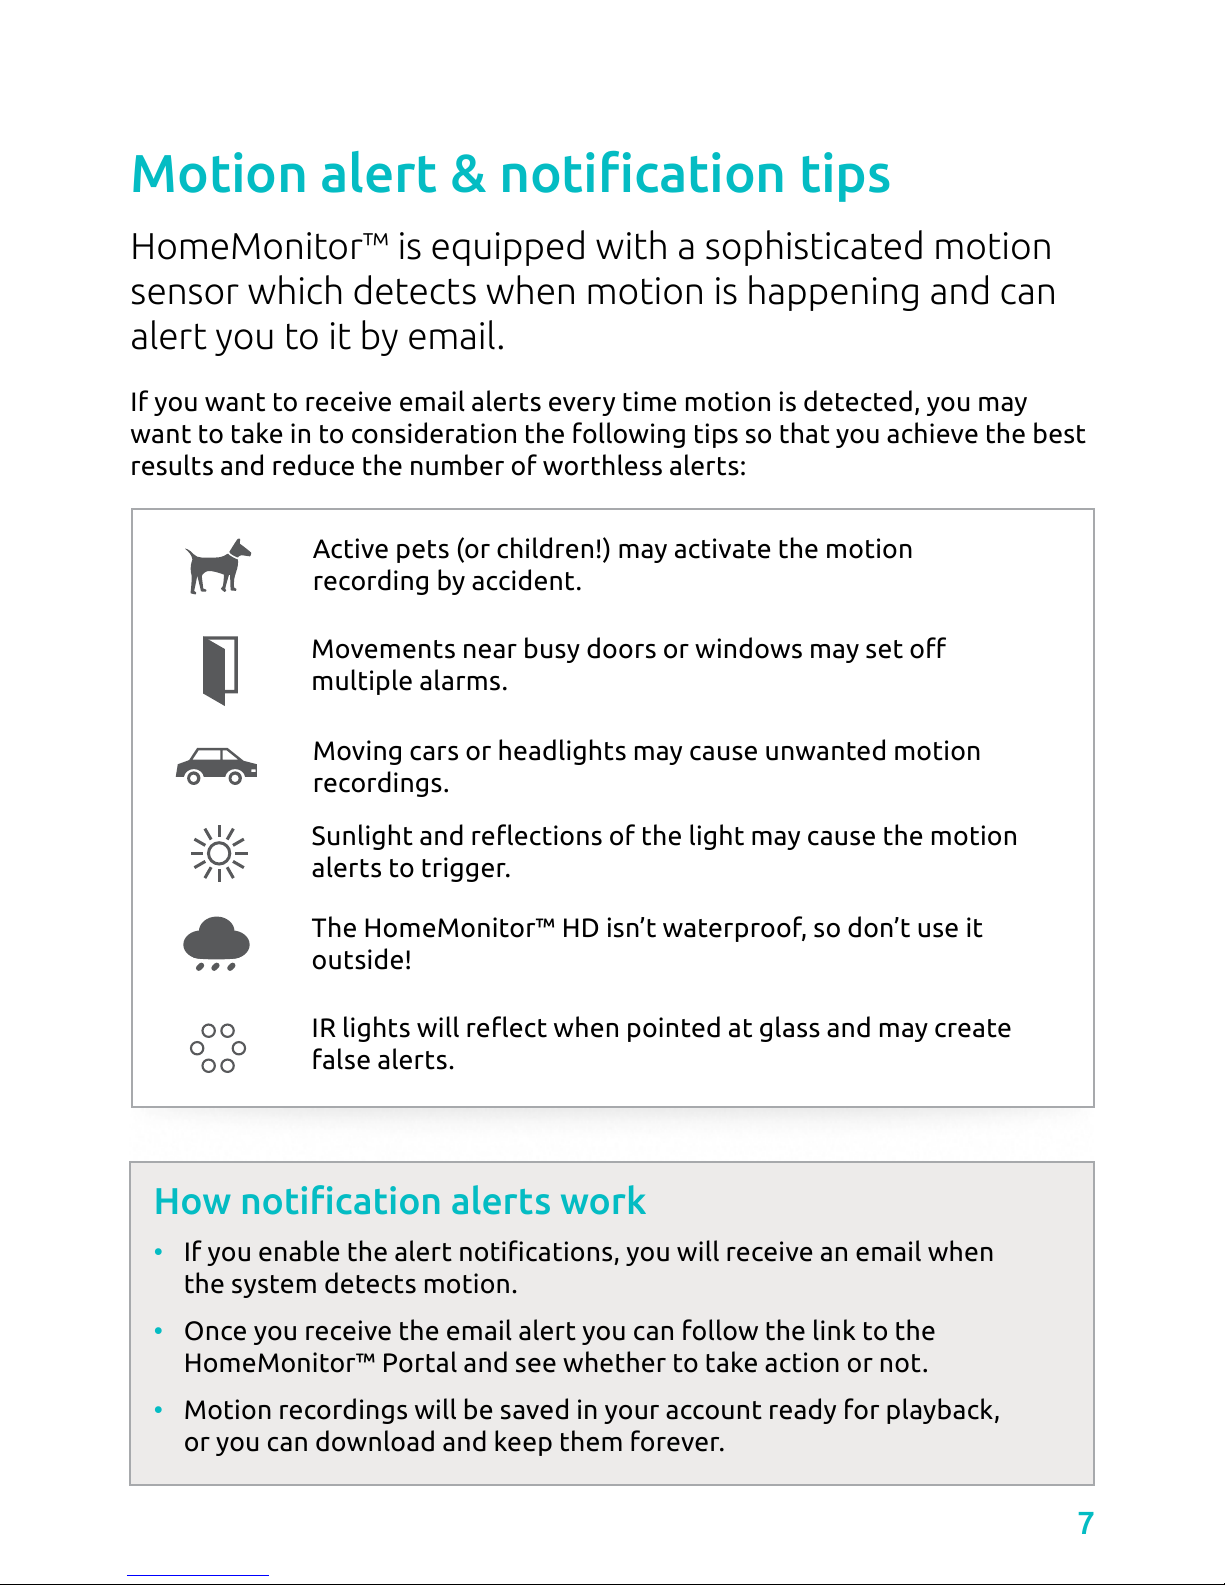
HomeMonitor™ is equipped with a sophisticated motion
sensor which detects when motion is happening and can
alert you to it by email.
If you want to receive email alerts every time motion is detected, you may
want to take in to consideration the following tips so that you achieve the best
results and reduce the number of worthless alerts:
Active pets (or children!) may activate the motion
recording by accident.
Moving cars or headlights may cause unwanted motion
recordings.
multiple alarms.
alerts to trigger.
The HomeMonitor™ HD isn’t waterproof, so don’t use it
outside!
false alerts.
the system detects motion.
Once you receive the email alert you can follow the link to the
HomeMonitor™ Portal and see whether to take action or not.
Motion recordings will be saved in your account ready for playback,
or you can download and keep them forever.

8
DEC
B
A
Day to day usage
Using HomeMonitor™ on your computer or tablet
Visit http://www.homemonitor.me and log in to see your dashboard.
Search for HomeMonitor channel
in the Channel Store on your Roku.
Roku channel may not be available
in all regions. Visit homemonitor.me
for more information.
Dedicated app for your smart TV
®

9
CD
B
A
Using HomeMonitor™ on your smartphone or tablet
Visit http://www. homemonitor.me/mobile and login.
Apple iPhone, iPad & iPod touch
iOS 5.1+ required
Visit App Store from
your iOS device &
search for “Y-cam
HomeMonitor”
or scan QR code.
Dedicated apps for your mobile device
Android smartphones & tablets
Android 2.3.1+ required
Visit Google Play from
your Android device
& search for “Y-cam
HomeMonitor”
or scan QR code.
When disconnected the camera
will not detect motion, record
clips or transmit live video.
Click/tap to open camera Live View.
Motion alarm settings
(Desktop website only).
A
D
E
B
C
We add more apps all the time - visit http://www.homemonitor.me/apps to see all our software.

10
Technical information
Power cable
socket
Camera ID
& serial number
Screw mount
Network cable socket
Reset button
Microphone
Status LED
Wide angle
HD Lens
Light sensor
30 infrared LEDs
HomeMonitor™ HD
Image device: 1 Megapixel ¼” CMOS
Viewing angle: Horizontal: 100°, Vertical: 71°
Infrared: 30 LEDs with range <15 m.
Dimensions (W x H x D): 85 x 85 x 30mm
HomeMonitor™ HD is not waterproof
Green: (solid) Online
Green: (blinking) Sending video
Red: (blinking) Establishing connection
No light: No power
Status LED indications:
Air vents

11
Take the next steps
Now you have your HomeMonitor
installed, why not try one of the
following:
Add more cameras
Use multiple cameras, even at multiple
locations, all under one account.
Upgrade to Plus Package
Get 30 days of online storage for
your camera for a small annual fee.
Visit http://www.homemonitor.me
for more information.
Safety information
Do not try to disassemble.
Keep the power supply dry and avoid contact with liquid.
Small parts may cause a choking hazard, keep away from children.
Only use approved Y-cam accessories and power supplies.
Do not cover the HomeMonitor™. Infrared Lights produce heat which may
Ensure the HomeMonitor™ is property attached to the supplied stand
Compliance is only assured by using the included power supply.
and safety requirements have been met by the developer and manufacturer, Y-cam Solutions Ltd.
Need further help?
If you have any further questions or need support, please visit
http://support.homemonitor.me – we’re happy to help.

Y-cam Solutions Ltd
Vision House
3 Dee Road
Richmond, Surrey
TW9 2JN
United Kingdom
Tel: +44 (0)20 8334 7373
Y-cam Solutions LLC
4500 140th Avenue North
Suite 101
Clearwater
FL 33762
United States
Tel: +1 727 233 8225
For more information or support on HomeMonitor, visit:
http://www.homemonitor.me or contact monitor@y-cam.com
Designed in Britain. Made in China.
v201311HD
Table of contents
Other Y-cam Security Camera manuals

Y-cam
Y-cam YCW003 User manual

Y-cam
Y-cam EVO User manual

Y-cam
Y-cam Black SD User manual

Y-cam
Y-cam HomeMonitor User manual

Y-cam
Y-cam Cube YCW005 User manual

Y-cam
Y-cam Black User manual

Y-cam
Y-cam Bullet HD 1080 User manual

Y-cam
Y-cam HomeMonitor User manual

Y-cam
Y-cam Black User manual

Y-cam
Y-cam EVO Installation instructions