manuals.online logo
Brands
  1. Home
  2. •
  3. Brands
  4. •
  5. Yamaha
  6. •
  7. Drum
  8. •
  9. Yamaha DTX900 User manual

Yamaha DTX900 User manual

yDTX900 Series QUICK START – SAMPLING A “ONE SHOT” SOUND
There are many ways to use the sampling function of
the DTX900. This document will focus on using the
on-board sampling capability to sample a single sound
through the on-board effects of the DTX900, then
assign it to a pad for playback where it can further
processed and effected.
SAMPLING ADVISORY: Unauthorized copying of the commercially
available musical data including audio data is strictly prohibited except for
your personal use.
Prepare for sampling – WHAT YOU WILL NEED:
In order to sample you must install the correct optional
DIMM memory chips in the DTX900. Use matching
pairs (2 x 64MB, 2 x 128MB, 2 x 256MB) of PC100 or
PC133 memory chips with no more than 18 chips per
module. Buy them from a reputable source and the
handle chips carefully to avoid static shocks.
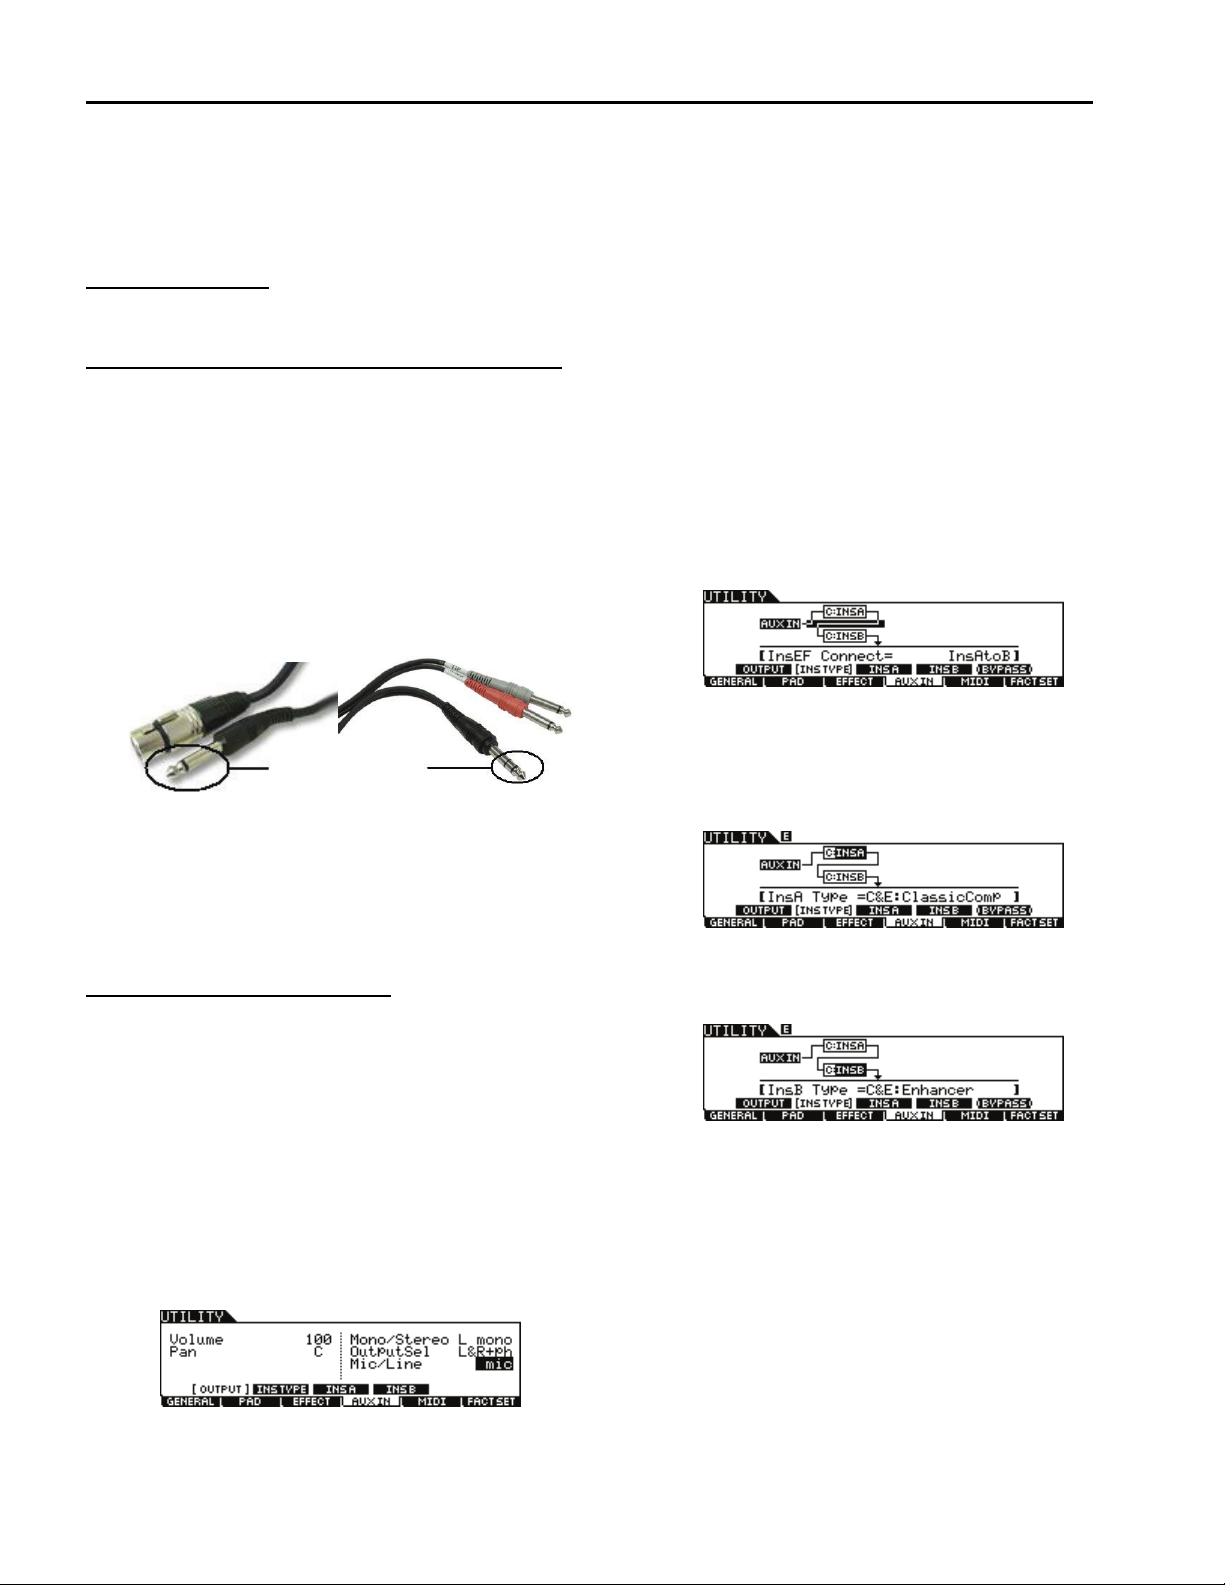
You need a dynamic microphone with a mono ¼”
cable for recording an acoustic sound OR a dual
mono to stereo ¼” cable for recording a CD player or
similar audio device. We’ll use a mic in this example
to record a snare sound-be sure to use proper cable.
mono stereo
It is also a good idea to have a set of quality
headphones for monitoring the sound during
sampling and for scrutinizing the sample closely after
it has been recorded.
Finally, you will need a USB device to save your data.
Setup the DTX900 AUX INPUT:
Plug the cable from your source into the AUX INPUT
on the back of DTX900. Next you need to set the
MIC/LINE parameter to the appropriate signal.
Press [UTILITY], and press the [F4] AUX IN button
then the [SF1] OUTPUT button. Set the Mic/Line
parameter to the value you require. When connecting
low output equipment, such as a microphone, electric
guitar or bass, set the Mic/Line parameter to “mic.”
When connecting high output equipment, such as a
keyboard, synth or CD player, set the Mic/Line
parameter to “line.” Since we are using a single mic,
set the Mono/Stereo parameter to “L mono”.
[If you want to get sampling right away, skip to the
next page – to sample with effects, read on…]
Sampling audio is part science, part art and various
amounts of luck – at least in the beginning. You can
reduce the amount of luck needed to achieve good
results by learning the art and science of audio
recording and applying those principles to your
sampling. The scope of audio recording is too big a
topic to be discussed here, so your mileage may vary.
Bottom line: Experience helps. The good news is that
there is help right inside of the DTX900.
The DTX900 features two insert effects processors
(think of them like guitar pedals) that can be patched
to the incoming audio and used in many useful and
creative ways. In this example, we’ll use a
compressor to help get a good signal level and a
harmonic enhancer to sweeten the sound.
Press [SF2] INS TYPE and navigate the cursor to the
area between the two effects processors and use the
data wheel to select InsEF Connect = to “InsAtoB”.
Selecting the effects is also done here. Use the
cursor to highlight the “C” box (category) for Insert A
and select C&E: (compression and eq). Move the
cursor to the “INSA” box and select ClassicComp as
the specific effect.
For INSERT B, we’ll select using a different method;
highlight the “INSB” box and scroll through the effects
and select C&E:Enhancer as the specific effect.
Press [SF3] INS A and set the classic compressor Pre
(preset) parameter to preset “60’s Drumkit”.
Press [SF4] INS B and set the harmonic enhancer
Pre (preset) parameter to preset “Edge”.
The above configuration is only a suggestion – no
single setup is perfect for every sampling task. Use
headphones to confirm the sound is to your liking.
You may decide you don’t want the sound of the
enhancer, or that you don’t want any effects because
you are sampling from a CD. What’s important is that
DTX900 provides you tools to professionally record
your audio and create your own great sounds. Now
that you know where those tools are and how they can
be used you can experiment with them.
Select an empty USER VOICE:
Press the [SAMPLING] mode button and the [F1]
SELECT button to access the main page. Use the jog-
dial or the INC/DEC buttons to select an empty user
voice from User-A:01 to User-H:127.
Press the [F2] SETTING button and set the
Mono/Stereo parameter to “L mono” which will allow
our mic signal to be recorded as a mono sample. Set
the Source to “AUX IN” and the Frequency to 44.1k.
SAMPLE the sound:
Access the sampling standby page by pressing [F6]
REC (accessible from the [F1] select page). Here you
can determine how sampling will take place (Trigger
Mode) and set the recording level.
Set the Trigger Mode to “level” with a value of around
20. This means that sampling will automatically begin
once the signal level exceeds 20 (or the value you set).
Next, play the snare and adjust the GAIN setting on
the back of the module so that you get a strong signal
without clipping (exceeding maximum record level).
Use the on-screen meter to check the level. Get as
strong a signal as possible without clipping the level.
When you are ready to go for it press the [F6] START
button. The display will indicate it is waiting for an
incoming audio signal louder than level 20 to begin
sampling. Play the snare and recording begins with a
display like this:
When the sound is finished, press [F6] STOP. You
are then presented the pad assign screen:
Press [F3] AUDITION to listen to your sample. If you
don’t like it press [F4] CANCEL and try again. If you
like it you can assign it to a pad by simply striking any
trigger on the kit or using the jog-dial. Press [F5] OK
to set the sample to that pad and return to the main
sampling page. Congratulations on your first sample!
AFTER Sampling – the TRIM page & sample JOBS:
[F3] TRIM – The trim page lets you view the waveform
in graphic form as well as make settings for start, loop
and end points and the sample play mode.
Notice that the Start point is not zero but 4410. This is
equal to 1/10th of a second when sampling at 44.1kHz.
Even though recording was set to occur after a trigger
level was crossed, the sampler began sampling just
prior to reaching that level. This ensures that you can
always get back the attack portion of the sound if your
trigger level was set too high. Press and hold [SF1]
AUDITION button to hear the full duration of the sound.
You might notice in my example above that the End
point is 81714, which means my sample is about 1.85
seconds long (81714 divided by 44100 equals 1.85).
Since my snare sound is shorter than that I can trim
the sample by highlighting the End point and using the
jog-dial. The display shows me where the new end
point is and I can audition the sound to make sure it
doesn’t get cut off too early.
The reason I want to trim the silence after my snare hit
is because I don’t want lots of long samples meant to
play short sounds. In some cases I can reclaim the
memory by using the Extract job described below.
[F4] JOB – Various jobs/processes can be applied to
the sample such as Normalize, Extract, and Name.
Normalize – Maximizes the level of the User Voice.
This is useful for bringing up the volume of a user
voice that was inadvertently recorded at a low level. A
Ratio of 100% will bring the level up to just below
clipping; use your ears for best results.
Name – Lets you assign a 10-character name to the
User Voice. It is highly recommended that you name
your samples as they will all default to “No Name”.
Use the [SF6] List button to see the characters
available and to aid in the naming process.
Extract – This Job lets you delete from DIMM memory
all unnecessary audio data located ahead of the Start
Point and located after the End Point, leaving only the
portion of the sample you wish to keep.
Be sure to SAVE your data as an “AllData” file so you
can reload your samples & kits after a power cycle.
For a video demonstration of Sampling visit:
www.DTXPERIENCE.com

Other manuals for DTX900

2

Other Yamaha Drum manuals

Yamaha DD-12 User manual

Yamaha

Yamaha DD-12 User manual

Yamaha CB832C User manual

Yamaha

Yamaha CB832C User manual

Yamaha DD-3 User manual

Yamaha

Yamaha DD-3 User manual

Yamaha DTX900 Instruction Manual

Yamaha

Yamaha DTX900 Instruction Manual

Yamaha DTX8K-X User manual

Yamaha

Yamaha DTX8K-X User manual

Yamaha DTX Drums DTX502 Mounting instructions

Yamaha

Yamaha DTX Drums DTX502 Mounting instructions

Yamaha DTXPRESS IV User manual

Yamaha

Yamaha DTXPRESS IV User manual

Yamaha FB9024 User manual

Yamaha

Yamaha FB9024 User manual

Yamaha RX-7 User manual

Yamaha

Yamaha RX-7 User manual

Yamaha BP80 User manual

Yamaha

Yamaha BP80 User manual

Yamaha RX 5 Quick start guide

Yamaha

Yamaha RX 5 Quick start guide

Yamaha DD-7 User manual

Yamaha

Yamaha DD-7 User manual

Yamaha DTXPRESS User manual

Yamaha

Yamaha DTXPRESS User manual

Yamaha BS7050 User manual

Yamaha

Yamaha BS7050 User manual

Yamaha RS-80 Installation guide

Yamaha

Yamaha RS-80 Installation guide

Yamaha RM-50 User manual

Yamaha

Yamaha RM-50 User manual

Yamaha DTXPLORER User manual

Yamaha

Yamaha DTXPLORER User manual

Yamaha PCY130 User manual

Yamaha

Yamaha PCY130 User manual

Yamaha RM-50 User manual

Yamaha

Yamaha RM-50 User manual

Yamaha BS-832/836/240 User manual

Yamaha

Yamaha BS-832/836/240 User manual

Yamaha DTX Drums TP70S User manual

Yamaha

Yamaha DTX Drums TP70S User manual

Yamaha BP80 User manual

Yamaha

Yamaha BP80 User manual

Yamaha DTX900M Mounting instructions

Yamaha

Yamaha DTX900M Mounting instructions

Yamaha RX-7 User manual

Yamaha

Yamaha RX-7 User manual

Popular Drum manuals by other brands

MFB TT/CO/CL-522 owner's manual

MFB

MFB TT/CO/CL-522 owner's manual

thomann MILLENIUM MPS-425 Assembly instructions

thomann

thomann MILLENIUM MPS-425 Assembly instructions

Simmons SDS 800 user manual

Simmons

Simmons SDS 800 user manual

First Act FD-480 Assembly manual

First Act

First Act FD-480 Assembly manual

XM NX1 user manual

XM

XM NX1 user manual

Microlife FH 80 instructions

Microlife

Microlife FH 80 instructions

Kawai Digital Drum Machine R100 owner's manual

Kawai

Kawai Digital Drum Machine R100 owner's manual

Roland PAD-80 owner's manual

Roland

Roland PAD-80 owner's manual

Medeli DD516 Assembly instructions

Medeli

Medeli DD516 Assembly instructions

ATV aDrums EXS-3CY quick start guide

ATV

ATV aDrums EXS-3CY quick start guide

Simmons Electronics SDX manual

Simmons Electronics

Simmons Electronics SDX manual

Roland CR-5000 Service notes

Roland

Roland CR-5000 Service notes

Millenium MPS-850 Assembly instructions

Millenium

Millenium MPS-850 Assembly instructions

XDrum PDP-10 user manual

XDrum

XDrum PDP-10 user manual

Skywalk TONIC2 Pro Guide

Skywalk

Skywalk TONIC2 Pro Guide

Simmons SDS 1 operating instructions

Simmons

Simmons SDS 1 operating instructions

Roland BT-1 owner's manual

Roland

Roland BT-1 owner's manual

ION IED04 Quick start manual

ION

ION IED04 Quick start manual

manuals.online logo
manuals.online logoBrands
  • About & Mission
  • Contact us
  • Privacy Policy
  • Terms and Conditions

Copyright 2025 Manuals.Online. All Rights Reserved.