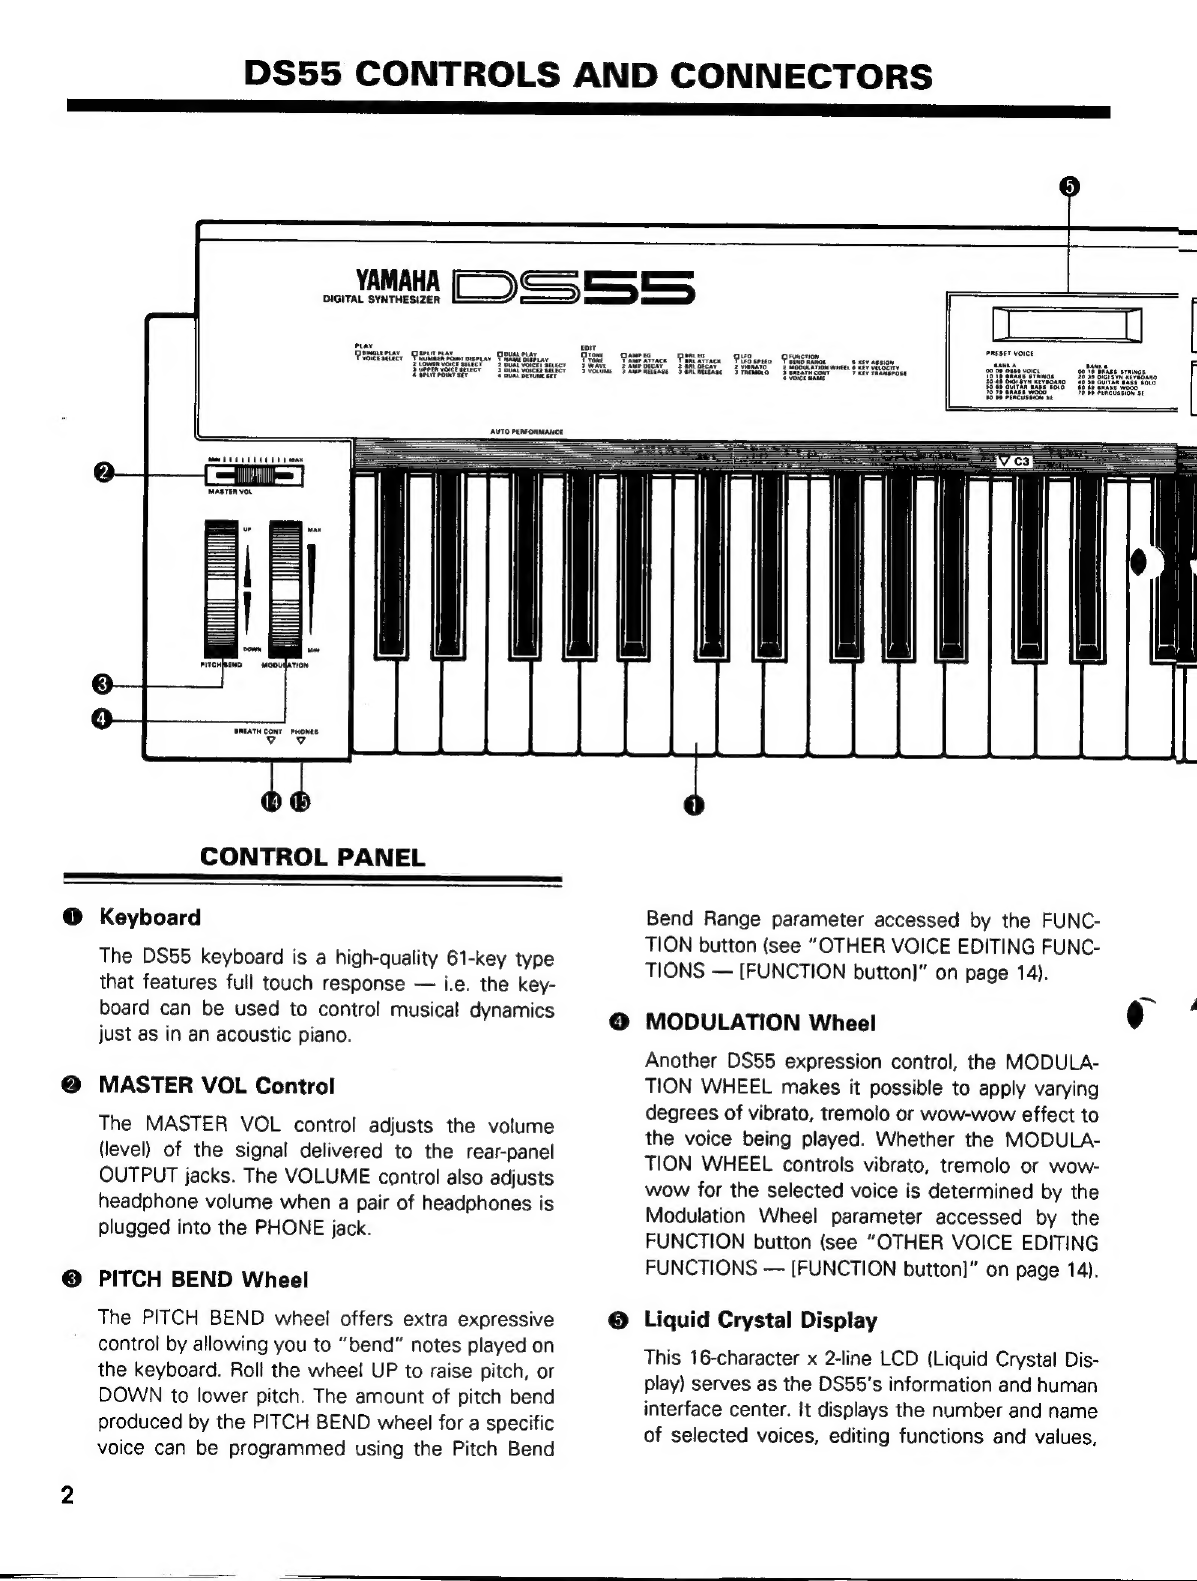
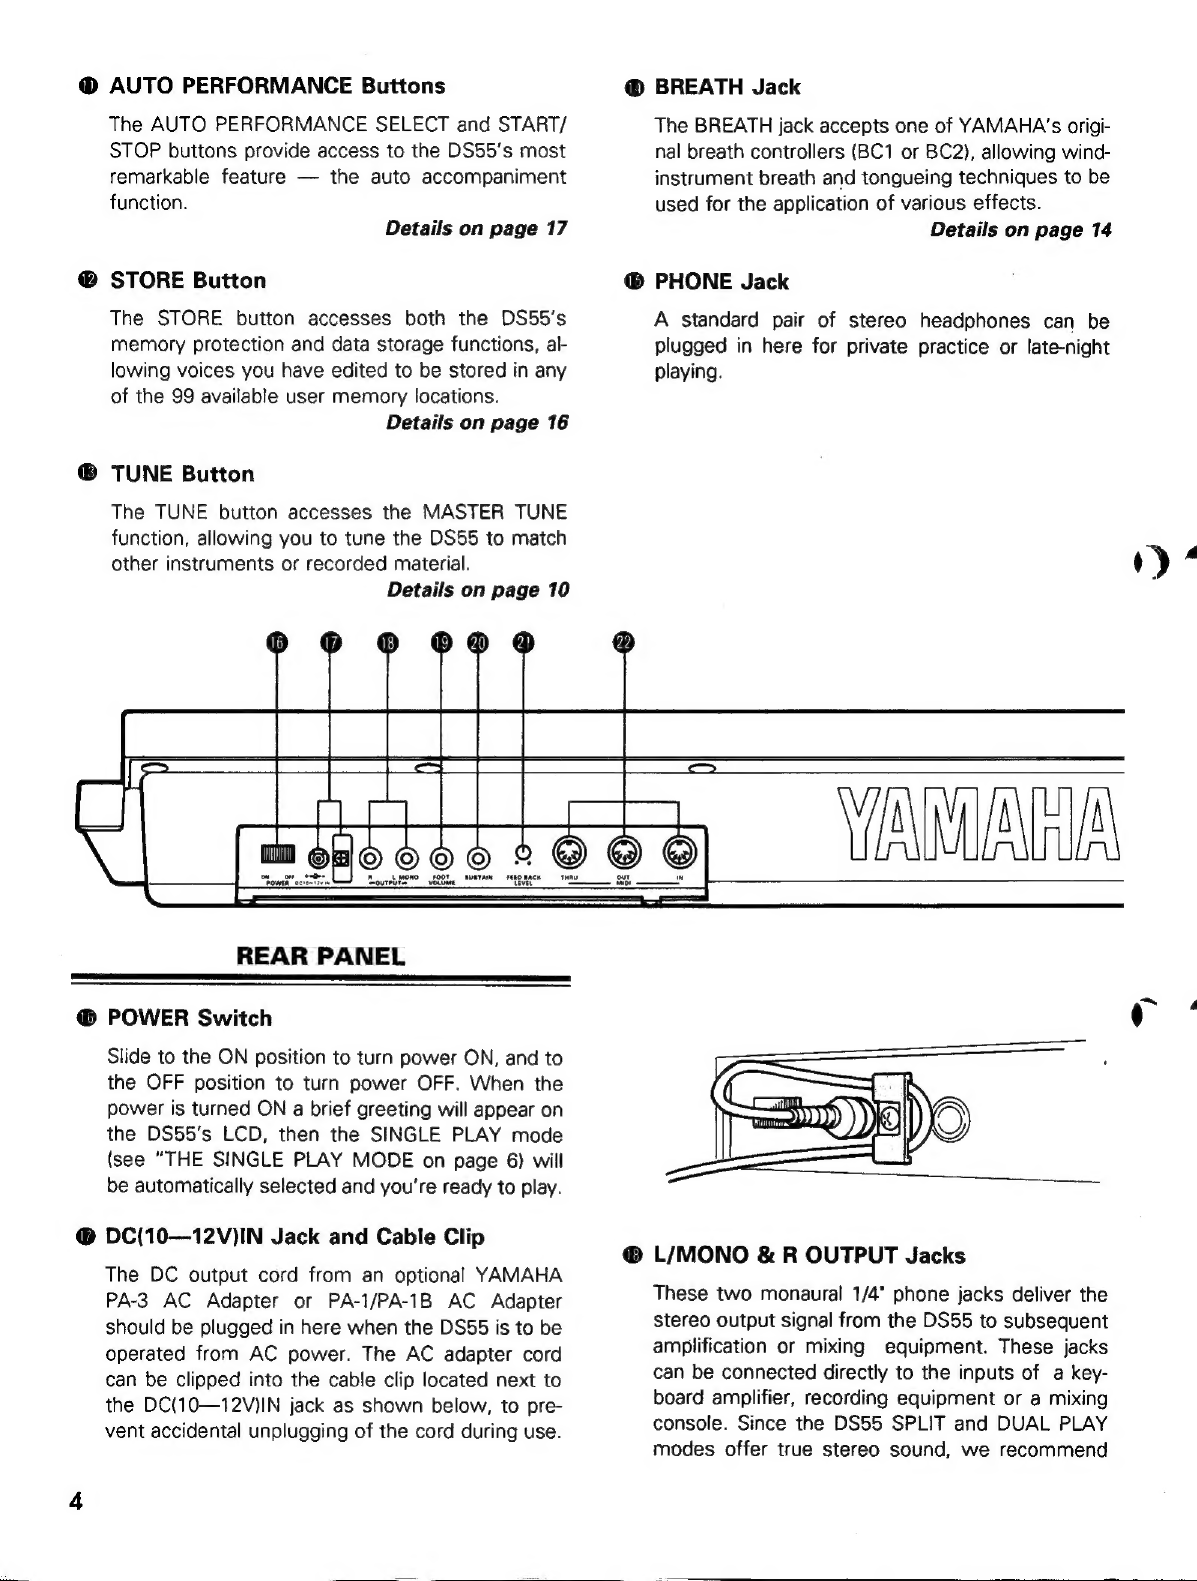
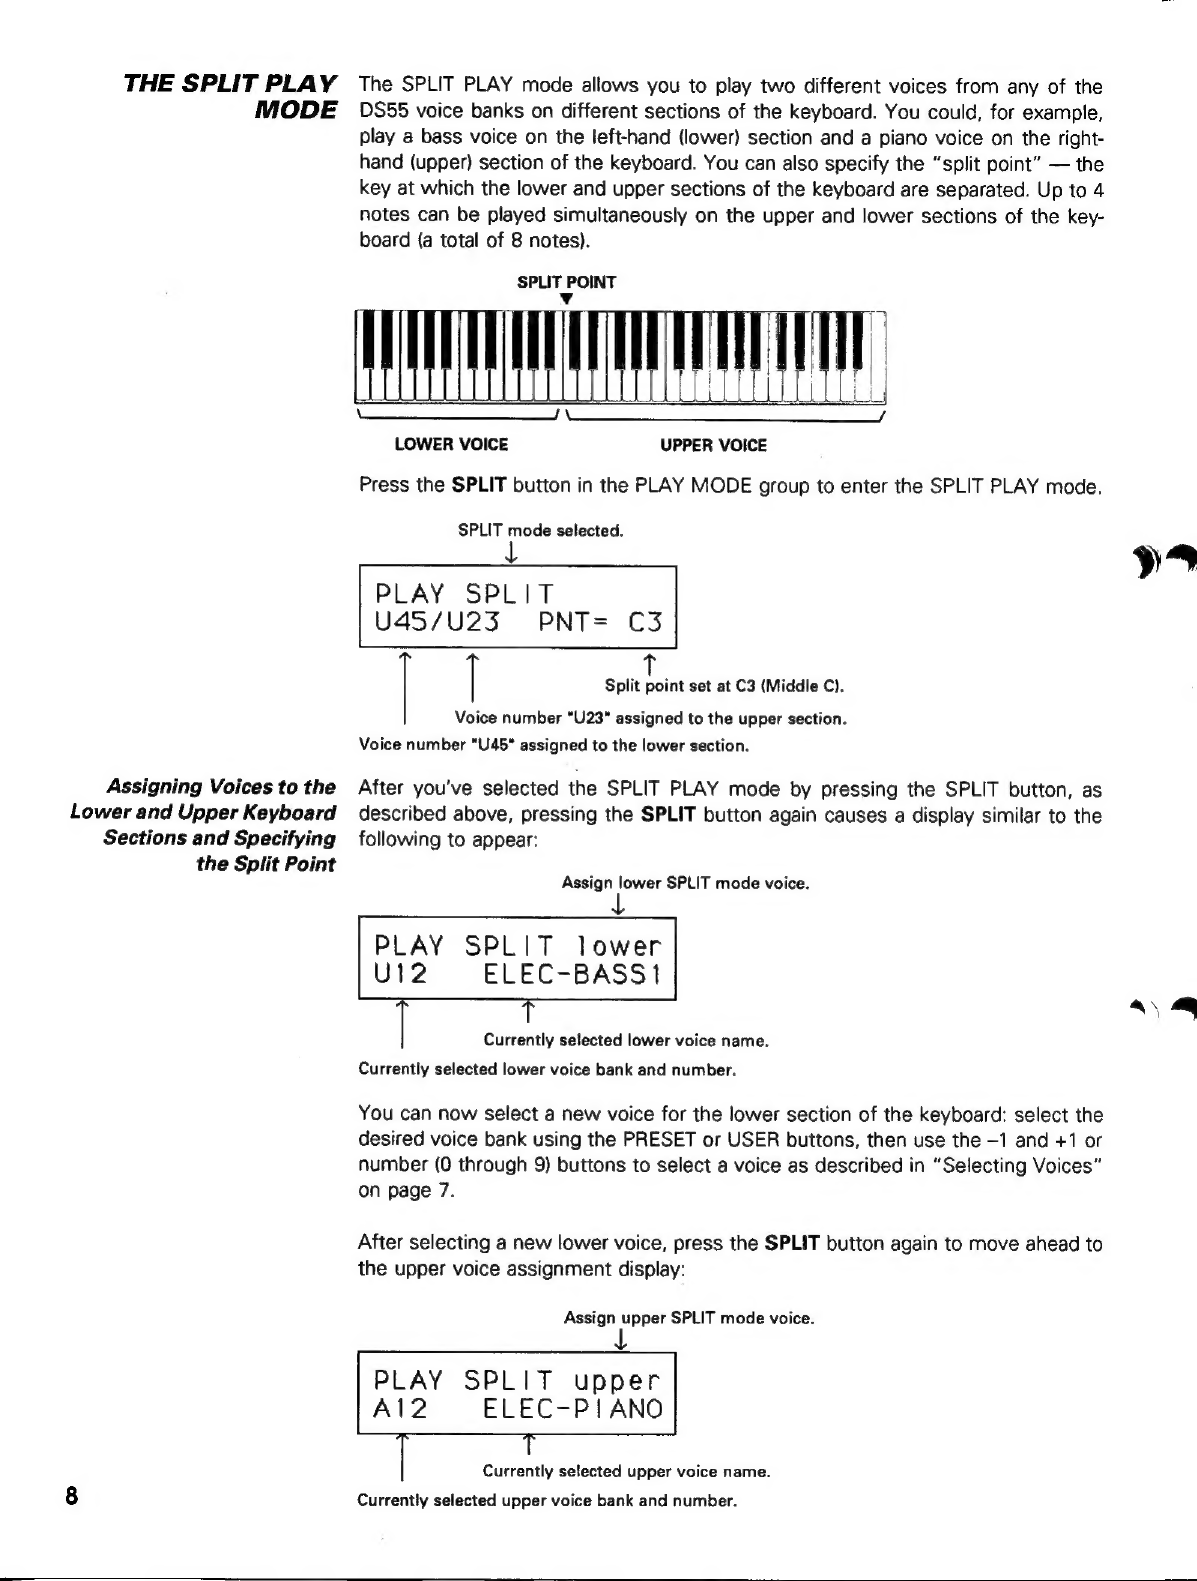
Yamaha DS-55 User manual

YAMAHA
DIGITAL
SYNTHESIZER
SYNTHETISEUR
NUMERIQUE
DIGITAL
SYNTHESIZER
OPERATION
MANUAL
MANUEL
D'INSTRUCTIONS
BEDIENUNGSANLEITUNG
TTT
mT,

Congratulations!
Your
DS55
Digital
Synthesizer
is
a
fine
example
of
advanced
YAMAHA
music
technology.
It
uses
the
un-
matched
YAMAHA
FM
tone
generation
system
to
create
rich,
vibrant
simulations
of
acoustic,
electric
and
electronic
instruments
—
and
sounds
that
are
totally
different.
The
DS55
offers
200
outstanding
preset
voices
that
you
can
use
immediately.
You
can
also
edit
the
presets
using
the
DS55's
easy
editing
system
to
create
subtle
variations
or
completely
original
voices.
Up
to
100
of
your
original
creations
can
be
stored
in
internal
memory
for
instant
recall.
The
DS55
even
has
a
built-in
delay
effect
that
can
add
extra
warmth
and
ambience
to
any
voice
you
play.
Of
course
you
can
play
any
single
voice,
but
the
DS55
also
offers
a
split
play
mode
in
which
you
can
play
two
voices
on
different
sections
of
the
keyboara,
and
a
dual
play
mode
in
which
two
voices
can
be
played
simultaneously
across
the
entire
keyboard.
Perhaps
the
highlight
of
the
DS55
is
its
remarkable
Auto
Performance
system.
This
YAMAHA
innovation
provides
a
wide
range
of
beautifully
orches-
trated
accompaniment
patterns
that
you
can
use
for
practice
or
performance.
Of
course,
the
DS55
is
fully
MIDI
equipped
so
it
can
serve
as
the
center
of
a
sophisticated
MIDI
music
system.
For
even
more
conven-
ience,
the
DS55
will
operate
from
an
AC
adapter
or
batteries,
so
you
can
play
anywhere,
anytime.
In
order
to
make
the
most
of
the
fine
performance
and
many
features
provided
by
your
DS55,
we
urge
you
to
read
this
operation
manual
thoroughly,
and
keep
it
in
a
safe
place
for
later
reference.
CONTENTS
NN
ee
ee
aaae
PRECAUTIONS
`...
1
THE
STORE
FUNCTION
—
[STORE
button]
....16
TIANSPOSE
LL
15
DS55
CONTROLS
AND
CONNECTORS
....2
AUTO
PERFORMANCE
................
17
CONTROL
PANEL
........
coo.
2
Pattern
Change
`...
17
REARSPANEL
uc
243
add
4
BOYS
ME
ii
e
do
pens
18
BOTTOM
PANEL,,,
coco
5
AIPCQQIO?
curar
ta
2
de?
18
THE
PLAY
MODES,
TUNING
8:
DELAY
....6
LISTEN
TO
THE
DEMONSTRATION
THE
SINGLE
PLAY
MODE
..................
6
See
EE
18
The
Preset
and
User
Voice
Banks
..........
A
RFORMANCE
Selecting
Voices
a
bafer
ses
4
S
EE
>
PLAYING
THE
SELECTED
ge
T
A
ears
19
THE
SPLIT
PLAY
MOE
@
BRING
THe
SELECTED
AUTO
PERFORMANCE
Assigning
Voi
he
L
SR
EE
E
Koy
ge
Numbers
when
PN
pa
20
THE
DUAL
PLAY
MODE
8
py
Rey
umber
when
IKEY
is
Selected
20
Dene
ee
el
USING
THE
MIDI
FUNCTIONS
>...
22
MASTER
TUNE
aaen
ee
e
10
MIDI
Switch
sissa
ccc
cece
kanen
22
USING
THE
DELAY
EFFECTS
...............
11
MIDI
Channel
`...
22
VOICE
EDITING
&
THE
STORE
FUNCTION
11
Omni
Mode
.....
6...
eevee
eee
ees
22
Understanding
and
Using
the
Edit
Function
EXCIUSIVE
ll
22
DISPIBVS
ii
ii
ka
jali
Ba
ea
td
11
Bulk
Dump
of
One
Voice
................
23
TONE
—
[TONE
button]
e,
12
All
Data
Bulk
Dump
a
23
AMPLITUDE
ENVELOPE
—
[AMP
EG
button]
.
.12
Setup
Data
Bulk
Dump
e,
23
BRILLIANCE
ENVELOPE
—
[BRL
EG
button]
..13
RECEIVING
VOICE
DATA
FROM
EXTERNAL
LOW
FREQUENCY
OSCILLATOR
(VIBRATO
&
EQUIPMENT
-naaasar
24
TREMOLO)—
[LFO
button]
................
14
THE
MULTI-INSTRUMENT
MODE
........
24
OTHER
VOICE
EDITING
FUNCTIONS
—
AN
EXAMPLE
OF
MULTI-INSTRUMENT
[FUNCTION
button]
`...
14
MODE
USE?
ii
Ai
a
KA
BA
ala
adas
tada
26
Pitch
Bend
Range
`,
14
USING
THE
DS55
KEVBOARD
TO
PLAV
Modulation
Wheel
Function
..............
14
IN
THE
MULTI-INSTRUMENT
MODE
.........
27
Breath
Controller
Function
...............
14
ERROR
MESSAGES
..................
27
Name
of
Voice...
15
SPECIFICATIONS
....................
28
“Assign
Mode...
15
INDEX
`...
29
Velocity
Depth...
15
MIDI
DATA
FORMAT
..............
Add-1
MIDI
IMPLEMENTATION
CHART
.....
Add-6
>

PRECAUTIONS
AVOID
EXCESSIVE
HEAT,
HUMIDITY,
DUST
AND
VIBRATION
—
Keep
the
unit
away
from
locations
where
it
is
likely
to
be
exposed
to
high
temperatures
or
humidity
—such
as
near
radiators,
stoves,
etc.
Also
avoid
locations
which
are
subject
to
excessive
dust
accumulation
or
vibration
which
could
cause
mechani-
cal
damage.
AVOID
PHYSICAL
SHOCKS
—
Strong
physical
shocks
to
the
unit
can
cause
damage.
Handle
it
with
care.
DO
NOT
OPEN
THE
CASE
OR
ATTEMPT
REPAIRS
OR
MODIFICATIONS
YOURSELF
—
This
product
contains
no
user-serviceable
parts.
Refer
all
mainte-
nance
to
qualified
YAMAHA
service
personnel.
Open-
Ming
the
case
and/or
tampering
with
the
internal
cir-
`
cuitry
will
void
the
warranty.
MAKE
SURE
POWER
IS
OFF
BEFORE
MAKING
OR
REMOVING
CONNECTIONS
—
Always
turn
the
power
OFF
prior
to
connecting
or
disconnecting
cables.
This
is
important
to
prevent
damage
to
the
unit
itself
as
well
as
other
connected
equipment.
HANDLE
THE
CABLES
CAREFULLY
—
Always
plug
and
unplug
cables
by
gripping
the
connector,
not
the
cord.
Also
avoid
applying
excessive
force
to
the
cables
or
connectors
during
use.
CLEAN
WITH
A
SOFT
DRY
CLOTH
—
Never
use
sol-
vents
such
as
benzine
or
thinner
to
clean
the
unit.
Wipe
clean
with
a
soft,
dry
cloth.
POWER
SUPPLY
—
The
DS55
must
be
powered
from
either
an
optional
YAMAHA
PA-3
AC
Adapter
(the
AC
input
voltage
of
the
adapter
supplied
depends
on
the
area
in
which
the
equipment
is
sold),
a
YAMAHA
PA-1
or
PA-1B
AC
Adapter,
or
the
specified
dry
batteries.
At-
tempting
to
use
an
AC
adapter
other
than
the
PA-3,
PA-1
or
PA-1B
can
cause
serious
damage
to
the
DSS5.
ELECTRICAL
INTERFERENCE
—
Since
the
DS55
con-
tains
digital
circuitry,
it
may
cause
interference
and
noise
if
placed
too
close
to
TV
sets,
radios
or
similar
equipment.
If
such
a
problem
does
occur,
move
the
DS55
further
away
from
the
affected
equipment.
BACKUP
BATTERY
—
The
DS55
contains
a
long-life
backup
battery
that
retains
the
contents
of
its
RAM
memory
locations
even
when
the
power
is
turned
OFF.
The
backup
battery
will
last
for
approximately
5
years.
When
the
battery
finally
fails,
the
contents
of
the
internal
RAM
memory
will
be
lost.
If
this
happens,
have
the
battery
replaced
by
qualified
YAMAHA
serv-
ice
personnel.
Dot
not
attempt
to
replace
the
battery
yourself,
worldwide,
following
measures:
of
corrective
measures.
of
America,
6600
Orangethorpe
Ave.,
Buena
Park,
CA
90620,
U.S.A.
Commission
helpful:
—
Stock
No,
004-000-00345-4.
FCC
INFORMATION
While
the
following
statements
are
provided
to
comply
with
FCC
Regulations
in
the
United
States,
the
corrective
measures
listed
below
are
applicable
This
series
of
YAMAHA
professional
music
equipment
uses
frequencies
that
appear
in
the
radio
frequency
range
and
if
installed
in
the
immediate
proximity
of
some
types
of
audio
or
video
devices
(within
three
meters),
interference
may
occur.
This
series
of
YAMAHA
professional
music
equipment
has
been
type
tested
and
found
to
comply
with
the
specifications
set
for
a
class
B
computing
device
in
accordance
with
those
specifications
listed
in
subpart
J
of
part
15
of
the
FCC
rules.
These
rules
are
designed
to
provide
a
reasonable
measure
of
protection
against
such
interference,
However,
this
does
not
guarantee
that
interference
will
not
occur.
If
your
professional
music
equipment
should
be
suspected
of
causing
interference
with
other
electronic
devices,
verification
can
be
made
by
turning
your
professional
music
equipment
off
and
on.
If
the
interference
continues
when
your
equipment
is
off,
the
equipment
is
not
the
source
of
interference.
If
your
equipment
does
appear
to
be
the
source
of
the
interference,
you
should
try
to
correct
the
situation
by
using
one
or
more
of
the
Relocate
either
the
equipment
or
the
electronic
device
that
is
being
affected
by
the
interference.
Utilize
power
outlets
for
the
professional
music
equipment
and
the
device
being
affected
that
are
on
different
branch
(circuit
breaker
or
fuse)
circuits,
or
install
AC
line
filters.
In
the
case
of
radio
or
TV
interference,
relocate
the
antenna
or,
if
the
antenna
lead-in
is
300
ohm
ribbon
lead,
change
the
lead-in
to
a
co-axial
type
cable.
If
these
corrective
measures
do
not
produce
satisfactory
results,
please
contact
your
authorized
YAMAHA
professional
products
dealer
for
suggestions
and/
If
you
cannot
locate
a
franchised
YAMAHA
professional
products
dealer
in
your
general
area
contact
the
Electronic
Service
Department,
YAMAHA
Corporation
If
for
any
reason,
you
should
need
additional
information
relating
to
radio
or
TV
interference,
you
may
find
a
booklet
prepared
by
the
Federal
Communications
“How
to
identify
and
Resolve
Radio
—
TV
Interference
Problems".
This
booklet
is
available
from
the
U.S.
Government
Printing
Office,
Washington
D.C.
20402
[This
information
on:safety-is
provided
to
comply
with
U.S.A.
laws,
but
should
be
observed
by
users
in
all
countries.
i

DS55
CONTROLS
AND
CONNECTORS
BREATH
CONT
PHONES
vv
CONTROL
PANEL
PP
NN
NN
cr
O
Keyboard
The
DS55
keyboard
is
a
high-quality
61-key
type
that
features
full
touch
response
—
i.e.
the
key-
board
can
be
used
to
control
musical
dynamics
just
as
in
an
acoustic
piano.
MASTER
VOL
Control
The
MASTER
VOL
control
adjusts
the
volume
(level)
of
the
signal
delivered
to
the
rear-panel
OUTPUT
jacks.
The
VOLUME
control
also
adjusts
headphone
volume
when
a
pair
of
headphones
is
plugged
into
the
PHONE
jack.
PITCH
BEND
Wheel
The
PITCH
BEND
wheel
offers
extra
expressive
control
by
allowing
you
to
“bend”
notes
played
on
the
keyboard.
Roll
the
wheel
UP
to
raise
pitch,
or
DOWN
to
lower
pitch.
The
amount
of
pitch
bend
produced
by
the
PITCH
BEND
wheel
for
a
specific
voice
can
be
programmed
using
the
Pitch
Bend
Bend
Range
parameter
accessed
by
the
FUNC-
TION
button
(see
“OTHER
VOICE
EDITING
FUNC-
TIONS
—
[FUNCTION
button)”
on
page
14).
O
MODULATION
Wheel
Another
DS55
expression
control,
the
MODULA-
TION
WHEEL
makes
it
possible
to
apply
varying
degrees
of
vibrato,
tremolo
or
wow-wow
effect
to
the
voice
being
played.
Whether
the
MODULA-
TION
WHEEL
controls
vibrato,
tremolo
or
wow-
wow
for
the
selected
voice
is
determined
by
the
Modulation
Wheel
parameter
accessed
by
the
FUNCTION
button
(see
“OTHER
VOICE
EDITING
FUNCTIONS
—
[FUNCTION
button!"
on
page
14).
O
Liquid
Crystal
Display
This
16-character
x
2-line
LCD
(Liquid
Crystal
Dis-
play)
serves
as
the
DS55's
information
and
human
interface
center.
It
displays
the
number
and
name
of
selected
voices,
editing
functions
and
values,

ao
and
all
other
information
you
need
for
smooth,
simple
operation.
PLAY
MODE
Buttons
The
PLAY
MODE
buttons
—
PRESET,
USER,
'
SINGLE,
SPLIT
and
DUAL
—
allow
selection
of
the
DS55's
various
voice
banks
and
play
modes.
Details
on
page
6
EDIT
Buttons
The
TONE,
AMP
EG,
BRL
EG,
LFO
and
FUNC-
TION
buttons
in
the
EDIT
group
provide
access
to
all
functions
and
parameters
required
for
voice
editing.
The
editing
parameters
are
separated
into
logically
related
groups,
and
editing
procedures
have
been
made:
simpler
than
ever
so
you
can
easily
create
new
voices.
Details
on
page
11
O
DELAY
Buttons
The
ON/OFF,
SHORT
and
LONG
buttons
control
the
DS55's
internal
delay
system,
allowing
you
to
add
delay
effects
to
any
voice
for
extra
depth
and
ambience.
Details
on
page
11
MIDI
Buttons
The
DS55's
many
MIDI
functions
are
accessed
by
the
MIDI
buttons.
In
addition
to
general
channel
and
mode
selection,
the
DS55
has
a
MIDl-control-
lable
multi-instrument
mode
that
can
be
accessed
and
controlled
via
the
MID!
buttons.
Details
on
page
19
Data
Entry
Buttons
The
number
buttons
(0
through
9)
and
the
-1
and’
+1
buttons
are
used
for
voice
selection
and
data
entry
when
required
by
any
of
the
DS55's
editing
or
other
functions.
Details
on
page
11
3

W
AUTO
PERFORMANCE
Buttons
The
AUTO
PERFORMANCE
SELECT
and
START/
STOP
buttons
provide
access
to
the
DS55's
most
remarkable
feature
—
the
auto
accompaniment
function.
Details
on
page
17
Y
STORE
Button
The
STORE
button
accesses
both
the
DS55's
memory
protection
and
data
storage
functions,
al-
lowing
voices
you
have
edited
to
be
stored
in
any
of
the
99
available
user
memory
locations.
Details
on
page
16
®
TUNE
Button
The
TUNE
button
accesses
the
MASTER
TUNE
function,
allowing
you
to
tune
the
DS55
to
match
other
instruments
or
recorded
material.
Details
on
page
10
6
BREATH
Jack
The
BREATH
jack
accepts
one
of
VAMAHA's
origi-
nal
breath
controllers
(BC1
or
BC2),
allowing
wind-
instrument
breath
and
tongueing
techniques
to
be
used
for
the
application
of
various
effects.
Details
on
page
14
6
PHONE
Jack
A
standard
pair
of
stereo
headphones
can
be
plugged
in
here
for
private
practice
or
late-night
playing.
REAR
PANEL
G
POWER
Switch
Slide
to
the
ON
position
to
turn
power
ON,
and
to
the
OFF
position
to
turn
power
OFF.
When
the
power
is
turned
ON
a
brief
greeting
will
appear
on
the
DS55's
LCD,
then
the
SINGLE
PLAY
mode
(see
“THE
SINGLE
PLAY
MODE
on
page
6)
will
be
automatically
selected
and
you're
ready
to
play.
O
DC(10—12V)IN
Jack
and
Cable
Clip
The
DC
output
cord
from
an
optional
YAMAHA
PA-3
AC
Adapter
or
PA-1/PA-1B
AC
Adapter
should
be
plugged
in
here
when
the
DS55
is
to
be
operated
from
AC
power.
The
AC
adapter
cord
can
be
clipped
into
the
cable
clip
located
next
to
the
DC(10—12W)IN
jack
as
shown
below,
to
pre-
vent
accidental
unplugging
of
the
cord
during
use.
Gm
6
L/MONO
&
R
OUTPUT
Jacks
These
two
monaural
1/4*
phone
jacks
deliver
the
stereo
output
signal
from
the
DS55
to
subsequent
amplification
or
mixing
equipment.
These
jacks
can
be
connected
directly
to
the
inputs
of
a
key-
board
amplifier,
recording
equipment
or
a
mixing
console.
Since
the
DS55
SPLIT
and
DUAL
PLAY
modes
offer
true
stereo
sound,
we
recommend

connecting
both
output
jacks
to
the
corresponding
inputs
of
a
stereo
or
two-channel!
sound
system
in
order
to
get
the
best
possible
sound.
If
this
is
not
possible,
connect
only
the
LIMONO
OUTPUT
jack
to
the
amplification
equipment
used.
@
SUSTAIN
Jack
This
jack
accepts
an
optional
YAMAHA
FC-4
or
FC-
5
footswitch
which
functions
as
a
sustain
pedal
when
connected.
The
sustain
pedal
functions
in
the
same
way
as
a
damper
pedal
on
an
acoustic
piano
—
when
the
pedal
is
pressed
notes
played
have
a
long
sustain.
Releasing
the
pedal
immedi-
ately
stops
(damps)
any
sustained
notes.
@®
FOOT
VOLUME
Jack
e
The
FOOT
VOLUME
jack
accepts
an
optional
YAMAHA
FC-7 Foot
Controller
which
permits
foot
volume
control
for
extra
expressive
capability.
BOTTOM
PANEL
Q
Battery
Compartment
If
you
intend
to
use
battery
power
(which
makes
the
DS55
very
portable
and
convenient),
six
1.5V
SUM-2,
R-14
or
equivalent
alkaline
batteries
(sold
separately)
must
first
be
installed
in
the
DS55
bat-
tery
compartment.
Open
the
battery
compartment
cover
located
in
the
center
of
the
instrument's
bottom
panel.
Insert
the
six
batteries,
being
careful
to
follow
the
polarity
markings
(+,
-)
on
the
inside
of
the
com-
partment.
Replace
the
compartment
cover,
making
sure
that
it
locks
firmly
in
place.
@
FEEDBACK
LEVEL
Control
This
control
makes
it
possible
to
adjust
the
overall
“length”
of
the
DS55’s
delay
effects
to
match
your
music.
Details
on
page
11
MIDI
IN,
OUT
&
THRU
Connectors
The
MIDI
IN
connector
receives
MIDI
data
from
an
external
MIDI
device
(such
as
another
MIDI
keyboard
or
a
MIDI
sequencer)
which
can
be
used
to
control
the
DS55.
The
MIDI
THRU
connector
re-
transmits
any
data
received
at
the
MIDI
IN
con-
nector,
allowing
“chaining”
of
several
MIDI
instru-
ments
or
other
devices.
The
MIDI
OUT
connector
transmits
MIDI
data
generated
by
the
DS55
(e.g.
note
and
velocity
data
produced
by
playing
the
DS55
keyboard).
More
details
on
MIDI
are
given
in
“MIDI
FUNC-
TIONS”
on
page
21.
Caution:
@
When
the
batteries
run
down,
replace
them
with
a
complete
set
of
six
new
batteries.
NEVER
mix
old
and
new
batteries.
4
To
prevent
possible
damage
due
to
battery
leak-
age,
remove
the
batteries
from
the
instrument
if
it
is
not
to
be
used
for
an
extended
period
of
time.
“aaa
8
DS55
CONTROLS
AND
CONNECTORS
5

THE
PLAY
MODES,
TUNING
&
DELAY
EE
a
THE
SINGLE
PLAY
This
is
the
DS55’s
“normal”
play
mode
in
which
you
can
play
a
single
selected
MODE
voice
on
the
keyboard.
The
SINGLE
PLAY
mode
is
always
selected
automatically
when
the
POWER
switch
is
turned
ON. The
SINGLE
PLAY
mode
can
also
be
selected
from
any
other
mode
by
pressing
the
SINGLE
button
in
the
PLAY
MODE
group.
When
the
SINGLE
PLAY
mode
is
selected,
the
LED
above
the
SINGLE
button
will
light
and
a
display
similar
to
the
one
shown
below
will
appear
on
the
LCD.
Up
to
8
notes
can
be
played
simultaneously
in
the
SINGLE
PLAY
mode.
Indicates
that
the
SINGLE
mode
is
selected.
PLAY
SINGLE
AO)
Soft
Brass
This
is
the
name
of
the
selected
voice.
This
is
the
bank
and
number
of
the
selected
voice
(in
this
example
voice
“01”
of
bank
“A”
is
selected).
The
Preset
and
User
The
DS55
has
two
PRESET
voice
banks
(bank
A
and
bank
B),
each
containing
100
y
Voice
Banks
(00
through
99)
different
preset
voices
(a
total
of
200
voices).
The
preset
voices
are
stored
in
ROM
(Read
Only
Memory)
and
cannot
be
edited
or
changed
in
any
way.
The
DS55
also
has
a
USER
voice
bank
(bank
U)
which
has
100
RAM
(Random
Access
Memory)
locations
into
which
you
can
store
edited
versions
of
the
preset
voices.
E
BANK
A
PERFORMANCE
PERFORMANCE
PERFORMANCE
PERFORMANCE
NAME
NAME
NAME,
Elegant
FloatChime
Guitar
1
Sax
1
SoftBrass
Guitar
2
Sax
2
WideString
.
E.Guitar
Oboe
Cosmic
SandBell
Harp
Clarinet
LargePipes
Suspense
Koto
Flute
SynString
1
Fog
Marimba
Recorder
FolkGuitar
HuskyVoice
Violin
1
Harmonica
~
M4
Piano
1
Swirlies
Cello
1
Whistle
E.
Piano
1
HuskyChoir
CelloEns.
Castanet
DistGuitar
PluckBrass
UpriteBass
Triangle
SoftString
AngelChoir
E.Bass
1
BellTree
SynString
2
FluteVoice
E.Bass
2
Referee
RichString
SmallPipes
SynBass
1
SteelDrum
1
SynBrass
1
)
E.Organ
1
SvnBass
2
SteelDrum
2
SvnBrass
2
:
E.Organ
2
SynBass
3
GuiRoach
SynBrass
3
Piano
2
SynBass
4
Zap!
BrethBrass
E.Piano
2
Bass
Shwhap!
SoftEns.
|
WireBrass
NasalLead
Poundwood
WarmEns.
EasyClav
SolidLead
OilDrum
OrchesEns.
FunkyClav
ClariLead
SynSnare
1
Sunbeam
Harpsichrd
Trumpet
1
DragonHit
Shimmer
1
Vibe
TightBrass
DuneHit
SoftCloud
Celeste
Trombone
1
Warp
Bamarimba
TubeBell
Horn
1
ModernTele
Sandarimba
MusicBox
Horn 2
Encore

E
BANK
B
PERFORMANCE
NAME
PERFORMANCE
NAME
PERFORMANCE
NAME
PERFORMANCE
NAME
MultiMoon
BrassEns.
SynBrass
4
SynBrass
5
SynBrass
8
Brass
1
Brass
2
Brass
3
Strings
1
Strings
2
Violin
2
Cello
2
Pizzicato
TremString
SynString
4
SynString
5
SynEns.
1
SynEns.
2
SynVoice
Digital
Vox
Aqua
MusicSaw
DolbyDream
DigiEns.
MetalTwang
Selecting
Voices
1.
FletlessB.
BrassLead
FatLead
SaxLead
RaspLead
ToughLead
AnasynLead
Wow
ProfetStab
TootyFloot
Trumpet
2
Trombone
2
Flugelhorn
MuteTrumpet
PanFlute
Bassoon
Calliope
WoodEns.
1
WoodEns.
2
Piccolo
Glocken
Xylophone
Gong
CowBell
AgogoBell
Shimmer
2
SandTube
SpaceEcho
DigitalPop
Upright
Grand
PF
HonkyTonk
ToyPiano
Rose
WirePiano
NasalClav
E.Organ
3
E.Organ
4
E.Organ
5
Accordion
LeadGuitar
FuzzGuitar
MuteGuitar
Banjo
E.
Sitar
Shamisen
SoftHarp
E.Bass
3
SynBass
5
SynBass
6
WoodBlock
Bongo
HandDrum
Cuica
SteelDrum
3
BassDrum
Snare
Cymbal
Slap
Timpani
Tom
SynTom
Tompany
Kick
&
HH
SynSnare
2
SynPerc.
1
SynPerc.
2
SpaceBell
Bell
GameSound1
GameSound2
Alarm
Thunder
WhiteNoise
ClashClap
Press
the
PRESET
button
to
select
the
PRESET
voice
banks
(the
LED
above
the
PRESET
button
will
light),
or
the
USER
button
to
select
the
USER
voice
bank
(the
LED
above
the
USER
button
will
light).
.
If
you
have
selected
the
PRESET
voice
banks,
you
can
switch
between
banks
A
and
B
by
pressing
the
PRESET
button.
If
preset
bank
A
is
selected,
pressing
PRESET
will
select
bank
B,
and
vice
versa.
There
is
only
one
USER
voice
bank
(“U")
so
no
further
bank
selection
is
possible
if
USER
is
selected.
.
Voices
within
the
selected
bank
can
be
selected
by
using
either
the
-1
and
+1
buttons
or
the
number
buttons
(0
through
9).
Press
the
+1
button
briefly
to
increment
the
voice
number
by
1,
or
hold
it
down
for
continuous
incrementing
(release
the
+1
button
when
the
desired
voice
number
has
been
reached).
The
-1
button
works
in
the
same
way
except
that
it
decrements
the
selected
voice
number.
To
select
a
voice
using
the
number
buttons,
enter
the
number
of
the
desired
voice
in
two
digits.
To
select
voice
number
“07,”
for
example,
first
press
the
“0”
button
(the
second
digit
on
the
LCD
will
change
to
a
”?”)
and
then
the
“7”
button.
To
select
voice
number
55,
press
the
“5”
button
twice.
The
new
voice
will
be
selected
as
soon
as
the
second
digit
is
entered.
THE
PLAY
MODES,
TUNING
&
DELAY
7

THE
SPLIT
PLAY
The
SPLIT
PLAY
mode
allows
you
to
play
two
different
voices
from
any
of
the
MODE
DS55
voice
banks
on
different
sections
of
the
keyboard.
You
could,
for
example,
play
a
bass
voice
on
the
left-hand
(lower)
section
and
a
piano
voice
on
the
right-
hand
(upper)
section
of
the
keyboard.
You
can
also
specify
the
“split
point”
—
the
key
at
which
the
lower
and
upper
sections
of
the
keyboard
are
separated.
Up
to
4
notes
can
be
played
simultaneously
on
the
upper
and
lower
sections
of
the
key-
board
{a
total
of
8
notes).
SPLIT
POINT
Yv
LOWER
VOICE
UPPER
VOICE
Press
the
SPLIT
button
in
the
PLAY
MODE
group
to
enter
the
SPLIT
PLAY
mode.
SPLIT
mode
selected.
ys
PLAY
SPLIT
U45/U23
PNT-
C3
|
|
Split
point
set
at
C3
(Middle
C).
Voice
number
'U23'
assigned
to
the
upper
section.
Voice
number
"U45"
assigned
to
the
lower
section.
Assigning
Voices
to
the
After
you've
selected
the
SPLIT
PLAY
mode
by
pressing
the
SPLIT
button,
as
Lower
and
Upper
Keyboard
described
above,
pressing
the
SPLIT
button
again
causes
a
display
similar
to
the
Sections
and
Specifying
following
to
appear:
the
Split
Point
Assign
lower
SPLIT
mode
voice.
PLAY
SPLIT
lower
U12
ELEC-BASSI
aq
Currentiv
selected
lower
voice
name.
Currentiv
selected
lower
voice
bank
and
number.
Vou
can
now
select
a
new
voice
for
the
lower
section
of
the
kevboard:
select
the
desired
voice
bank
using
the
PRESET
or
USER
buttons,
then
use
the
-1
and
+1
or
number
(0
through
9)
buttons
to
select
a
voice
as
described
in
“Selecting
Voices”
on
page
7.
After
selecting
a
new
lower
voice,
press
the
SPLIT
button
again
to
move
ahead
to
the
upper
voice
assignment
display:
Assign
upper
SPLIT
mode
voice.
PLAY
SPLIT
upper
A12
ELEC-PIANO
Currentiv
selected
upper
voice
name.
8
Currentiv
selected
upper
voice
bank
and
number.

THE
DUAL
PLAY
MODE
e
Assigning
Dual-mode
Voices
and
Setting
Detune
You
can
now
select
a
new
voice
for
the
upper
section
of
the
keyboard:
select
the
desired
voice
bank
using
the
PRESET
or
USER
buttons,
then
use
the
-1
and
+1
or
number
(0
through
9)
buttons
to
select
a
voice
as
described
in
“Selecting
Voices”
on
page
7.
After
selecting
a
new
upper
voice,
press
the
SPLIT
button
again
to
move
ahead
to
the
split
point
display:
Assign
SPLIT
mode
split
point.
PLAY
SPLIT
point
point
=
C3
Current
split
point
key.
Immediately
after
this
display
appears
you
can
select
the
desired
split
point
by
pressing
the
corresponding
key
on
the
DS55
keyboard.
This
method
can
only
be
used
once
after
the
split
point
display
has
been
selected.
Further
changes
to
the
split
point
can
be
made
by
using
the
-1
and
+1
buttons.
Press
the
SPLIT
button
again
to
return
to
the
first
SPLIT
PLAY
display.
The
voice
and
split
point
assignments
are
stored
in
the
DS55's
memory,
and
will
be
recalled
whenever
you
enter
the
SPLIT
PLAY
mode
from
any
other
mode
—
until
new
assignments
are
made.
The
DUAL
PLAY
mode
allows
you
to
combine
and
play
two
voices
from
any
of
the
DS55
voice
banks
across
the
entire
keyboard.
You
can
also
specify
an
amount
of
“detune”
between
the
two
voices
used,
creating
a
thicker,
distinctly
''multi-instru-
ment”
sound.
Up
to
4
notes
can
be
played
simultaneously
in
the
DUAL
PLAY
mode.
Press
the
DUAL
button
in
the
PLAY
MODE
group
to
enter
the
DUAL
PLAY
mode.
D
U11
1stVoice
Bank,
number
and
name
of
1st
voice.
ASS
2ndVoice
Bank,
number
and
name
of
2nd
voice.
After
you've
selected
the
DUAL
PLAY
mode
by
pressing
the
DUAL
button,
as
described
above,
pressing
the
DUAL
button
again
causes
a
display
similar
to
the
following
to
appear:
Assign
1st
DUAL
mode
voice.
PLAY
DUAL
tone
1
U11
FirstVoice
Currently
selected
1st
voice
name.
Currently
selected
1st
voice
bank
and
number.
You
can
now
select
a
new
1st
voice
for
the
DUAL
PLAY
mode:
select
the
desired
voice
bank
using
the
PRESET
or
USER
buttons,
then
use
the
-1
and
+1
or
number
(0
through
9)
buttons
to
select
a
voice
as
described
in
“Selecting
Voices”
on
page
7.
THE
PLAY
MODES,
TUNING
&
DELAY
9

10
MASTER
TUNE
After
selecting
a
new
ist
voice,
press
the
DUAL
button
again
to
assign
the
2nd
voice:
Assign
2nd
DUAL
mode
voice.
PLAY
DUAL
tone
2
A
SecondVoice
Currently
selected
2nd
voice
name.
Currently
selected
2nd
voice
bank
and
number.
You
can
now
select
a
new
2nd
voice
for
the
DUAL
PLAY
mode:
select
the
desired
voice
bank
using
the
PRESET
or
USER
buttons,
then
use
the
-1
and
+1
or
number
(0
through
9)
buttons
to
select
a
voice
as
described
in
“Selecting
Voices”
on
page
7.
After
selecting
a
new
2nd
voice,
press
the
DUAL
button
again
to
move
ahead
to
the
detune
display:
PLAY
DUAL
dual
detune
=
07
Detune,
as
the
name
implies,
makes
it
possible
to
alter
the
relative
pitches
of
the
two
voices
used
in
the
DUAL
mode.
Slight
detuning
can
thicken
the
overall
sound
by
producing
sympathetic
“beats”
between
the
two
voices.
The
detune
range
is
from
00
to
7,
with
a
setting
of
“00”
producing
no
detune
effect.
The
desired
detune
value
can
be
entered
either
by
using
the
-1
and
+1
buttons,
or
by
pressing
the
appropriate
number
button
(0
through
7).
Press
the
DUAL
button
again
to
return
to
the
first
DUAL
PLAY
display.
The
voice
assignments
and
detune
setting
are
stored
in
the
DS55’s
memory,
and
will
be
recalled
whenever
you
enter
the
DUAL
PLAY
mode
from
any
other
mode
—
until
new
assignments
are
made.
There
may
be
situations
in
which
you
need
to
tune
the
DS55
to
other
instruments
or
recorded
material
—
the
MASTER
TUNE
function
allows
you
to
do
just
that.
Press
the
TUNE
button
to
call
the
MASTER
TUNE
function:
Master
tune
=+00
Tuning
can
be
adjusted
over
a
range
of
-64
to
+63
by
using
the
-1
and
+1
buttons,
or
by
directly
entering
the
desired
tune
value
using
the
number
buttons
(0
through
9).
Remember
to
enter
two
digits
when
entering
the
tune
value
via
the
number
buttons.
The
”+/-"
button
located
to
the
right
of
the
+1
button
can
be
used
to
change
a
“+”
setting
to
a
'—'
one,
and
vice
versa.
A
setting
of
“+00”
corresponds
to
standard
concert
pitch
—
i.e.
A3
=
440
Hz.
“+”
settings
increase
pitch
while
'—'
settings
lower
pitch.
Each
increment
corresponds
to
approximately
1.56
cents
(one
cent
is
one-hundredth
of
a
semitone).
THE
PLAY
MODES,
TUNING
&
DELAY
4)

e
USING
THE
DELAY
The
DS55
has
a
built-in
delay
effect
system
that
can
be
used
to
add
extra
ambi-
EFFECTS
ence
and
depth
to
any
of
its
voices.
The
delay
system
is
controlled
by
the
three
DELAY
buttons
—
ON/OFF,
SHORT
and
LONG.
The
delay
effect
can
be
turned
ON
or
OFF
using
the
ON/OFF
button.
The
SHORT
button
selects
a
short
delay
time,
and
the
LONG
button
selects
a
long
delay
time.
The
DS55
memorizes
the
delay
settings
you
make
for
each
voice
in
the
SINGLE
PLAY
mode
(USER
mem-
ory),
so
the
appropriate
settings
are
automatically
recalled
each
time
you
select
a
voice.
DELAY
settings
are
also
memorized
for
the
SPLIT
and
DUAL
PLAY
modes.
The
overall
length
of
the
SHORT
and
LONG
delay
effects
can
be
adjusted
using
the
FEEDBACK
control
on
the
rear
panel.
The
FEEDBACK
control
setting
affects
the
entire
delay
system
and
is
not
memorized
for
each
voice.
VOICE
EDITING
&
THE
STORE
FUNCTION
Understanding
and
Using
the
Edit
Function
Displays
The
DS55
offers
a
range
of
voice
editing
parameters
that
allow
you
to
edit
any
of
its
voices
—
PRESET
or
USER
—
to
create
subtle
variations
or
totally
new
sounds.
You
can
even
give
your
original
creations
original
titles
so
you
can
identify
them
at
a
glance.
To
edit
a
voice,
simply
select
it
in
the
normal
way,
then
use
any
of
the
editing
parameters
accessed
by
the
TONE,
AMP
EG,
BRL
EG,
LFO
or
FUNCTION
buttons
(the
various
editing
parameters
are
described
below).
Once
you're
satisfied
with
the
sound
you've
created,
use
the
STORE
function
(described
on
page
16)
to
store
the
new
voice
into
one
of
the
100
USER
memory
locations.
If
you
do
not
STORE
the
new
voice
into
a
USER
memory
location,
all
your
editing
work
will
be
lost
as
soon
as
you
select
a
different
voice
or
press
the
SINGLE
button.
Please
note
that
all
editing
takes
place
in
a
special
memory
location
called
the
“edit
buffer,”
and
that
any
changes
you
make
are
not
actually
made
to
the
original
voice
you
selected
for
editing,
but
to
a
“copy”
of
the
voice
residing
in
the
edit
buffer.
The
contents
of
the
edit
buffer
are
changed
each
time
you
select
a
new
voice
—
that's
why
you
have
to
STORE
an
edited
voice
to
a
USER
memory
location
if
you
want
to
keep
it.
Each
of
the
DS55's
EDIT
buttons
—
TONE,
AMP
EG,
BRL
EG,
LFO
and
FUNC-
TION
—
provides
access
to
a
number
of
related
editing
parameters.
When
you
press
the
TONE
button
in
the
EDIT
group,
for
example,
the
following
display
will
appear:
“T"
=
Tone
TONE
EDIT
[TWV]
$=
age
Al2
Tone
=+10
u
VI
=
Volume
|
]
Current
value
of
selected
edit
parameter.
Selected
edit
parameter.
Currently
selected
voice
bank
and
number
(i.e.
the
bank
and
number
of
the
voice
you
are
editing).
The
TONE
button
accesses
three
editing
parameters:
Tone,
Wave
and
Volume.
These
are
represented
by
the
three
letters
inside
the
square
brackets
to
the
right
of
the
top
line
of
the
display
—
[TWV].
When
you
first
press
the
TONE
button,
the
first
of
the
available
parameters
will
automatically
be
selected.
This
is
indicated
by
the
fact
that
the
letter
“T”
within
the
square
brackets
is
flashing.
The
other
para-
meters
—
“W”
and
“V”
—
can
be
selected
in
sequence
by
pressing
the
TONE
button.
If
you
press
the
TONE
button
again
after
the
last
parameter
—
"V"
in
this
case
—
is
selected,
the
first
parameter
will
be
selected
again.
11

12
TONE
-
[TONE
button]
Tone
Wave
Volume
AMPLITUDE
ENVELOPE
—
[AMP
EG
button]
This
process
repeats
as
many
times
as
you
press
the
TONE
button.
All
of
the
other
EDIT
buttons
work
in
the
same
way
—
any
of
the
parameters
accessed
by
an
EDIT
button
can
be
selected
by
pressing
the
same
EDIT
button
repeatedly
until
the
letter
representing
the
desired
parameter
begins
to
flash.
Once
the
desired
parameter
has
been
selected,
its
value
can
be
edited
by
using
the
-1
and
+1
buttons
or
by
directly
entering
the
value
using
the
number
buttons
(0
through
9).
When
a
parameter
is
selected
that
has
a
range
from
''—'
to
“+”
values,
the
“+/-"
button
located
to
the
right
of
the
+1
button
can
be
used
to
change
a
“+”
setting
to
a
'—'
one,
and
vice
versa.
Once
the
required
edits
have
been
made,
you
can
press
another
EDIT
button
to
access
and
edit
other
parameters,
press
the
STORE
button
to
access
the
STORE
function
that
allows
you
to
store
your
creation
in
a
USER
memory
location,
or
select
any
other
mode
by
pressing
the
appropriate
button.
The
TONE
button
accesses
two
parameters
(Tone
and
Wave)
that
change
the
basic
tone
or
timbre
of
the
voice,
and
one
parameter
(Volume)
that
adjusts
the
overall
volume
of
the
voice.
All
of
the
edit
parameters
accessed
by
the
TONE
button
have
a
range
of
-10
to
+10.
A
setting
of
"+00"
represents
the
original
value
of
the
selected
parameter
(i.e.
no
change).
If
an
exclamation
mark
(!)
appears
to
the
right
of
the
parameter's
value,
the
parameter
is
set
at
its
limit
and
cannot
be
increased
or
decreased
further.
“T"
=
Tone
“W”
=
Wave
“Y”
=
Volume
TONE EDIT
[TWV]
A12
Tone
=+10
This
parameter
changes
the
brilliance
of
the
voice.
Brilliance
can
be
increased
by
setting
“+”
values,
or
reduced
by
setting
“-”
values.
This
parameter
actually
changes
the
timbre
of
the
voice
by
altering
its
harmonic
structure.
The
audible
change
produced
will
depend
to
a
large
degree
on
the
original
voice
data.
The
Volume
parameter
adjusts
the
volume
of
the
voice.
This
is
handy
since
chang-
ing
the
Tone
and
or
Wave
values
can
significantly
alter
the
perceived
volume
of
the
voice.
Use
Volume
to
set
the
voice
to
the
required
volume
level.
Volume
can
be
increased
by
setting
“+”
values,
or
reduced
by
setting
'—'
values.
The
AMP
EG
button
accesses
three
parameters
that
shape
the
“amplitude
enve-
lope”
of
the
voice.
The
amplitude
envelope
determines
how
fast
the
attack
of
the
sound
is,
how
quickly
the
sound
decays
after
the
attack,
and
how
quickly
the
sound
level
returns
to
zero
after
the
note
(key)
is
released.
In
addition
to
the
tone
or
timbre
of
the
sound,
the
amplitude
envelope
is
one
of
the
most
important
factors
in
“identifying”
a
specific
voice.
A
simple
graphic
representation
of
an
amplitude
envelope
is
given
below.
DECAY
SUSTAIN
(not
adjustable)
LEVEL
RELEASE
TIME
yo
ma

|
All
of
the
edit
parameters
accessed
by
the
AMP
EG
button
have
a
range
of
-10
to
f
+10.
A
setting
of
“+00”
represents
the
original
value
of
the
selected
parameter
(i.e.
no
change).
If
an
exclamation
mark
(l)
apears
to
the
right
of
the
parameter's
value,
the
parameter
is
set
at
its
limit
and
cannot
be
increased
or
decreased
further.
“A”
=
Attack
“D”
=
Decay
AMP
EG
EDIT[ADR]
|
A12
Attack
=+10
“R”
=
Release
Attack
The
Attack
parameter
determines
how
fast
the
level
of
the
voice
increases
from
zero
to
maximum
when
a
key
is
played.
Percussive
voices
such
as
piano
and
harpsichord,
for
example,
have
a
very
fast
attack,
while
strings
and
flute
type
|
voices
have
a
slower,
gentler
attack.
The
attack
speed
can
be
increased
by
setting
“on
o
nm
+”
values,
or
reduced
by
setting
'—'
values.
Decay
Decay
is
the
amount
of
time
it
takes
for
the
sound
to
fall
to
the
sustain
level
of
the
voice
after
the
attack
has
finished.
Some
voices
have
no
sustain
and
will
decay
to
e
zero
before
the
key
is
released.
The
decay
speed
can
be
increased
by
setting
“+”
E
values,
or
reduced
by
setting
'—'
values.
Release
Release
determines
the
length
of
time
it
takes
for
the
level
of
the
voice
to
fall
to
zero
after
a
note
(key)
played
is
released.
With
voices
that
have
no
sustain
(i.e.
they
decay
to
zero
before
the
key
is
released),
the
release
parameter
only
applies
if
a
key
is
released
before
the
sound
decays
to
zero.
The
release
speed
can
be
”. $”
|
increased
by
setting
“+”
values,
or
reduced
by
setting
''—'
values.
BRILLIANCE
The
BRL
EG
button
accesses
three
parameters
that
shape
the
“brilliance
enve-
ENVELOPE
—
`
one"
of
the
voice.
The
brilliance
envelope
has
the
same
parameters
as
the
ampli-
[BRL
EG
button]
tude
envelope,
described
above.
The
difference
is
that
the
brilliance
envelope
changes
the
tone
of
the
voice
rather
than
its
level.
All
of
the
edit
parameters
accessed
by
the
BRL
EG
button
have
a
range
of
-10
to
+10.
A
setting
of
“+00”
represents
the
original
value
of
the
selected
parameter
(i.e.
no
change).
If
an
exclamation
mark
(!)appears
to
the
right
of
the
parameter's
value,
the
parameter
is
set
at
its
limit
and
cannot
be
increased
or
decreased
|
P
further.
“A"
=
Attack
“D”
=
Decay
BRL
EG
EDIT[ADR]
A12
Attack
=+10
'R'
=
Release
|
Attack
The
Attack
parameter
determines
how
fast
the
tone
of
the
voice
reaches
its
maxi-
|
mum
brilliance
when
a
key
is
played.
The
brilliance
attack
speed
can
be
increased
li
l
l
“non
won
by
setting
“+”
values,
or
reduced
by
setting
'—'
values.
Decay
Decay
is
the
amount
of
time
it
takes
for
the
brilliance
of
the
sound
to
fall
to
an
intermediate
level
after
the
attack
has
finished.
The
brilliance
decay
speed
can
be
“uae
increased
by
setting
“+”
values,
or
reduced
by
setting
'—'
values.
Release
Release
determines
the
length
of
time
it
takes
for
the
tone
of
the
voice
to
fall
to
|
minimum
brilliance
after
a
note
(key)
played
is
released.
The
brilliance
release
|
speed
can
be
increased
by
setting
“+”
values,
or
reduced
by
setting
'—'
values.
|
VOICE
EDITING
&
THE
STORE
FUNCTION
13
|
A

LOW
FREQUENCY
OSCILLATOR
(VIBRATO
&
TREM-
OLO)—
[LFO
button]
Speed
Vibrato
Tremolo
OTHER
VOICE
EDIT-
ING
FUNCTIONS
—
[FUNCTION
button]
Pitch
Bend
Range
Modulation
Wheel
Function
Breath
Controller
Function
14
The
three
parameters
accessed
by
the
LFO
button
control
operation
of
the
internal
low-frequency
oscillator.
The
low-frequency
oscillator
is
an
oscillator
with
a
fre-
quency
range
from
a
few
tenths
of
a
second
to
several
seconds,
which
is
used
to
control
slowly
varying
effects
such
as
tremolo
and
vibrato.
The
LFO
parameters
allow
you
to
control
the
speed
of
the
LFO,
the
amount
of
tremolo
(periodic
volume
variation)
it
produces,
and
the
amount
of
vibrato
(periodic
pitch
variation)
it
pro-
duces.
Tremolo
and
vibrato
effects
can
be
produced
simultaneously.
“S”
=
Speed
“Y”
=
Vibrato
“T”
=
Tremolo
LFO
EDIT
A12
Speed
Adjusts
the
speed
of
the
LFO.
LFO
speed
can
be
increased
by
setting
“+”
values,
or
reduced
by
setting
'—'
values.
Sets
the
depth
of
the
vibrato
effect
produced
by
the
LFO.
Vibrato
depth
can
be
increased
by
setting
“+”
values,
or
reduced
by
setting
“—"
values.
Sets
the
depth
of
the
tremolo
effect
produced
by
the
LFO.
Tremolo
depth
can
be
increased
by
setting
“+”
values,
or
reduced
by
setting
“~"
values.
The
parameters
accessed
by
the
FUNCTION
button
do
not
directly
affect
the
basic
sound
of
the
voice
being
edited,
but
they
control
a
number
of
important
“support”
parameters
such
as
how
the
DS55's
controllers
(pitch
bend
wheel
and
modulation
wheel)
function,
etc.
“P”
=
Pitch
Bend
Range
“M”
=
Modulation
Wheel
“B”
=
Breath
Controller
“N”
=
Name
of
Voice
“A”
=
Assign
Mode
“Y”
=
Velocity
Depth
“T"
=
Transpose
FUNC
ED[
PMBNAVT]
Pit
bend
rng=
12
This
parameter
determines
the
pitch
range
covered
by
the
DS55's
pitch
bend
wheel.
The
range
of
this
parameter
is
from
00
to
12,
with
each
increment
corre-
sponding
to
a
semitone.
A
setting
of
“00”
produces
no
pitch
bend
even
if
the
pitch
bend
wheel
is
moved.
A
setting
of
12
gives
a
total
range
of
2
octaves
—
one
up
and
one
down
(12
semitones
=
1
octave).
This
parameter
determines
whether
the
modulation
wheel
controls
vibrato,
trem-
olo
or
wow-wow.
The
three
possible
settings
are
“vib”
for
vibrato,
“tre”
for
tremolo,
and
“wow”
for
wow-wow.
If
a
modulation
wheel
function
for
the
se-
lected
voice
has
not
been
previously
selected,
“—”
appears
on
the
display
in
place
of
“vib,”
“tre,”
or
“wow.”
The
Breath
Controller
Function
can
be
utilized
by
plugging
a
YAMAHA
BC1
or
BC2
into
the
BREATH
jack.
This
parameter
determines
whether
a
YAMAHA
BC1
or
BC2
breath
controller
plugged
into
the
DS55's
BREATH
jack
controls
vibrato,
trem-
olo
or
wow-wow.
The
three
possible
settings
are
“vib”
for
vibrato,
“tre”
for
tremolo,
and
“wow”
for
wow-wow.
If
a
breath
controller
function
for
the
selected
.
voice
has
not
been
previously
selected,
“—”
appears
on
the
display
in
place
of
“vib,”
“tre,”
or
“wow.”
14
en

SW
Name
of
Voice
This
function
lets
you
create
an
original
title
for
a
new
voice
you
have
created,
so
you
can
easily
identify
it
later.
When
the
Name
function
is
called,
the
current
name
of
the
voice
being
edited
is
shown
on
the
lower
line
of
the
LCD,
and
an
underline
cursor
appears
under
the
first
character
of
the
voice
name.
|
|
i
FUNC
ED[PMBNAVT]
|
|
NAME:
VoiceName
|
The
DS55's
keyboard
(white
keys)
is
then
used
to
enter
a
new
character
at
the
i
cursor
position.
Numbers
are
entered
using
the
number
buttons.
Refer
to
the
kev-
l
board/character
chart
below
to
see
which
kevs
correspond
to
which
characters.
|
Note
that
the
C1
key
switches
from
upper
to
lower
case,
and
vice
versa.
When
|
upper
case
is
selected,
“NAME”
to
the
left
of
the
lower
LCD
line
will
be
in
upper-
|
case
characters,
while
it
will
appear
in
lower-case
characters
when
the
lower-case
|
mode
is
selected.
When
a
character
has
been
entered,
press
a
black
key
on
the
DS55
keyboard
to
move
the
cursor
one
character
to
right,
ready
to
enter
the
next
character
of
your
voice
name.
The
—1
and
+1
buttons
can
also
be
used
to
move
the
d
e
cursor
backward
and
forward,
respectively.
Continue
entering
the
required
charac-
ters
(or
spaces)
until
your
voice
name
is
complete.
; |
—
Capital
abcdef
ghijkimnopqrstuvwxyz/::;?
<—
Lowercase
Press
C1
(the
lowest
key)
to
Press
a
white
key
to
enter
Press
a
black
key
to
move
to
the
next
select
lowercase
or
capital
the
corresponding
charac-
character
in
the
voice
name.
(You
can
letters.
ter.
also
use
the
+/-
keys
to
move
through
the
name.)
Note:
”+”
and
“—"
symbols
can
be
entered
using
the
+/-
(SYNC)
button
—
press
“uon
EI
once
for
“+”
or
twice
for
“-.”
Assign
Mode
The
Assign
Mode
parameter
sets
the
DS55
for
either
monophonic
(mono)
or
polyphonic
(poly)
operation.
The
polyphonic
mode
is
the
one
you'll
normally
use
with
most
voices,
since
it
allows
you
play
up
to
8
notes
simultaneously.
The
mono
i
mode
is
useful
for
certain
types
of
voices
—
bass
voices
and
some
sound
effects
i
—
since
it
can
provide
a
thicker, richer
sound.
Velocity
Depth
Velocity
Depth
determines
how
the
DS55
responds
to
keyboard
dynamics
(i.e.
how
hard
or
fast
you
play
the
keys).
The
Velocity
Depth
range
is
from
0
to
7.
The
higher
the
setting,
the
greater
the
response
will
be
to
variations
in
the
way
you
play
the
keys.
The
amount
of
variation
produced
will
depend
on
the
initial
settings
of
individual
voices.
Transpose
The
transpose
parameter
allows
you
to
shift
the
pitch
of
the
entire
keyboard
up
or
down
by
a
maximum
of
2
octaves
in
semitone
increments.
The
range
is
from
-24
to
+24.
A
setting
of
+4,
for
example,
will
raise
the
pitch
of
the
keyboard
by
a
major
third
(middle
C
will
have
the
pitch
of
E
above
middle
C,
etc.).
VOICE
EDITING
8:
STORE
FUNCTION
15
|

THE
STORE
The
STORE
button
actually
accesses
2
functions:
Memory
Protect
and
Store.
As
FUNCTION
—
with
the
voice
editing
functions
described
above,
when
Memory
Protect
is
off
the
[STORE
button]
“P”
and
“S”
functions
are
alternately
selected
by
pressing
the
STORE
button.
Please
note
that
the
STORE
mode
can
only
be
selected
from
a
voice
editing
mode
or
the
SINGLE
PLAY
mode.
“P”
ZM
P
STORE
[PS]
|
—
Se
EH
rotect
MEM.protect
=
on
|
Memory
protect
currently
“on.”
Memory
protect
function
selected.
Memory
Protect
Memory
Protect
should
normally
be
turned
“on”
to
prevent
accidental
alteration
of
data
in
the
DS55
memory.
It
is
turned
on
automatically
whenever
the
POWER
switch
is
turned
ON.
Memory
Protect
must
be
turned
“off,”
however,
whenever:
you
store
a
voice
that
you
have
edited
to
a
new
memory
location.
If
you
do
not
">
turn
Memory
Protect
off,
the
STORE
function
cannot
be
selected.
Once
you
have
completed
the
STORE
operation,
it's
a
good
idea
to
turn
Memory
Protect
back
on
to
protect
your
data.
Memory
protect
can
be
turned
"off
by
pressing
the
-1
button,
and
'on'
by
pressing
the
+1
button.
Store
When
you
press
the
STORE
button
a
second
time
after
turning
Memory
Protect
“off,”
a
display
similar
to
the
following
will
appear:
Store
AQ1
to
Ux%
a
The
number
you
input
will
appear
here.
Input
number!
The
first
voice
on
the
upper
line
is
the
one
you
have
edited
and
will
be
storing
to
a
new
user
memory
location,
and
the
second
(with
the
flashing
asterisks)
is
the
user
memory
location
you
specify
to
which
the
voice
will
be
stored.
Use
the
number
buttons
to
enter
the
number
of
the
memory
location
you
wish
to
store
to
(enter
NA
two
digits).
When
you've
entered
the
second
digit,
the
display
will
look
something
like
this:
Store
AO1
to
U23
<VoiceName>
OK
7
Now
press
the
+1
(YES)
button
to
execute
the
STORE
operation,
or
the
-1
(NO)
button
to
cancel
the
STORE
operation
and
return
to
the
previous
display.
Note:
When
you
store
the
voice
you've
created
to
a
location
in
the
User
bank,
any
voice
data
previously
in
that
location
will
be
erased.
16
VOICE
EDITING
&
THE
STORE
FUNCTION

AUTO
PERFORMANCE
The
DS55
Auto
Performance
function
provides
a
range
of
43
different
Auto
Per-
formance
sequences
that
can
be
used
as
accompaniment
for
performance
or
prac-
tice.
The
43
Auto
Performance
sequences
are
divided
into
three
types
—
PAT-
TERN
CHANGE,
KEY
SHIFT
and
ARPEGGIO
—
as
shown
in
the
Auto
Performance
Sequence
list,
below.
In
all
cases,
the
selected
Auto
Performance
sequence
is
controlled
by
the
keys
C1
through
C2
(the
lowest
octave
on
the
DS55
keyboard).
N
Auto
Performance
Sequence
list
Number
of
Number
of
Nime
Melody
Notes*
Nanie
Melody
Notes*
Cruise
TV
Game
Latin
SoulKing
i
Swan
Dreaming
i
e
Oh!Blues
Country
Respect
Bubble
Roadstar
Maria
LA
Night
Japan
Memories
Samba
Wendy
:
Fly
Away
Power
pop
Salsa
I
saw
H.
Discoman
Metalkid
HeilR&R
Fusion
3
Finger
Nature
Dog
walk
IceCream
Ballade
Meatball
Elec
Pop
TubeBell
Pizz
Brastring
Syn
String
KEY
SHIFT
hy
E
Š
E
EN
:
A
ARPEGGIO
Syn
Brass
Tin
Perc
Nasty
Wood
Perc
NNNNYyr-=NNNA2-ODNNN--=mn
YF
ed
W
ra
N
ra
NEP
BR
ra
ba
RB
Re
RB
Ne
Be
RP
PP
eee
KEY
SHIFT
*
Number
of
Melody
Notes
is
the
number
of
notes
that
can
be
Played
simultaneously
on
the
upper
i
octaves
of
the
keyboard
while
the
Auto
Performance
sequence
is
Playing.
When
an
Auto
Perform-
|
ance
sequence
is
playing,
the
available
melody
note(s)
have
no
initial
touch
response.
|
Pattern
Change
The
pattern
change
sequences
provide
13
different
patterns
(selected
by
pressing
keys
C1
through
C2)
of
between
1
and
4
measures
in
length
that
can
be
combined
to
create
entire
compositions
in
a
number
of
different
musical
styles.
The
C1
key,
i
for
example
selects
an
introduction,
the
F1
key
selects
a
subdominant
pattern,
the
G1
key
selects
a
dominant
pattern,
the
D#1
key
selects
an
ending,
etc.
All
you
need
to
do
is
to
select
and
start
the
desired
PATTERN
CHANGE
sequence,
then
select
the
desired
patterns
by
pressing
the
appropriate
keys.
17
zz...

18
The
patterns
selected
by
the
low-octave
keys
generally
conform
to
the
diagram
below.
the
"OTHER
VARIATIONS’
keys
select
patterns
and
'turn-arounds'
that
vary
according
to
the
selected
Auto
Performance
Sequence.
ENDING
INTRO
OR
COUNT-IN
OTHER
VARIATIONS
BASIC
TONIC
PATTERN:
Im7
PATTERN
Vim
PATTERN
lim
PATTERN
DOMINANT
(V)
PATTERN
SUBDOMINANT
(IV)
PATTERN
A
basic
3-chord
progression
can
be
constructed
with
any
of
these
Auto
Perform-
ance
sequences
using
the
C
(BASIC
TONIC
PATTERN),
F
(SUBDOMINANT
PAT-
TERN)
and
G
(DOMINANT
PATTERN)
keys.
Once
you
get
the
feel
of
using
these
three
basic
patterns,
try
adding
the
other
patterns
and
variations.
Key
Shift
The
Key
Shift
sequences
are
all
based
on
a
single
pattern
that
can
be
transposed
to
any
key
by
pressing
the
appropriate
key
(between
C1
and
C2)
on
the
DS55
keyboard.
This
is
ideal
for
simple
'3-chord'
type
progressions.
The
KEY
SHIFT
patterns
are
between
1
and
4
measures
in
length.
Arpeggio
Arpeggio,
as
the
name
suggests,
produces
automatic
arpeggios
when
two
or
more
notes
are
played
on
the
lower
octave
of
the
DS55
keyboard.
The
DS55
automati-
cally
creates
appropriate
arpeggios
for
the
notes
or
chord
played
on
the
keyboard.
LISTEN
TO
THE
To
hear
the
type
of
sound
that
can
be
achieved
using
the
DS55
Auto
Performance
DEMONSTRATION
function,
try
listening
to
the
demonstration
sequences
provided.
SEQUENCES
1.
While
in
the
SINGLE
PLAY
mode,
press
the
STORE
and
TUNE
buttons
simul-
taneously.
The
following
display
will
appear:
Demo
song
select
Hit
tenky
0-9
2.
Press
any
of
the
number
keys
—
0
through
9
—
to
hear
one
of
the
10
demon-
stration
sequences.
You
can
switch
to
another
demonstration
sequence
at
any
time
by
pressing
a
different
number
button.
You
can
play
along
on
the
key-
board
(one
note
at
a
time)
while
the
demonstration
sequence
is
playing.
3.
Press
the
AUTO
PERFORMANCE
START/STOP
button
to
stop
the
demo,
then
any
other
mode
button
to
exit
from
the
demonstration
mode.
AU
Jm
NA
AU
Other manuals for DS-55
1
Table of contents
Other Yamaha Synthesizer manuals

Yamaha
Yamaha CS2x User manual

Yamaha
Yamaha DX100 User manual

Yamaha
Yamaha DX100 User manual

Yamaha
Yamaha P-120 P-120S User manual

Yamaha
Yamaha FB-01 User manual

Yamaha
Yamaha SY55 User manual

Yamaha
Yamaha CS-70M User manual

Yamaha
Yamaha CP35 User manual

Yamaha
Yamaha S-03SL User manual

Yamaha
Yamaha YPP-35 Assembly instructions

Yamaha
Yamaha DX5 User manual

Yamaha
Yamaha DX9 User manual

Yamaha
Yamaha CS-60 User manual

Yamaha
Yamaha EOS B900 User manual

Yamaha
Yamaha YPP-15 Assembly instructions

Yamaha
Yamaha PSR-S670 User manual

Yamaha
Yamaha SY-2 User manual

Yamaha
Yamaha CS-30 User manual

Yamaha
Yamaha PF-80 User manual

Yamaha
Yamaha Electone Stagea ELS-01 User manual