Yamaha Motif XS User manual

Contents
MOTIF XS Using Display Templates 1
Using Display Templates
Version 1.50 of the MOTIF XS firmware saw the introduction of a new feature for customizing the design of
displays using display templates. Yamaha has prepared a range of display templates for use with this
feature. In order to make use of these templates, you will need to transfer them to your MOTIF XS using the
network file-sharing function or a USB flash-memory device. Following the steps outlined below, you can
then use these display templates to customize the appearance of MOTIF XS displays.
Contents
Transferring Display Templates via a Network................................................2
Connecting your MOTIF XS and Computer via a Network...................2
Configuring the Network.........................................................................2
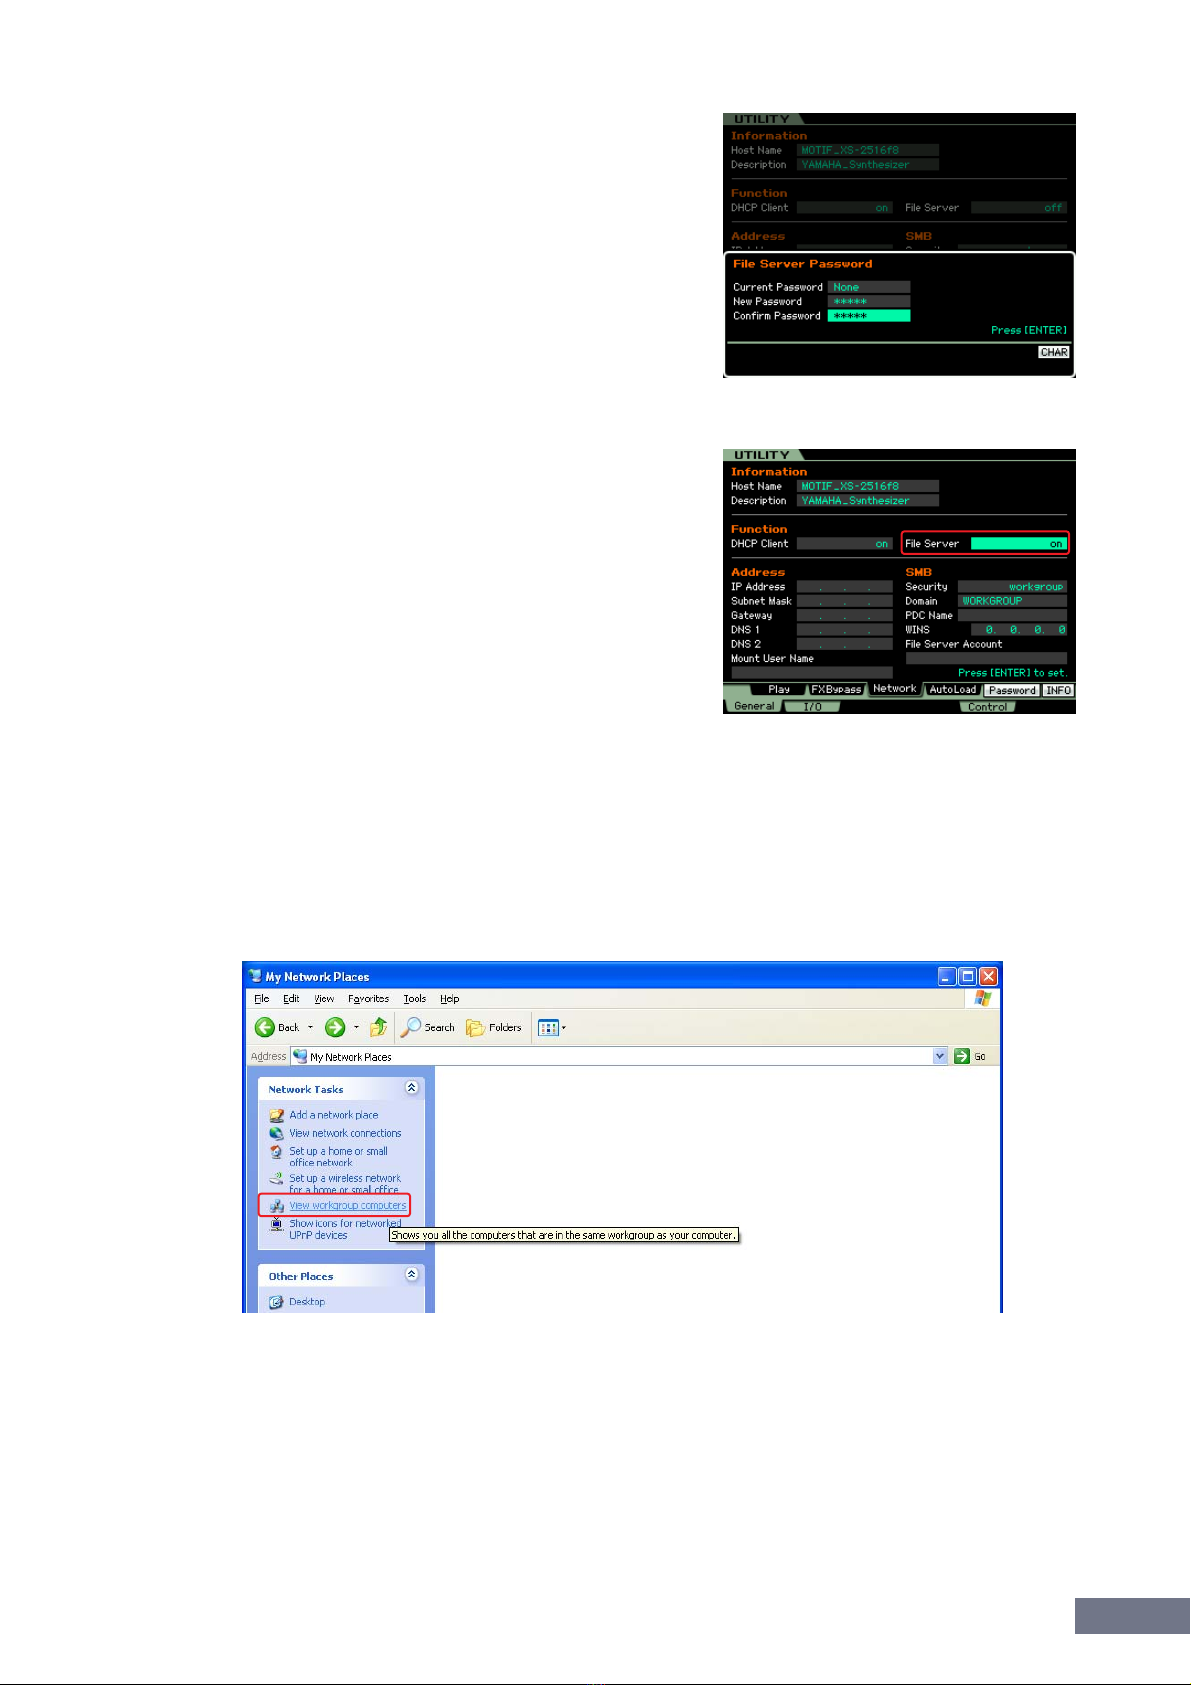
Network Settings on MOTIF XS ..................................................................2
Network Settings on Computer ...................................................................3
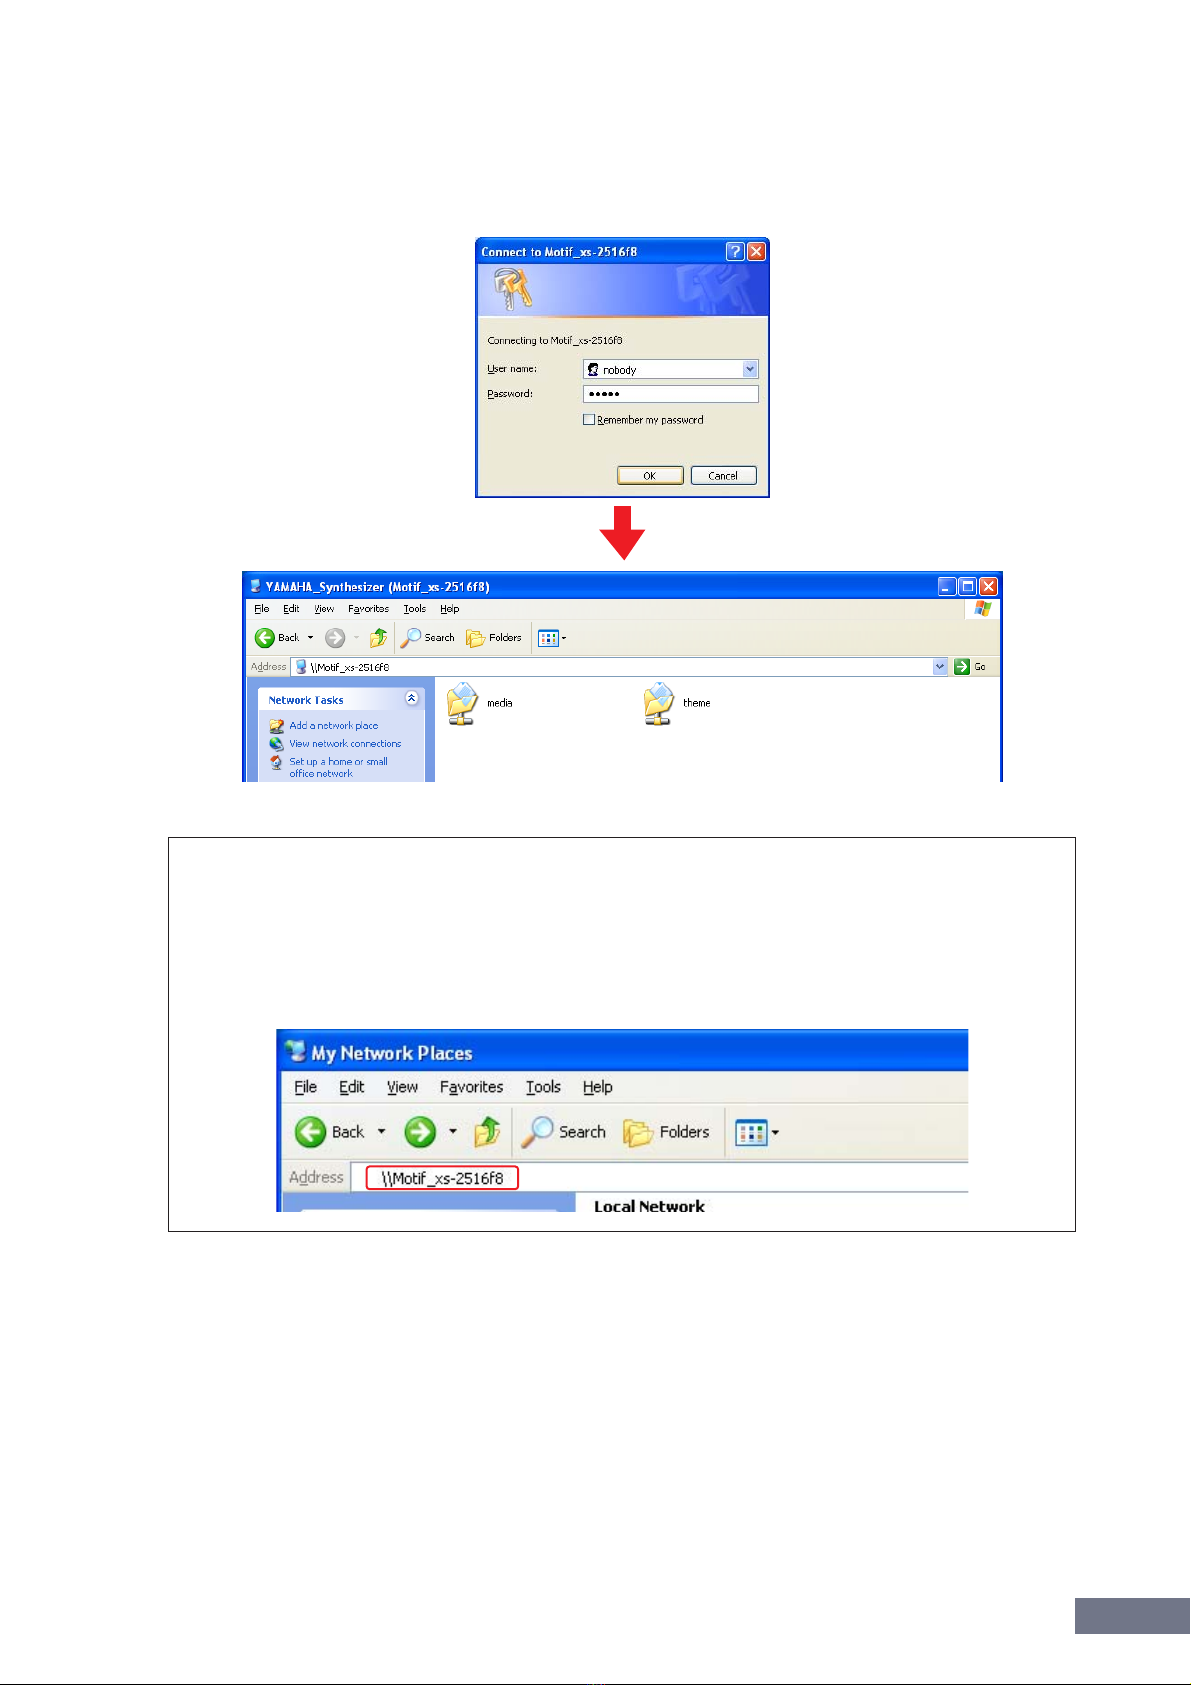
Windows XP Settings.......................................................................3
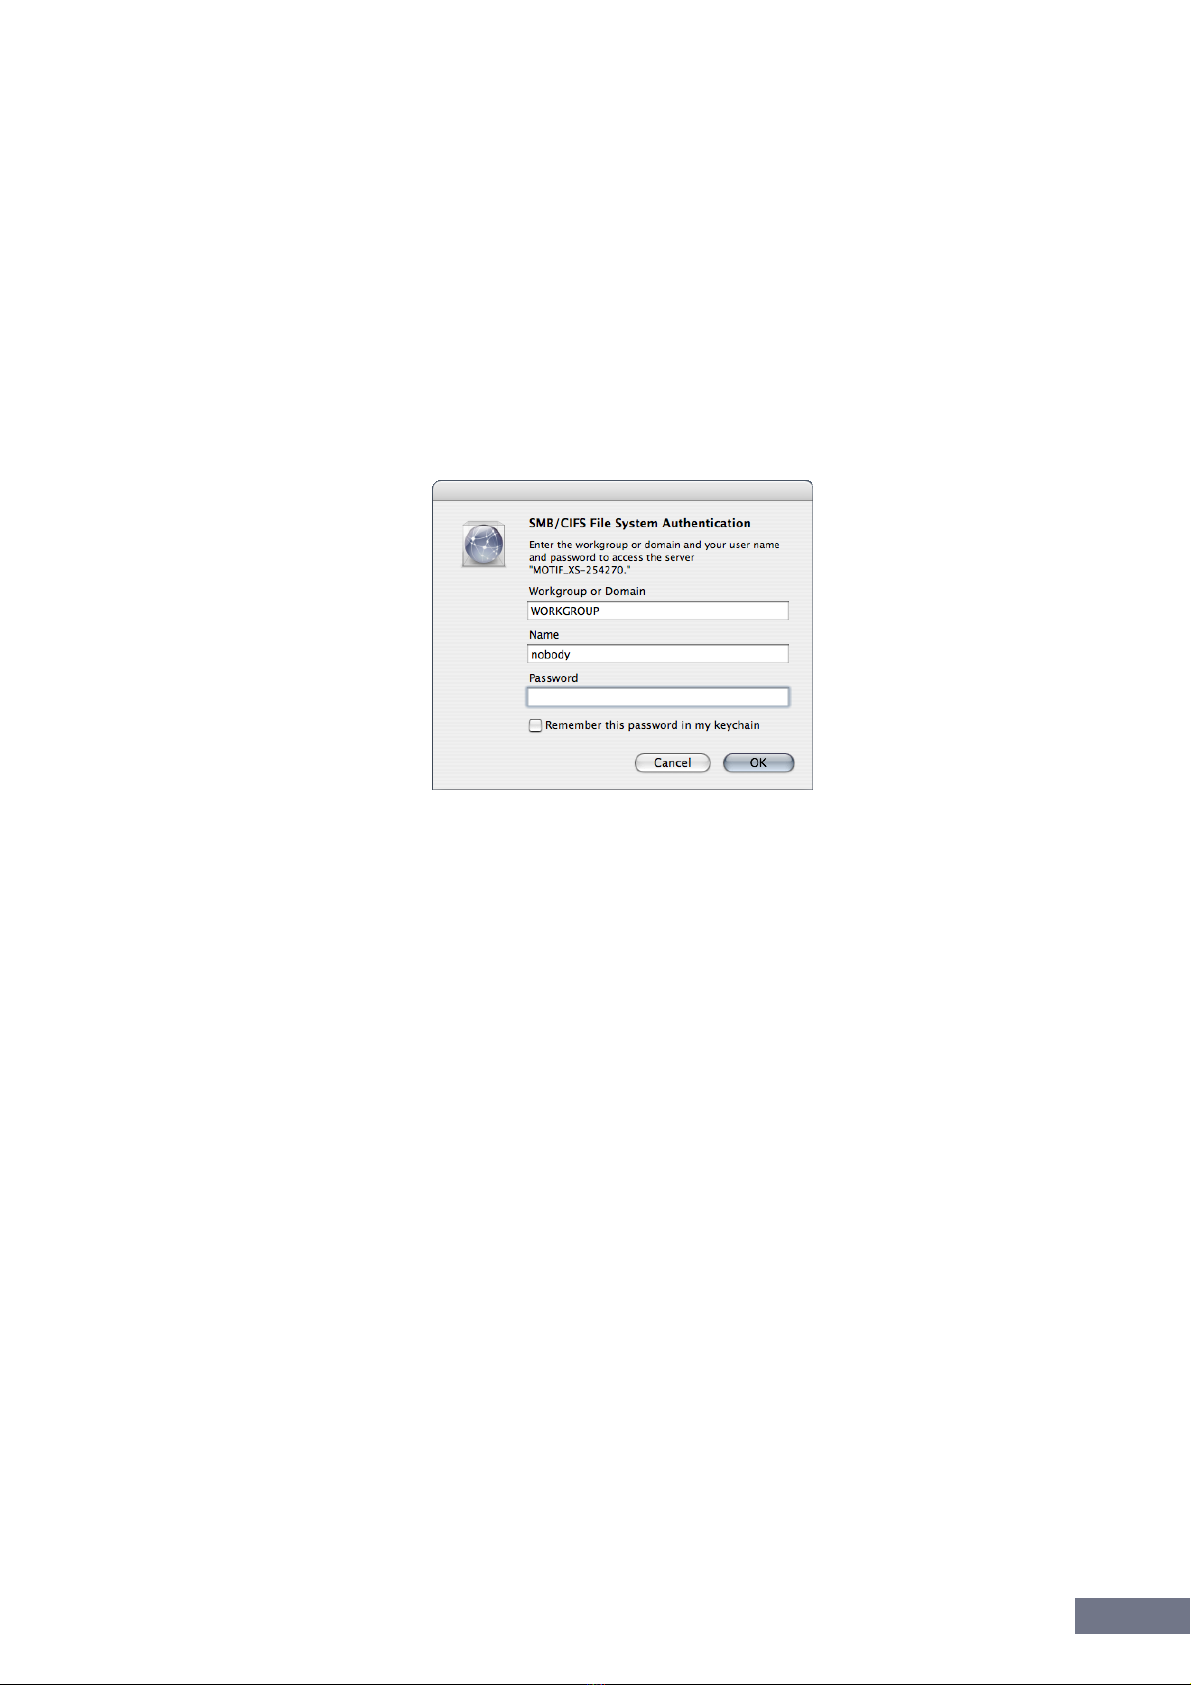
Mac OS X 10.5 (Leopard) Settings ..................................................5
Mac OS X 10.4 (Tiger) Settings .......................................................7
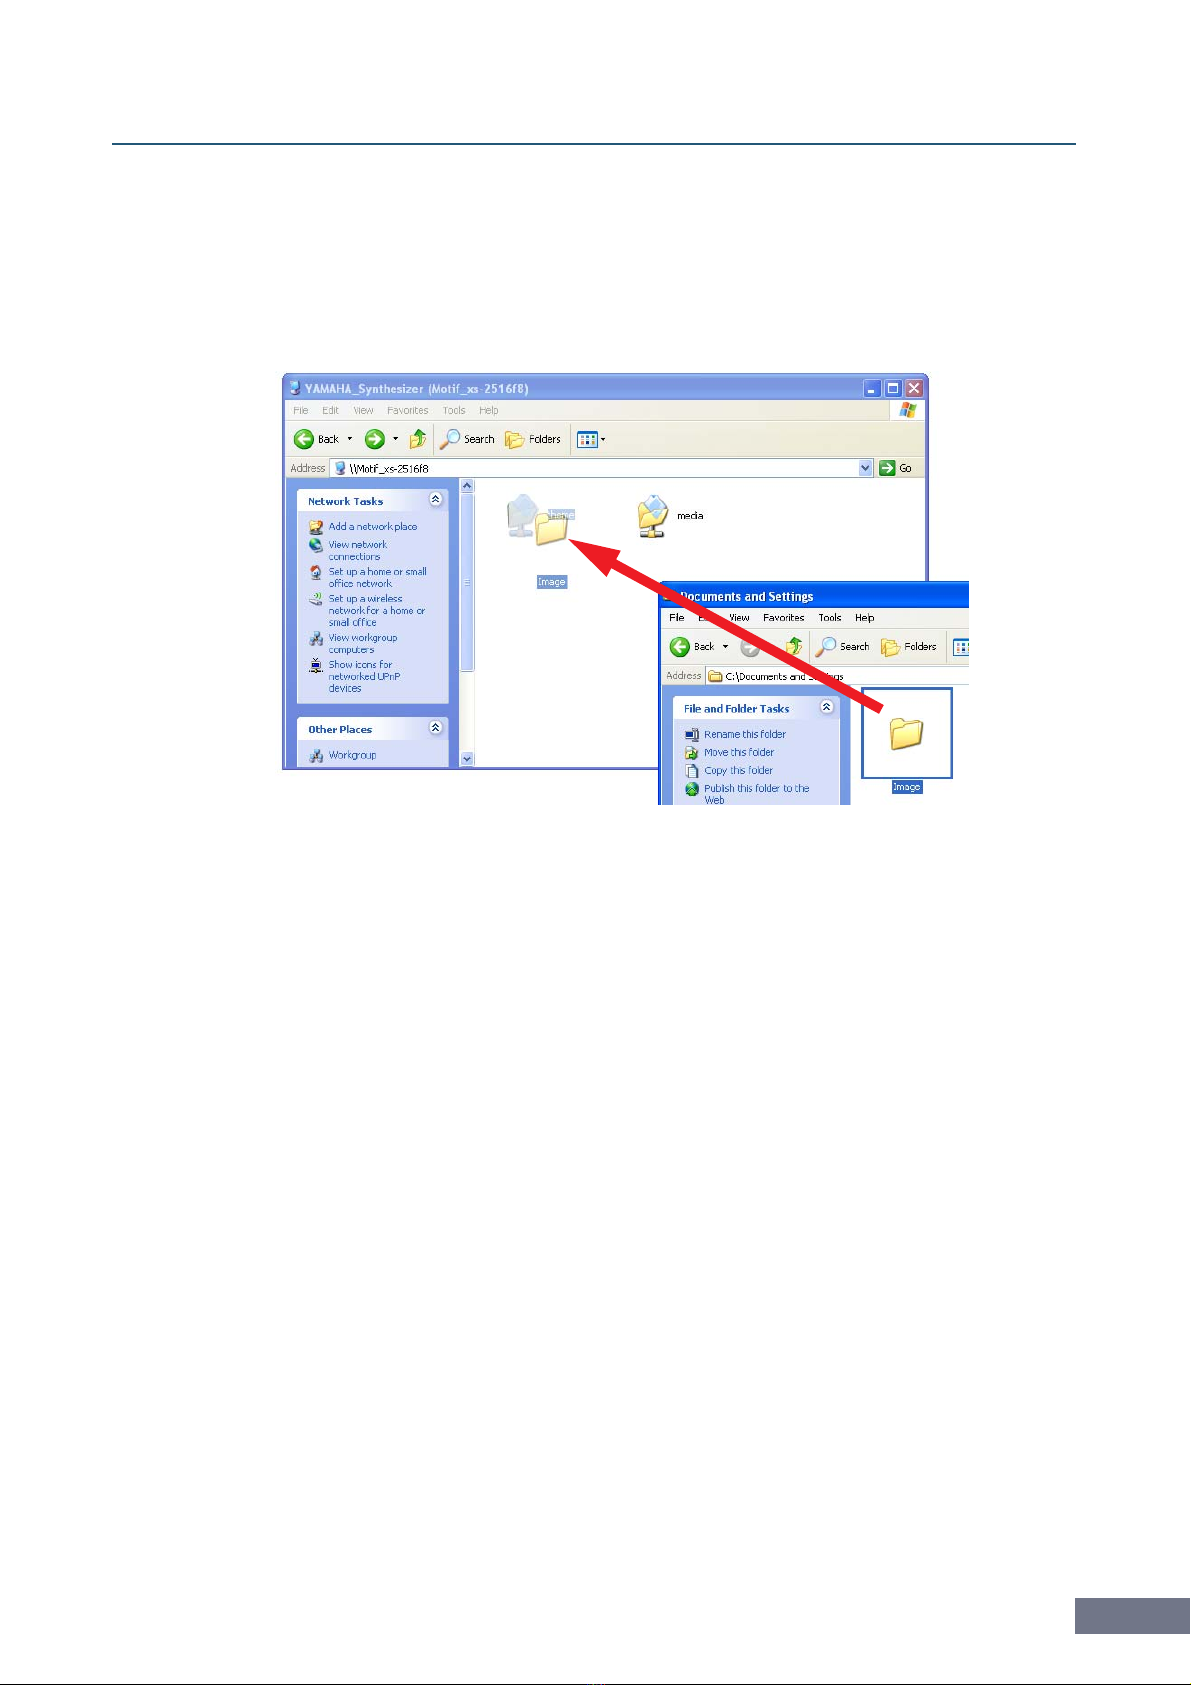
Copying a Display Template onto the MOTIF XS ..................................8
Restoring the Original Displays.............................................................9
Transferring Display Templates via USB Flash Memory ..............................10
Restrictions on Display Template Usage.......................................................10
SPECIAL NOTICE
• Copying of the commercially available musical data and content data including but not limited to MIDI data and/or
audio data is strictly prohibited except for your personal use.
• The display templates and this manual are the exclusive copyrights of Yamaha Corporation.
• Copying of the display templates or reproduction of this manual in whole or in part by any means is expressly
forbidden without the written consent of the manufacturer.
•Yamaha makes no representations or warranties with regard to the use of the display templates and documentation
and cannot be held responsible for the results of the use of this manual and the data.
•Future upgrades of application and system software, any changes in specifications and functions, and any changes of
the display templates data will be announced separately.
• The screen displays as illustrated in this manual are for instructional purposes, and may appear somewhat different
from the screens which appear on your computer.
• Windows is a registered trademark of Microsoft®Corporation in the United States and other countries.
• Apple, Mac and Macintosh are trademarks of Apple Inc., registered in the U.S. and other countries.
• The company names and product names in this manual are the trademarks or registered trademarks of their
respective companies.
© 2009 Yamaha Corporation. All rights reserved.

Transferring Display Templates via a Network
MOTIF XS Using Display Templates 2
Transferring Display Templates via a Network
Follow the instructions outlined below to customize the appearance of displays with display templates by
employing your instrument’s ability to share files over a network.
nBefore starting this procedure, ensure that your MOTIF XS firmware has been upgraded to version 1.50 or later. For
details regarding firmware upgrades, visit the following web page.
http://www.yamahasynth.com/products/motifxs/index.html
Connecting your MOTIF XS and Computer via a Network
The MOTIF XS can be connected to a local area network (LAN) using a standard Ethernet cable. When
connected in this way, the File mode allows you save files created on your instrument to a computer on the
same network. In order to do so, connect the MOTIF XS to a router or hub using an Ethernet cable. Then,
connect your computer to the router or hub using an Ethernet cable or via wireless connection.
nEnsure that you use straight-through Ethernet cables.
nDue to EU regulations, users within Europe should use STP (shielded twisted pair) cables to prevent electromagnetic
interference.
nIf your computer is not equipped with an ETHERNET connector, install a commercially-available LAN adaptor into its PCI
slot or PC Card slot.
nIf you employ a broadband router to connect your computer to the Internet, use a vacant ETHERNET connector on the
router to connect the MOTIF XS. Bear in mind, however, that this does not connect the MOTIF XS to the Internet, only to
other computers and drives on the same network.
Configuring the Network
When you have successfully connected your MOTIF XS and computer via a network, you will need to
configure the network to allow files to be exchanged. Despite the fact that these two devices are now
physically joined, they will not be able to access each other via the network until these software settings have
been completed correctly.
Network Settings on MOTIF XS
1. Call up the Network display of the Utility mode.
Press the [UTILITY] button to enter the Utility mode, and then press the [F1] General button followed by
the [SF3] Network button to call up the Network display.
MOTIF XS Computer equipped with an
ETHERNET connector
Hub or router
LAN cable
LAN cable
ETHERNET connector

Transferring Display Templates via a Network
MOTIF XS Using Display Templates 3
2. Press the [SF5] Password button to open the
File Server Password display, and set a
password for accessing the MOTIF XS from your
computer.
In order to enter a password, press the [SF6] CHAR
button to call up the Input Character window. Passwords
must be between 5 and 8 characters in length. For
details regarding the input of characters, see page 82 of
your MOTIF XS6/7/8 Owner’s Manual.
When you have input a password as required, press the
[ENTER] button to close the File Server Password
display.
3. Set the File Server parameter to “on”.
You will now be able to access the MOTIF XS from a
computer using the account name “nobody”.
nIf necessary, you can set an account name other than
“nobody” in the File Server Account field.
4. Press the [ENTER] button and confirm that the
network settings are as required. If necessary,
press the [STORE] button to store your new
settings.
Network Settings on Computer
nAs a result of certain other settings on your computer, screen displays and the like may not be exactly as shown below.
Windows XP Settings
5. Open “My Network Places”, followed by “View workgroup computers”.
nIf your computer’s workgroup is not the same as that entered into the [Domain] field on your MOTIF XS
(Network display in the Utility mode), open Microsoft Windows Network and create a domain with that name.
6. Open “YAMAHA_Synthesizer (Motif_xs-2516f8)”.
The name “YAMAHA_Synthesizer (Motif_xs-2516f8)” assumes that [Host Name] has been set to
“MOTIF_XS-2516f8” and [Description] has been set to “YAMAHA_Synthesizer” on the Utility mode’s
Network display.

Transferring Display Templates via a Network
MOTIF XS Using Display Templates 4
7. Enter the user name (i.e., account name) and password that you set in the Network
Settings on MOTIF XS section above.
Two network folders will be displayed — “theme”, which contains display data for the MOTIF XS being
accessed, and “media”, which contains data from the connected USB memory device.
Accessing the MOTIF XS by Entering a Host Name
In cases where the MOTIF XS cannot be accessed by the method described above, an alternative approach
is to enter the host name set on the instrument directly into the Windows Address Bar. In such a case, you
will need to enter “\\” in front of the MOTIF XS host name.
For example, if the host name is set as “MOTIF_XS-2516f8”, enter “\\MOTIF_XS-2516f8” into the Address Bar.
nYou can confirm the MOTIF XS host-name setting on the Network display in the Utility mode.

Transferring Display Templates via a Network
MOTIF XS Using Display Templates 5
Mac OS X 10.5 (Leopard) Settings
5. From the Menu Bar, click “Go” and then “Connect to Server…”.
The Connect to Server dialog will open.
6. Click the [Browse] button.
The Network screen will open.
7. From the displayed list of servers, click the one with the MOTIF XS host name.
For example, if [Host Name] has been set to “MOTIF_XS-2516f8” on the instrument, click the server
named “motif_xs-2516f8”.
nIf the list of servers does not contain an entry in the form “motif_xs-******”, see the section Accessing the
MOTIF XS by Entering a Host Name below.
8. If the message “Connection Failed” is displayed, click the [Connect As…] button.
9. Enter the user name (i.e., account name) and password that you set in the Network
Settings on MOTIF XS section above, and then click the [Connect] button.

Transferring Display Templates via a Network
MOTIF XS Using Display Templates 6
10. Your Mac will access the MOTIF XS, and two network folders will be displayed –
“theme”, which contains display data for the MOTIF XS, and “media”, which contains
data from the connected USB memory device.
Accessing the MOTIF XS by Entering a Host Name
In cases where the MOTIF XS cannot be accessed by the method described above, an alternative approach
is to enter the host name set on the instrument directly into the Connect to Server dialog.
1. From the Menu Bar, click “Go” and then “Connect to Server…”.
The Connect to Server dialog will open.
2. In the Server Address: field, enter “smb://” followed by the MOTIF XS host
name, and then click the [Connect] button.
For example, if the host name is set as “MOTIF_XS-2516f8”, enter “smb://MOTIF_XS-2516f8”.
nYou can confirm the MOTIF XS host-name setting on the Network display in the Utility mode.
3. Enter the user name (i.e., account name) and password that you set in the
Network Settings on MOTIF XS section above, and then click the [Connect]
button.
4. Select “theme” as the volume to mount, and then click the [OK] button.
The “theme” folder, containing MOTIF XS display data, will be mounted.

Transferring Display Templates via a Network
MOTIF XS Using Display Templates 7
Mac OS X 10.4 (Tiger) Settings
5. Click “Network” in a Finder window.
A Network window containing the server “MOTIF_XS” will open.
6. Double-click “MOTIF_XS”.
7. Select “theme” as the SMB/CIFS shared volume and then click the [Authenticate] button.
The SMB/CIFS File System Authentication dialog will open.
8. Enter the domain, user name (i.e., account name), and password that you set in the
Network Settings on MOTIF XS section above, and then click the [OK] button.
The “theme” folder, containing MOTIF XS display data, will be mounted.
nIn cases where the MOTIF XS cannot be accessed by the method described above, an alternative approach
is to directly enter the host name set on the instrument. For details, see the above Mac OS X section
Accessing the MOTIF XS by Entering a Host Name.

Transferring Display Templates via a Network
MOTIF XS Using Display Templates 8
Copying a Display Template onto the MOTIF XS
1. Inside the “Type” folder created by expanding the downloaded zip file, click the
folder corresponding to the number of the display template you wish to use.
nFor details regarding display designs for each template number, visit the following web page.
http://www.yamahasynth.com/products/motifxs/index.html
2. Copy the “Image” folder into the MOTIF XS “theme” folder.
nIf your computer tells you that a folder named “Image” already exists inside the “theme” folder, proceed by
indicating that you wish to overwrite or replace all items.
3. Reboot the MOTIF XS.
The MOTIF XS displays will have changed to reflect the copied display template.
nIf you were to continue to use the MOTIF XS without rebooting it at this time, some but not all of the display
template would be applied. In order to apply the display template in full, therefore, ensure that you turn the
instrument off and back on.

Transferring Display Templates via a Network
MOTIF XS Using Display Templates 9
Restoring the Original Displays
If you would like to restore the original MOTIF XS display designs after customizing them using display
templates, proceed as follows.
1. As explained in the section Configuring the Network above, mount the “theme”
folder from the MOTIF XS on your computer.
2. Delete the “Image” folder contained within that “theme” folder.
CAUTION
This action will permanently delete your customized MOTIF XS displays. If you would like to keep a copy of this design data
for use at a later date, therefore, copy the “Image” folder onto your computer as a backup.
3. Reboot the MOTIF XS.
The original display designs will be restored.
As an alternative to the above approach, you can also restore the original display design by
executing the Factory Set. To do so, press the [UTILITY] button, followed by the [JOB] button.
For details regarding the Factory Set, see page 22 of your MOTIF XS6/7/8 Owner’s Manual.

Transferring Display Templates via USB Flash Memory
MOTIF XS Using Display Templates 10
Transferring Display Templates via USB Flash
Memory
As an alternative to the above-described method, you can also use a USB flash-memory device to transfer
display-template files to your MOTIF XS in order to customize displays. To do so, follow the steps described
below.
nBefore starting this procedure, ensure that your MOTIF XS firmware has been upgraded to version 1.50 or later. For
details regarding firmware upgrades, visit the following web page.
http://www.yamahasynth.com/products/motifxs/index.html
1. Copy the downloaded file 8E54OS_.PGM, which contains display template files for
use with USB flash-memory devices, to such a device.
2. Ensure that the MOTIF XS is turned off and then plug the USB flash-memory device into
the USB TO DEVICE port.
3. While holding down the [UTILITY] button and the cursor [L] button, press in the POWER
switch to turn the MOTIF XS back on. Be sure to keep the [UTILITY] and cursor [L]
buttons held down until the MOTIF XS logo is displayed.
A display for selecting a display template will appear.
4. Select the desired display template using the cursor [<]/[>] buttons.
5. When the message “PRESS [ENTER] TO SELECT” is displayed, press the [ENTER]
button.
The process of updating the display with the selected template will begin.
CAUTION
Never attempt to turn off the power while data is being stored (i.e., while a “Please keep power on” message is being
displayed).If this precaution is not observed, your MOTIF XS may be rendered unable to startup correctly in future.
6. When the message “Please turn off” is displayed, turn the instrument off and then back
on.
The MOTIF XS displays will have changed to reflect the copied display template.
Restrictions on Display Template Usage
MOTIF XS display templates can be edited to create original display designs. It should be noted,
however, that individual image files can be no larger than 8 kilobytes in size, and in addition, each
must be named exactly the same as the corresponding file from the display template.
U.R.G., Pro Audio & Digital Musical Instrument Division, Yamaha Corporation
©2009 Yamaha Corporation
Table of contents
Other Yamaha Synthesizer manuals

Yamaha
Yamaha P-70S User manual

Yamaha
Yamaha S90 User manual

Yamaha
Yamaha CX5M User manual

Yamaha
Yamaha VP1 User manual

Yamaha
Yamaha CS-30L User manual

Yamaha
Yamaha CS-80 User manual

Yamaha
Yamaha SY-1 User manual

Yamaha
Yamaha CS6X User manual

Yamaha
Yamaha Portatone PSR-1500 User manual

Yamaha
Yamaha DX7 II D Installation and operation manual

Yamaha
Yamaha PF-1000 User manual

Yamaha
Yamaha PF10 User manual

Yamaha
Yamaha CP10 User manual

Yamaha
Yamaha MOTIF XF6 Instructions and recipes

Yamaha
Yamaha DX100 User manual

Yamaha
Yamaha DX1 User manual

Yamaha
Yamaha W5 User manual

Yamaha
Yamaha P-120 User manual

Yamaha
Yamaha SY-77 User manual

Yamaha
Yamaha DX27 User manual