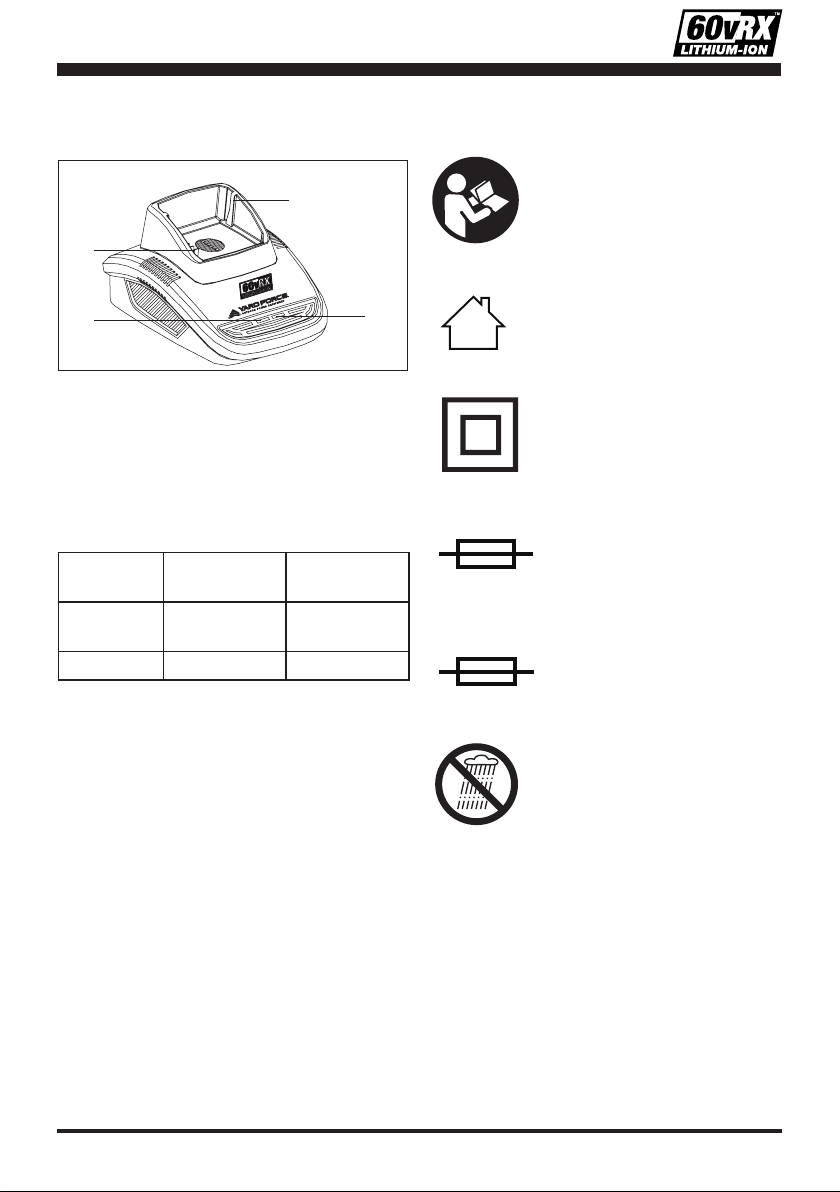
Yard force YF60VRX4A-CHG User manual

YF60VRX4A-CHG
YF60VRX2A-CHG
60v Lithium-Ion Battery Charger
OPERATOR’S MANUAL
Our Customer Service staff is ready to provide assistance.
In the case of a damaged or missing part, most replacement parts ship directly from
Merotec USA in Atlanta or from one of our service partners in the US.
For immediate help with assembly, or for additional product information, email
information can be found on www.YardForceUSA.com.
SAVE THIS MANUAL FOR REFERENCE
You will need this manual for safety
instructions, operating procedures, and Warranty.
The original sales receipt is required for warranty service.

2
TABLE OF CONTENTS
Product features ....................................................................................................................3
Technical data……………......................................................................................................3
Intended use………........................................................................................……...……......3
Warning symbols…....................................................................................……………..…....3
Product description and specications…........………………...........................................…..4
Safety notes…........................................................................……………………….........…..4
Operation……………………................................................................................…....………5
Maintenance and service .................................................................…………………….……6
Disposal ................................................................................................................................6
Trouble shooting...................................................................................................................7
Warranty ................................................................................................................................8

3
WARNING SYMBOLS
PRODUCT FEATURES
1. Battery pack guide groove
2. Battery pack connect terminals
3. Green LED indicator
4. Red LED indicator
TECHNICAL DATA
Model YF60VRX2A-
CHG
YF60VRX4A-
CHG
Input 100-240 V,
50/60 Hz,
100-240 V,
50/60 Hz,
Output 63 V d.c. 2.5 A 63 V d.c. 4 A
INTENDED USE
The battery charger YF60VRX2A-CHG/
YF60VRX4A-CHG only can be matched
for Yard force 60V Li-ion battery pack
YF60VRX2.5-BAT/ YF60VRX4.0-BAT.
Before any use, refer to the
corresponding paragraph in
the present manual.
The charger is for indoor
use only.
Double insulation
Protective 4A limited
Protective 5A limited
Do not expose and operate
the tool in rain.
1
2
34
T4A
T5A

4
WARNING SYMBOLS
PRODUCT DESCRIPTION AND
SPECIFICATIONS
WARNING!
IMPORTANT SAFETY
INSTRUCTIONS
1. SAVE THESE INSTRUCTIONS –
This manual contains important
safety and operating instructions
for battery charger YF60VRX4A-
CHG & YF60VRX2A-CHG.
2. Before using battery charger, read
all instructions and cautionary
markings on battery charger,
battery, and product using battery.
3. CAUTION – To reduce risk of
injury, charge only YF60VRX2.5-
BAT & YF60VRX4.0-BAT batteries.
Other types of batteries may
burst causing personal injury and
damage.
SAFETY NOTES
1. Use only YardForce 60V Li-ion
battery pack YF60VRX2.5-BAT
& YF60VRX4.0-BAT. Do not use
the original charger on other Li-
ion batteries or on any other type
of battery—re or explosion may
occur.
2. Check the battery charger, cable
and plug each time before using.
Do not use the battery charger
when defects are detected. Do not
open the battery charger yourself
and have it repaired only by
qualied personnel using original
spare parts.
3. The charger is designed to use
standard household 100-240
V~ 50/60Hz power source. The
charger's plug must match the
outlet. Never modify the plug in
any way. Unmodied plugs and
matching outlets will reduce risk of
electric shock.
4. Do not abuse the cord of charger.
Never use the cord for carrying,
pulling or unplugging the charger.
Keep cord away from heat, oil,
sharp edges or moving parts.
Damaged or entangled cords
increase the risk of electric shock.
5. Make sure the charger cord
is located so that it will not be
stepped on, tripped over, or
otherwise subjected to damage or
stress.
6. Keep the battery charger clean.
Contamination may cause the
danger of electric shock.
7. Protect the battery charger away
from rain and moisture. The
penetration of water in a battery
charger increases the risk of
electric shock.
8. Do not operate the battery charger
on easily inammable surfaces
(e.g. paper, textiles, etc.) or in
combustible environments. There
is danger of re due to the heating
of the battery charger during
charging.

5
9. The temperature range over which
the battery pack can be charged
is typically from 32 °F to 113 ° F.
Therefore, charging eorts outside
the prescribed temperature range
may automatically be blocked
by the protection circuitry of the
battery pack. Longest life and best
performance can be obtained if
the battery pack is charged in the
normal room condition.
10. Disconnect charger from the power
supply when not in use. This will
reduce the risk of electric shock
or damage to the charger if metal
items should fall into the opening.
11. This tool is not intended for use
by persons (including children)
with reduced physical, sensory
or mental capabilities, or lack of
experience and knowledge, unless
they have been given supervision
or instruction concerning use of the
appliance by a person responsible
for their safety.
Children should be supervised to
ensure that they do not play with
the appliance.
12. Cleaning and user maintenance
of the battery charger shall not
be made by children without
supervision.
WARNING: Charger terminals
and related accessories may
contain lead and lead compounds,
chemicals known to the State of
California to cause cancer and
birth defects or other reproductive
harm. Wash hands after handling.
For more information, go to www.
P65Warnings.ca.gov.
OPERATION
Note:
- A new battery pack is supplied
partially charged.To ensure the
best performance, charge the
battery completely before rst use.
- Make sure the main voltage is
the same as rating label which is
located on the charger.
- Remove the battery pack from
the charger after it has been fully
charged.
1. Connect the charger to a power
supply, the red and green LED
lights will ash alternately for about
2 seconds. And then the red LED
light on the charger will be on.
This manual suits for next models
1
Table of contents
Other Yard force Batteries Charger manuals