Yealink W73P User manual

DECT IP Base Station
W73P & W73H
Yealink Documentation
support.yealink.com
Quick Start Guide (V1.0)
For W70B rmware:146.85.193.1 or later
For W73H rmware: 116.85.193.1 or later
www.yealink.com
English | Deutsch


Table of Contents
English ..........................................1
Deutsch .......................................14


1
E
N
G
L
I
S
H
W73P Package Contents
W73H Package Contents
W73H
Handset
Charging Cradle
2 Power Adapters
Battery Cover Rechargeable
Battery
Base Stand
W70B Base Station Ethernet Cable
Belt Clip Quick Start
Guide
Note: Yealink W73P DECT phone consists of one W70B base station and one W73H handset.
W73H
Handset
Charging Cradle
Power Adapter
Battery Cover
Rechargeable
Battery Belt Clip

2
W70B Package Contents
Power Adapter Base Stand
W70B Base Station Ethernet Cable
Assembling the DECT Phone
1. Connect the base station power and the network using method a or
method b.
a. AC Power Option b. PoE (Power over Ethernet) Option
IEEE 802.3af compliant
PoE Hub/Switch
Note:
• If you choose method a, use Yealink supplied power adapter (5V/0.6A). A third-party power adapter may
damage the base station.
• If you choose method b, you do not need to connect the power adapter. Make sure the hub/switch is PoE-
compliant.

3
E
N
G
L
I
S
H
2b. (Wall-Mount Installation) Attach the base station.
3. Insert the battery into the handset.
2a. (Desktop Installation) Attach and remove the base stand.
Attach the Base Stand Remove the Base Stand
MAC
SN
MAC
SN
MAC
SN
Align the snap-ts with the corresponding
holes and push forward, snapping them
into the holes.
Remove the snap-ts from the
holes horizontally.
59mm

4
4. Attach the belt clip to the handset.
5. (Optional) Mount the charging cradle to the wall.
6. Connect the charging cradle and charge the handset.
38mm
38mm
Note:
• Use Yealink-supplied power adapter (5V/0.6A). A third-party power adapter may damage the handset.
• Check the charging status on the top-right corner of the LCD screen.

5
E
N
G
L
I
S
H
Startup
Getting Started
After the IP phone is connected to the network and supplied with power, it
automatically begins the initialization process. After startup, the phone is
ready for use.
Depending on how you use the phone there are various commissioning
procedures.
You can find out how to connect the telephone to the corresponding
Telekom service under:
https://www.telekom.de/yealink-hilfe
Should there be any further questions, please contact the various support
contacts via telephone, e-mail, Internet or on site.
Shortcut Keys
Shortcut keys help you quickly access the frequently used phone features.
The following describes the default shortcut-keys behaviors:
1
Access the call history records.
2
Check the line status.
3
Access the intercom list, select one to place an internal call.
4
Decrease the ringer volume.
5
Increase the ringer volume.
6
Access the directory list.
2
5
4
6
1
3

6
Entering and Editing Data
• Press one or more times to switch among different input modes or to
type “#”.
• Press to provide the special characters to choose or to type “*”.
• Press a digit key one or more times to type the desired character or digit.
• Press the Del soft key to delete entered characters.
• Press the Save soft key to accept the change or the Back soft key to
cancel.
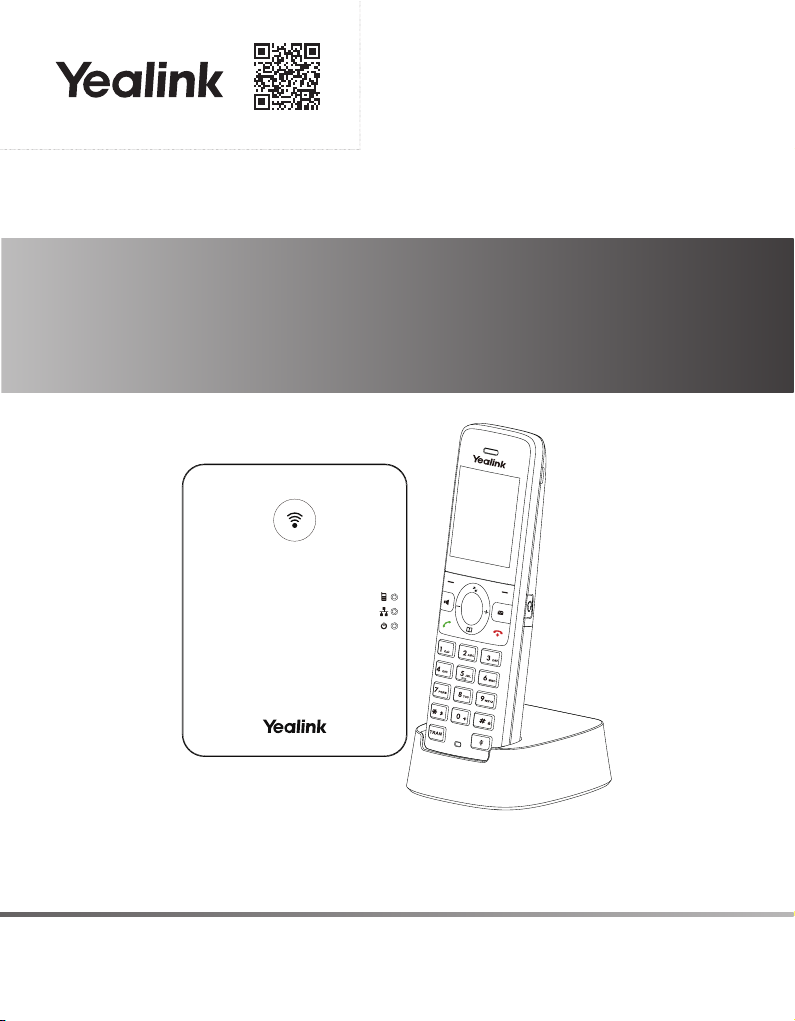
Handset Registration
You can register up to 10 handsets to one W70B base station. Each handset
can be registered to 4 different base stations.
When the handset LCD screen prompts “Unregistered!”, long press on the
base station till the registration LED indicator ashes.
There are two methods to register a new handset:
Easy Registration:
1. Press the Reg soft key on the handset to register quickly.
Normal Registration:
1. Press the OK soft key on the handset, and then select Register Handset.
2.Select the desired base station and then press the OK soft key. The handset
begins searching the base station.
3. Press the OK soft key after searching a base station successfully.
4. Enter the base station PIN (default: 0000), and then press the Done soft key
to complete the registration.
To register to multiple base stations, press to enter the main menu, and
select Settings->Registration->Register Handset, then repeat steps 2-4.
Note:
• If the handset is registered to the base station successfully, the handset LCD
screen prompts “Handset Subscribed” and “Base NO.”( the last 4 characters
indicate the base station’s MAC address).
• If the handset LCD screen prompts “Searching for Base”, check that your
base station is powered on.

7
E
N
G
L
I
S
H
Network Settings
You can congure the base station to obtain network settings in one of the
following ways:
DHCP
By default, the base station attempts to contact a DHCP server in your
network to obtain the valid network settings, such as IP address, subnet
mask, gateway address and DNS address.
Static
If the base station cannot contact a DHCP server for any reason, you need
to congure the IP address, subnet mask, gateway address, primary DNS
address and secondary DNS address for the base station manually.
To congure the network parameters for the base station manually:
1. Press the key to enter the main menu, and then select Settings-
>System Settings -> Network (default PIN: 0000)->Basic.
2.Select the desired IP addressing mode from the IP Mode eld.
3. Press to select the desired IP addressing mode.
4. Make the desired changes.
5. Press the Save soft key to accept the change.
Note:
• The DECT IP phone supports either or both IPv4 and IPv6 addressing
modes, but IPv6 is disabled by default.
• Wrong network settings may result in inaccessibility of your phone and may
affect the network performance. Contact your system administrator for the
network parameters.
Basic Operations
Turning Handset On/Off
To turn the handset on, do one of the following:
• Press , wait until the LCD screen lights up.
• Place the handset in the charger cradle. The handset will be turned on
automatically.

8
Handset Settings
To turn the handset off:
Long press to turn the handset off.
Locking/Unlocking Keypad
• Long press when the handset is idle to lock the keypad.
• Long press again to unlock the keypad.
Silent Mode
• Long press when the handset is idle to switch the silent mode to on.
• Long press again to switch the silent mode to off.
Handset Name
To rename the handset:
1. Press the key to enter the main menu, and then select Settings-
>Handset Name.
2.Edit the value in the Rename eld.
3. Press the Save soft key to accept the change.
Volume Adjustment
• Press or when the handset is idle or ringing to adjust the ringer volume.
• Press or during a call to adjust the receiver volume of speakerphone/
earpiece/headset.
Ring Tones
1. Press the key to enter the main menu, and then select Settings-
>Audio->Ring Tones->Melodies.
2.Press or to highlight Intercom Call or the desired line.
3. Press or to select the desired ring tone.
4. Press the Save soft key to accept the change.
Local Directory
To add a contact:
1. Press the key to enter the main menu, and then select Directory.

9
E
N
G
L
I
S
H
1. Press the Options soft key, and then select New Contact.
2.Enter the desired value in the Name, Office, Mobile and Other field
respectively.
3. Press the Save soft key to accept the change.
To edit a contact:
1. Press the key to enter the main menu, and then select Directory.
2.Press or to highlight the desired entry.
3. Press the Options soft key, and then select Edit.
4. Edit the desired value in the Name, Office, Mobile and Other field
respectively.
5. Press the Save soft key to accept the change.
To delete a contact:
1. Press the key to enter the main menu, and then select Directory.
2.Press or to highlight the desired entry.
3. Press the Options soft key, and then select Delete to delete the selected
entry.
4. Press the Yes soft key when the LCD screen prompts “Do you want to
delete the selected item?”.
Speed Dial
1. Press the key to enter the main menu, and then select Settings->
Telephony->Speed Dial.
2.Press or to highlight the desired digit key, and then press the Assign
soft key.
3. Press or to select the desired directory type.
4. Press or to highlight the desired entry, and then press the OK soft key.
If both the ofce number and mobile number are stored, press or to
highlight the desired number, and then press the OK soft key again.
Basic Call Features
Placing Calls
To place a call directly:
1. Do one of the following:
• Enter the desired number when the handset is idle.

10
• Press to enter the pre-dialing screen. Enter the desired number using
the keypad.
If there are multiple lines assigned to your handset as outgoing lines, press
the Line soft key to select the desired line. If you do not select a line, the
handset uses the default outgoing line to dial out.
2. Press , or to dial out.
To place a call from the local directory:
1. Press when the handset is idle.
2.Press or to select the desired directory type.
3. Highlight the desired entry, and then press or to dial out using the
default line.
If multiple numbers for the contact are stored, press or to highlight the
desired number, and then press or again to dial out using the default line.
To place a call from the call history:
1. Press the History soft key when the handset is idle, and then select the
desired call history list.
2.Press or to highlight the desired entry, and then press or to dial
out using the default line.
To place a call from the redial list:
1. Press when the handset is idle.
2.Press or to highlight the desired entry, and then press or .
To place a call using the speed dial key:
Long press the speed dial key to call the preset number directly.
Answering Calls
To answer a call, do one of the following:
• Press the Accept soft key.
• Press .
• Press .
• Press .
Note: You can ignore an incoming call by pressing the Silence soft key or
reject an incoming call by pressing .
Ending Calls
Press .

11
E
N
G
L
I
S
H
Call Mute
• Press during a call to mute the call.
• Press again to un-mute the call.
Call Hold and Resume
To place a call on hold:
Press the Options soft key during a call, and then select Hold.
To resume a call, do one of the following:
• If there is only a call on hold, press the Resume soft key.
• If there are two calls on hold, press the Resume soft key to resume the
current call. Press the Swap soft key to swap between calls.
Call Transfer
You can transfer a call in one of the following ways:
Blind Transfer
1. Press the Options soft key during a call, and then select Transfer.
2.Enter the number you want to transfer the call to.
3. Press the Transfer soft key.
Semi-Attended Transfer
1. Press the Options soft key during a call, and then select Transfer.
2.Enter the number you want to transfer the call to.
3. Press , or to dial out.
4. Press the Transfer soft key when you hear the ring-back tone.
Attended Transfer
1. Press the Options soft key during a call, and then select Transfer.
2.Enter the number you want to transfer the call to.
3. Press , or to dial out.
4. Press the Transfer soft key after the call is answered.

12
Call Forward
To enable the call forward feature on a specic line:
1. Press the key to enter the main menu, and then select Call Features-
>Call Forward.
2. If there are multiple lines assigned to your handset, press or to
highlight the desired line, and then press the OK soft key.
3. Press or to highlight the desired forwarding type, and then press the
OK soft key.
• Always----Incoming calls are forwarded immediately.
• Busy----Incoming calls are forwarded when the line is busy.
• No Answer----Incoming calls are forwarded if not answered after a period
of time.
4. Select Enabled from the Status eld.
5. Enter the number you want to forward the incoming calls to in the Target
eld.
For No Answer Forward, press or to select the desired ring time to
wait before forwarding in the After Ring Time eld.

13
Regulatory Notices
Operating Ambient Temperatures
• Operating temperature: +14 to 122°F (-10 to 50°C)
• Relative humidity: 5% to 90%, noncondensing
• Storage temperature: -22 to +160°F (-30 to +70°C)
Warranty
Our product warranty is limited only to the unit itself, when used normally in
accordance with the operating instructions and the system environment. We
are not liable for damage or loss resulting from the use of this product, or for
any claim from a third party. We are not liable for problems with Yealink device
arising from the use of this product; we are not liable for nancial damages,
lost prots, claims from third parties, etc., arising from the use of this product.
DC symbol
is the DC voltage symbol.
Restriction of Hazardous Substances Directive (RoHS)
This device complies with the requirements of the EU RoHS Directive.
Statements of compliance can be obtained by contacting support@yealink.
com.
Safety Instructions
Save these instructions. Read these safety instructions before use!
The following basic safety precautions should always be followed to
reduce risk of re, electrical shock, and other personal injury.
General Requirements
• Before you install and use the device, read the safety instructions
carefully and observe the situation during operation.
• During the process of storage, transportation, and operation, please
always keep the device dry and clean.
• During the process of storage, transportation, and operation, please
avoid collision and crash of the device.
• Please attempt not to dismantle the device by yourself. In case of any
discrepancy, please contact the appointed maintenance center for
repair.
• Without prior written consent, no organization or individual is
permitted to make any change to the structure or the safety design of
the device. Yealink is under no circumstance liable to consequences
or legal issues caused by such changes.
• Please refer to the relevant laws and statutes while using the device.
Legal rights of others should be respected as well.
Environmental Requirements
• Place the device at a well-ventilated place. Do not expose the device
under direct sunlight.
• Keep the device dry and free of dusts.
• Place the device on a stable and level platform.
• Please place no heavy objects on the device in case of damageand
deformation caused by the heavy load.
• Keep at least 10 cm between the device and the closest object for
heat dissipation.
• Do not place the device on or near any inammable or re-vulnerable
object, such as rubber-made materials.
• Keep the device away from any heat source or bare re, such as a
candle or an electric heater.
• Keep the device away from any household appliance with strong
magnetic eld or electromagnetic eld, such as a microwave oven or
a refrigerator.
Operating Requirements
• Do not let a child operate the device without guidance.
• Do not let a child play with the device or any accessory in case of
accidental swallowing.
• Please use the accessories provided or authorized by the
manufacturer only.
• The power supply of the device shall meet the requirements of the
input voltage of the device. Pleaseusethe provided surge protection
power socket only.
• Before plugging or unplugging any cable, make sure that your hands
are completely dry.
• Do not spill liquid of any kind on the product or use the equipment
near water, for example, near a bathtub, washbowl, kitchen sink, wet
basement or near a swimming pool.
• Do not tread on, pull, or over-bend any cable in case of malfunction of
the device.
• During a thunderstorm, stop using the device and disconnect it from
the power supply. Unplug the power plug and the Asymmetric Digital
Subscriber Line (ADSL) twisted pair (the radio frequency cable) to
avoid lightning strike.
• If the device is left unused for a rather long time, disconnect it from the
power supply and unplug the power plug.
• When there is smoke emitted from the device, or some abnormal noise
or smell, disconnect the device from the power supply, and unplug the
power plug immediately. Contact the specied maintenance center for
repair.
• Do not insert any object into equipment slots that is not part of the
product or auxiliary product.
• Before connecting a cable, connect the grounding cable of the device
rst. Do not disconnect the grounding cable until you disconnect all
other cables.
Cleaning Requirements
• Before cleaning the device, stop using it and disconnect it from the
power supply.
• Use a piece of soft, dry and anti-static cloth to clean the device.
• Keep the power plug clean and dry. Using a dirty or wet power plug
may lead to electric shock or other perils.
ENVIRONMENTAL RECYCLING
Never dispose of the device with domestic waste
Ask your Town Council about how to dispose of it
in an environmentally friendly way. The cardboarc
box, plastic packaging and player components may
be recycled in accordance with prevailing recycling
regulations in your country.
Always adhere to prevailing regulations
Those who fail to do so may be ned or prosecuted
in accordance with the law. The crossed out garbage
can that appears on the device means that when it
has reached the end of its useful life, it should be
taken to a special waste disposal centre and treated
separately to general urban waste.
Troubleshooting
The unit cannot supply power to Yealink device.
There is a bad connection with the plug.
1. Clean the plug with a dry cloth.
2. Connect it to another wall outlet.
The usage environment is out of operating temperature range.
1. Use in the operating temperature range.
The cable between the unit and the Yealink device is connected incorrectly.
1. Connect the cable correctly.
You cannot connect the cable properly.
1. You may have connected a wrong Yealink device.
2. Use the correct power supply.
Some dust, etc., may be in the port.
1. Clean the port.
Contact your dealer or authorized service facility for any further questions.
Contact Information
YEALINK NETWORK TECHNOLOGY CO.,LTD.
309, 3rd Floor, No.16, Yun Ding North Road, Huli District, Xiamen City, Fujian,
P.R.C
YEALINK (EUROPE) NETWORK TECHNOLOGY B.V.
Strawinskylaan 3127, Atrium Building, 8th oor, 1077ZX Amsterdam, The
Netherlands
YEALINK (USA) NETWORK TECHNOLOGY CO., LTD.
999 Peachtree Street Suite 2300, Fulton, Atlanta, GA, 30309, USA
Made in China
E
N
G
L
I
S
H

14
W73H Verpackungsinhalt
W73P Verpackungsinhalt
W73H
Mobilteil
Ladestation
Zwei Netzteile
Batterieab-
deckung
Wiederauad-
bare Batterie
Basisständer
W70B Basisstation Ethernet-Kabel
Gürtelclip Kurzanleitung
Hinweis: Das Yealink DECT phone W73P besteht aus einer W70B Basisstation und einem W73H-
Mobilteil.
W73H
Mobilteil Netzteil
Batterieab-
deckung
Wiederauad-
bare Batterie Gürtelclip Ladestation

15
D
E
U
T
S
C
H
W70B Verpackungsinhalt
W70B Basisstation Netzteil Basisständer Ethernet-Kabel
Das DECT-Telefon zusammensetzen
1. Stellen Sie die Basisstation Stromversorgungs- und
Netzwerkverbindung anhand Methode a oder Methode b her.
a. Option
Wechselstromversorgung
b. Option Power-over-Ethernet (PoE)
IEEE 802.3af-konform
PoE Hub/Switch
Hinweis:
• Wenn Sie sich für Methode a entscheiden, verwenden Sie das von Yealink mitgelieferte Netzteil (5V/0,6A). Ein
Netzteil eines Drittanbieters kann das Basisstation beschädigen.
• Wenn Sie sich für Methode b entscheiden, müssen Sie das Netzteil nicht anschließen. Stellen Sie sicher, dass
der Hub/Switch PoE-konform ist.

16
2b. (Wandmontage) Anbringen der Basisstation
3. Legen Sie die Batterie in das Mobilteil ein.
2a. (Installation auf einer Arbeitsäche) Anbringen und Entfernen des Standfußes.
Anbringen des Standfußes Entfernen des Standfußes
MAC
SN
MAC
SN
MAC
SN
Richten Sie die Einrasthaken an den
entsprechenden Öffnungen aus und drücken Sie
diese in die Öffnungen hinein bis sie einrasten.
Entfernen Sie die Einrasthaken indem
Sie sie in horizontaler Richtung aus
Öffnungen herausziehen.
59mm
Other manuals for W73P
7
This manual suits for next models
1
Table of contents
Languages:
Other Yealink Accessories manuals